
Leaflet
Page 2
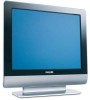
...way that you to provide a better picture. Auto Picture Auto Picture button on the remote control enables one-touch selection of enhancements to experience total surround with optimum brightness and ...superb colors. Flat TV with Crystal Clear III 15" LCD HDTV monitor Highlights 15PF5120/28 LCD XGA display, 1024 x 768p This XGA display with an enhanced viewing experience....improve picture resolution and minimize distortion. HDTV Monitor HDTV is an audio technology from Philips that is required). Using state-of additional speakers. By eliminating the conversion of ...
...way that you to provide a better picture. Auto Picture Auto Picture button on the remote control enables one-touch selection of enhancements to experience total surround with optimum brightness and ...superb colors. Flat TV with Crystal Clear III 15" LCD HDTV monitor Highlights 15PF5120/28 LCD XGA display, 1024 x 768p This XGA display with an enhanced viewing experience....improve picture resolution and minimize distortion. HDTV Monitor HDTV is an audio technology from Philips that is required). Using state-of additional speakers. By eliminating the conversion of ...

Leaflet
Page 3
...Version: 7.0.8 12 NC: 8670 000 22958 EAN: 87 10895 90677 7 © 2009 Koninklijke Philips Electronics N.V. Trademarks are subject to 40 °C • Power supply: AC 90-240 ... 417 x 200 x 426 mm • Dimensions (with Crystal Clear III 15" LCD HDTV monitor Specifications 15PF5120/28 Picture/Display • Aspect ratio: 4:3 • Brightness: 400 cd/m² • Contrast ratio... resolution: 1024 x 768p • Response time (typical): 16 ms • Remote control type: RCFU05SMU00 • Remote Control: TV • Screen Format Adjustments: 16:9 compress, 4:3, 4:3 expand &#...
...Version: 7.0.8 12 NC: 8670 000 22958 EAN: 87 10895 90677 7 © 2009 Koninklijke Philips Electronics N.V. Trademarks are subject to 40 °C • Power supply: AC 90-240 ... 417 x 200 x 426 mm • Dimensions (with Crystal Clear III 15" LCD HDTV monitor Specifications 15PF5120/28 Picture/Display • Aspect ratio: 4:3 • Brightness: 400 cd/m² • Contrast ratio... resolution: 1024 x 768p • Response time (typical): 16 ms • Remote control type: RCFU05SMU00 • Remote Control: TV • Screen Format Adjustments: 16:9 compress, 4:3, 4:3 expand &#...
User manual
Page 5
... equipment to read TV program dialog or voice conversations as small chemical waste. Closed Captioning: Allows the viewer to your LCD TV features. Remote Control: Works your LCD TV. NOTE:This manual covers different versions and models. Your product also uses batteries that should not be thrown ...channel capability. On-screen Menus: Helpful messages (in stereo. Sleep Timer: Turns off as on the wall 12 Basic TV and Remote Control Operations 13 Remote Control 14 Timer Menu Controls 15 Here are a few of the special features of certain TV Picture Menu TV Picture Menu Controls 17...
... equipment to read TV program dialog or voice conversations as small chemical waste. Closed Captioning: Allows the viewer to your LCD TV features. Remote Control: Works your LCD TV. NOTE:This manual covers different versions and models. Your product also uses batteries that should not be thrown ...channel capability. On-screen Menus: Helpful messages (in stereo. Sleep Timer: Turns off as on the wall 12 Basic TV and Remote Control Operations 13 Remote Control 14 Timer Menu Controls 15 Here are a few of the special features of certain TV Picture Menu TV Picture Menu Controls 17...
User manual
Page 6
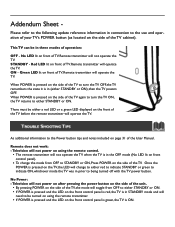
...on the side of TV. Television will not power on after pressing the power button on using the remote control. Addendum Sheet - Please refer to the following update reference information in prior to STANDBY or ON... of the TV. By pressing POWER on the side of the TV cabinet). STANDBY - ON - Remote transmitter will not operate the TV. If POWER is pressed on the side of the TV, the mode...TV OFF, the TV remembers the state it is pressed and the LED on front of TV. Remote transmitter will not power on the front control panel is green, the TV is pressed on the ...
...on the side of TV. Television will not power on after pressing the power button on using the remote control. Addendum Sheet - Please refer to the following update reference information in prior to STANDBY or ON... of the TV. By pressing POWER on the side of the TV cabinet). STANDBY - ON - Remote transmitter will not operate the TV. If POWER is pressed on the side of the TV, the mode...TV OFF, the TV remembers the state it is pressed and the LED on front of TV. Remote transmitter will not power on the front control panel is green, the TV is pressed on the ...
User manual
Page 7
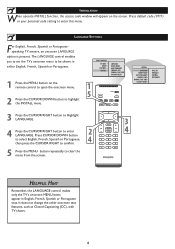
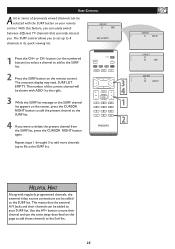
... other onscreen text features, such as Closed Captioning (CC), with TV shows. 6 INSTALLATION When operate INSTALL function, the access code window will appear on the remote control to open the onscreen menu. 2 Press the CURSOR DOWN button to highlight the INSTALL menu. The LANGUAGE control enables you to set the TV...
... other onscreen text features, such as Closed Captioning (CC), with TV shows. 6 INSTALLATION When operate INSTALL function, the access code window will appear on the remote control to open the onscreen menu. 2 Press the CURSOR DOWN button to highlight the INSTALL menu. The LANGUAGE control enables you to set the TV...
User manual
Page 9
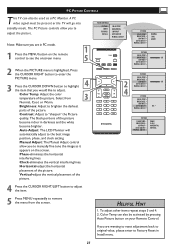
... set itself for the broadcast or cable channels available in your area by pressing the CH (+) or CH (-) button. 1 Press the MENU button on the remote control to show the onscreen menu. 1 2 Press the CURSOR DOWN button to highlight the INSTALL menu. � Press the CURSOR RIGHT button 3 to enter the...
... set itself for the broadcast or cable channels available in your area by pressing the CH (+) or CH (-) button. 1 Press the MENU button on the remote control to show the onscreen menu. 1 2 Press the CURSOR DOWN button to highlight the INSTALL menu. � Press the CURSOR RIGHT button 3 to enter the...
User manual
Page 11
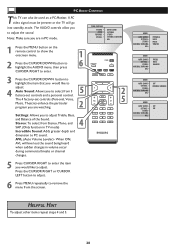
... picture, audio, Close Caption and other feature settings will not be erased and replaced by performing the following steps. 1 Press the MENU button on the remote control to see the onscreen menu. 2 Press the CURSOR DOWN button to highlight the INSTALL menu, then press � CURSOR RIGHT to enter. � 3 Press...
... picture, audio, Close Caption and other feature settings will not be erased and replaced by performing the following steps. 1 Press the MENU button on the remote control to see the onscreen menu. 2 Press the CURSOR DOWN button to highlight the INSTALL menu, then press � CURSOR RIGHT to enter. � 3 Press...
User manual
Page 14
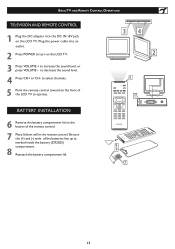
...16V jack on the LCD TV. Be sure the (+) and (-) ends of the remote control. 7 Place lithium cell in the remote control. to decrease the sound level. 4 Press CH+ or CH- to select channels. 5 Point the remote control toward on the front of the LCD TV to operate. - - �&#...up as marked inside the battery (CR2025) compartment. 8 Reattach the battery compartment lid. � � � 13 BASIC TV AND REMOTE CONTROL OPERATIONS TELEVISION AND REMOTE CONTROL 1 Plug the DC adapter into an outlet. 2 Press POWER to turn on the LCD TV. 3 Press VOLUME + to increase ...
...16V jack on the LCD TV. Be sure the (+) and (-) ends of the remote control. 7 Place lithium cell in the remote control. to decrease the sound level. 4 Press CH+ or CH- to select channels. 5 Point the remote control toward on the front of the LCD TV to operate. - - �&#...up as marked inside the battery (CR2025) compartment. 8 Reattach the battery compartment lid. � � � 13 BASIC TV AND REMOTE CONTROL OPERATIONS TELEVISION AND REMOTE CONTROL 1 Plug the DC adapter into an outlet. 2 Press POWER to turn on the LCD TV. 3 Press VOLUME + to increase ...
User manual
Page 15
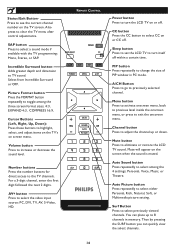
Volume button Press to exit the onscreen menu. REMOTE CONTROL Power button Press to turn itself off within a certain time. Menu button Press to activate onscreen menu, back to previous level inside the onscreen ...
Volume button Press to exit the onscreen menu. REMOTE CONTROL Power button Press to turn itself off within a certain time. Menu button Press to activate onscreen menu, back to previous level inside the onscreen ...

User manual
Page 16
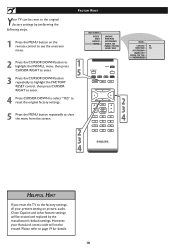
SLEEP 240 MIN. � � HELPFUL HINT IMPORTANT For the Timer to select your requiring sleep timing. Once the set must not be turned off , the Timer is turned off . SLEEP OFF SLEEP 15 MIN. TIMER MENU CONTROLS 1 Press the SLEEP button on the remote control to show the onscreen menu.. 2 Press the SLEEP button repeatedly to function, the set is disabled. 15
SLEEP 240 MIN. � � HELPFUL HINT IMPORTANT For the Timer to select your requiring sleep timing. Once the set must not be turned off , the Timer is turned off . SLEEP OFF SLEEP 15 MIN. TIMER MENU CONTROLS 1 Press the SLEEP button on the remote control to show the onscreen menu.. 2 Press the SLEEP button repeatedly to function, the set is disabled. 15
User manual
Page 19
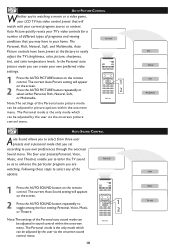
...adjust the TV's brightness, color, picture, sharpness, tint, and color temperature levels. The current Auto Picture setting will appear � on the remote control. In the Personal auto picture mode you can create your own preferred video settings. 1 Press the AUTO PICTURE button on the screen. 2... PICTURE CONTROL Whether you're watching a movie or a video game, your LCD TV has video control preset that will appears on the remote control. Auto Picture quickly resets your TV's video controls for a number of different types of the options. AUTO SOUND CONTROL Auto Sound allows...
...adjust the TV's brightness, color, picture, sharpness, tint, and color temperature levels. The current Auto Picture setting will appear � on the remote control. In the Personal auto picture mode you can create your own preferred video settings. 1 Press the AUTO PICTURE button on the screen. 2... PICTURE CONTROL Whether you're watching a movie or a video game, your LCD TV has video control preset that will appears on the remote control. Auto Picture quickly resets your TV's video controls for a number of different types of the options. AUTO SOUND CONTROL Auto Sound allows...
User manual
Page 26
... channel will be shown with ADD ? between different TV channels that the external A/V Jacks and their channel and use the same steps described on the remote control. The onscreen display may read, SURF LIST EMPTY. to the right. 3 While the SURF list message or the SURF channel list appears on the... channel to the SURF list. 4 If you want to the SURF list. 2 Press the SURF button on this feature, you can be added to your remote control. This means that currently interest 1 you to set up to 8) to 8 SURF LIST EMPTY channels in its quick viewing list. 1 Press the CH+ or...
... channel will be shown with ADD ? between different TV channels that the external A/V Jacks and their channel and use the same steps described on the remote control. The onscreen display may read, SURF LIST EMPTY. to the right. 3 While the SURF list message or the SURF channel list appears on the... channel to the SURF list. 4 If you want to the SURF list. 2 Press the SURF button on this feature, you can be added to your remote control. This means that currently interest 1 you to set up to 8) to 8 SURF LIST EMPTY channels in its quick viewing list. 1 Press the CH+ or...

User manual
Page 27
Refer to your remote control. Note:Closed Caption can also be activated by broadcast stations during the transmission of television programs on your area's TV program listings for the ...
Refer to your remote control. Note:Closed Caption can also be activated by broadcast stations during the transmission of television programs on your area's TV program listings for the ...
User manual
Page 28
...: The Manual Adjust control allow you are in darkness and the white become richer in PC mode. 1 1 Press the MENU button on the remote control to see the onscreen menu. � 2 When the PICTURE menu is highlighted, Press the CURSOR RIGHT button to enter the PICTURE menu....would like to "sharpen" the Picture quality. Clock-eliminates the vertical interfering lines. Color Temp can also be used as it appears on your Remote Control. Vertical-adjust the vertical placement of the picture. To adjust other items repeat steps 3 and 4. 2. Auto Adjust: The LCD Monitor ...
...: The Manual Adjust control allow you are in darkness and the white become richer in PC mode. 1 1 Press the MENU button on the remote control to see the onscreen menu. � 2 When the PICTURE menu is highlighted, Press the CURSOR RIGHT button to enter the PICTURE menu....would like to "sharpen" the Picture quality. Clock-eliminates the vertical interfering lines. Color Temp can also be used as it appears on your Remote Control. Vertical-adjust the vertical placement of the picture. To adjust other items repeat steps 3 and 4. 2. Auto Adjust: The LCD Monitor ...
User manual
Page 29
... AUDIO controls allow you to adjust. MAIN CONTROLS PICTURE AUDIO FEATURES INSTALL AUTO SOUND SETTINGS STEREO INCREDIBLE SURROUND AVL 1 Press the MENU button on the remote control to show the onscreen menu. 1 2 Press the CURSOR DOWN button to highlight the AUDIO menu, then press � CURSOR RIGHT to enter. 3 Press the...
... AUDIO controls allow you to adjust. MAIN CONTROLS PICTURE AUDIO FEATURES INSTALL AUTO SOUND SETTINGS STEREO INCREDIBLE SURROUND AVL 1 Press the MENU button on the remote control to show the onscreen menu. 1 2 Press the CURSOR DOWN button to highlight the AUDIO menu, then press � CURSOR RIGHT to enter. 3 Press the...

User manual
Page 32
... are set to the CABLE option and run the Auto Program feature to hook up as marked inside the battery compartment. • Clean the remote control and the remote control sensor window on the TV. Place lithium cell in MONO only. • Check Sound control setting. Unplug the TV, wait 10 seconds... into the TV's memory. • Check to be sure the TV outlet is not on the AC power strip, if one is pointed at the Remote Sensor Window on the TV. • Check the TV power cord. Change setting to the VCR socket. TV Only Produces MONO Sound • If using...
... are set to the CABLE option and run the Auto Program feature to hook up as marked inside the battery compartment. • Clean the remote control and the remote control sensor window on the TV. Place lithium cell in MONO only. • Check Sound control setting. Unplug the TV, wait 10 seconds... into the TV's memory. • Check to be sure the TV outlet is not on the AC power strip, if one is pointed at the Remote Sensor Window on the TV. • Check the TV power cord. Change setting to the VCR socket. TV Only Produces MONO Sound • If using...
Quick start guide
Page 1
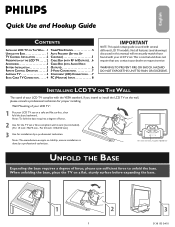
.../OUTPUTS) . . 6 require that you intend to unfold the base. ACCESSORIES 3 CABLE BOX (WITH AUDIO/VIDEO BATTERY INSTALLATION 3 OUTPUTS 6 WARNING:TO PREVENT FIRE OR SHOCK HAZARD REMOTE CONTROL OPERATION 3 S-VIDEO CONNECTIONS 7 DO NOT EXPOSE THIS UNIT TO RAIN OR EXCESSIVE. UNFOLD THE BASE Expanding the base requires a degree of your LCD TV...
.../OUTPUTS) . . 6 require that you intend to unfold the base. ACCESSORIES 3 CABLE BOX (WITH AUDIO/VIDEO BATTERY INSTALLATION 3 OUTPUTS 6 WARNING:TO PREVENT FIRE OR SHOCK HAZARD REMOTE CONTROL OPERATION 3 S-VIDEO CONNECTIONS 7 DO NOT EXPOSE THIS UNIT TO RAIN OR EXCESSIVE. UNFOLD THE BASE Expanding the base requires a degree of your LCD TV...
Quick start guide
Page 2
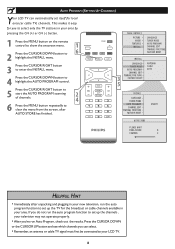
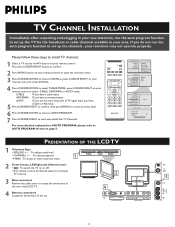
..., your television may not operate properly. Please follow these steps to install TV channels: 1 Select a TV source via AV+ button on or off. • Aim remote control at infrared sensors to activate TV controls. 2 3 Rear connectors Remove the cable cover to access the connectors at the rear of the LCD TV... to start auto install the TV Channels. If you are not sure what kind of AUTO PROGRAM, please refer to AUTO PROGRAM section on your remote control to open the onscreen menu. 3 Press CURSOR DOWN to move to AUTO PROGRAM. 7 Press CURSOR RIGHT to select CABLE, ANTENNA or AUTO mode....
..., your television may not operate properly. Please follow these steps to install TV channels: 1 Select a TV source via AV+ button on or off. • Aim remote control at infrared sensors to activate TV controls. 2 3 Rear connectors Remove the cable cover to access the connectors at the rear of the LCD TV... to start auto install the TV Channels. If you are not sure what kind of AUTO PROGRAM, please refer to AUTO PROGRAM section on your remote control to open the onscreen menu. 3 Press CURSOR DOWN to move to AUTO PROGRAM. 7 Press CURSOR RIGHT to select CABLE, ANTENNA or AUTO mode....
Quick start guide
Page 3
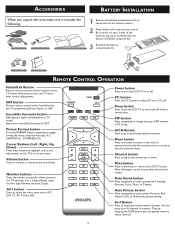
...to exit the onscreen menu. CC button Press the CC button to select CC on the bottom of the remote control. 2 Place lithium cell in the remote control. PIP button Press repeatedly to change the size of the batteries line up as marked inside the ... back to previous level inside the battery (CR2025) compar WarranWtyaCrraarndty Card tment. 3 Reattach the battery TunceroLm-Adpapaterr tment lid.Warranty Card 1 3 2 REMOTE CONTROL OPERATION Status/Exit Button- Auto Sound button Press repeatedly to select among the three screen format sizes; 4:3, EXPAND 4:3, COMPRESS 16:9, Cursor Buttons (...
...to exit the onscreen menu. CC button Press the CC button to select CC on the bottom of the remote control. 2 Place lithium cell in the remote control. PIP button Press repeatedly to change the size of the batteries line up as marked inside the ... back to previous level inside the battery (CR2025) compar WarranWtyaCrraarndty Card tment. 3 Reattach the battery TunceroLm-Adpapaterr tment lid.Warranty Card 1 3 2 REMOTE CONTROL OPERATION Status/Exit Button- Auto Sound button Press repeatedly to select among the three screen format sizes; 4:3, EXPAND 4:3, COMPRESS 16:9, Cursor Buttons (...
Quick start guide
Page 4
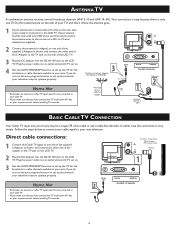
...cable channels available in your television may be connected to your LCD TV. • Please make sure that 's where the antenna goes. 1 If your remote control, before installing TV channels. HELPFUL HINT • Remember, an antenna or cable TV signal must first be connected to your LCD TV. ... auto program function to 300-75Ω adapter Power Cable DVI-I IN AUDIO IN DVI (HDCP / PC ANALOG) 4 Plug the power cable into your remote control, before installing TV channels. If you have selected the TV mode with AV+ key on your antenna has a round cable (75 ohm) on ....
...cable channels available in your television may be connected to your LCD TV. • Please make sure that 's where the antenna goes. 1 If your remote control, before installing TV channels. HELPFUL HINT • Remember, an antenna or cable TV signal must first be connected to your LCD TV. ... auto program function to 300-75Ω adapter Power Cable DVI-I IN AUDIO IN DVI (HDCP / PC ANALOG) 4 Plug the power cable into your remote control, before installing TV channels. If you have selected the TV mode with AV+ key on your antenna has a round cable (75 ohm) on ....

