
Operation Manual
Page 9
...the Self-Timer 51 Continuous Shooting (Continuous Shooting Mode 52 Using the Remote Control Unit (optional 53 Taking Pictures with Color Filters (Digital Filter Mode 54 Taking Two-in-One Pictures (Two-in-One Mode 55 Taking Panorama Pictures (Panorama Assist Mode 56 Setting the ...Focusing Area 68 Setting the Light Metering Range to Determine the Exposure (AE Metering 69 Setting the Sensitivity 70 Setting the Instant Review Time (Instant Review 71 Setting the Image Sharpness (Sharpness 72 Setting the Color Saturation (Saturation 73 Setting the Image Contrast (Contrast 74 Setting the ...
...the Self-Timer 51 Continuous Shooting (Continuous Shooting Mode 52 Using the Remote Control Unit (optional 53 Taking Pictures with Color Filters (Digital Filter Mode 54 Taking Two-in-One Pictures (Two-in-One Mode 55 Taking Panorama Pictures (Panorama Assist Mode 56 Setting the ...Focusing Area 68 Setting the Light Metering Range to Determine the Exposure (AE Metering 69 Setting the Sensitivity 70 Setting the Instant Review Time (Instant Review 71 Setting the Image Sharpness (Sharpness 72 Setting the Color Saturation (Saturation 73 Setting the Image Contrast (Contrast 74 Setting the ...

Operation Manual
Page 28
...turns green if the subject is described below. x : enlarges the subject. Press the shutter release button fully. w: enlarges the area captured by the camera. 04/25/2004 10:25 Focus frame You can change the captured area by looking through the viewfinder. 4 5 26 As there is no focus... Start Shutter release button Power switch 2 Viewfinder LCD monitor Mode Dial Zoom/f/y button DISPLAY button The standard procedure for 0.5 second (Instant Review) and is being recorded. Press the shutter release button halfway. You can check the captured area by pressing the Zoom/w/x button.
...turns green if the subject is described below. x : enlarges the subject. Press the shutter release button fully. w: enlarges the area captured by the camera. 04/25/2004 10:25 Focus frame You can change the captured area by looking through the viewfinder. 4 5 26 As there is no focus... Start Shutter release button Power switch 2 Viewfinder LCD monitor Mode Dial Zoom/f/y button DISPLAY button The standard procedure for 0.5 second (Instant Review) and is being recorded. Press the shutter release button halfway. You can check the captured area by pressing the Zoom/w/x button.

Operation Manual
Page 29
...Blinks Focus status lamp (green) Subject is in the same picture • Strongly reflected light or strong backlighting (bright background) Instant Review The Instant Review default setting is pressed 2 halfway. In this time, you can delete the image by pressing the shutter release button halfway), then aim... the camera at the focus position if the subject is pressed lightly (halfway). Press halfway The focus and exposure are locked when...
...Blinks Focus status lamp (green) Subject is in the same picture • Strongly reflected light or strong backlighting (bright background) Instant Review The Instant Review default setting is pressed 2 halfway. In this time, you can delete the image by pressing the shutter release button halfway), then aim... the camera at the focus position if the subject is pressed lightly (halfway). Press halfway The focus and exposure are locked when...

Operation Manual
Page 39
Yes Yes p.49 Instant Review For setting the Instant Review time 0.5 sec - Yes Yes p.75 ∗ Only the flash, digital zoom and file number settings are invalid. image compression rate - p.65...L (Multi-segment) - Mode] menu in actual operation. Item Description Default Setting - Yes No p.70 Digital Zoom For taking digital zoom pictures On - Any changes made are saved. • There is no [A Rec. You can ... - Yes No p.71 For saving the shooting Memory function settings when ∗ the camera is the only menu available in d, H and = modes.
Yes Yes p.49 Instant Review For setting the Instant Review time 0.5 sec - Yes Yes p.75 ∗ Only the flash, digital zoom and file number settings are invalid. image compression rate - p.65...L (Multi-segment) - Mode] menu in actual operation. Item Description Default Setting - Yes No p.70 Digital Zoom For taking digital zoom pictures On - Any changes made are saved. • There is no [A Rec. You can ... - Yes No p.71 For saving the shooting Memory function settings when ∗ the camera is the only menu available in d, H and = modes.

Operation Manual
Page 52
Mode] menu appears. 2 Use the four-way controller (23) Rec. Digital Zoom 3 Use the four-way controller (45) Instant Review Memory 0.5sec to select [Digital Zoom]. Mode to select O(On). Contrast MENU E x i t OK OK The camera is ready to On. • You should compose the picture on the LCD monitor when you turn the LCD...
Mode] menu appears. 2 Use the four-way controller (23) Rec. Digital Zoom 3 Use the four-way controller (45) Instant Review Memory 0.5sec to select [Digital Zoom]. Mode to select O(On). Contrast MENU E x i t OK OK The camera is ready to On. • You should compose the picture on the LCD monitor when you turn the LCD...
Operation Manual
Page 73
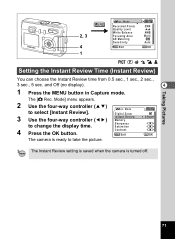
... controller (23) Rec. Digital Zoom 3 Use the four-way controller (45) Instant Review Memory 0.5sec to select [Instant Review]. Taking Pictures 71 H = Setting the Instant Review Time (Instant Review) You can choose the Instant Review time from 0.5 sec., 1 sec., 2 sec., 3 sec., 5 sec. Contrast MENU E x i t OK OK The camera is turned off. The Instant Review setting is saved when...
... controller (23) Rec. Digital Zoom 3 Use the four-way controller (45) Instant Review Memory 0.5sec to select [Instant Review]. Taking Pictures 71 H = Setting the Instant Review Time (Instant Review) You can choose the Instant Review time from 0.5 sec., 1 sec., 2 sec., 3 sec., 5 sec. Contrast MENU E x i t OK OK The camera is turned off. The Instant Review setting is saved when...

Operation Manual
Page 74
...to have sharp or soft 4 outlines. 1 Press the MENU button in d, H and = modes. • The Sharpness setting is saved when the camera is ready to take the picture. • Any changes made to z [Hard (+)] or Contrast y [Soft (-)]. Mode] menu appears. 2 Use .... Setting the Image Sharpness (Sharpness) You can choose whether you want the image to select [Sharpness]. The [A Rec. Digital Zoom 3 Use the four-way controller (45) Instant Review Memory 0.5sec to change the setting from Sharpness Saturation x [Normal] to the Sharpness setting are invalid in Capture mode. ...
...to have sharp or soft 4 outlines. 1 Press the MENU button in d, H and = modes. • The Sharpness setting is saved when the camera is ready to take the picture. • Any changes made to z [Hard (+)] or Contrast y [Soft (-)]. Mode] menu appears. 2 Use .... Setting the Image Sharpness (Sharpness) You can choose whether you want the image to select [Sharpness]. The [A Rec. Digital Zoom 3 Use the four-way controller (45) Instant Review Memory 0.5sec to change the setting from Sharpness Saturation x [Normal] to the Sharpness setting are invalid in Capture mode. ...
Operation Manual
Page 75
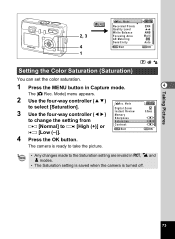
Taking Pictures MENU 2, 3 4 1 Rec. Digital Zoom 3 Use the four-way controller (45) Instant Review Memory 0.5sec to change the setting from Sharpness Saturation x [Normal] to select [Saturation]. MENU E x i t OK OK 4 Press the OK button. Mode Recorded Pixels Quality Level ... the Color Saturation (Saturation) You can set the color saturation. 1 Press the MENU button in d, H and = modes. • The Saturation setting is saved when the camera is turned off. 73 Mode to z [High (+)] or Contrast y [Low (-)].
Taking Pictures MENU 2, 3 4 1 Rec. Digital Zoom 3 Use the four-way controller (45) Instant Review Memory 0.5sec to change the setting from Sharpness Saturation x [Normal] to select [Saturation]. MENU E x i t OK OK 4 Press the OK button. Mode Recorded Pixels Quality Level ... the Color Saturation (Saturation) You can set the color saturation. 1 Press the MENU button in d, H and = modes. • The Saturation setting is saved when the camera is turned off. 73 Mode to z [High (+)] or Contrast y [Low (-)].
Operation Manual
Page 76
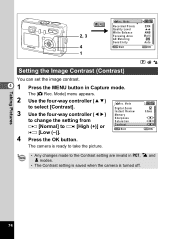
... the picture. • Any changes made to the Contrast setting are invalid in Capture mode. Mode to z [High (+)] or Contrast y [Low (-)]. The camera is turned off. 74 The [A Rec. MENU E x i t OK OK 4 Press the OK button. Taking Pictures MENU 2, 3 4 1 Rec. ...Mode] menu appears. 2 Use the four-way controller (23) Rec. Digital Zoom 3 Use the four-way controller (45) Instant Review Memory 0.5sec to change the setting from Sharpness Saturation x [Normal] to select [Contrast]. Mode Recorded Pixels Quality Level White Balance ...
... the picture. • Any changes made to the Contrast setting are invalid in Capture mode. Mode to z [High (+)] or Contrast y [Low (-)]. The camera is turned off. 74 The [A Rec. MENU E x i t OK OK 4 Press the OK button. Taking Pictures MENU 2, 3 4 1 Rec. ...Mode] menu appears. 2 Use the four-way controller (23) Rec. Digital Zoom 3 Use the four-way controller (45) Instant Review Memory 0.5sec to change the setting from Sharpness Saturation x [Normal] to select [Contrast]. Mode Recorded Pixels Quality Level White Balance ...

Operation Manual
Page 79
Mode to choose an item. Digital Zoom 3 Press the four-way controller (5). Saturation Contrast MENU E x i t OK OK 4 Use the four-way controller (23) Memory to select [Memory]. Flash 5 Use the four-... to take the picture. The [A Rec. Focusing Area AE Metering 6 Press the OK button twice. Taking Pictures 77 Instant Review Memory 0.5sec 4 Sharpness The [Memory] menu appears. Sensitivity MENU E x i t OK OK The camera is ready to select O (On) or P (Off). Mode Recorded Pixels Quality Level White Balance Focusing Area AE Metering Sensitivity...
Mode to choose an item. Digital Zoom 3 Press the four-way controller (5). Saturation Contrast MENU E x i t OK OK 4 Use the four-way controller (23) Memory to select [Memory]. Flash 5 Use the four-... to take the picture. The [A Rec. Focusing Area AE Metering 6 Press the OK button twice. Taking Pictures 77 Instant Review Memory 0.5sec 4 Sharpness The [Memory] menu appears. Sensitivity MENU E x i t OK OK The camera is ready to select O (On) or P (Off). Mode Recorded Pixels Quality Level White Balance Focusing Area AE Metering Sensitivity...

Operation Manual
Page 90
... the four-way controller (45) to choose the image or sound to [On] in the [B Set-up] menu, Step 3 can also delete images from Instant Review (1p.71). • If [Quick Delete] is set to delete. Press the OK button. Press the i button. Deleting 2 1, 3 4 Deleting Single Images and Sounds You can...
... the four-way controller (45) to choose the image or sound to [On] in the [B Set-up] menu, Step 3 can also delete images from Instant Review (1p.71). • If [Quick Delete] is set to delete. Press the OK button. Press the i button. Deleting 2 1, 3 4 Deleting Single Images and Sounds You can...

Operation Manual
Page 92
All data deleted Cancel MENU E x i t OK OK • You can also delete images from Instant Review (1p.71). • If [Quick Delete] is set to select [All data deleted]. Press the i button twice in the [B Set-up] menu, Step 2 can delete ...
All data deleted Cancel MENU E x i t OK OK • You can also delete images from Instant Review (1p.71). • If [Quick Delete] is set to select [All data deleted]. Press the i button twice in the [B Set-up] menu, Step 2 can delete ...

Operation Manual
Page 131
• This warranty policy does not affect the customer's statutory rights. • The local warranty policies available from PENTAX distributors in your country for more information and to receive a copy of the warranty policy. 8 The CE Mark is a Directive conformity mark of the European Community. 129 Appendix Therefore, we recommend that you review the warranty card supplied with your product at the time of purchase, or contact the PENTAX distributor in some countries can supersede this warranty policy.
• This warranty policy does not affect the customer's statutory rights. • The local warranty policies available from PENTAX distributors in your country for more information and to receive a copy of the warranty policy. 8 The CE Mark is a Directive conformity mark of the European Community. 129 Appendix Therefore, we recommend that you review the warranty card supplied with your product at the time of purchase, or contact the PENTAX distributor in some countries can supersede this warranty policy.