
Operation Manual
Page 3
...being dropped, please do not hang the strap around your nearest PENTAX service center. Warning Caution These symbols indicate that small children do not under any other irregularity, stop using the camera immediately, remove the battery or disconnect the AC adapter and contact your neck is a danger... of receiving an electric shock. • Wrapping the strap of the camera around their necks. • To avoid the risk ...
...being dropped, please do not hang the strap around your nearest PENTAX service center. Warning Caution These symbols indicate that small children do not under any other irregularity, stop using the camera immediately, remove the battery or disconnect the AC adapter and contact your neck is a danger... of receiving an electric shock. • Wrapping the strap of the camera around their necks. • To avoid the risk ...

Operation Manual
Page 4
... are held for long periods of time. • Should the LCD be damaged, be careful of the battery leakage should come in contact with water. • Remove the battery from the camera immediately if it becomes hot or begins to get medical attention immediately. • If any... batteries other than rechargeable Ni-MH batteries. The battery could explode or catch fire. Also, do not dispose of the battery in this camera, only the Ni-MH battery can be careful...
... are held for long periods of time. • Should the LCD be damaged, be careful of the battery leakage should come in contact with water. • Remove the battery from the camera immediately if it becomes hot or begins to get medical attention immediately. • If any... batteries other than rechargeable Ni-MH batteries. The battery could explode or catch fire. Also, do not dispose of the battery in this camera, only the Ni-MH battery can be careful...

Operation Manual
Page 8
... 9 Checking the Contents of the Package 10 Names of Parts 11 Names of Operating Parts 12 Getting Started 13 Attaching the Strap 13 Powering the Camera 14 Installing the Batteries 14 Using the AC Adapter (optional 16 Installing the SD Memory Card 17 Recorded Pixels and Quality 19 Turning the... Camera On and Off 21 Playback Only Mode 21 Voice Recording Only Mode 22 Initial Settings 23 Setting the Display Language 23 Setting the Date and ...
... 9 Checking the Contents of the Package 10 Names of Parts 11 Names of Operating Parts 12 Getting Started 13 Attaching the Strap 13 Powering the Camera 14 Installing the Batteries 14 Using the AC Adapter (optional 16 Installing the SD Memory Card 17 Recorded Pixels and Quality 19 Turning the... Camera On and Off 21 Playback Only Mode 21 Voice Recording Only Mode 22 Initial Settings 23 Setting the Display Language 23 Setting the Date and ...
Operation Manual
Page 12
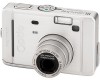
For other optional accessories, refer to "Optional Accessories" (p.121). 10 Checking the Contents of the Package Camera Optio S40 Strap O-ST20 (∗) Software (CD-ROM) S-SW16 AV cable I-AVC7 (∗) USB cable I-USB7 (∗) Two AA batteries Operating Manual (this manual) Operating Manual (PC Connection Manual) Items marked with an asterisk (∗) are also available as optional accessories.
For other optional accessories, refer to "Optional Accessories" (p.121). 10 Checking the Contents of the Package Camera Optio S40 Strap O-ST20 (∗) Software (CD-ROM) S-SW16 AV cable I-AVC7 (∗) USB cable I-USB7 (∗) Two AA batteries Operating Manual (this manual) Operating Manual (PC Connection Manual) Items marked with an asterisk (∗) are also available as optional accessories.

Operation Manual
Page 13
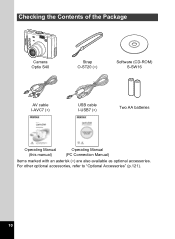
Names of Parts Front Back Shutter release button Remote control receiver Self-timer lamp Power switch Flash Speaker Viewfinder Microphone Lens PC/AV terminal DC input terminal Terminal cover Viewfinder Focus status lamp (green) Mode dial Flash status lamp (red) Strap lug Card cover Battery cover LCD monitor Tripod socket 11
Names of Parts Front Back Shutter release button Remote control receiver Self-timer lamp Power switch Flash Speaker Viewfinder Microphone Lens PC/AV terminal DC input terminal Terminal cover Viewfinder Focus status lamp (green) Mode dial Flash status lamp (red) Strap lug Card cover Battery cover LCD monitor Tripod socket 11
Operation Manual
Page 16
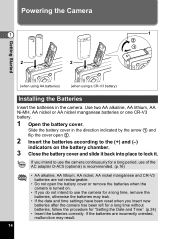
.... Use two AA alkaline, AA lithium, AA Ni-MH, AA nickel or AA nickel manganese batteries or one CR-V3 battery. 1 Open the battery cover. Powering the Camera 1 2 2 1 2 1 Getting Started (when using AA batteries) (when using a CR-V3 battery) Installing the Batteries Insert the batteries in the direction indicated by the arrow 1 and flip the cover open the...
.... Use two AA alkaline, AA lithium, AA Ni-MH, AA nickel or AA nickel manganese batteries or one CR-V3 battery. 1 Open the battery cover. Powering the Camera 1 2 2 1 2 1 Getting Started (when using AA batteries) (when using a CR-V3 battery) Installing the Batteries Insert the batteries in the direction indicated by the arrow 1 and flip the cover open the...

Operation Manual
Page 17
... above figures are based on PENTAX measuring conditions and may vary depending on the LCD monitor. # (lit green) ↓ $ (lit yellow) ↓ % (lit red) ↓ [Battery Depleted] : Adequate power remains. : Battery is running very low. : Battery is exhausted. : The camera will be restored when the battery is recommended when using the camera in your pocket or inside...
... above figures are based on PENTAX measuring conditions and may vary depending on the LCD monitor. # (lit green) ↓ $ (lit yellow) ↓ % (lit red) ↓ [Battery Depleted] : Adequate power remains. : Battery is running very low. : Battery is exhausted. : The camera will be restored when the battery is recommended when using the camera in your pocket or inside...

Operation Manual
Page 18
...Be sure to a PC, use the LCD monitor for a long time or connect the camera to read the operation manual accompanying the AC adapter D-AC5 before using the adapter. • The batteries inside the camera cannot be lost if the cable becomes disconnected while you intend to use of the DC ...terminal (indicated by ∗ in the grooves of the AC adapter D-AC5 is recommended. 1 Make sure that the camera is turned off when connecting or ...
...Be sure to a PC, use the LCD monitor for a long time or connect the camera to read the operation manual accompanying the AC adapter D-AC5 before using the adapter. • The batteries inside the camera cannot be lost if the cable becomes disconnected while you intend to use of the DC ...terminal (indicated by ∗ in the grooves of the AC adapter D-AC5 is recommended. 1 Make sure that the camera is turned off when connecting or ...
Operation Manual
Page 20
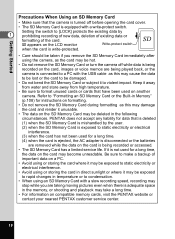
... after using or storing the card where it may become unreadable. PENTAX does not accept any liability for a long time, the data on another camera. Getting Started Precautions When Using an SD Memory Card • Make sure that the camera is turned off while data is being recorded on the card is... SD Memory Card or the Built-in Memory" (p.108) for a long time. (4) when the card is ejected, the AC adapter is disconnected or the batteries are removed while the data on the card, images or voice memos are taking moving pictures even when there is equipped with a write-protect switch...
... after using or storing the card where it may become unreadable. PENTAX does not accept any liability for a long time, the data on another camera. Getting Started Precautions When Using an SD Memory Card • Make sure that the camera is turned off while data is being recorded on the card is... SD Memory Card or the Built-in Memory" (p.108) for a long time. (4) when the card is ejected, the AC adapter is disconnected or the batteries are removed while the data on the card, images or voice memos are taking moving pictures even when there is equipped with a write-protect switch...

Operation Manual
Page 35
... to operation appears on the LCD monitor. How to Use the Menus Common Operations When you are making settings from a menu, a guide to change the camera settings on ), any changes you have made to [Quality Level]. MENU E x i t OK OK 3 Press the four-way controller (3). Ex.) To set ...saved. • Even after pressing the OK button or the shutter release button to exit the menu, if you turn the camera off incorrectly (such as by removing the batteries while the camera is turned on these menus. Rec. You can choose an item. Mode] menu 3 1 Press the MENU button. The...
... to operation appears on the LCD monitor. How to Use the Menus Common Operations When you are making settings from a menu, a guide to change the camera settings on ), any changes you have made to [Quality Level]. MENU E x i t OK OK 3 Press the four-way controller (3). Ex.) To set ...saved. • Even after pressing the OK button or the shutter release button to exit the menu, if you turn the camera off incorrectly (such as by removing the batteries while the camera is turned on these menus. Rec. You can choose an item. Mode] menu 3 1 Press the MENU button. The...

Operation Manual
Page 55
2 1 Taking Pictures - d R + C . Contact your nearest PENTAX customer service center if the battery needs changing. (A charge is made for the Remote Control Unit A signal can be used in Capture mode to Remote Control mode and take the picture. 2 ... blinking. • The buttons on the camera can switch the drive mode to display i or h 4 on the remote control unit. h The picture is taken after approximately three seconds. The self-timer lamp blinks slowly and the camera is no more than four meters away from the front of the Battery for changing the...
2 1 Taking Pictures - d R + C . Contact your nearest PENTAX customer service center if the battery needs changing. (A charge is made for the Remote Control Unit A signal can be used in Capture mode to Remote Control mode and take the picture. 2 ... blinking. • The buttons on the camera can switch the drive mode to display i or h 4 on the remote control unit. h The picture is taken after approximately three seconds. The self-timer lamp blinks slowly and the camera is no more than four meters away from the front of the Battery for changing the...

Operation Manual
Page 61
... changed , such as the flash mode, the mode you compose your pictures. Displaying Shooting Information in memory 7 Remaining number of recordable images 8 Date and time 9 Battery level indicator 123 4 5 6 7 11 04/25/2004 10:25 9 8 Histogram Display The brightness distribution of the image is displayed. Taking Pictures Display Off No shooting...
... changed , such as the flash mode, the mode you compose your pictures. Displaying Shooting Information in memory 7 Remaining number of recordable images 8 Date and time 9 Battery level indicator 123 4 5 6 7 11 04/25/2004 10:25 9 8 Histogram Display The brightness distribution of the image is displayed. Taking Pictures Display Off No shooting...

Operation Manual
Page 87
... Information in Playback Mode Shooting information can be displayed on the LCD monitor in memory icon 5 Four-way controller operation guide 6 Shooting date and time 7 Battery level indicator 8 Aperture 9 Shutter speed 1/30 F2.6 98 7 12 3 4 100-0004 04/25/2004 10:25 65 Histogram Display The brightness distribution of pixels. 1 Recorded...
... Information in Playback Mode Shooting information can be displayed on the LCD monitor in memory icon 5 Four-way controller operation guide 6 Shooting date and time 7 Battery level indicator 8 Aperture 9 Shutter speed 1/30 F2.6 98 7 12 3 4 100-0004 04/25/2004 10:25 65 Histogram Display The brightness distribution of pixels. 1 Recorded...
Operation Manual
Page 99
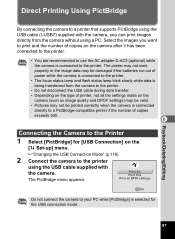
...USB connection mode. The PictBridge menu appears. The printer may not work properly or the image data may be damaged if the batteries run out of power while the camera is connected to the printer. • The focus status lamp and flash status lamp blink slowly while data is being transferred from...] on the [B Set-up] menu. 1"Changing the USB Connection Mode" (p.116) 2 Connect the camera to the printer using the USB cable supplied with the camera, you want to print and the number of copies on the camera after it has been connected to the printer. • You are recommended to use the...
...USB connection mode. The PictBridge menu appears. The printer may not work properly or the image data may be damaged if the batteries run out of power while the camera is connected to the printer. • The focus status lamp and flash status lamp blink slowly while data is being transferred from...] on the [B Set-up] menu. 1"Changing the USB Connection Mode" (p.116) 2 Connect the camera to the printer using the USB cable supplied with the camera, you want to print and the number of copies on the camera after it has been connected to the printer. • You are recommended to use the...

Operation Manual
Page 124
...You are no image/sound files on a PC or other device and is not compatible with this camera. The batteries are exhausted.Replace with the SD Memory Card. If using rechargeable batteries, charge the batteries (p.12). The protect setting or DPOF setting is being changed. No image to play it back ...being recorded The image is unformatted or has been formatted on the SD Memory Card or in the built-in memory. Compression error Compression of camera or PC. The SD Memory Card or the built-in memory. (p.108) Image & sound protected The image or sound you captured has ...
...You are no image/sound files on a PC or other device and is not compatible with this camera. The batteries are exhausted.Replace with the SD Memory Card. If using rechargeable batteries, charge the batteries (p.12). The protect setting or DPOF setting is being changed. No image to play it back ...being recorded The image is unformatted or has been formatted on the SD Memory Card or in the built-in memory. Compression error Compression of camera or PC. The SD Memory Card or the built-in memory. (p.108) Image & sound protected The image or sound you captured has ...

Operation Manual
Page 126
... both person and background are installed incorrectly Check orientation of batteries. No available space on the battery compartment. (p.14) Battery power is set to OFF Press DISPLAY button to turn on . (p.59) Camera is connected to see hard to LCD monitor is off when camera is dark When taking pictures outside in space or delete...
... both person and background are installed incorrectly Check orientation of batteries. No available space on the battery compartment. (p.14) Battery power is set to OFF Press DISPLAY button to turn on . (p.59) Camera is connected to see hard to LCD monitor is off when camera is dark When taking pictures outside in space or delete...
Operation Manual
Page 129
...°C with LCD monitor on, flash fired for 50% of shots and using a lithium battery CR-V3, in 1/3 EV steps) Capture Modes Easy, Program, Picture, Night-Scene, Moving Picture, Digital Effect, Landscape, Portrait Moving Picture Recording time approx. 1 sec. Flash Type Auto flash with...Mechanism AE Metering TTL metering by sensor (multi-segment, center-weighted, spot) EV Compensation ±2 EV (can be set in accordance with PENTAX measuring conditions) 8 In/Out Port USB/AV terminal (PC communication type USB 1.1), external power supply terminal Video Output Format NTSC/PAL Size...
...°C with LCD monitor on, flash fired for 50% of shots and using a lithium battery CR-V3, in 1/3 EV steps) Capture Modes Easy, Program, Picture, Night-Scene, Moving Picture, Digital Effect, Landscape, Portrait Moving Picture Recording time approx. 1 sec. Flash Type Auto flash with...Mechanism AE Metering TTL metering by sensor (multi-segment, center-weighted, spot) EV Compensation ±2 EV (can be set in accordance with PENTAX measuring conditions) 8 In/Out Port USB/AV terminal (PC communication type USB 1.1), external power supply terminal Video Output Format NTSC/PAL Size...

Operation Manual
Page 130
...equipment does not show evidence of impact, sand or liquid damage, mishandling, tampering, battery or chemical corrosion, operation contrary to operating instructions, or modification by non-authorized PENTAX service facilities. In any kind, whether caused by warranty, regular charges of the manufacturer...before the equipment can be liable for damages from delay or loss of parts as hereinbefore provided. WARRANTY POLICY All PENTAX cameras purchased through authorized bona fide photographic distribution channels are sending it directly to the manufacturer. If the equipment is strictly...
...equipment does not show evidence of impact, sand or liquid damage, mishandling, tampering, battery or chemical corrosion, operation contrary to operating instructions, or modification by non-authorized PENTAX service facilities. In any kind, whether caused by warranty, regular charges of the manufacturer...before the equipment can be liable for damages from delay or loss of parts as hereinbefore provided. WARRANTY POLICY All PENTAX cameras purchased through authorized bona fide photographic distribution channels are sending it directly to the manufacturer. If the equipment is strictly...

