Operation Manual
Page 2
... operations. • There is a possibility that the illustrations and the display screen of images. Regarding copyrights Images taken using the Optio S40 that 0.01% or fewer of functioning pixels is a trademark of Seiko Epson Corporation. • "PictBridge" allows the user to connect the printer and digital camera directly, using the unified standard for the direct printout of the LCD monitor in surroundings such as items for buying the PENTAX Optio S40 Digital Camera...
... operations. • There is a possibility that the illustrations and the display screen of images. Regarding copyrights Images taken using the Optio S40 that 0.01% or fewer of functioning pixels is a trademark of Seiko Epson Corporation. • "PictBridge" allows the user to connect the printer and digital camera directly, using the unified standard for the direct printout of the LCD monitor in surroundings such as items for buying the PENTAX Optio S40 Digital Camera...

Operation Manual
Page 9
... Self-Timer 51 Continuous Shooting (Continuous Shooting Mode 52 Using the Remote Control Unit (optional 53 Taking Pictures with Color Filters (Digital Filter Mode 54 Taking Two-in-One Pictures (Two-in-One Mode 55 Taking Panorama Pictures (Panorama Assist Mode 56 Setting the Shooting Functions 58 Changing the Mode 58 Selecting the Capture Mode 58 Displaying Shooting Information in Capture Mode 59 Selecting the Focus Mode 60 Selecting the Flash Mode 62 Selecting the Recorded Pixels 63 Selecting the Quality Level 64 Selecting the Image Quality 65 Adjusting the White Balance...
... Self-Timer 51 Continuous Shooting (Continuous Shooting Mode 52 Using the Remote Control Unit (optional 53 Taking Pictures with Color Filters (Digital Filter Mode 54 Taking Two-in-One Pictures (Two-in-One Mode 55 Taking Panorama Pictures (Panorama Assist Mode 56 Setting the Shooting Functions 58 Changing the Mode 58 Selecting the Capture Mode 58 Displaying Shooting Information in Capture Mode 59 Selecting the Focus Mode 60 Selecting the Flash Mode 62 Selecting the Recorded Pixels 63 Selecting the Quality Level 64 Selecting the Image Quality 65 Adjusting the White Balance...
Operation Manual
Page 10
... Image Size and Quality 101 Editing Pictures with Digital Filters 103 Copying Files 105 Settings 108 Camera Settings 108 Formatting an SD Memory Card or the Built-in Memory 108 Changing the Sound Settings 109 Changing the Date and Time 110 Setting the World Time 110 Changing the Start-up Screen, Background Color and Screen Effects 112 Changing the Display Language 114 Adjusting the Brightness of the LCD Monitor 114 Changing the Video Output Format 115 Changing the USB Connection Mode 116 Setting Auto Power Off 117 Resetting to Default Settings (Reset 117 Registering Functions...
... Image Size and Quality 101 Editing Pictures with Digital Filters 103 Copying Files 105 Settings 108 Camera Settings 108 Formatting an SD Memory Card or the Built-in Memory 108 Changing the Sound Settings 109 Changing the Date and Time 110 Setting the World Time 110 Changing the Start-up Screen, Background Color and Screen Effects 112 Changing the Display Language 114 Adjusting the Brightness of the LCD Monitor 114 Changing the Video Output Format 115 Changing the USB Connection Mode 116 Setting Auto Power Off 117 Resetting to Default Settings (Reset 117 Registering Functions...

Operation Manual
Page 13
Names of Parts Front Back Shutter release button Remote control receiver Self-timer lamp Power switch Flash Speaker Viewfinder Microphone Lens PC/AV terminal DC input terminal Terminal cover Viewfinder Focus status lamp (green) Mode dial Flash status lamp (red) Strap lug Card cover Battery cover LCD monitor Tripod socket 11
Names of Parts Front Back Shutter release button Remote control receiver Self-timer lamp Power switch Flash Speaker Viewfinder Microphone Lens PC/AV terminal DC input terminal Terminal cover Viewfinder Focus status lamp (green) Mode dial Flash status lamp (red) Strap lug Card cover Battery cover LCD monitor Tripod socket 11
Operation Manual
Page 20
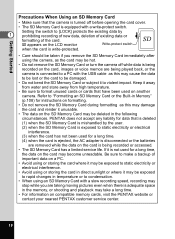
... adapter is disconnected or the batteries are removed while the data on compatible memory cards, visit the PENTAX website or contact your nearest PENTAX customer service center. 18 Getting Started Precautions When Using an SD Memory Card • Make sure that is deleted (1) when the SD Memory Card is mishandled by 1 prohibiting recording of new data, deletion of existing data or formatting of important data on a PC. • Avoid using or storing the card in Memory" (p.108) for instructions...
... adapter is disconnected or the batteries are removed while the data on compatible memory cards, visit the PENTAX website or contact your nearest PENTAX customer service center. 18 Getting Started Precautions When Using an SD Memory Card • Make sure that is deleted (1) when the SD Memory Card is mishandled by 1 prohibiting recording of new data, deletion of existing data or formatting of important data on a PC. • Avoid using or storing the card in Memory" (p.108) for instructions...

Operation Manual
Page 25
... procedure below to choose the display language. Initial Settings 2 Use the four-way controller (45) English City NYC to set the display language and/or current date and time. Setting the Display Language You can choose the language in which the menus, error messages, etc. MENU E x i t OK OK 23 DST The default setting is not required. Initial Settings Power switch 1 Getting Started Q Playback button Four-way controller OK button DISPLAY button MENU button If the Initial Settings screen or Date Adjust screen appears when you turn the camera on .
... procedure below to choose the display language. Initial Settings 2 Use the four-way controller (45) English City NYC to set the display language and/or current date and time. Setting the Display Language You can choose the language in which the menus, error messages, etc. MENU E x i t OK OK 23 DST The default setting is not required. Initial Settings Power switch 1 Getting Started Q Playback button Four-way controller OK button DISPLAY button MENU button If the Initial Settings screen or Date Adjust screen appears when you turn the camera on .

Operation Manual
Page 28
... green and red lamps on the right of automatic focusing. The focus frame in focus. The image appears on the LCD monitor. Quick Start Taking Still Pictures Quick Start Shutter release button Power switch 2 Viewfinder LCD monitor Mode Dial Zoom/f/y button DISPLAY button The standard procedure for 0.5 second (Instant Review) and is being recorded. The flash fires automatically depending on the light conditions. 1 Press the power switch. 4 The camera turns on. 2 Set the mode dial to check the focusing area on the SD Memory Card or...
... green and red lamps on the right of automatic focusing. The focus frame in focus. The image appears on the LCD monitor. Quick Start Taking Still Pictures Quick Start Shutter release button Power switch 2 Viewfinder LCD monitor Mode Dial Zoom/f/y button DISPLAY button The standard procedure for 0.5 second (Instant Review) and is being recorded. The flash fires automatically depending on the light conditions. 1 Press the power switch. 4 The camera turns on. 2 Set the mode dial to check the focusing area on the SD Memory Card or...

Operation Manual
Page 29
... taken while the flash is charging. Status lamps Lit Blinks Focus status lamp (green) Subject is in focus. During this case, lock the focus on the LCD monitor when the shutter release button is pressed 2 halfway. Quick Start Using the Shutter Release Button The shutter release button works in the same picture • Strongly reflected light or strong backlighting (bright background) Instant Review The Instant Review default setting is 0.5 second. The shutter speed and aperture settings only appear on...
... taken while the flash is charging. Status lamps Lit Blinks Focus status lamp (green) Subject is in focus. During this case, lock the focus on the LCD monitor when the shutter release button is pressed 2 halfway. Quick Start Using the Shutter Release Button The shutter release button works in the same picture • Strongly reflected light or strong backlighting (bright background) Instant Review The Instant Review default setting is 0.5 second. The shutter speed and aperture settings only appear on...

Operation Manual
Page 31
... button. Quick Start Rotating the Displayed Image 1 Press the Q Playback button after taking a picture. The image appears on the LCD monitor by pressing the i button, using the fourway controller (2) to the Playback mode. • You can enlarge the image by pressing the Zoom /f/y button. • If there are no images stored, the [No image & sound] message appears. Deleting 1p.88 29 Deleting the Displayed Image You can DPOF or delete/protect settings be made. Press the Q Playback button again or press the shutter...
... button. Quick Start Rotating the Displayed Image 1 Press the Q Playback button after taking a picture. The image appears on the LCD monitor by pressing the i button, using the fourway controller (2) to the Playback mode. • You can enlarge the image by pressing the Zoom /f/y button. • If there are no images stored, the [No image & sound] message appears. Deleting 1p.88 29 Deleting the Displayed Image You can DPOF or delete/protect settings be made. Press the Q Playback button again or press the shutter...

Operation Manual
Page 35
You can choose an item. Ex.) To set functions, save the settings and change the setting. Mode] menu 3 1 Press the MENU button. Rec. Mode The menu screen appears. Mode] menu is pressed. Rec. Mode The frame moves to operation appears on the LCD monitor. Mode to change the camera settings on the [A Rec. White Balance Focusing Area AWB Multi 5 Press the OK button or the shutter AE Metering Sensitivity Auto release button. Using the Menus When you have made to the...
You can choose an item. Ex.) To set functions, save the settings and change the setting. Mode] menu 3 1 Press the MENU button. Rec. Mode The menu screen appears. Mode] menu is pressed. Rec. Mode The frame moves to operation appears on the LCD monitor. Mode to change the camera settings on the [A Rec. White Balance Focusing Area AWB Multi 5 Press the OK button or the shutter AE Metering Sensitivity Auto release button. Using the Menus When you have made to the...

Operation Manual
Page 39
... EV Compensation For adjusting the exposure between -2.0 and +2.0 ±0.0 - Mode] menu in - Adjustable # ... Yes No p.70 Digital Zoom For taking digital zoom pictures On - Yes No p.71 For saving the shooting Memory function settings when ∗ the camera is turned off - Mode] Menu Yes ... You can change the setting on the menu, but any changes you make are saved. • There is the only menu available in O mode. • [Image Quality] is no [A Rec. mode. 37 Item Description Default Setting - Yes 320...
... EV Compensation For adjusting the exposure between -2.0 and +2.0 ±0.0 - Mode] menu in - Adjustable # ... Yes No p.70 Digital Zoom For taking digital zoom pictures On - Yes No p.71 For saving the shooting Memory function settings when ∗ the camera is turned off - Mode] Menu Yes ... You can change the setting on the menu, but any changes you make are saved. • There is the only menu available in O mode. • [Image Quality] is no [A Rec. mode. 37 Item Description Default Setting - Yes 320...

Operation Manual
Page 40
... screen effects For changing the brightness of start-up ] Menu Item Format Sound Date Adjust World Time Language/ Screen Setting Brightness Level Video Out USB Connection Auto Power Off Fn Setting Reset Description For formatting the SD Memory Card or built-in memory to the SD Memory Card and vice versa p.105 Digital Filter For creating a filter effect using color filters (red, blue, green, etc.) p.103 3 Quick Zoom Quick Delete For playing back images at the maximum zoom size by pressing the Zoom button only once p.83 For displaying the Delete screen with [Delete...
... screen effects For changing the brightness of start-up ] Menu Item Format Sound Date Adjust World Time Language/ Screen Setting Brightness Level Video Out USB Connection Auto Power Off Fn Setting Reset Description For formatting the SD Memory Card or built-in memory to the SD Memory Card and vice versa p.105 Digital Filter For creating a filter effect using color filters (red, blue, green, etc.) p.103 3 Quick Zoom Quick Delete For playing back images at the maximum zoom size by pressing the Zoom button only once p.83 For displaying the Delete screen with [Delete...

Operation Manual
Page 41
Mode] menu in Easy mode. • As a slow shutter speed is selected to -. 2 Press the shutter release button 4 halfway. is chosen in all other surface when taking night views. 39 The focus frame on the LCD monitor changes to green if the subject is in focus, the settings are recommended to set any functions. You are selected for a night view. - : This icon appears in Easy mode, night-scene pictures may be changed on a tripod or...
Mode] menu in Easy mode. • As a slow shutter speed is selected to -. 2 Press the shutter release button 4 halfway. is chosen in all other surface when taking night views. 39 The focus frame on the LCD monitor changes to green if the subject is in focus, the settings are recommended to set any functions. You are selected for a night view. - : This icon appears in Easy mode, night-scene pictures may be changed on a tripod or...

Operation Manual
Page 45
....47) Taking Pictures 43 The picture is selected. 5 Press the shutter release button halfway. Flower OK OK 8 04/25/2004 10:25 4 • In Picture mode, the saturation, contrast, sharpness and white balance are automatically set to the optimal settings for each mode. (You cannot change the settings.) • You can switch to choose the Picture mode. 4 Press the OK button. The Picture mode is taken. The focus frame turns green if the...
....47) Taking Pictures 43 The picture is selected. 5 Press the shutter release button halfway. Flower OK OK 8 04/25/2004 10:25 4 • In Picture mode, the saturation, contrast, sharpness and white balance are automatically set to the optimal settings for each mode. (You cannot change the settings.) • You can switch to choose the Picture mode. 4 Press the OK button. The Picture mode is taken. The focus frame turns green if the...
Operation Manual
Page 48
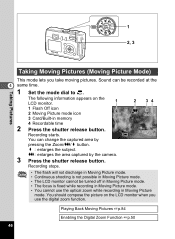
...Moving Picture mode. • Continuous shooting is fixed while recording in Moving Picture mode. • You cannot use the digital zoom function. Sound can change the captured area by the camera. 3 Press the shutter release button. x : enlarges the subject. You should compose the picture on the LCD monitor. 1 2 34 1 Flash Off icon 2 Moving Picture mode icon 3 Card/Built-in Moving Picture mode. The following information appears on the LCD monitor when you take moving pictures. 1 2, 3 Taking Pictures Taking Moving Pictures (Moving Picture Mode) This mode lets you use...
...Moving Picture mode. • Continuous shooting is fixed while recording in Moving Picture mode. • You cannot use the digital zoom function. Sound can change the captured area by the camera. 3 Press the shutter release button. x : enlarges the subject. You should compose the picture on the LCD monitor. 1 2 34 1 Flash Off icon 2 Moving Picture mode icon 3 Card/Built-in Moving Picture mode. The following information appears on the LCD monitor when you take moving pictures. 1 2, 3 Taking Pictures Taking Moving Pictures (Moving Picture Mode) This mode lets you use...
Operation Manual
Page 78
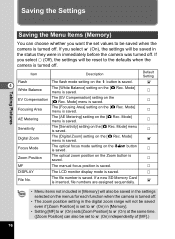
... before the camera was turned off. Item Flash 4 White Balance Description The flash mode setting on the [A Rec. P AE Metering The [AE Metering] setting on the b button is saved. P Digital Zoom The [Digital Zoom] setting on the Zoom button is saved. Mode] menu is saved. P Zoom Position The optical zoom position on the [A Rec. P File No. Saving the Settings Taking Pictures Saving the Menu Items (Memory) You can also be saved in the settings selected on the [A Rec. Mode] menu is saved. P Focusing Area The [Focusing Area] setting on the...
... before the camera was turned off. Item Flash 4 White Balance Description The flash mode setting on the [A Rec. P AE Metering The [AE Metering] setting on the b button is saved. P Digital Zoom The [Digital Zoom] setting on the Zoom button is saved. Mode] menu is saved. P Zoom Position The optical zoom position on the [A Rec. P File No. Saving the Settings Taking Pictures Saving the Menu Items (Memory) You can also be saved in the settings selected on the [A Rec. Mode] menu is saved. P Focusing Area The [Focusing Area] setting on the...
Operation Manual
Page 99
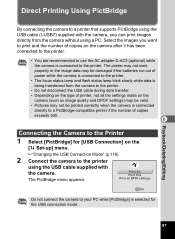
... recommended to use the AC adapter D-AC5 (optional) while the camera is selected for the USB connection mode. Playback/Deleting/Editing 97 The printer may not work properly or the image data may be damaged if the batteries run out of power while the camera is connected to the printer. • The focus status lamp and flash status lamp blink slowly while data is being transferred from the camera without using the USB cable supplied with...
... recommended to use the AC adapter D-AC5 (optional) while the camera is selected for the USB connection mode. Playback/Deleting/Editing 97 The printer may not work properly or the image data may be damaged if the batteries run out of power while the camera is connected to the printer. • The focus status lamp and flash status lamp blink slowly while data is being transferred from the camera without using the USB cable supplied with...

Operation Manual
Page 112
... the camera. You can display the time in "Initial Settings" (p.23) serve as the Home Time setting. This is useful when taking pictures abroad. 1 Select [World Time] on the [B Set-up ] menu MENU Four-way controller OK button MENU button Rec. Mode Recorded Pixels Quality Level White Balance Focusing Area AE Metering Sensitivity MENU E x i t 2304 AWB Multi Auto OK OK Changing the Date and Time You can change the initial date and time settings. The Date Adjust screen appears. Setting the World Time 7 The date and time selected...
... the camera. You can display the time in "Initial Settings" (p.23) serve as the Home Time setting. This is useful when taking pictures abroad. 1 Select [World Time] on the [B Set-up ] menu MENU Four-way controller OK button MENU button Rec. Mode Recorded Pixels Quality Level White Balance Focusing Area AE Metering Sensitivity MENU E x i t 2304 AWB Multi Auto OK OK Changing the Date and Time You can change the initial date and time settings. The Date Adjust screen appears. Setting the World Time 7 The date and time selected...

Operation Manual
Page 124
... a format not supported by this camera. Card not formatted The SD Memory Card you are trying to an image and no image/sound files on a PC. If using rechargeable batteries, charge the batteries (p.12). Camera cannot replay this camera. (p.108) Card locked The SD Memory Card is write-protected. (p.18) Data being recorded The image is being deleted. 8 Battery depleted. The moving picture is being formatted. Deleting The image is protected. The largest file number has been assigned to play it back on the LCD monitor during camera operation...
... a format not supported by this camera. Card not formatted The SD Memory Card you are trying to an image and no image/sound files on a PC. If using rechargeable batteries, charge the batteries (p.12). Camera cannot replay this camera. (p.108) Card locked The SD Memory Card is write-protected. (p.18) Data being recorded The image is being deleted. 8 Battery depleted. The moving picture is being formatted. Deleting The image is protected. The largest file number has been assigned to play it back on the LCD monitor during camera operation...
Operation Manual
Page 129
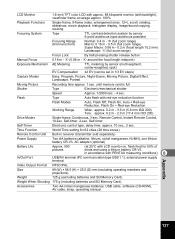
... power supply terminal Video Output Format NTSC/PAL Size 89 (W) × 58.5 (H) × 25.5 (D) mm (excluding operating members and projections) Weight 125 g (excluding batteries and SD Memory Card) Weight When Shooting 175 g (including batteries and SD Memory Card) Accessories Two AA nickel manganese batteries, USB cable, software (CD-ROM), AV cable, strap, operating manual Appendix 127 Self-timer Self-Timer Electronic control type, delay time: approx. 10 sec., 2 sec. Time Function World Time setting for 62 cities (28 time zones) Remote Control...
... power supply terminal Video Output Format NTSC/PAL Size 89 (W) × 58.5 (H) × 25.5 (D) mm (excluding operating members and projections) Weight 125 g (excluding batteries and SD Memory Card) Weight When Shooting 175 g (including batteries and SD Memory Card) Accessories Two AA nickel manganese batteries, USB cable, software (CD-ROM), AV cable, strap, operating manual Appendix 127 Self-timer Self-Timer Electronic control type, delay time: approx. 10 sec., 2 sec. Time Function World Time setting for 62 cities (28 time zones) Remote Control...


