Operation Manual
Page 1
... and external dimensions are subject to change without notice. 57351 Copyright © PENTAX Corporation 2004 01-200402 Printed in Japan Digital Camera Operating Manual To ensure the best performance from your camera, please read the Operating Manual before using the camera. http://www.pentaxeurope.com) (Germany - Limited PENTAX House, Heron Drive, Langley, Slough, Berks SL3 8PN, U.K. (http://www...
... and external dimensions are subject to change without notice. 57351 Copyright © PENTAX Corporation 2004 01-200402 Printed in Japan Digital Camera Operating Manual To ensure the best performance from your camera, please read the Operating Manual before using the camera. http://www.pentaxeurope.com) (Germany - Limited PENTAX House, Heron Drive, Langley, Slough, Berks SL3 8PN, U.K. (http://www...
Operation Manual
Page 2
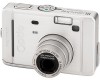
...purpose of obtaining copyrights also cannot be used in the LCD display is 99.99% or better, you for buying the PENTAX Optio S40 Digital Camera. Copyright 2001 Seiko Epson Corporation. PRINT Image Matching II is a possibility that recorded data may be erased or that the... read this manual are for the direct printout of PENTAX Corporation. • All other than personal enjoyment cannot be a valuable tool in the Copyright Act. Regarding copyrights Images taken using the Optio S40 that the illustrations and the display screen of the LCD monitor in this manual before using the...
...purpose of obtaining copyrights also cannot be used in the LCD display is 99.99% or better, you for buying the PENTAX Optio S40 Digital Camera. Copyright 2001 Seiko Epson Corporation. PRINT Image Matching II is a possibility that recorded data may be erased or that the... read this manual are for the direct printout of PENTAX Corporation. • All other than personal enjoyment cannot be a valuable tool in the Copyright Act. Regarding copyrights Images taken using the Optio S40 that the illustrations and the display screen of the LCD monitor in this manual before using the...

Operation Manual
Page 8
... to be Taken During Handling 4 Contents 6 Contents of the Operating Manual 9 Checking the Contents of the Package 10 Names of Parts 11 Names of Operating Parts 12 Getting Started 13 Attaching the Strap 13 Powering the Camera 14 Installing the Batteries 14 Using the AC Adapter (optional 16 Installing the... SD Memory Card 17 Recorded Pixels and Quality 19 Turning the Camera On and Off 21 Playback Only Mode 21 Voice Recording Only Mode 22 Initial Settings 23 Setting the Display Language 23 Setting the ...
... to be Taken During Handling 4 Contents 6 Contents of the Operating Manual 9 Checking the Contents of the Package 10 Names of Parts 11 Names of Operating Parts 12 Getting Started 13 Attaching the Strap 13 Powering the Camera 14 Installing the Batteries 14 Using the AC Adapter (optional 16 Installing the... SD Memory Card 17 Recorded Pixels and Quality 19 Turning the Camera On and Off 21 Playback Only Mode 21 Voice Recording Only Mode 22 Initial Settings 23 Setting the Display Language 23 Setting the ...

Operation Manual
Page 11
H, ., C, O, + Ex.) R + . Contents of the Operating Manual This operating manual contains the following chapters. 1 Getting Started 1 This chapter explains what to do after purchasing the camera before you start taking pictures. The icons above the title show the Capture modes that is useful to ... explains how to set the camera-related functions. 7 8 Appendix This tells you about the messages displayed on the LCD monitor and what you need to do in the event of trouble. 8 The meanings of the symbols used in this operating manual are explained below. 1 indicates...
H, ., C, O, + Ex.) R + . Contents of the Operating Manual This operating manual contains the following chapters. 1 Getting Started 1 This chapter explains what to do after purchasing the camera before you start taking pictures. The icons above the title show the Capture modes that is useful to ... explains how to set the camera-related functions. 7 8 Appendix This tells you about the messages displayed on the LCD monitor and what you need to do in the event of trouble. 8 The meanings of the symbols used in this operating manual are explained below. 1 indicates...
Operation Manual
Page 12
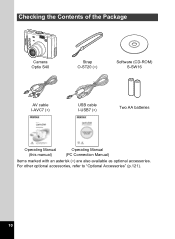
Checking the Contents of the Package Camera Optio S40 Strap O-ST20 (∗) Software (CD-ROM) S-SW16 AV cable I-AVC7 (∗) USB cable I-USB7 (∗) Two AA batteries Operating Manual (this manual) Operating Manual (PC Connection Manual) Items marked with an asterisk (∗) are also available as optional accessories. For other optional accessories, refer to "Optional Accessories" (p.121). 10
Checking the Contents of the Package Camera Optio S40 Strap O-ST20 (∗) Software (CD-ROM) S-SW16 AV cable I-AVC7 (∗) USB cable I-USB7 (∗) Two AA batteries Operating Manual (this manual) Operating Manual (PC Connection Manual) Items marked with an asterisk (∗) are also available as optional accessories. For other optional accessories, refer to "Optional Accessories" (p.121). 10

Operation Manual
Page 18
...the AC adapter. • Make sure that the camera is turned off and open the terminal cover. 2 Connect the DC terminal on the AC adapter to the DC input terminal on the camera. 3 Connect the AC power cable to read the operation manual accompanying the AC adapter D-AC5 before using the ...adapter. • The batteries inside the camera cannot be lost if the cable becomes disconnected while you are taking pictures...
...the AC adapter. • Make sure that the camera is turned off and open the terminal cover. 2 Connect the DC terminal on the AC adapter to the DC input terminal on the camera. 3 Connect the AC power cable to read the operation manual accompanying the AC adapter D-AC5 before using the ...adapter. • The batteries inside the camera cannot be lost if the cable becomes disconnected while you are taking pictures...
Operation Manual
Page 32
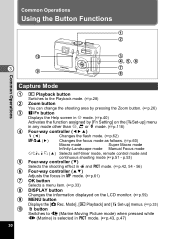
... controller (452) b (4) Changes the flash mode. (1p.62) zqs (5) Changes the focus mode as follows. (1p.60) Macro mode Super Macro mode Infinity-Landscape mode Manual Focus mode grihj (2) Selects self-timer mode, remote control mode and continuous shooting mode (1p.51 -
... controller (452) b (4) Changes the flash mode. (1p.62) zqs (5) Changes the focus mode as follows. (1p.60) Macro mode Super Macro mode Infinity-Landscape mode Manual Focus mode grihj (2) Selects self-timer mode, remote control mode and continuous shooting mode (1p.51 -
Operation Manual
Page 42
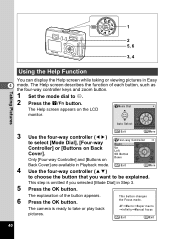
... changes the Focus mode. Press the OK button. AF Macro Super macro infinity Manual focus ?/Fn E x i t OK Exit 1 2 5, 6 3, 4 Taking Pictures Using the Help Function You can display the Help screen while taking or viewing pictures in Step 3. The camera is omitted if you want to select [Mode Dial], [Four-way Controller] or...
... changes the Focus mode. Press the OK button. AF Macro Super macro infinity Manual focus ?/Fn E x i t OK Exit 1 2 5, 6 3, 4 Taking Pictures Using the Help Function You can display the Help screen while taking or viewing pictures in Step 3. The camera is omitted if you want to select [Mode Dial], [Four-way Controller] or...
Operation Manual
Page 62
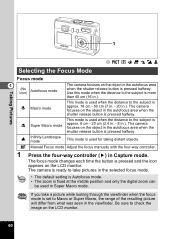
...; The default setting is Autofocus mode. • The zoom is pressed and the icon appears on the LCD monitor. The camera focuses on the object in .). z Manual Focus mode Adjust the focus manually with the four-way controller. 1 Press the four-way controller (5) in .). q Macro mode This mode is used in .). d R + C . 1 Taking ... on the LCD monitor. 60 The focus mode changes each time the button is fixed at the middle position and only the digital zoom can be used when the distance to check the image on the object in the autofocus area when the shutter release button is more...
...; The default setting is Autofocus mode. • The zoom is pressed and the icon appears on the LCD monitor. The camera focuses on the object in .). z Manual Focus mode Adjust the focus manually with the four-way controller. 1 Press the four-way controller (5) in .). q Macro mode This mode is used in .). d R + C . 1 Taking ... on the LCD monitor. 60 The focus mode changes each time the button is fixed at the middle position and only the digital zoom can be used when the distance to check the image on the object in the autofocus area when the shutter release button is more...

Operation Manual
Page 63
... the mode is set to z (Manual Focus), the central portion of the picture is set, press any button except the four-way controller (23) or take your finger off the four-...
... the mode is set to z (Manual Focus), the central portion of the picture is set, press any button except the four-way controller (23) or take your finger off the four-...
Operation Manual
Page 68
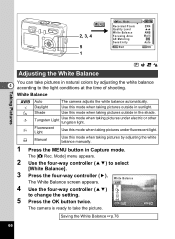
White Balance F G H I J K Auto The camera adjusts the white balance automatically. Manual Use this mode when taking pictures outside in natural colors by adjusting the white balance manually. 1 Press the MENU button in sunlight. Mode] menu appears. 2 Use the four-way controller (23) to change the setting. 5 Press the...the shade. Tungsten Light Use this mode when taking pictures outside in Capture mode. MENU E x i t OK OK The camera is ready to the light conditions at the time of shooting. Saving the White Balance 1p.76 66 Adjusting the White Balance You...
White Balance F G H I J K Auto The camera adjusts the white balance automatically. Manual Use this mode when taking pictures outside in natural colors by adjusting the white balance manually. 1 Press the MENU button in sunlight. Mode] menu appears. 2 Use the four-way controller (23) to change the setting. 5 Press the...the shade. Tungsten Light Use this mode when taking pictures outside in Capture mode. MENU E x i t OK OK The camera is ready to the light conditions at the time of shooting. Saving the White Balance 1p.76 66 Adjusting the White Balance You...

Operation Manual
Page 69
The camera is finished and the display returns to the menu screen. 4 4 Press the OK button. Taking Pictures 67 Any changes made to take the picture. White ... LCD MENU E x i t OK Adjust monitor during adjustment. [Complete] appears on the [White Balance] screen. 2 Point the camera at the blank sheet of paper so that it fills the frame of white paper ready. 1 Select [K] (manual) on the LCD monitor when adjustment is ready to the White Balance setting are invalid in d, H and...
The camera is finished and the display returns to the menu screen. 4 4 Press the OK button. Taking Pictures 67 Any changes made to take the picture. White ... LCD MENU E x i t OK Adjust monitor during adjustment. [Complete] appears on the [White Balance] screen. 2 Point the camera at the blank sheet of paper so that it fills the frame of white paper ready. 1 Select [K] (manual) on the LCD monitor when adjustment is ready to the White Balance setting are invalid in d, H and...
Operation Manual
Page 78
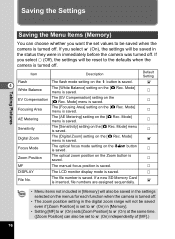
... of [MF].) 76 If you select P (Off), the settings will be saved in the status they were in the digital zoom range will not be reset to the defaults when the camera is saved. If you select O (On), the settings will be saved even if [Zoom Position] is inserted, file numbers... on the [A Rec. P Zoom Position The optical zoom position on the b button is turned off . • The zoom position setting in immediately before the camera was turned off . P MF The manual focus position is saved. P DISPLAY The LCD monitor display mode is saved. The file number is saved.
... of [MF].) 76 If you select P (Off), the settings will be saved in the status they were in the digital zoom range will not be reset to the defaults when the camera is saved. If you select O (On), the settings will be saved even if [Zoom Position] is inserted, file numbers... on the [A Rec. P Zoom Position The optical zoom position on the b button is turned off . • The zoom position setting in immediately before the camera was turned off . P MF The manual focus position is saved. P DISPLAY The LCD monitor display mode is saved. The file number is saved.

Operation Manual
Page 95
... the AV cable, you intend to the image input terminal and sound input terminal on the TV. Make sure that both the TV and the camera are turned off before connecting the cable. 1 Open the terminal cover and connect the AV cable to the PC/AV terminal. 6 2 Connect the other... equipment with a video IN jack. Refer to the operating manual for a long time, use the camera for the TV or equipment to which the camera is recommended. Viewing Images on a TV PC/AV terminal Playback/Deleting/Editing By using stereo sound equipment, insert the...
... the AV cable, you intend to the image input terminal and sound input terminal on the TV. Make sure that both the TV and the camera are turned off before connecting the cable. 1 Open the terminal cover and connect the AV cable to the PC/AV terminal. 6 2 Connect the other... equipment with a video IN jack. Refer to the operating manual for a long time, use the camera for the TV or equipment to which the camera is recommended. Viewing Images on a TV PC/AV terminal Playback/Deleting/Editing By using stereo sound equipment, insert the...

Operation Manual
Page 121
... mode. 7 The functions registered on the four-way controller displays a histogram showing the EV setting. (1p.75) To adjust the white balance, select K (manual) and press the OK button when White Balance is registered on the four-way controller (2345) appear. +0.7 2 Use the four-way controller (2345) to .... (1p.40) 119 Select [Off] if you do not want to choose the registered function and change the setting. The setting is saved and the camera is not possible to register only EV Compensation (+) or (-), or to take pictures. Pressing the 0 button in - (Easy) mode. Set-up Format...
... mode. 7 The functions registered on the four-way controller displays a histogram showing the EV setting. (1p.75) To adjust the white balance, select K (manual) and press the OK button when White Balance is registered on the four-way controller (2345) appear. +0.7 2 Use the four-way controller (2345) to .... (1p.40) 119 Select [Off] if you do not want to choose the registered function and change the setting. The setting is saved and the camera is not possible to register only EV Compensation (+) or (-), or to take pictures. Pressing the 0 button in - (Easy) mode. Set-up Format...

Operation Manual
Page 127
... using focus on autofocus: objects with focus mode set on q (Macro) Macro) or r (Super Macro). If the subject is outside the focusing area, aim the camera at target and press shutter release button fully, or use Manual Focus mode. Zoom will not discharge in d mode, Continuous Shooting or Infinity-Landscape mode.
... using focus on autofocus: objects with focus mode set on q (Macro) Macro) or r (Super Macro). If the subject is outside the focusing area, aim the camera at target and press shutter release button fully, or use Manual Focus mode. Zoom will not discharge in d mode, Continuous Shooting or Infinity-Landscape mode.

Operation Manual
Page 128
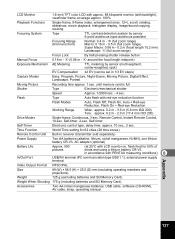
...;240) Approx. 33 sec. Main Specifications Type Effective Pixels Sensor Recorded Pixels Sensitivity File Format Quality Level Storage Medium Fully automatic compact digital still camera with built-in memory (approx. 11 MB), SD Memory Card Image Storage Capacity (when using 16 MB SD Memory Card) "Best...2048×1536 pixels, 1600×1200 pixels, 1024×768 pixels, 640×480 pixels Moving Picture 320×240 pixels Auto, manual (equivalent to 8×) Type Real-image zoom viewfinder Magnification Wide 0.28×, Tele 0.78× Appendix 126 f/4.8 Lens Composition 6 ...
...;240) Approx. 33 sec. Main Specifications Type Effective Pixels Sensor Recorded Pixels Sensitivity File Format Quality Level Storage Medium Fully automatic compact digital still camera with built-in memory (approx. 11 MB), SD Memory Card Image Storage Capacity (when using 16 MB SD Memory Card) "Best...2048×1536 pixels, 1600×1200 pixels, 1024×768 pixels, 640×480 pixels Moving Picture 320×240 pixels Auto, manual (equivalent to 8×) Type Real-image zoom viewfinder Magnification Wide 0.28×, Tele 0.78× Appendix 126 f/4.8 Lens Composition 6 ...
Operation Manual
Page 129
... sec. LCD Monitor 1.6-inch TFT color LCD with approx. 85 kilopixels monitor (with PENTAX measuring conditions) 8 In/Out Port USB/AV terminal (PC communication type USB 1.1), ...0.18 m - 0.5 m (full zoom range) SLaunpdesrcMaapcer:o∞: 0(.0fu6llmzo-o0m.2ramng(feo)cal length 10.2 mm) Manual Focus Focus Lock By half-pressing shutter release button 0.18 m - ∞ (0.06 m - ∞ around the...in 1/3 EV steps) Capture Modes Easy, Program, Picture, Night-Scene, Moving Picture, Digital Effect, Landscape, Portrait Moving Picture Recording time approx. 1 sec. Flash Type Auto flash ...
... sec. LCD Monitor 1.6-inch TFT color LCD with approx. 85 kilopixels monitor (with PENTAX measuring conditions) 8 In/Out Port USB/AV terminal (PC communication type USB 1.1), ...0.18 m - 0.5 m (full zoom range) SLaunpdesrcMaapcer:o∞: 0(.0fu6llmzo-o0m.2ramng(feo)cal length 10.2 mm) Manual Focus Focus Lock By half-pressing shutter release button 0.18 m - ∞ (0.06 m - ∞ around the...in 1/3 EV steps) Capture Modes Easy, Program, Picture, Night-Scene, Moving Picture, Digital Effect, Landscape, Portrait Moving Picture Recording time approx. 1 sec. Flash Type Auto flash ...


