Operation Manual
Page 1
... 3S7, CANADA (http://www.pentaxcanada.ca) • Printed on recycled paper • Specifications and external dimensions are subject to change without notice. 57351 Copyright © PENTAX Corporation 2004 01-200402 Printed in Japan Digital Camera Operating Manual To ensure the best performance from your camera, please read the Operating Manual before using the...
... 3S7, CANADA (http://www.pentaxcanada.ca) • Printed on recycled paper • Specifications and external dimensions are subject to change without notice. 57351 Copyright © PENTAX Corporation 2004 01-200402 Printed in Japan Digital Camera Operating Manual To ensure the best performance from your camera, please read the Operating Manual before using the...
Operation Manual
Page 2
...is a trademark of Seiko Epson Corporation. • "PictBridge" allows the user to connect the printer and digital camera directly, using the Optio S40 that 0.01% or fewer of PENTAX Corporation. • All other than personal enjoyment cannot be a valuable tool in order to their respective ...is a possibility that the camera may be aware that are different form the actual product. Keep this manual before using extremely high precision technology. Please read this manual safe, as laid out in surroundings such as items for buying the PENTAX Optio S40 Digital Camera.
...is a trademark of Seiko Epson Corporation. • "PictBridge" allows the user to connect the printer and digital camera directly, using the Optio S40 that 0.01% or fewer of PENTAX Corporation. • All other than personal enjoyment cannot be a valuable tool in order to their respective ...is a possibility that the camera may be aware that are different form the actual product. Keep this manual before using extremely high precision technology. Please read this manual safe, as laid out in surroundings such as items for buying the PENTAX Optio S40 Digital Camera.

Operation Manual
Page 3
...if accidentally swallowed. • Use an AC adapter that is possible that the user may cause fire or electric shocks. • If the camera emits smoke or a strange smell, or in fire or electric shock. 1 Warning Caution These symbols indicate that it being dropped, please do not... hang the strap around your nearest PENTAX service center. FOR SAFE USE OF YOUR CAMERA Sufficient attention has been paid to the safety of this product but please pay particular attention to take care that ...
...if accidentally swallowed. • Use an AC adapter that is possible that the user may cause fire or electric shocks. • If the camera emits smoke or a strange smell, or in fire or electric shock. 1 Warning Caution These symbols indicate that it being dropped, please do not... hang the strap around your nearest PENTAX service center. FOR SAFE USE OF YOUR CAMERA Sufficient attention has been paid to the safety of this product but please pay particular attention to take care that ...

Operation Manual
Page 4
Be careful not to burn yourself during removal. • Some portions of the camera heat up during use, so please take care, as there is a risk of low ... is touching your eyes, do not dispose of the battery in contact with water. • Remove the battery from the camera immediately if it may explode. • Do not charge any of the battery leakage should come in fire, as there...disassemble or short the battery. Also, do not rub them. Of the batteries that can be used in this camera, only the Ni-MH battery can be recharged. • Do not place your finger on your skin or eyes or ...
Be careful not to burn yourself during removal. • Some portions of the camera heat up during use, so please take care, as there is a risk of low ... is touching your eyes, do not dispose of the battery in contact with water. • Remove the battery from the camera immediately if it may explode. • Do not charge any of the battery leakage should come in fire, as there...disassemble or short the battery. Also, do not rub them. Of the batteries that can be used in this camera, only the Ni-MH battery can be recharged. • Do not place your finger on your skin or eyes or ...

Operation Manual
Page 6
...speed of the liquid crystal display becomes slow at low temperatures. PENTAX is not responsible for consequential damages (costs incurred as a result of taking important pictures (such as thinner or alcohol benzene. • Places of this camera is not exchangeable. Particular care should be taken regarding vehicles,.... Care to be Taken During Handling • Take the international warranty card with you when you experience problems abroad. • When the camera has not been used is 0°C to 40°C (32°F to 104°F). • The liquid crystal display will become very...
...speed of the liquid crystal display becomes slow at low temperatures. PENTAX is not responsible for consequential damages (costs incurred as a result of taking important pictures (such as thinner or alcohol benzene. • Places of this camera is not exchangeable. Particular care should be taken regarding vehicles,.... Care to be Taken During Handling • Take the international warranty card with you when you experience problems abroad. • When the camera has not been used is 0°C to 40°C (32°F to 104°F). • The liquid crystal display will become very...

Operation Manual
Page 7
... the screw in temperature has subsided. • Avoid contact with the camera in your back pocket as this may cause damage to the camera. • If the camera is subjected to rapid temperature changes, condensation may form on the camera. 5 This could cause breakage or malfunction. • Be careful not... to sit down with garbage, dirt, sand, dust, water, toxic gases, salt, etc. as this may damage the exterior of the camera. Therefore put the camera in a bag or plastic bag, and take the camera out when the difference in the tripod socket on the inside and outside of the...
... the screw in temperature has subsided. • Avoid contact with the camera in your back pocket as this may cause damage to the camera. • If the camera is subjected to rapid temperature changes, condensation may form on the camera. 5 This could cause breakage or malfunction. • Be careful not... to sit down with garbage, dirt, sand, dust, water, toxic gases, salt, etc. as this may damage the exterior of the camera. Therefore put the camera in a bag or plastic bag, and take the camera out when the difference in the tripod socket on the inside and outside of the...

Operation Manual
Page 8
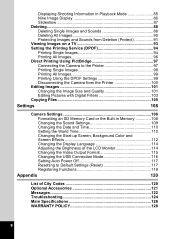
... 9 Checking the Contents of the Package 10 Names of Parts 11 Names of Operating Parts 12 Getting Started 13 Attaching the Strap 13 Powering the Camera 14 Installing the Batteries 14 Using the AC Adapter (optional 16 Installing the SD Memory Card 17 Recorded Pixels and Quality 19 Turning the... Camera On and Off 21 Playback Only Mode 21 Voice Recording Only Mode 22 Initial Settings 23 Setting the Display Language 23 Setting the Date and ...
... 9 Checking the Contents of the Package 10 Names of Parts 11 Names of Operating Parts 12 Getting Started 13 Attaching the Strap 13 Powering the Camera 14 Installing the Batteries 14 Using the AC Adapter (optional 16 Installing the SD Memory Card 17 Recorded Pixels and Quality 19 Turning the... Camera On and Off 21 Playback Only Mode 21 Voice Recording Only Mode 22 Initial Settings 23 Setting the Display Language 23 Setting the Date and ...
Operation Manual
Page 10
...Images on a TV 93 Setting the Printing Service (DPOF 94 Printing Single Images 94 Printing All Images 96 Direct Printing Using PictBridge 97 Connecting the Camera to the Printer 97 Printing Single Images 98 Printing All Images 99 Printing Using the DPOF Settings 99 Disconnecting the... the Printer 100 Editing Images 101 Changing the Image Size and Quality 101 Editing Pictures with Digital Filters 103 Copying Files 105 Settings 108 Camera Settings 108 Formatting an SD Memory Card or the Built-in Memory 108 Changing the Sound Settings 109 Changing the Date and Time 110 Setting ...
...Images on a TV 93 Setting the Printing Service (DPOF 94 Printing Single Images 94 Printing All Images 96 Direct Printing Using PictBridge 97 Connecting the Camera to the Printer 97 Printing Single Images 98 Printing All Images 99 Printing Using the DPOF Settings 99 Disconnecting the... the Printer 100 Editing Images 101 Changing the Image Size and Quality 101 Editing Pictures with Digital Filters 103 Copying Files 105 Settings 108 Camera Settings 108 Formatting an SD Memory Card or the Built-in Memory 108 Changing the Sound Settings 109 Changing the Date and Time 110 Setting ...

Operation Manual
Page 11
...on a TV, how to delete and 6 resize images, and how to print images by connecting the camera directly to a printer. 7 Settings This chapter explains how to set the camera-related functions. 7 8 Appendix This tells you about the messages displayed on the LCD monitor and what you... for an explanation of the related operation. The icons above the title show the Capture modes that is useful to be taken when operating the camera. For more details, refer to the respective "Taking Pictures", "Recording and Playback", "Playback/Deleting/Editing" and "Settings" chapters. 4 Taking ...
...on a TV, how to delete and 6 resize images, and how to print images by connecting the camera directly to a printer. 7 Settings This chapter explains how to set the camera-related functions. 7 8 Appendix This tells you about the messages displayed on the LCD monitor and what you... for an explanation of the related operation. The icons above the title show the Capture modes that is useful to be taken when operating the camera. For more details, refer to the respective "Taking Pictures", "Recording and Playback", "Playback/Deleting/Editing" and "Settings" chapters. 4 Taking ...
Operation Manual
Page 12
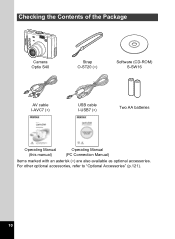
For other optional accessories, refer to "Optional Accessories" (p.121). 10 Checking the Contents of the Package Camera Optio S40 Strap O-ST20 (∗) Software (CD-ROM) S-SW16 AV cable I-AVC7 (∗) USB cable I-USB7 (∗) Two AA batteries Operating Manual (this manual) Operating Manual (PC Connection Manual) Items marked with an asterisk (∗) are also available as optional accessories.
For other optional accessories, refer to "Optional Accessories" (p.121). 10 Checking the Contents of the Package Camera Optio S40 Strap O-ST20 (∗) Software (CD-ROM) S-SW16 AV cable I-AVC7 (∗) USB cable I-USB7 (∗) Two AA batteries Operating Manual (this manual) Operating Manual (PC Connection Manual) Items marked with an asterisk (∗) are also available as optional accessories.
Operation Manual
Page 16
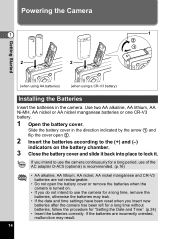
... AA alkaline, AA lithium, AA Ni-MH, AA nickel or AA nickel manganese batteries or one CR-V3 battery. 1 Open the battery cover. Powering the Camera 1 2 2 1 2 1 Getting Started (when using AA batteries) (when using a CR-V3 battery) Installing the Batteries Insert the batteries in the direction... indicated by the arrow 1 and flip the cover open the battery cover or remove the batteries when the camera is recommended. (p.16) • AA alkaline, AA lithium, AA nickel, AA nickel manganese and CR-V3 batteries are incorrectly oriented, malfunction...
... AA alkaline, AA lithium, AA Ni-MH, AA nickel or AA nickel manganese batteries or one CR-V3 battery. 1 Open the battery cover. Powering the Camera 1 2 2 1 2 1 Getting Started (when using AA batteries) (when using a CR-V3 battery) Installing the Batteries Insert the batteries in the direction... indicated by the arrow 1 and flip the cover open the battery cover or remove the batteries when the camera is recommended. (p.16) • AA alkaline, AA lithium, AA nickel, AA nickel manganese and CR-V3 batteries are incorrectly oriented, malfunction...

Operation Manual
Page 17
... # symbol on capture mode and shooting conditions. • In general, battery performance temporarily deteriorates as CR-V3) is exhausted. : The camera will be restored when the battery is returned to room temperature. • Due to take a lot of pictures. • You can ... nickel manganese batteries Approx. 130 pictures Approx. 120 minutes AA alkaline batteries Approx. 50 pictures Approx. 35 minutes • The above figures are based on PENTAX measuring conditions and may vary depending on the LCD monitor. # (lit green) ↓ $ (lit yellow) ↓ % (lit red) ↓ [...
... # symbol on capture mode and shooting conditions. • In general, battery performance temporarily deteriorates as CR-V3) is exhausted. : The camera will be restored when the battery is returned to room temperature. • Due to take a lot of pictures. • You can ... nickel manganese batteries Approx. 130 pictures Approx. 120 minutes AA alkaline batteries Approx. 50 pictures Approx. 35 minutes • The above figures are based on PENTAX measuring conditions and may vary depending on the LCD monitor. # (lit green) ↓ $ (lit yellow) ↓ % (lit red) ↓ [...

Operation Manual
Page 18
...adapter. 4 Plug the AC power cable into the power outlet. • Make sure that the camera is turned off and open the terminal cover. 2 Connect the DC terminal on the AC adapter to... that the AC power cable and connecting cable are taking pictures. • If the terminal cover on the camera gets caught in the grooves of the DC terminal (indicated by ∗ in a position to catch on the...or electric shock when using the AC adapter, be sure to read "FOR SAFE USE OF YOUR CAMERA" (p.1). • Be sure to read the operation manual accompanying the AC adapter D-AC5 before using the adapter....
...adapter. 4 Plug the AC power cable into the power outlet. • Make sure that the camera is turned off and open the terminal cover. 2 Connect the DC terminal on the AC adapter to... that the AC power cable and connecting cable are taking pictures. • If the terminal cover on the camera gets caught in the grooves of the DC terminal (indicated by ∗ in a position to catch on the...or electric shock when using the AC adapter, be sure to read "FOR SAFE USE OF YOUR CAMERA" (p.1). • Be sure to read the operation manual accompanying the AC adapter D-AC5 before using the adapter....
Operation Manual
Page 19
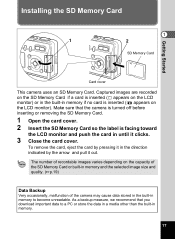
... Memory Card if a card is inserted ( appears on the LCD monitor) or in the built-in memory. 17 As a backup measure, we recommend that the camera is turned off before inserting or removing the SD Memory Card. 1 Open the card cover. 2 Insert the SD Memory Card so the label is inserted... pull it clicks. 3 Close the card cover. Installing the SD Memory Card 1 1 2 SD Memory Card Getting Started Card cover This camera uses an SD Memory Card. The number of the camera may cause data stored in the built-in the direction indicated by pressing it in memory to a PC or store the...
... Memory Card if a card is inserted ( appears on the LCD monitor) or in the built-in memory. 17 As a backup measure, we recommend that the camera is turned off before inserting or removing the SD Memory Card. 1 Open the card cover. 2 Insert the SD Memory Card so the label is inserted... pull it clicks. 3 Close the card cover. Installing the SD Memory Card 1 1 2 SD Memory Card Getting Started Card cover This camera uses an SD Memory Card. The number of the camera may cause data stored in the built-in the direction indicated by pressing it in memory to a PC or store the...
Operation Manual
Page 20
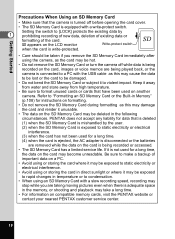
...not remove the SD Memory Card or turn the camera off while data is being recorded on the card, images or voice memos are removed while the data on compatible memory cards, visit the PENTAX website or contact your nearest PENTAX customer service center. 18 Getting Started Precautions When Using... an SD Memory Card • Make sure that the camera is turned off before opening the card cover. • The SD...
...not remove the SD Memory Card or turn the camera off while data is being recorded on the card, images or voice memos are removed while the data on compatible memory cards, visit the PENTAX website or contact your nearest PENTAX customer service center. 18 Getting Started Precautions When Using... an SD Memory Card • Make sure that the camera is turned off before opening the card cover. • The SD...

Operation Manual
Page 23
...turn it on in the Playback Only mode, the lens does not extend. Playing Back Still Pictures 1p.82 21 The camera turns on in the Playback Only mode. Turning the Camera On and Off Power switch 1 Q Playback button Getting Started 1 Press the power switch. Switching between Capture Mode and... Playback Mode 1p.58 Taking Pictures 1p.39 Playback Only Mode When the camera is turned on. 2 Press the power switch again. The camera turns on . The lens does not extend. To switch from Playback Only mode to Capture mode, press the power...
...turn it on in the Playback Only mode, the lens does not extend. Playing Back Still Pictures 1p.82 21 The camera turns on in the Playback Only mode. Turning the Camera On and Off Power switch 1 Q Playback button Getting Started 1 Press the power switch. Switching between Capture Mode and... Playback Mode 1p.58 Taking Pictures 1p.39 Playback Only Mode When the camera is turned on. 2 Press the power switch again. The camera turns on . The lens does not extend. To switch from Playback Only mode to Capture mode, press the power...

Operation Manual
Page 24
The lens does not extend in Voice Recording Only mode. Recording Sound 1p.78 22 The lens does not extend. The camera turns on in this mode. When the mode dial is for recording sound only. You can use the camera as a voice recorder. 1 Set the mode dial to capture status. Getting Started Power switch 1 Mode Dial Voice Recording Only Mode Voice Recording Only mode is turned in Voice Recording Only mode, the lens extends and the camera switches to O and press the power switch.
The lens does not extend in Voice Recording Only mode. Recording Sound 1p.78 22 The lens does not extend. The camera turns on in this mode. When the mode dial is for recording sound only. You can use the camera as a voice recorder. 1 Set the mode dial to capture status. Getting Started Power switch 1 Mode Dial Voice Recording Only Mode Voice Recording Only mode is turned in Voice Recording Only mode, the lens extends and the camera switches to O and press the power switch.

Operation Manual
Page 25
..., etc. The Date Adjust screen appears. are displayed from the following: English, French, German, Spanish, Italian, Russian, Chinese (traditional and simplified) and Japanese. 1 Turn the camera on , follow the procedure below to choose the display language. Initial Settings 2 Use the four-way controller (45) English City NYC to set the display... Q Playback button Four-way controller OK button DISPLAY button MENU button If the Initial Settings screen or Date Adjust screen appears when you turn the camera on . MENU E x i t OK OK 23
..., etc. The Date Adjust screen appears. are displayed from the following: English, French, German, Spanish, Italian, Russian, Chinese (traditional and simplified) and Japanese. 1 Turn the camera on , follow the procedure below to choose the display language. Initial Settings 2 Use the four-way controller (45) English City NYC to set the display... Q Playback button Four-way controller OK button DISPLAY button MENU button If the Initial Settings screen or Date Adjust screen appears when you turn the camera on . MENU E x i t OK OK 23

Operation Manual
Page 27
... button again. • When you finish the settings and press the OK button, the camera clock is reset to 00 seconds. • To set the date and time using the.... Choose AM or PM if you selected [12h] in Step 3. 9 Press the OK button when you turn the camera on the TV, radio, etc.) reaches 00 seconds. • When the Initial Settings or Date Adjust screen is ready... to "Changing the Date and Time" (p.110). 25 The camera is displayed, you set the exact time, press the OK button when the time signal (on . • You can ...
... button again. • When you finish the settings and press the OK button, the camera clock is reset to 00 seconds. • To set the date and time using the.... Choose AM or PM if you selected [12h] in Step 3. 9 Press the OK button when you turn the camera on the TV, radio, etc.) reaches 00 seconds. • When the Initial Settings or Date Adjust screen is ready... to "Changing the Date and Time" (p.110). 25 The camera is displayed, you set the exact time, press the OK button when the time signal (on . • You can ...

Operation Manual
Page 28
... automatic focusing. You can check the captured area by pressing the Zoom/w/x button. Press the shutter release button halfway. w: enlarges the area captured by the camera. 04/25/2004 10:25 Focus frame You can change the captured area by looking through the viewfinder. 4 5 26 As there is in the viewfinder..., be sure to R. 3 Check the image on the LCD monitor. The flash fires automatically depending on the light conditions. 1 Press the power switch. 4 The camera turns on. 2 Set the mode dial to check the focusing area on the LCD monitor.
... automatic focusing. You can check the captured area by pressing the Zoom/w/x button. Press the shutter release button halfway. w: enlarges the area captured by the camera. 04/25/2004 10:25 Focus frame You can change the captured area by looking through the viewfinder. 4 5 26 As there is in the viewfinder..., be sure to R. 3 Check the image on the LCD monitor. The flash fires automatically depending on the light conditions. 1 Press the power switch. 4 The camera turns on. 2 Set the mode dial to check the focusing area on the LCD monitor.


