
Operation Manual
Page 3
... an AC adapter other irregularity, stop using the camera immediately, remove the battery or disconnect the AC adapter and contact your neck is possible that it being dropped, please do not hang the strap around your nearest PENTAX service center. Seek medical attention immediately if accidentally swallowed... the Camera Warning • Do not attempt to take care that the user may experience serious difficulties if the warnings are not heeded. Continued use with this product but please pay particular attention to the warnings indicated by mistake, keep the SD Memory Card out of...
... an AC adapter other irregularity, stop using the camera immediately, remove the battery or disconnect the AC adapter and contact your neck is possible that it being dropped, please do not hang the strap around your nearest PENTAX service center. Seek medical attention immediately if accidentally swallowed... the Camera Warning • Do not attempt to take care that the user may experience serious difficulties if the warnings are not heeded. Continued use with this product but please pay particular attention to the warnings indicated by mistake, keep the SD Memory Card out of...

Operation Manual
Page 7
...when the difference in the tripod socket on the camera. 5 • If the camera is subjected to rapid temperature changes, condensation may damage the exterior of the camera or the LCD monitor. • When using an SD Memory Card" (p.18) regarding the SD Memory Card. • Please do not press forcefully on ...the LCD monitor. This could cause breakage or malfunction. • Be careful not to sit down with the camera in your back...
...when the difference in the tripod socket on the camera. 5 • If the camera is subjected to rapid temperature changes, condensation may damage the exterior of the camera or the LCD monitor. • When using an SD Memory Card" (p.18) regarding the SD Memory Card. • Please do not press forcefully on ...the LCD monitor. This could cause breakage or malfunction. • Be careful not to sit down with the camera in your back...

Operation Manual
Page 8
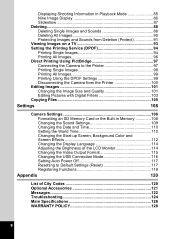
... Names of Operating Parts 12 Getting Started 13 Attaching the Strap 13 Powering the Camera 14 Installing the Batteries 14 Using the AC Adapter (optional 16 Installing the SD Memory Card 17 Recorded Pixels and Quality 19 Turning the Camera On and Off 21 Playback Only Mode 21 Voice Recording Only Mode 22 Initial... the Menus 33 Example of Menu Operation 34 Enlarging a Menu Display 36 Menu List 37 Taking Pictures 39 Setting the Shooting Functions 39 Letting the Camera Set the Functions (Easy Mode 39 Using the Help Function 40 6
... Names of Operating Parts 12 Getting Started 13 Attaching the Strap 13 Powering the Camera 14 Installing the Batteries 14 Using the AC Adapter (optional 16 Installing the SD Memory Card 17 Recorded Pixels and Quality 19 Turning the Camera On and Off 21 Playback Only Mode 21 Voice Recording Only Mode 22 Initial... the Menus 33 Example of Menu Operation 34 Enlarging a Menu Display 36 Menu List 37 Taking Pictures 39 Setting the Shooting Functions 39 Letting the Camera Set the Functions (Easy Mode 39 Using the Help Function 40 6
Operation Manual
Page 10
... the Printer 100 Editing Images 101 Changing the Image Size and Quality 101 Editing Pictures with Digital Filters 103 Copying Files 105 Settings 108 Camera Settings 108 Formatting an SD Memory Card or the Built-in Memory 108 Changing the Sound Settings 109 Changing the Date and Time 110 Setting the World Time 110 Changing...
... the Printer 100 Editing Images 101 Changing the Image Size and Quality 101 Editing Pictures with Digital Filters 103 Copying Files 105 Settings 108 Camera Settings 108 Formatting an SD Memory Card or the Built-in Memory 108 Changing the Sound Settings 109 Changing the Date and Time 110 Setting the World Time 110 Changing...
Operation Manual
Page 19
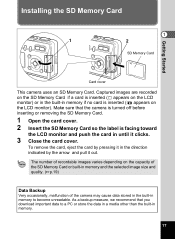
... it out. Installing the SD Memory Card 1 1 2 SD Memory Card Getting Started Card cover This camera uses an SD Memory Card. Make sure that you download important data to become unreadable. As a backup measure, we recommend that the camera is turned off before inserting or removing the SD Memory Card. 1 Open the card cover. 2 Insert the SD Memory Card so the label is inserted...
... it out. Installing the SD Memory Card 1 1 2 SD Memory Card Getting Started Card cover This camera uses an SD Memory Card. Make sure that you download important data to become unreadable. As a backup measure, we recommend that the camera is turned off before inserting or removing the SD Memory Card. 1 Open the card cover. 2 Insert the SD Memory Card so the label is inserted...
Operation Manual
Page 20
... to be hot. • Do not remove the SD Memory Card or turn the camera off before opening the card cover. • The SD Memory Card is being recorded on the card, images or voice memos are taking moving pictures even when there is not used on another camera. PENTAX does not accept any liability for instructions on formatting...
... to be hot. • Do not remove the SD Memory Card or turn the camera off before opening the card cover. • The SD Memory Card is being recorded on the card, images or voice memos are taking moving pictures even when there is not used on another camera. PENTAX does not accept any liability for instructions on formatting...

Operation Manual
Page 22
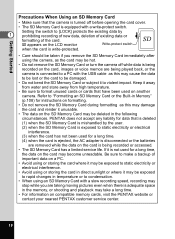
number of Recordable Images by PENTAX and may vary depending on the subject, shooting conditions, capture mode, SD Memory Card, etc. 20 Approx. 16 min. 1024×7680 Approx. 25 Approx. 47 Approx. 62 640×480 Approx. 57 Approx. 89 Approx. 119 • The .... 12 Approx. 18 1600×1200 Approx. 11 Approx. 20 Approx. 28 Approx. 33 sec. Getting Started The Number of images when using a 16MB SD Memory Card. • The above table indicates the approx.
number of Recordable Images by PENTAX and may vary depending on the subject, shooting conditions, capture mode, SD Memory Card, etc. 20 Approx. 16 min. 1024×7680 Approx. 25 Approx. 47 Approx. 62 640×480 Approx. 57 Approx. 89 Approx. 119 • The .... 12 Approx. 18 1600×1200 Approx. 11 Approx. 20 Approx. 28 Approx. 33 sec. Getting Started The Number of images when using a 16MB SD Memory Card. • The above table indicates the approx.

Operation Manual
Page 28
... focusing area on the LCD monitor. w: enlarges the area captured by the camera. 04/25/2004 10:25 Focus frame You can change the captured area by looking through the viewfinder. 4 5 26 As there is recorded on the SD Memory Card or in the built-in the middle of the LCD monitor indicates... the zone of the viewfinder blink alternately while the image is in the viewfinder, be sure to R. 3 Check the image on the LCD monitor. The focus frame in memory. You can check the captured...
... focusing area on the LCD monitor. w: enlarges the area captured by the camera. 04/25/2004 10:25 Focus frame You can change the captured area by looking through the viewfinder. 4 5 26 As there is recorded on the SD Memory Card or in the built-in the middle of the LCD monitor indicates... the zone of the viewfinder blink alternately while the image is in the viewfinder, be sure to R. 3 Check the image on the LCD monitor. The focus frame in memory. You can check the captured...

Operation Manual
Page 40
... USB connection mode For turning off the power automatically after a fixed time For registering a function on the four-way controller (2345) For returning the camera settings to defaults Page p.108 p.109 p.110 p.110 p.114 p.112 p.114 p.115 p.116 p.117 p.118 p.117 38 Common Operations [Q Playback]...images successively p.87 Resize For changing the size of images p.101 Copy image/sound For copying files from the built-in memory to the SD Memory Card and vice versa p.105 Digital Filter For creating a filter effect using color filters (red, blue, green, etc.) p.103 3 Quick Zoom Quick ...
... USB connection mode For turning off the power automatically after a fixed time For registering a function on the four-way controller (2345) For returning the camera settings to defaults Page p.108 p.109 p.110 p.110 p.114 p.112 p.114 p.115 p.116 p.117 p.118 p.117 38 Common Operations [Q Playback]...images successively p.87 Resize For changing the size of images p.101 Copy image/sound For copying files from the built-in memory to the SD Memory Card and vice versa p.105 Digital Filter For creating a filter effect using color filters (red, blue, green, etc.) p.103 3 Quick Zoom Quick ...

Operation Manual
Page 54
...; You can continue shooting until the built-in focus. 3 Press the shutter release button fully. The focus frame turns green if the subject is in memory or the SD Memory Card is pressed. Taking Pictures 04/25/2004 10:25 2 Press the shutter release button halfway. d R + .
...; You can continue shooting until the built-in focus. 3 Press the shutter release button fully. The focus frame turns green if the subject is in memory or the SD Memory Card is pressed. Taking Pictures 04/25/2004 10:25 2 Press the shutter release button halfway. d R + .
Operation Manual
Page 78
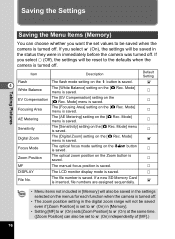
...P DISPLAY The LCD monitor display mode is inserted, file numbers are assigned sequentially. If a new SD Memory Card is saved. If you select P (Off), the settings will be reset to the defaults when the camera is saved. Item Flash 4 White Balance Description The flash mode setting on the menus for each function... also be saved in the settings selected on the b button is turned off . • The zoom position setting in the digital zoom range will be saved in the status they were in [Memory]. • Setting [MF] to O (On) sets [Zoom Position] to O (On) at the same time. ([Zoom Position]...
...P DISPLAY The LCD monitor display mode is inserted, file numbers are assigned sequentially. If a new SD Memory Card is saved. If you select P (Off), the settings will be reset to the defaults when the camera is saved. Item Flash 4 White Balance Description The flash mode setting on the menus for each function... also be saved in the settings selected on the b button is turned off . • The zoom position setting in the digital zoom range will be saved in the status they were in [Memory]. • Setting [MF] to O (On) sets [Zoom Position] to O (On) at the same time. ([Zoom Position]...

Operation Manual
Page 80
The recordable time appears on the LCD monitor according to how much space is available on the SD Memory Card or the built-in WAVE monaural files. • The microphone is saved in memory. 2, 3 4 1 Microphone Speaker 51 2 3 4 Set the mode dial to obtain the best sound. ... during recording. 00 : 01 : 22 Press the shutter release button. Recording stops. Aim the camera to O and press the power switch. SHUTTER S t a r t 2 To exit Voice Recording mode, turn the camera off. • Sound is located on the LCD monitor. 1 Remaining recordable time 2 Recording time...
The recordable time appears on the LCD monitor according to how much space is available on the SD Memory Card or the built-in WAVE monaural files. • The microphone is saved in memory. 2, 3 4 1 Microphone Speaker 51 2 3 4 Set the mode dial to obtain the best sound. ... during recording. 00 : 01 : 22 Press the shutter release button. Recording stops. Aim the camera to O and press the power switch. SHUTTER S t a r t 2 To exit Voice Recording mode, turn the camera off. • Sound is located on the LCD monitor. 1 Remaining recordable time 2 Recording time...

Operation Manual
Page 89
Protect 3 Use the four-way controller (23) DPOF Slideshow 6 3sec to change the playback interval. Resize Copy image/sound 4 Use the four-way controller (45) Digital Filter MENU E x i t OK OK to select [Slideshow]. Playback The [Q Playback] menu appears. Choose from the following: 1 sec, 3 sec, 5 sec,...the slideshow. 2 Press the MENU button. 1, 3, 4 5 2 Slideshow You can play back all the images on the SD Memory Card or in the builtin memory continuously. 1 Enter the Playback mode and use the four-way controller (45) to choose the image with a voice memo will ...
Protect 3 Use the four-way controller (23) DPOF Slideshow 6 3sec to change the playback interval. Resize Copy image/sound 4 Use the four-way controller (45) Digital Filter MENU E x i t OK OK to select [Slideshow]. Playback The [Q Playback] menu appears. Choose from the following: 1 sec, 3 sec, 5 sec,...the slideshow. 2 Press the MENU button. 1, 3, 4 5 2 Slideshow You can play back all the images on the SD Memory Card or in the builtin memory continuously. 1 Enter the Playback mode and use the four-way controller (45) to choose the image with a voice memo will ...

Operation Manual
Page 92
... cannot be omitted. (1p.89) Playback/Deleting/Editing 90 The Delete All screen appears. 1 2 3 Deleting All Images You can delete all images & sounds on the memory card?
... cannot be omitted. (1p.89) Playback/Deleting/Editing 90 The Delete All screen appears. 1 2 3 Deleting All Images You can delete all images & sounds on the memory card?
Operation Manual
Page 94
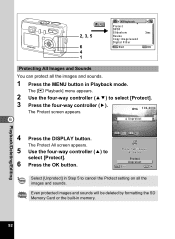
.... 5 Use the four-way controller (2) to Protect all the images and sounds. MENU 2, 3, 5 6 4 1 Playback Protect DPOF Slideshow Resize Copy image/sound Digital Filter MENU E x i t 3sec OK OK Protecting All Images and Sounds You can protect all the images and sounds. 1 Press the MENU button in Step 5...all images & sounds select [Protect]. 6 Press the OK button. Even protected images and sounds will be deleted by formatting the SD Memory Card or the built-in memory. Playback/Deleting/Editing 92 The Protect screen appears. 100-0004 6 Unprotect 4 Press the DISPLAY button.
.... 5 Use the four-way controller (2) to Protect all the images and sounds. MENU 2, 3, 5 6 4 1 Playback Protect DPOF Slideshow Resize Copy image/sound Digital Filter MENU E x i t 3sec OK OK Protecting All Images and Sounds You can protect all the images and sounds. 1 Press the MENU button in Step 5...all images & sounds select [Protect]. 6 Press the OK button. Even protected images and sounds will be deleted by formatting the SD Memory Card or the built-in memory. Playback/Deleting/Editing 92 The Protect screen appears. 100-0004 6 Unprotect 4 Press the DISPLAY button.
Operation Manual
Page 96
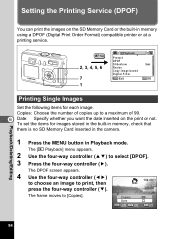
... 3sec OK OK Printing Single Images Set the following items for images stored in the built-in memory, check that there is no SD Memory Card inserted in the camera. 1 Press the MENU button in memory using a DPOF (Digital Print Order Format) compatible printer or at a printing service. The DPOF screen appears. 4 Use ...way controller (5). Copies: Choose the number of copies up to a maximum of 99. 6 Date: Specify whether you want the date inserted on the SD Memory Card or the built-in Playback mode. To set the items for each image. Copies Date MENU E x i t DISP A l l 00 OK OK...
... 3sec OK OK Printing Single Images Set the following items for images stored in the built-in memory, check that there is no SD Memory Card inserted in the camera. 1 Press the MENU button in memory using a DPOF (Digital Print Order Format) compatible printer or at a printing service. The DPOF screen appears. 4 Use ...way controller (5). Copies: Choose the number of copies up to a maximum of 99. 6 Date: Specify whether you want the date inserted on the SD Memory Card or the built-in Playback mode. To set the items for each image. Copies Date MENU E x i t DISP A l l 00 OK OK...

Operation Manual
Page 97
... to DPOF settings at a photo processing lab., follow the procedure in "Copying Files" (p.105 - 106) and copy the files from the built-in memory to the SD Memory Card first. 6 • You cannot set the printing service for moving pictures or sound-only files. • Depending on the printer or printing equipment at...., the date may not be imprinted on the pictures even if the DPOF setting was made. • Pictures may not be printed correctly when the camera is connected directly to choose the number of copies and date setting will be imprinted. 7 Press the OK button.
... to DPOF settings at a photo processing lab., follow the procedure in "Copying Files" (p.105 - 106) and copy the files from the built-in memory to the SD Memory Card first. 6 • You cannot set the printing service for moving pictures or sound-only files. • Depending on the printer or printing equipment at...., the date may not be imprinted on the pictures even if the DPOF setting was made. • Pictures may not be printed correctly when the camera is connected directly to choose the number of copies and date setting will be imprinted. 7 Press the OK button.

Operation Manual
Page 103
... Protect DPOF Slideshow Resize Copy image/sound Digital Filter MENU E x i t 3sec OK OK Changing the Image Size and Quality By changing the size and quality of a selected image, you can use this function to continue taking pictures when the SD Memory Card or the built-in memory is full, by making the images smaller...
... Protect DPOF Slideshow Resize Copy image/sound Digital Filter MENU E x i t 3sec OK OK Changing the Image Size and Quality By changing the size and quality of a selected image, you can use this function to continue taking pictures when the SD Memory Card or the built-in memory is full, by making the images smaller...

Operation Manual
Page 107
...]. 3 Press the four-way controller (5). Be sure to turn the camera off before inserting or removing the SD Memory Card. 6 1 Press the MENU button in the camera. When files are copied from the built-in memory to the SD Memory Card and vice versa. Resize Copy image/sound Digital Filter MENU E x i t OK OK Playback/Deleting/Editing 105 Copying...
...]. 3 Press the four-way controller (5). Be sure to turn the camera off before inserting or removing the SD Memory Card. 6 1 Press the MENU button in the camera. When files are copied from the built-in memory to the SD Memory Card and vice versa. Resize Copy image/sound Digital Filter MENU E x i t OK OK Playback/Deleting/Editing 105 Copying...

Operation Manual
Page 108
Copy image/sound All the files are copied to the built-in memory, it is copied from the SD Memory Card to the SD Memory Card. Cancel MENU E x i t OK OK To Copy Files from the SD Memory Card to the Built-in Memory to the SD Memory Card 4 Use the four-way controller (23) to select [ ’ ...] and press the OK button. To Copy Files from the Built-in Memory 5 Use ...
Copy image/sound All the files are copied to the built-in memory, it is copied from the SD Memory Card to the SD Memory Card. Cancel MENU E x i t OK OK To Copy Files from the SD Memory Card to the Built-in Memory to the SD Memory Card 4 Use the four-way controller (23) to select [ ’ ...] and press the OK button. To Copy Files from the Built-in Memory 5 Use ...

