Operation Manual
Page 1
... to change without notice. 57351 Copyright © PENTAX Corporation 2004 01-200402 Printed in Japan Digital Camera Operating Manual To ensure the best performance from your camera, please read the Operating Manual before using the camera. Limited PENTAX House, Heron Drive, Langley, Slough, Berks SL3 8PN, U.K. (http://www.pentax.co.uk) PENTAX France S.A.S. 12/14, rue Jean Poulmarch...
... to change without notice. 57351 Copyright © PENTAX Corporation 2004 01-200402 Printed in Japan Digital Camera Operating Manual To ensure the best performance from your camera, please read the Operating Manual before using the camera. Limited PENTAX House, Heron Drive, Langley, Slough, Berks SL3 8PN, U.K. (http://www.pentax.co.uk) PENTAX France S.A.S. 12/14, rue Jean Poulmarch...
Operation Manual
Page 2
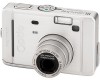
...II. To users of this manual are for the direct printout of the copyright as laid out in this camera • There is manufactured using the Optio S40 that are different form the actual product. Copyright 2001 Seiko Epson Corporation. PRINT Image Matching II is 99...electromagnetic radiation or magnetic fields. • The liquid crystal panel used in order to the rights as items for buying the PENTAX Optio S40 Digital Camera. Keep this has no effect on taking pictures even for personal enjoyment during demonstrations, industrial enterprise or as specified in the ...
...II. To users of this manual are for the direct printout of the copyright as laid out in this camera • There is manufactured using the Optio S40 that are different form the actual product. Copyright 2001 Seiko Epson Corporation. PRINT Image Matching II is 99...electromagnetic radiation or magnetic fields. • The liquid crystal panel used in order to the rights as items for buying the PENTAX Optio S40 Digital Camera. Keep this has no effect on taking pictures even for personal enjoyment during demonstrations, industrial enterprise or as specified in the ...
Operation Manual
Page 10
...Images on a TV 93 Setting the Printing Service (DPOF 94 Printing Single Images 94 Printing All Images 96 Direct Printing Using PictBridge 97 Connecting the Camera to the Printer 97 Printing Single Images 98 Printing All Images 99 Printing Using the DPOF Settings 99 Disconnecting the... the Printer 100 Editing Images 101 Changing the Image Size and Quality 101 Editing Pictures with Digital Filters 103 Copying Files 105 Settings 108 Camera Settings 108 Formatting an SD Memory Card or the Built-in Memory 108 Changing the Sound Settings 109 Changing the Date and Time 110 Setting ...
...Images on a TV 93 Setting the Printing Service (DPOF 94 Printing Single Images 94 Printing All Images 96 Direct Printing Using PictBridge 97 Connecting the Camera to the Printer 97 Printing Single Images 98 Printing All Images 99 Printing Using the DPOF Settings 99 Disconnecting the... the Printer 100 Editing Images 101 Changing the Image Size and Quality 101 Editing Pictures with Digital Filters 103 Copying Files 105 Settings 108 Camera Settings 108 Formatting an SD Memory Card or the Built-in Memory 108 Changing the Sound Settings 109 Changing the Date and Time 110 Setting ...

Operation Manual
Page 39
...Focusing Area For changing the area of [ ] the autofocus (Multiple) - Yes No p.71 For saving the shooting Memory function settings when ∗ the camera is the only menu available in - Mode] menu in O mode. • [Image Quality] is turned off - p.65 3 Recorded Pixels For ... Yes No p.64 White Balance For adjusting the color balance according to determine the exposure L (Multi-segment) - Yes No p.70 Digital Zoom For taking digital zoom pictures On - Yes Yes p.49 Instant Review For setting the Instant Review time 0.5 sec - Yes Yes p.75 ∗ ...
...Focusing Area For changing the area of [ ] the autofocus (Multiple) - Yes No p.71 For saving the shooting Memory function settings when ∗ the camera is the only menu available in - Mode] menu in O mode. • [Image Quality] is turned off - p.65 3 Recorded Pixels For ... Yes No p.64 White Balance For adjusting the color balance according to determine the exposure L (Multi-segment) - Yes No p.70 Digital Zoom For taking digital zoom pictures On - Yes Yes p.49 Instant Review For setting the Instant Review time 0.5 sec - Yes Yes p.75 ∗ ...

Operation Manual
Page 40
... the size of images p.101 Copy image/sound For copying files from the built-in memory to the SD Memory Card and vice versa p.105 Digital Filter For creating a filter effect using color filters (red, blue, green, etc.) p.103 3 Quick Zoom Quick Delete For playing back images at the maximum zoom... the USB connection mode For turning off the power automatically after a fixed time For registering a function on the four-way controller (2345) For returning the camera settings to defaults Page p.108 p.109 p.110 p.110 p.114 p.112 p.114 p.115 p.116 p.117 p.118 p.117 38
... the size of images p.101 Copy image/sound For copying files from the built-in memory to the SD Memory Card and vice versa p.105 Digital Filter For creating a filter effect using color filters (red, blue, green, etc.) p.103 3 Quick Zoom Quick Delete For playing back images at the maximum zoom... the USB connection mode For turning off the power automatically after a fixed time For registering a function on the four-way controller (2345) For returning the camera settings to defaults Page p.108 p.109 p.110 p.110 p.114 p.112 p.114 p.115 p.116 p.117 p.118 p.117 38
Operation Manual
Page 48
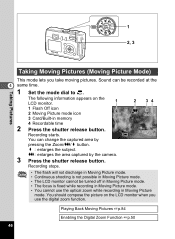
... monitor. 1 2 34 1 Flash Off icon 2 Moving Picture mode icon 3 Card/Built-in Moving Picture mode. • You cannot use the digital zoom function. 1 2, 3 Taking Pictures Taking Moving Pictures (Moving Picture Mode) This mode lets you use the optical zoom while recording in Moving Picture...fixed while recording in memory 00:01:23 4 Recordable time 2 Press the shutter release button. Sound can change the captured area by the camera. 3 Press the shutter release button. Recording stops. • The flash will not discharge in Moving Picture mode. • Continuous shooting...
... monitor. 1 2 34 1 Flash Off icon 2 Moving Picture mode icon 3 Card/Built-in Moving Picture mode. • You cannot use the digital zoom function. 1 2, 3 Taking Pictures Taking Moving Pictures (Moving Picture Mode) This mode lets you use the optical zoom while recording in Moving Picture...fixed while recording in memory 00:01:23 4 Recordable time 2 Press the shutter release button. Sound can change the captured area by the camera. 3 Press the shutter release button. Recording stops. • The flash will not discharge in Moving Picture mode. • Continuous shooting...
Operation Manual
Page 51
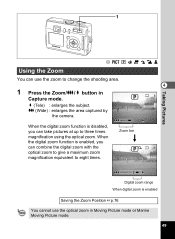
... Pictures - H = Using the Zoom You can use the optical zoom in Capture mode. w (Wide) : enlarges the area captured by the camera. 4 4 When the digital zoom function is enabled Saving the Zoom Position 1p.76 You cannot use the zoom to change the shooting area. 1 Press the Zoom/w/x button in... Moving Picture mode or Marine Moving Picture mode. 49 Digital zoom range When digital zoom is disabled, you can take pictures at up to eight times. x (Tele) : enlarges the subject. d R + C . When the...
... Pictures - H = Using the Zoom You can use the optical zoom in Capture mode. w (Wide) : enlarges the area captured by the camera. 4 4 When the digital zoom function is enabled Saving the Zoom Position 1p.76 You cannot use the zoom to change the shooting area. 1 Press the Zoom/w/x button in... Moving Picture mode or Marine Moving Picture mode. 49 Digital zoom range When digital zoom is disabled, you can take pictures at up to eight times. x (Tele) : enlarges the subject. d R + C . When the...

Operation Manual
Page 52
... the four-way controller (45) Instant Review Memory 0.5sec to select [Digital Zoom]. Contrast MENU E x i t OK OK The camera is O (On). Enabling the Digital Zoom Function 1 Press the MENU button in Capture mode. The [A Rec. Sharpness Saturation 4 Press the OK button. The digital zoom is disabled when you turn the LCD monitor off, even...
... the four-way controller (45) Instant Review Memory 0.5sec to select [Digital Zoom]. Contrast MENU E x i t OK OK The camera is O (On). Enabling the Digital Zoom Function 1 Press the MENU button in Capture mode. The [A Rec. Sharpness Saturation 4 Press the OK button. The digital zoom is disabled when you turn the LCD monitor off, even...
Operation Manual
Page 58
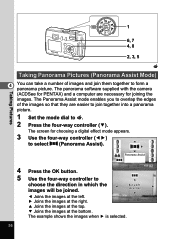
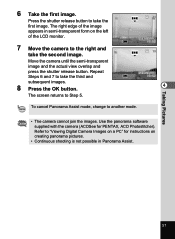
... you to overlap the edges of images and join them together to +. 2 Press the four-way controller (3). The screen for choosing a digital effect mode appears. 3 Use the four-way controller (45) to choose the direction in which the images will be joined. Use the ...four-way controller to select F (Panorama Assist). The panorama software supplied with the camera (ACDSee for PENTAX) and a computer are easier to join together into a panorama picture. 1 Set the mode dial to form a panorama picture. 1 Taking Pictures 6, 7 4, 8 2, 3, ...
... you to overlap the edges of images and join them together to +. 2 Press the four-way controller (3). The screen for choosing a digital effect mode appears. 3 Use the four-way controller (45) to choose the direction in which the images will be joined. Use the ...four-way controller to select F (Panorama Assist). The panorama software supplied with the camera (ACDSee for PENTAX) and a computer are easier to join together into a panorama picture. 1 Set the mode dial to form a panorama picture. 1 Taking Pictures 6, 7 4, 8 2, 3, ...
Operation Manual
Page 59
... third and subsequent images. 8 Press the OK button. The right edge of the LCD monitor. 7 Move the camera to take the first image. Move the camera until the semi-transparent image and the actual view overlap and press the shutter release button. Repeat Steps 6 and...change to "Viewing Digital Camera Images on the left of the image appears in Panorama Assist. Use the panorama software supplied with the camera (ACDSee for instructions on creating panorama pictures. • Continuous shooting is not possible in semi-transparent form on a PC" for PENTAX, ACD Photostitcher). ...
... third and subsequent images. 8 Press the OK button. The right edge of the LCD monitor. 7 Move the camera to take the first image. Move the camera until the semi-transparent image and the actual view overlap and press the shutter release button. Repeat Steps 6 and...change to "Viewing Digital Camera Images on the left of the image appears in Panorama Assist. Use the panorama software supplied with the camera (ACDSee for instructions on creating panorama pictures. • Continuous shooting is not possible in semi-transparent form on a PC" for PENTAX, ACD Photostitcher). ...
Operation Manual
Page 60
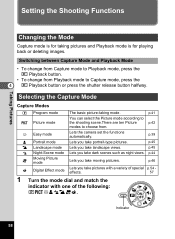
... the camera set the functions automatically. p.39 = Portrait mode Lets you take moving pictures. p.44 C Moving Picture mode Lets you take pictures with one of special p.54 - Selecting the Capture Mode Capture Modes R Program mode The basic picture-taking pictures and Playback mode is for taking mode. p.45 . Indicator 58 p.46 + Digital...
... the camera set the functions automatically. p.39 = Portrait mode Lets you take moving pictures. p.44 C Moving Picture mode Lets you take pictures with one of special p.54 - Selecting the Capture Mode Capture Modes R Program mode The basic picture-taking pictures and Playback mode is for taking mode. p.45 . Indicator 58 p.46 + Digital...
Operation Manual
Page 62
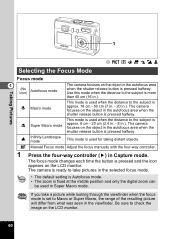
... pictures in the selected focus mode. • The default setting is Autofocus mode. • The zoom is fixed at the middle position and only the digital zoom can be used when the distance to check the image on the LCD monitor. 60 q Macro mode This mode is approx. 18 cm - 50... the icon appears on the object in the autofocus area when the shutter release button is more than 40 cm (16 in Capture mode. The camera is ready to the subject is used when the distance to take a picture while looking through the viewfinder when the focus mode is set to...
... pictures in the selected focus mode. • The default setting is Autofocus mode. • The zoom is fixed at the middle position and only the digital zoom can be used when the distance to check the image on the LCD monitor. 60 q Macro mode This mode is approx. 18 cm - 50... the icon appears on the object in the autofocus area when the shutter release button is more than 40 cm (16 in Capture mode. The camera is ready to the subject is used when the distance to take a picture while looking through the viewfinder when the focus mode is set to...
Operation Manual
Page 73
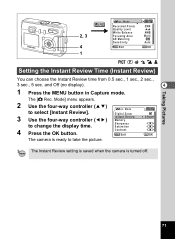
...OK button. Taking Pictures 71 Digital Zoom 3 Use the four-way controller (45) Instant Review Memory 0.5sec to select [Instant Review]. and Off (no display). 4 1 Press the MENU button in Capture mode. The Instant Review setting is saved when the camera is ready to take the ... 2304 AWB Multi Auto OK OK d R + . Mode] menu appears. 2 Use the four-way controller (23) Rec. Contrast MENU E x i t OK OK The camera is turned off. H = Setting the Instant Review Time (Instant Review) You can choose the Instant Review time from 0.5 sec., 1 sec., 2 sec., 3 sec., 5 sec.
...OK button. Taking Pictures 71 Digital Zoom 3 Use the four-way controller (45) Instant Review Memory 0.5sec to select [Instant Review]. and Off (no display). 4 1 Press the MENU button in Capture mode. The Instant Review setting is saved when the camera is ready to take the ... 2304 AWB Multi Auto OK OK d R + . Mode] menu appears. 2 Use the four-way controller (23) Rec. Contrast MENU E x i t OK OK The camera is turned off. H = Setting the Instant Review Time (Instant Review) You can choose the Instant Review time from 0.5 sec., 1 sec., 2 sec., 3 sec., 5 sec.

Operation Manual
Page 74
...image to have sharp or soft 4 outlines. 1 Press the MENU button in d, H and = modes. • The Sharpness setting is saved when the camera is ready to take the picture. • Any changes made to the Sharpness setting are invalid in Capture mode. Mode to z [Hard (+)] or Contrast... Quality Level White Balance Focusing Area AE Metering Sensitivity MENU E x i t 2304 AWB Multi Auto OK OK R + . Taking Pictures MENU 2, 3 4 1 Rec. The camera is turned off. 72 Mode] menu appears. 2 Use the four-way controller (23) Rec. MENU E x i t OK OK 4 Press the OK button. The [A Rec...
...image to have sharp or soft 4 outlines. 1 Press the MENU button in d, H and = modes. • The Sharpness setting is saved when the camera is ready to take the picture. • Any changes made to the Sharpness setting are invalid in Capture mode. Mode to z [Hard (+)] or Contrast... Quality Level White Balance Focusing Area AE Metering Sensitivity MENU E x i t 2304 AWB Multi Auto OK OK R + . Taking Pictures MENU 2, 3 4 1 Rec. The camera is turned off. 72 Mode] menu appears. 2 Use the four-way controller (23) Rec. MENU E x i t OK OK 4 Press the OK button. The [A Rec...
Operation Manual
Page 75
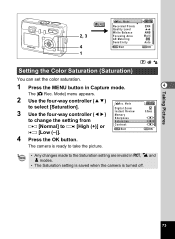
... Focusing Area AE Metering Sensitivity MENU E x i t 2304 AWB Multi Auto OK OK R + . Mode] menu appears. 2 Use the four-way controller (23) Rec. The camera is turned off. 73 Digital Zoom 3 Use the four-way controller (45) Instant Review Memory 0.5sec to change the setting from Sharpness Saturation x [Normal] to select [Saturation]. Setting...
... Focusing Area AE Metering Sensitivity MENU E x i t 2304 AWB Multi Auto OK OK R + . Mode] menu appears. 2 Use the four-way controller (23) Rec. The camera is turned off. 73 Digital Zoom 3 Use the four-way controller (45) Instant Review Memory 0.5sec to change the setting from Sharpness Saturation x [Normal] to select [Saturation]. Setting...
Operation Manual
Page 76
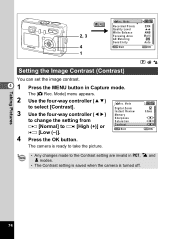
Mode] menu appears. 2 Use the four-way controller (23) Rec. Mode to z [High (+)] or Contrast y [Low (-)]. Digital Zoom 3 Use the four-way controller (45) Instant Review Memory 0.5sec to change the setting from Sharpness Saturation x [Normal] to select [Contrast]. Setting ... Contrast (Contrast) You can set the image contrast. 4 1 Press the MENU button in d, H and = modes. • The Contrast setting is saved when the camera is ready to take the picture. • Any changes made to the Contrast setting are invalid in Capture mode. Mode Recorded Pixels Quality Level White...
Mode] menu appears. 2 Use the four-way controller (23) Rec. Mode to z [High (+)] or Contrast y [Low (-)]. Digital Zoom 3 Use the four-way controller (45) Instant Review Memory 0.5sec to change the setting from Sharpness Saturation x [Normal] to select [Contrast]. Setting ... Contrast (Contrast) You can set the image contrast. 4 1 Press the MENU button in d, H and = modes. • The Contrast setting is saved when the camera is ready to take the picture. • Any changes made to the Contrast setting are invalid in Capture mode. Mode Recorded Pixels Quality Level White...
Operation Manual
Page 78
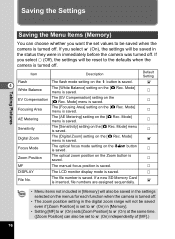
... on the [A Rec. P Focusing Area The [Focusing Area] setting on the [A Rec. Mode] menu is turned off . • The zoom position setting in the digital zoom range will also be saved in [Memory]. • Setting [MF] to O (On) sets [Zoom Position] to O (On) at the same time. ([Zoom... is saved. If a new SD Memory Card is set to the defaults when the camera is saved. O • Menu items not included in immediately before the camera was turned off . Mode] menu is saved. P Digital Zoom The [Digital Zoom] setting on the [A Rec. Mode] menu is saved. Item Flash 4 White...
... on the [A Rec. P Focusing Area The [Focusing Area] setting on the [A Rec. Mode] menu is turned off . • The zoom position setting in the digital zoom range will also be saved in [Memory]. • Setting [MF] to O (On) sets [Zoom Position] to O (On) at the same time. ([Zoom... is saved. If a new SD Memory Card is set to the defaults when the camera is saved. O • Menu items not included in immediately before the camera was turned off . Mode] menu is saved. P Digital Zoom The [Digital Zoom] setting on the [A Rec. Mode] menu is saved. Item Flash 4 White...

Operation Manual
Page 79
... controller (45) White Balance EV Compensation to take the picture. Mode] menu appears. 2 Use the four-way controller (23) Rec. Sensitivity MENU E x i t OK OK The camera is ready to select O (On) or P (Off). Digital Zoom 3 Press the four-way controller (5). Focusing Area AE Metering 6 Press the OK button twice.
... controller (45) White Balance EV Compensation to take the picture. Mode] menu appears. 2 Use the four-way controller (23) Rec. Sensitivity MENU E x i t OK OK The camera is ready to select O (On) or P (Off). Digital Zoom 3 Press the four-way controller (5). Focusing Area AE Metering 6 Press the OK button twice.

Operation Manual
Page 85
... Copy image/sound Digital Filter MENU E x i t 3sec OK OK Setting the Quick Zoom Function You can display the image at maximum magnification. The [Q Playback] menu appears. 2 Use the four-way controller (23) to select [Quick Zoom]. 3 Use the four-way controller (45) to take or play back images. The camera is ready...
... Copy image/sound Digital Filter MENU E x i t 3sec OK OK Setting the Quick Zoom Function You can display the image at maximum magnification. The [Q Playback] menu appears. 2 Use the four-way controller (23) to select [Quick Zoom]. 3 Use the four-way controller (45) to take or play back images. The camera is ready...
Operation Manual
Page 118
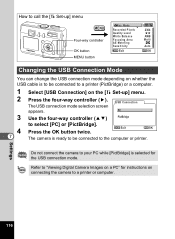
...four-way controller (23) PictBridge 4 7 to your PC while [PictBridge] is selected for instructions on connecting the camera to a printer or computer. The camera is to be connected to the computer or printer. Settings 116 Mode Recorded Pixels Quality Level White Balance Focusing Area AE..." for the USB connection mode. USB Connection The USB connection mode selection screen appears. Do not connect the camera to select [PC] or [PictBridge]. Refer to "Viewing Digital Camera Images on the [B Set-up ] menu MENU Four-way controller OK button MENU button Rec. How to ...
...four-way controller (23) PictBridge 4 7 to your PC while [PictBridge] is selected for instructions on connecting the camera to a printer or computer. The camera is to be connected to the computer or printer. Settings 116 Mode Recorded Pixels Quality Level White Balance Focusing Area AE..." for the USB connection mode. USB Connection The USB connection mode selection screen appears. Do not connect the camera to select [PC] or [PictBridge]. Refer to "Viewing Digital Camera Images on the [B Set-up ] menu MENU Four-way controller OK button MENU button Rec. How to ...


