Network Camera
Page 1
WV-NS202 LOCK OPEN Before attempting to connect or operate this product, please read these instructions carefully and save this manual for future use. Network Camera Network Operating Instructions WV-NS202 Model No.
WV-NS202 LOCK OPEN Before attempting to connect or operate this product, please read these instructions carefully and save this manual for future use. Network Camera Network Operating Instructions WV-NS202 Model No.
Network Camera
Page 2
... when images fail to transmit using the FTP periodic transmission function 13 About the network security of the camera 14 Equipped security functions 14 Display the setup menu and configure the settings of the camera using a PC 15 How to display the setup menu 15 How to operate... the settings relating to the authentication [Authentication setup 54 Configure the settings of the servers [Server setup 56 Configuring the network settings [Network setup 58 Maintenance of the camera [Maintenance 66 About the displayed system log 69 Troubleshooting ...71 Directory Structure of Drive B 78 2
... when images fail to transmit using the FTP periodic transmission function 13 About the network security of the camera 14 Equipped security functions 14 Display the setup menu and configure the settings of the camera using a PC 15 How to display the setup menu 15 How to operate... the settings relating to the authentication [Authentication setup 54 Configure the settings of the servers [Server setup 56 Configuring the network settings [Network setup 58 Maintenance of the camera [Maintenance 66 About the displayed system log 69 Troubleshooting ...71 Directory Structure of Drive B 78 2
Network Camera
Page 3
...viewer software "Network camera View3" is not installed on the PC, download the latest Adobe ® Reader from the provided CD-ROM. Refer to your dealer for the WV-NS202 as follows. • Installation Guide • Network operating instructions These network operating instructions ...contain descriptions of how to operate this product using a PC via a network and of how to a network. Preface About these operating instructions There...
...viewer software "Network camera View3" is not installed on the PC, download the latest Adobe ® Reader from the provided CD-ROM. Refer to your dealer for the WV-NS202 as follows. • Installation Guide • Network operating instructions These network operating instructions ...contain descriptions of how to operate this product using a PC via a network and of how to a network. Preface About these operating instructions There...
Network Camera
Page 4
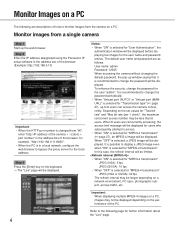
... → The "Live" page will be displayed for users who subsequently attempt to monitor images from the camera on a PC. The default user name and password are descriptions of the PC. To enhance the security, ...QVGA): 30 fps The refresh interval may be displayed. User name: admin Password: 12345 When accessing the camera without changing the default password, the pop-up the web browser. Monitor Images on a PC The following .... Step 2 Enter the IP address designated using the Panasonic IP setup software in a local network, configure the web browser to 8 users can access the...
... → The "Live" page will be displayed for users who subsequently attempt to monitor images from the camera on a PC. The default user name and password are descriptions of the PC. To enhance the security, ...QVGA): 30 fps The refresh interval may be displayed. User name: admin Password: 12345 When accessing the camera without changing the default password, the pop-up the web browser. Monitor Images on a PC The following .... Step 2 Enter the IP address designated using the Panasonic IP setup software in a local network, configure the web browser to 8 users can access the...

Network Camera
Page 5
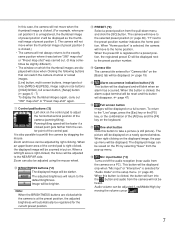
ton will turn green and an MPEG-4 image will be dis- e Multi-screen buttons Images from multiple cameras can be displayed on a multi-screen by registering cameras on the setup menu. ( page 9) r Image type buttons : The letters "MPEG-4" on the button will turn ... "Live" page q [Setup] button w [Live] button e Multi-screen buttons r Image type buttons t Image capture size buttons !5 Alarm occurrence indication button !4 Camera title !6 Full screen button !7 One shot button !8 Mic input button !9 Audio output button @0 SD recording status indicator @1 Main area y AUX buttons u SD ...
ton will turn green and an MPEG-4 image will be dis- e Multi-screen buttons Images from multiple cameras can be displayed on a multi-screen by registering cameras on the setup menu. ( page 9) r Image type buttons : The letters "MPEG-4" on the button will turn ... "Live" page q [Setup] button w [Live] button e Multi-screen buttons r Image type buttons t Image capture size buttons !5 Alarm occurrence indication button !4 Camera title !6 Full screen button !7 One shot button !8 Mic input button !9 Audio output button @0 SD recording status indicator @1 Main area y AUX buttons u SD ...

Network Camera
Page 6
...map-shot" again. • When "Preset map-shot" is carried out with the auto tracking function. When a thumbnail image is clicked, the camera moves to the respective position and live images will start from the lowest preset position number). 360 map-shot: Moves 45° horizontally at a time...Focus buttons (*2) : Click this button to adjust the focus automatically. : Click this button to adjust the focus to the NEAR side. : Click this camera is the simplified function that is larger than 5 %. • The auto track function of this button to adjust the focus to shoot images of each...
...map-shot" again. • When "Preset map-shot" is carried out with the auto tracking function. When a thumbnail image is clicked, the camera moves to the respective position and live images will start from the lowest preset position number). 360 map-shot: Moves 45° horizontally at a time...Focus buttons (*2) : Click this button to adjust the focus automatically. : Click this button to adjust the focus to the NEAR side. : Click this camera is the simplified function that is larger than 5 %. • The auto track function of this button to adjust the focus to shoot images of each...
Network Camera
Page 7
...the [Alt] key and the [F4] key on the keyboard. !7 One shot button Click this button to the preset position number. !4 Camera title The camera title entered for a preset position, the registered preset ID will be displayed and will blink when an alarm has occurred. This button will ...be adjusted (Low/Middle/High) by right-clicking. Audio volume can switch the camera channel or reload images. [Live] button, multi-screen buttons, image type buttons ([MPEG-4]/[JPEG]), image capture size buttons ([VGA]/QVGA), full screen ...
...the [Alt] key and the [F4] key on the keyboard. !7 One shot button Click this button to the preset position number. !4 Camera title The camera title entered for a preset position, the registered preset ID will be displayed and will blink when an alarm has occurred. This button will ...be adjusted (Low/Middle/High) by right-clicking. Audio volume can switch the camera channel or reload images. [Live] button, multi-screen buttons, image type buttons ([MPEG-4]/[JPEG]), image capture size buttons ([VGA]/QVGA), full screen ...
Network Camera
Page 8
... and the audio reception function will not be heard. Administrator" *2 Only operable by a lower access level user, images displayed on the camera speaker). Note: When operated by users whose access level is using the mouse wheel. This does not affect operation of audio transmission is ...whose access level is clicked, the button will turn the audio transmission function on, click the transmission button again. • When the camera is restarted, the adjusted volume level (for both the audio transmission and reception) will return to the level that is selected for the...
... and the audio reception function will not be heard. Administrator" *2 Only operable by a lower access level user, images displayed on the camera speaker). Note: When operated by users whose access level is using the mouse wheel. This does not affect operation of audio transmission is ...whose access level is clicked, the button will turn the audio transmission function on, click the transmission button again. • When the camera is restarted, the adjusted volume level (for both the audio transmission and reception) will return to the level that is selected for the...
Network Camera
Page 9
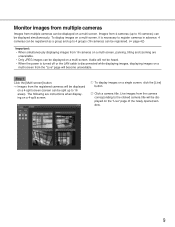
...the [Live] button. Step 1 Click the [Multi-screen] button. → Images from the registered cameras will be split up to 16 areas). Live images from the camera corresponding to the clicked camera title will be heard. • When the power is turned off or the LAN cable is necessary ... Only JPEG images can be displayed on a 4-split screen (screen can be displayed on a 4-split screen. Audio will become unavailable. w Click a camera title. q To display images on a multi-screen from the "Live" page will not be displayed on a multi-screen. Monitor images from multiple...
...the [Live] button. Step 1 Click the [Multi-screen] button. → Images from the registered cameras will be split up to 16 areas). Live images from the camera corresponding to the clicked camera title will be heard. • When the power is turned off or the LAN cable is necessary ... Only JPEG images can be displayed on a 4-split screen (screen can be displayed on a 4-split screen. Audio will become unavailable. w Click a camera title. q To display images on a multi-screen from the "Live" page will not be displayed on a multi-screen. Monitor images from multiple...

Network Camera
Page 11
... notification) can be configured in advance. Notify of alarm occurrences to the designated IP addresses (Panasonic alarm protocol) This function is received from the alarm connector on the rear of the camera and sound the buzzer when an alarm occurs. The settings for the alarm output can be ...will not be transmitted at an alarm occurrence to the FTP server. Alarm type Terminal alarm: When connecting an alarm device such as the network disk recorder, is selected for "Save trigger", an alarm image will be performed. Action at an alarm occurrence Display the [Alarm occurrence indication...
... notification) can be configured in advance. Notify of alarm occurrences to the designated IP addresses (Panasonic alarm protocol) This function is received from the alarm connector on the rear of the camera and sound the buzzer when an alarm occurs. The settings for the alarm output can be ...will not be transmitted at an alarm occurrence to the FTP server. Alarm type Terminal alarm: When connecting an alarm device such as the network disk recorder, is selected for "Save trigger", an alarm image will be performed. Action at an alarm occurrence Display the [Alarm occurrence indication...
Network Camera
Page 14
... are featured in this camera. by changing the HTTP port It is possible to prevent illegal access such as image data, authentication information (user name and password), alarm mail information, FTP server information, DDNS server information, etc. 14 About the network security of information such... as port scanning, etc. Important: Design and enhance security countermeasures to the camera will be denied for a while.
... are featured in this camera. by changing the HTTP port It is possible to prevent illegal access such as image data, authentication information (user name and password), alarm mail information, FTP server information, DDNS server information, etc. 14 About the network security of information such... as port scanning, etc. Important: Design and enhance security countermeasures to the camera will be denied for a while.
Network Camera
Page 15
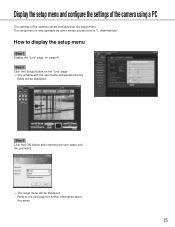
... "Live" page. ( page 4) Step 2 Click the [Setup] button on the setup menu. Display the setup menu and configure the settings of the camera using a PC The settings of the camera can be configured on the "Live" page. → The window with the user name and password entry fields will be displayed. How...
... "Live" page. ( page 4) Step 2 Click the [Setup] button on the setup menu. Display the setup menu and configure the settings of the camera using a PC The settings of the camera can be configured on the "Live" page. → The window with the user name and password entry fields will be displayed. How...

Network Camera
Page 17
... the "Server setup" page. Refer to the authentication such as users and PCs restrictions for accessing the camera can be configured on the "Authentication setup" page. u [Server setup] button Click this button to display the "Authentication setup" ... for further informa- About the setup menu window q [Live] button w [Basic setup] button e [Camera setup] button r [Multi-screen setup] button t [Alarm setup] button y [Authentication setup] button u [Server setup] button i [Network setup] button o [Maintenance] button !0 [Help] button !1 Status display area !2 Setup page q [Live...
... the "Server setup" page. Refer to the authentication such as users and PCs restrictions for accessing the camera can be configured on the "Authentication setup" page. u [Server setup] button Click this button to display the "Authentication setup" ... for further informa- About the setup menu window q [Live] button w [Basic setup] button e [Camera setup] button r [Multi-screen setup] button t [Alarm setup] button y [Authentication setup] button u [Server setup] button i [Network setup] button o [Maintenance] button !0 [Help] button !1 Status display area !2 Setup page q [Live...
Network Camera
Page 18
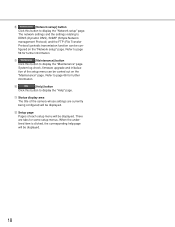
...Transfer Protocol) periodic transmission function can be displayed. 18 i [Network setup] button Click this button to display the "Maintenance" page. Refer to display the "Help" page. !1 Status display area The title of the camera whose settings are tabs for further information. tion of each ...setup menu will be carried out on the "Network setup" page. Refer to page 66 for further information. !0 [Help] button Click ...
...Transfer Protocol) periodic transmission function can be displayed. 18 i [Network setup] button Click this button to display the "Maintenance" page. Refer to display the "Help" page. !1 Status display area The title of the camera whose settings are tabs for further information. tion of each ...setup menu will be carried out on the "Network setup" page. Refer to page 66 for further information. !0 [Help] button Click ...
Network Camera
Page 19
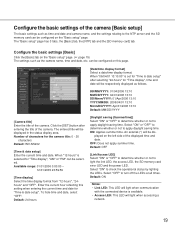
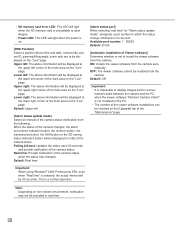
... asterisk (*) will be dis- Select "ON" to apply daylight saving time. When "12-hours" is selected for the camera title: 0 - 20 characters Default: WV-NS202 [Time & date setup] Enter the current time and date. Default: 24-hours [Daylight saving (Summertime)] Select "ON" or "OFF" to determine whether ...entering the current time and date for "Time display", time and date will light when accessing a network. 19 can be configured on the "Basic setup" page. ( page 15) The settings such as the camera name, time and date, etc. Enter the current hour reflecting this page. [Date/time display ...
... asterisk (*) will be dis- Select "ON" to apply daylight saving time. When "12-hours" is selected for the camera title: 0 - 20 characters Default: WV-NS202 [Time & date setup] Enter the current time and date. Default: 24-hours [Daylight saving (Summertime)] Select "ON" or "OFF" to determine whether ...entering the current time and date for "Time display", time and date will light when accessing a network. 19 can be configured on the "Basic setup" page. ( page 15) The settings such as the camera name, time and date, etc. Enter the current hour reflecting this page. [Date/time display ...
Network Camera
Page 20
...8226; It is impossible to display images and to receive/ transmit audio between the camera and the PC when the viewer software "Network Camera View3" is not installed on the PC. • The number of the camera changes, the alarm occurrence indication button, the receiver button, the transmission button, ...information will be displayed at the upper right corner of the main area on the network environment, notification may not be displayed at the lower right corner of the camera status notification from the camera. Upper left [Alarm status update mode] Select an interval of the main area...
...8226; It is impossible to display images and to receive/ transmit audio between the camera and the PC when the viewer software "Network Camera View3" is not installed on the PC. • The number of the camera changes, the alarm occurrence indication button, the receiver button, the transmission button, ...information will be displayed at the upper right corner of the main area on the network environment, notification may not be displayed at the lower right corner of the camera status notification from the camera. Upper left [Alarm status update mode] Select an interval of the main area...

Network Camera
Page 21
... for "NTP server address", it is in 1 hour intervals) of synchronization with the NTP server will be used as the standard time of the camera. Manual setup: Time set on the [Basic] tab on the "Basic setup" page will be used as the NTP server address, port number..., etc. Default: Manual setup [Time zone] Select a time zone corresponding to the location where the camera is necessary to configure the DNS settings on the [Network] tab of the "Network setup" page. ( page 59) 21 Default: (GMT) Greenwich Mean Time: Dublin, Edinburgh, Lisbon, London [NTP server ...
... for "NTP server address", it is in 1 hour intervals) of synchronization with the NTP server will be used as the standard time of the camera. Manual setup: Time set on the [Basic] tab on the "Basic setup" page will be used as the NTP server address, port number..., etc. Default: Manual setup [Time zone] Select a time zone corresponding to the location where the camera is necessary to configure the DNS settings on the [Network] tab of the "Network setup" page. ( page 59) 21 Default: (GMT) Greenwich Mean Time: Dublin, Edinburgh, Lisbon, London [NTP server ...
Network Camera
Page 23
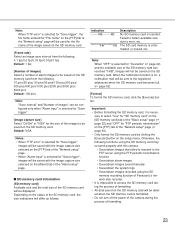
... images to be saved on the SD memory card from the following functions using the SD memory card may not work properly with this camera. • Save/obtain images that failed to transmit to the FTP server using the FTP periodic transmission function • Save/obtain alarm...; Save/obtain images saved manually • Save/obtain the system logs • Save/obtain images recorded using the SD memory recording function of Panasonic's network disk recorder. • It is impossible to access the SD memory card during the process of formatting. 23 Important: • Before formatting the...
... images to be saved on the SD memory card from the following functions using the SD memory card may not work properly with this camera. • Save/obtain images that failed to transmit to the FTP server using the FTP periodic transmission function • Save/obtain alarm...; Save/obtain images saved manually • Save/obtain the system logs • Save/obtain images recorded using the SD memory recording function of Panasonic's network disk recorder. • It is impossible to access the SD memory card during the process of formatting. 23 Important: • Before formatting the...
Network Camera
Page 24
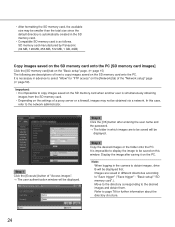
... on the settings of a proxy server or a firewall, images may be smaller than the total size since the default directory is automatically created in the camera to page 78 for "FTP access" on the SD memory card onto the PC. Move to the directory corresponding to be saved on the "Basic...) The following are to select "Allow" for further information about the directory structure. 24 Step 1 Click the [Execute] button of the "Network setup" page ( page 59). SD memory card manufactured by Panasonic (64 MB, 128 MB, 256 MB, 512 MB, 1 GB, 2GB) Copy images saved on the SD memory card onto the...
... on the settings of a proxy server or a firewall, images may be smaller than the total size since the default directory is automatically created in the camera to page 78 for "FTP access" on the SD memory card onto the PC. Move to the directory corresponding to be saved on the "Basic...) The following are to select "Allow" for further information about the directory structure. 24 Step 1 Click the [Execute] button of the "Network setup" page ( page 59). SD memory card manufactured by Panasonic (64 MB, 128 MB, 256 MB, 512 MB, 1 GB, 2GB) Copy images saved on the SD memory card onto the...
Network Camera
Page 26
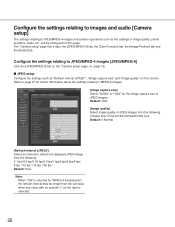
...to MPEG-4 images. [Image capture size] Select "QVGA" or "VGA" for "MPEG-4 transmission", the refresh interval may be configured on the "Camera setup" page. ( page 15) JPEG setup Configure the settings such as the settings of JPEG images. Default: VGA [Image quality] Select image ... fps/1 fps/2 fps/3 fps/5 fps/ 6 fps */10 fps */15 fps */30 fps * Default: 5 fps Note: When "ON" is selected. 26 The "Camera setup" page has 4 tabs; Configure the settings relating to refresh the displayed JPEG image from the following. 0 Super fine/1 Fine/2/3/4/5 Normal/6/7/8/9 Low Default: 5 Normal [Refresh...
...to MPEG-4 images. [Image capture size] Select "QVGA" or "VGA" for "MPEG-4 transmission", the refresh interval may be configured on the "Camera setup" page. ( page 15) JPEG setup Configure the settings such as the settings of JPEG images. Default: VGA [Image quality] Select image ... fps/1 fps/2 fps/3 fps/5 fps/ 6 fps */10 fps */15 fps */30 fps * Default: 5 fps Note: When "ON" is selected. 26 The "Camera setup" page has 4 tabs; Configure the settings relating to refresh the displayed JPEG image from the following. 0 Super fine/1 Fine/2/3/4/5 Normal/6/7/8/9 Low Default: 5 Normal [Refresh...


