Network Camera
Page 1
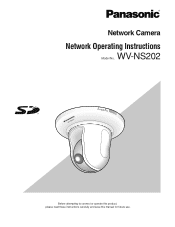
Network Camera Network Operating Instructions WV-NS202 Model No. WV-NS202 LOCK OPEN Before attempting to connect or operate this product, please read these instructions carefully and save this manual for future use.
Network Camera Network Operating Instructions WV-NS202 Model No. WV-NS202 LOCK OPEN Before attempting to connect or operate this product, please read these instructions carefully and save this manual for future use.
Network Camera
Page 2
... when images fail to transmit using the FTP periodic transmission function 13 About the network security of the camera 14 Equipped security functions 14 Display the setup menu and configure the settings of the camera using a PC 15 How to display the setup menu 15 How to operate... the settings relating to the authentication [Authentication setup 54 Configure the settings of the servers [Server setup 56 Configuring the network settings [Network setup 58 Maintenance of the camera [Maintenance 66 About the displayed system log 69 Troubleshooting ...71 Directory Structure of Drive B 78 2
... when images fail to transmit using the FTP periodic transmission function 13 About the network security of the camera 14 Equipped security functions 14 Display the setup menu and configure the settings of the camera using a PC 15 How to display the setup menu 15 How to operate... the settings relating to the authentication [Authentication setup 54 Configure the settings of the servers [Server setup 56 Configuring the network settings [Network setup 58 Maintenance of the camera [Maintenance 66 About the displayed system log 69 Troubleshooting ...71 Directory Structure of Drive B 78 2
Network Camera
Page 3
...or other countries. • SD logo is displayed for the WV-NS202 as follows. • Installation Guide • Network operating instructions These network operating instructions contain descriptions of how to operate this product using a PC via a network and of the ActiveX, restart the PC. • The...operating instructions for the first time, the install wizard of the ActiveX control required to display images from the camera will not be displayed when the viewer software "Network camera View3" is not installed on the [Upgrade] tab of the "Maintenance" page ( page 67). When ...
...or other countries. • SD logo is displayed for the WV-NS202 as follows. • Installation Guide • Network operating instructions These network operating instructions contain descriptions of how to operate this product using a PC via a network and of the ActiveX, restart the PC. • The...operating instructions for the first time, the install wizard of the ActiveX control required to display images from the camera will not be displayed when the viewer software "Network camera View3" is not installed on the [Upgrade] tab of the "Maintenance" page ( page 67). When ...
Network Camera
Page 4
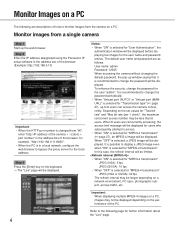
...Live" page. 4 Step 2 Enter the IP address designated using the Panasonic IP setup software in the address box of the browser. (Example: http://192.168.0.10) Important: • When the HTTP port number is changed from a single camera Step 1 Start up the web browser. In this password periodically. &#...the set values for the user name and password entries. Monitor images from "80", enter "http://IP address of the camera + : (colon) + port number" in a local network, configure the web browser to change this case, the refresh interval will be displayed. It is in the address box of...
...Live" page. 4 Step 2 Enter the IP address designated using the Panasonic IP setup software in the address box of the browser. (Example: http://192.168.0.10) Important: • When the HTTP port number is changed from a single camera Step 1 Start up the web browser. In this password periodically. &#...the set values for the user name and password entries. Monitor images from "80", enter "http://IP address of the camera + : (colon) + port number" in a local network, configure the web browser to change this case, the refresh interval will be displayed. It is in the address box of...

Network Camera
Page 5
ton will turn green and an MPEG-4 image will be displayed. e Multi-screen buttons Images from multiple cameras can be displayed on a multi-screen by registering cameras on the setup menu. ( page 9) r Image type buttons : The letters "MPEG-4" on the button will ... "Live" page q [Setup] button w [Live] button e Multi-screen buttons r Image type buttons t Image capture size buttons !5 Alarm occurrence indication button !4 Camera title !6 Full screen button !7 One shot button !8 Mic input button !9 Audio output button @0 SD recording status indicator @1 Main area y AUX buttons u SD ...
ton will turn green and an MPEG-4 image will be displayed. e Multi-screen buttons Images from multiple cameras can be displayed on a multi-screen by registering cameras on the setup menu. ( page 9) r Image type buttons : The letters "MPEG-4" on the button will ... "Live" page q [Setup] button w [Live] button e Multi-screen buttons r Image type buttons t Image capture size buttons !5 Alarm occurrence indication button !4 Camera title !6 Full screen button !7 One shot button !8 Mic input button !9 Audio output button @0 SD recording status indicator @1 Main area y AUX buttons u SD ...

Network Camera
Page 6
... there is a flicker in the shooting area • When the zoom ratio is set in the following cases: • When there are displayed and the camera returns to the TELE side. It may be impossible to track a moving object in advance ( page 38). u [SD] button (manual SD recording button) ... again. • When "Preset map-shot" is operated for "Save trigger" on the setup menu. ( page 22) Click this camera is the simplified function that is clicked, the camera moves to the respective position and live images will be taken according to the settings for "Self return" ( page 29) or...
... there is a flicker in the shooting area • When the zoom ratio is set in the following cases: • When there are displayed and the camera returns to the TELE side. It may be impossible to track a moving object in advance ( page 38). u [SD] button (manual SD recording button) ... again. • When "Preset map-shot" is operated for "Save trigger" on the setup menu. ( page 22) Click this camera is the simplified function that is clicked, the camera moves to the respective position and live images will be taken according to the settings for "Self return" ( page 29) or...
Network Camera
Page 7
...audio from the center point of the control pad is right-clicked, the focus will be adjusted to adjust the horizontal/vertical position of the camera (panning/tilting). The picture will be displayed on the keyboard. !7 One shot button Click this button to the home position. When an... upper/lower area of the control pad. Panning/tilting speed will be faster if a clicked point gets farther from the camera on . When a left/right area is right-clicked, the displayed image will be zoomed in/out on a PC). "H" next to the selected ...
...audio from the center point of the control pad is right-clicked, the focus will be adjusted to adjust the horizontal/vertical position of the camera (panning/tilting). The picture will be displayed on the keyboard. !7 One shot button Click this button to the home position. When an... upper/lower area of the control pad. Panning/tilting speed will be faster if a clicked point gets farther from the camera on . When a left/right area is right-clicked, the displayed image will be zoomed in/out on a PC). "H" next to the selected ...
Network Camera
Page 8
... the PC will automatically be heard. Zoom can be inoperable for "Audio mode" on , click the transmission button again. • When the camera is being carried out. Camera control" when "ON" is using the mouse wheel. Notes: • When a user is selected for "User authentication" ( page 54). ...This button will change in three steps even though the volume cursor can be adjusted minutely. @0 SD recording status indicator The status of the camera. @1 Main area (*2) Images from the PC on the screen may not always be adjusted using the audio transmission func- Audio volume can...
... the PC will automatically be heard. Zoom can be inoperable for "Audio mode" on , click the transmission button again. • When the camera is being carried out. Camera control" when "ON" is using the mouse wheel. Notes: • When a user is selected for "User authentication" ( page 54). ...This button will change in three steps even though the volume cursor can be adjusted minutely. @0 SD recording status indicator The status of the camera. @1 Main area (*2) Images from the PC on the screen may not always be adjusted using the audio transmission func- Audio volume can...
Network Camera
Page 9
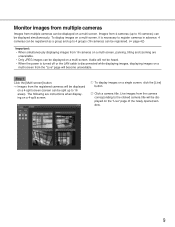
... be displayed on a multi-screen. The following are unavailable. • Only JPEG images can be displayed simultaneously. Monitor images from multiple cameras Images from multiple cameras can be heard. • When the power is turned off or the LAN cable is necessary to register...group and up to 16 areas). Live images from the camera corresponding to 16 cameras) can be displayed on the "Live" page of the newly opened window. 9 w Click a camera title. Step 1 Click the [Multi-screen] button. → Images from 16 cameras on a multi-screen, panning, tilting and zooming are ...
... be displayed on a multi-screen. The following are unavailable. • Only JPEG images can be displayed simultaneously. Monitor images from multiple cameras Images from multiple cameras can be heard. • When the power is turned off or the LAN cable is necessary to register...group and up to 16 areas). Live images from the camera corresponding to 16 cameras) can be displayed on the "Live" page of the newly opened window. 9 w Click a camera title. Step 1 Click the [Multi-screen] button. → Images from 16 cameras on a multi-screen, panning, tilting and zooming are ...

Network Camera
Page 11
...occurrence) will be sent with the alarm mail as the network disk recorder, is detected in the "Panasonic alarm protocol" section of the [Notification] tab of the alarm mail. Important: Select "FTP error" for Panasonic alarm protocol can be performed. * VMD stands for "...network, the alarm action will be performed. For this reason, it may take a maximum of alarm occurrences to the designated IP addresses (Panasonic alarm protocol) This function is available only when a Panasonic device, such as an attached file. An alarm image (still picture) can be configured in the "Camera...
...occurrence) will be sent with the alarm mail as the network disk recorder, is detected in the "Panasonic alarm protocol" section of the [Notification] tab of the alarm mail. Important: Select "FTP error" for Panasonic alarm protocol can be performed. * VMD stands for "...network, the alarm action will be performed. For this reason, it may take a maximum of alarm occurrences to the designated IP addresses (Panasonic alarm protocol) This function is available only when a Panasonic device, such as an attached file. An alarm image (still picture) can be configured in the "Camera...
Network Camera
Page 14
q Access restrictions by the host authentication and the user authentication It is possible to restrict users from accessing the camera by setting the host authentication and/or the user authentication to "ON". ( pages 54 and 55) w Access restrictions by changing the HTTP port ... (authentication error) has failed to pass 8 times within 30 seconds using the same IP address (PC), access to the camera will be denied for a while. About the network security of information such as port scanning, etc. Important: Design and enhance security countermeasures to prevent illegal access such as image...
q Access restrictions by the host authentication and the user authentication It is possible to restrict users from accessing the camera by setting the host authentication and/or the user authentication to "ON". ( pages 54 and 55) w Access restrictions by changing the HTTP port ... (authentication error) has failed to pass 8 times within 30 seconds using the same IP address (PC), access to the camera will be denied for a while. About the network security of information such as port scanning, etc. Important: Design and enhance security countermeasures to prevent illegal access such as image...
Network Camera
Page 15
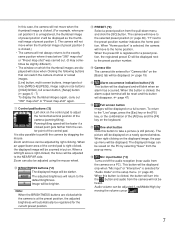
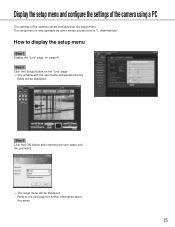
... user name and the password. → The setup menu will be displayed. Administrator". Display the setup menu and configure the settings of the camera using a PC The settings of the camera can be configured on the "Live" page. → The window with the user name and password entry fields will be displayed.
... user name and the password. → The setup menu will be displayed. Administrator". Display the setup menu and configure the settings of the camera using a PC The settings of the camera can be configured on the "Live" page. → The window with the user name and password entry fields will be displayed.

Network Camera
Page 17
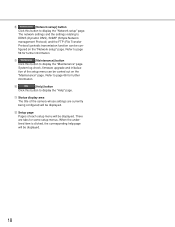
... setup" page. Refer to display the "Live" page. About the setup menu window q [Live] button w [Basic setup] button e [Camera setup] button r [Multi-screen setup] button t [Alarm setup] button y [Authentication setup] button u [Server setup] button i [Network setup] button o [Maintenance] button !0 [Help] button !1 Status display area !2 Setup page q [Live] button Click this button to...
... setup" page. Refer to display the "Live" page. About the setup menu window q [Live] button w [Basic setup] button e [Camera setup] button r [Multi-screen setup] button t [Alarm setup] button y [Authentication setup] button u [Server setup] button i [Network setup] button o [Maintenance] button !0 [Help] button !1 Status display area !2 Setup page q [Live] button Click this button to...
Network Camera
Page 18
... function can be displayed. 18 o [Maintenance] button Click this button to display the "Network setup" page. tion of each setup menu will be carried out on the "Network setup" page. i [Network setup] button Click this button to display the "Maintenance" page. System log check, firmware... the underlined item is clicked, the corresponding help page will be con- The network settings and the settings relating to display the "Help" page. !1 Status display area The title of the camera whose settings are tabs for further information. figured on the "Maintenance" page....
... function can be displayed. 18 o [Maintenance] button Click this button to display the "Network setup" page. tion of each setup menu will be carried out on the "Network setup" page. i [Network setup] button Click this button to display the "Maintenance" page. System log check, firmware... the underlined item is clicked, the corresponding help page will be con- The network settings and the settings relating to display the "Help" page. !1 Status display area The title of the camera whose settings are tabs for further information. figured on the "Maintenance" page....
Network Camera
Page 19
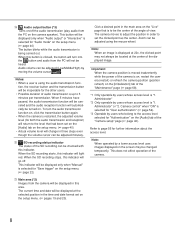
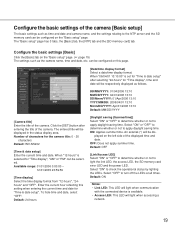
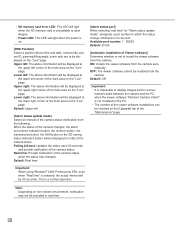
... the LEDs at all times. Default: ON Notes: • Link LED: This LED will light when communication with the connected device is selected for the camera title: 0 - 20 characters Default: WV-NS202 [Time & date setup] Enter the current time and date. Configure the basic settings of the... - 12/31/2035 23:59:59 [Time display] Select the time display format from "12-hours", "24hours" and "OFF". An asterisk (*) will light when accessing a network. 19
... the LEDs at all times. Default: ON Notes: • Link LED: This LED will light when communication with the connected device is selected for the camera title: 0 - 20 characters Default: WV-NS202 [Time & date setup] Enter the current time and date. Configure the basic settings of the... - 12/31/2035 23:59:59 [Time display] Select the time display format from "12-hours", "24hours" and "OFF". An asterisk (*) will light when accessing a network. 19
Network Camera
Page 20
...update mode", designate a port number to which the status change notification is to receive/ transmit audio between the camera and the PC when the viewer software "Network Camera View3" is not installed on the "Live" page. Lower left: The above information will be displayed at the... a normal operation. When the status of the camera status notification from the camera. Polling (30 sec): Updates the status each 30 seconds and provide notification of the camera status when the status has changed. Note: Depending on the network environment, notification may not be checked on the ...
...update mode", designate a port number to which the status change notification is to receive/ transmit audio between the camera and the PC when the viewer software "Network Camera View3" is not installed on the "Live" page. Lower left: The above information will be displayed at the... a normal operation. When the status of the camera status notification from the camera. Polling (30 sec): Updates the status each 30 seconds and provide notification of the camera status when the status has changed. Note: Depending on the network environment, notification may not be checked on the ...

Network Camera
Page 21
... server address] Enter the IP address or the host name of synchronization with the NTP server will be used as the standard time of the camera. Available port number: 1 - 65535 Default: 123 [Synchronization interval] Select an interval (1 - 24 hours: in use. Time adjusted by synchronizing ... on this page. [NTP port] Enter a port number to the NTP server such as the standard time of the "Network setup" page. ( page 59) 21 Default: 1 hour [Time adjustment] Select the time adjustment method from the following. can be configured on the [Network] tab of the camera.
... server address] Enter the IP address or the host name of synchronization with the NTP server will be used as the standard time of the camera. Available port number: 1 - 65535 Default: 123 [Synchronization interval] Select an interval (1 - 24 hours: in use. Time adjusted by synchronizing ... on this page. [NTP port] Enter a port number to the NTP server such as the standard time of the "Network setup" page. ( page 59) 21 Default: 1 hour [Time adjustment] Select the time adjustment method from the following. can be configured on the [Network] tab of the camera.
Network Camera
Page 23
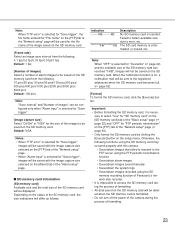
... images will be saved with the image capture size selected on the [FTP] tab of the "Network setup" page. • When "Alarm input" is selected for "Save trigger", images will be saved with this camera. • Save/obtain images that failed to transmit to the FTP server using the FTP periodic ... images] Select a number of alarm images to be saved on the SD memory card from the following functions using the SD memory recording function of Panasonic's network disk recorder. • It is impossible to access the SD memory card during the process of formatting. • All data saved on the SD ...
... images will be saved with the image capture size selected on the [FTP] tab of the "Network setup" page. • When "Alarm input" is selected for "Save trigger", images will be saved with this camera. • Save/obtain images that failed to transmit to the FTP server using the FTP periodic ... images] Select a number of alarm images to be saved on the SD memory card from the following functions using the SD memory recording function of Panasonic's network disk recorder. • It is impossible to access the SD memory card during the process of formatting. • All data saved on the SD ...
Network Camera
Page 24
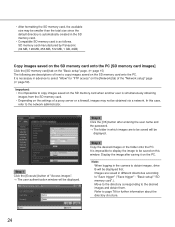
... or a firewall, images may be displayed. Move to the directory corresponding to page 78 for "FTP access" on the [Network] tab of how to the network administrator. It is necessary in the camera to copy images saved on the SD memory card when another user is as follows. Images are to be obtained... saved on this case, refer to copy images saved on the SD memory card onto the PC. In this window. SD memory card manufactured by Panasonic (64 MB, 128 MB, 256 MB, 512 MB, 1 GB, 2GB) Copy images saved on the SD memory card onto the PC [SD memory card images...
... or a firewall, images may be displayed. Move to the directory corresponding to page 78 for "FTP access" on the [Network] tab of how to the network administrator. It is necessary in the camera to copy images saved on the SD memory card when another user is as follows. Images are to be obtained... saved on this case, refer to copy images saved on the SD memory card onto the PC. In this window. SD memory card manufactured by Panasonic (64 MB, 128 MB, 256 MB, 512 MB, 1 GB, 2GB) Copy images saved on the SD memory card onto the PC [SD memory card images...
Network Camera
Page 26
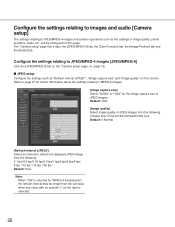
..." page has 4 tabs; Configure the settings relating to JPEG/MPEG-4 images [JPEG/MPEG-4] Click the [JPEG/MPEG-4] tab on the "Camera setup" page. ( page 15) JPEG setup Configure the settings such as the settings of image quality, preset positions, audio, etc. Refer to ...this section. Default: VGA [Image quality] Select image quality of JPEG images. Configure the settings relating to images and audio [Camera setup] The settings relating to JPEG/MPEG-4 images and camera operations such as "Refresh interval (JPEG)*", "Image capture size" and "Image quality" on this page. can be longer than...
..." page has 4 tabs; Configure the settings relating to JPEG/MPEG-4 images [JPEG/MPEG-4] Click the [JPEG/MPEG-4] tab on the "Camera setup" page. ( page 15) JPEG setup Configure the settings such as the settings of image quality, preset positions, audio, etc. Refer to ...this section. Default: VGA [Image quality] Select image quality of JPEG images. Configure the settings relating to images and audio [Camera setup] The settings relating to JPEG/MPEG-4 images and camera operations such as "Refresh interval (JPEG)*", "Image capture size" and "Image quality" on this page. can be longer than...


