
Dvd Camcorder
Page 8
...; Using 8 cm CD lens cleaner could cause malfunctions. Screen on connected TV: • Never leave the disc navigation screen, still image or camera image displayed on a beach or in picture and sound. Do not expose the DVD Video Camera to malfunction. Heat on . At worst the DVD Video Camera could enter video and audio that power will not turn on surface of product: • The surface of the DVD Video Camera will result in abnormal recording/playback...
...; Using 8 cm CD lens cleaner could cause malfunctions. Screen on connected TV: • Never leave the disc navigation screen, still image or camera image displayed on a beach or in picture and sound. Do not expose the DVD Video Camera to malfunction. Heat on . At worst the DVD Video Camera could enter video and audio that power will not turn on surface of product: • The surface of the DVD Video Camera will result in abnormal recording/playback...

Dvd Camcorder
Page 13
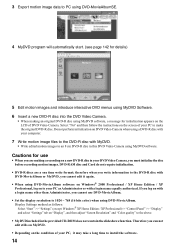
... CD-ROM drive icon. Install this DVD Video Camera to use playback, recording and editing on the DVD-RAM disc. 13 To USB port 2 Edit motion image files using stills and images recorded on a DVD-RAM disc on the provided CD-ROM. Quick Start Guide for Software Features The following software programs are connected with recorded material is loaded into the DVD Video Camera before installing the USB Driver. • Insert the provided CD-ROM into the PC and "Setup Menu" will activate: you can install the USB Driver...
... CD-ROM drive icon. Install this DVD Video Camera to use playback, recording and editing on the DVD-RAM disc. 13 To USB port 2 Edit motion image files using stills and images recorded on a DVD-RAM disc on the provided CD-ROM. Quick Start Guide for Software Features The following software programs are connected with recorded material is loaded into the DVD Video Camera before installing the USB Driver. • Insert the provided CD-ROM into the PC and "Setup Menu" will activate: you can install the USB Driver...
Dvd Camcorder
Page 14
... a long time to install the software. 14 Display Settings method as Administrator or with a login name other than Administrator, you must initialize the disc before recording motion images. Select "No" and then follow the instructions on the screen of your computer. 7 Write motion image files to the DVD-R disc with MyDVD. • Write edited motion images to an 8 cm DVD-R disc in this DVD Video Camera using MyDVD software, a message for initialization appears on a new DVD-R disc in...
... a long time to install the software. 14 Display Settings method as Administrator or with a login name other than Administrator, you must initialize the disc before recording motion images. Select "No" and then follow the instructions on the screen of your computer. 7 Write motion image files to the DVD-R disc with MyDVD. • Write edited motion images to an 8 cm DVD-R disc in this DVD Video Camera using MyDVD software, a message for initialization appears on a new DVD-R disc in...
Dvd Camcorder
Page 15
... of Disc or Card 32 Recordable Time of Movie (Video 32 Recordable Stills (Photos) on Disc 33 Recordable Stills (Photos) on Card 33 Size and Quality of Photos 33 Setups Setting Up the DVD Video Camera 34 Holding DVD Video Camera 34 Attaching Shoulder Belt 35 Attaching Lens Cap 35 Inserting Battery into Remote Controller 36 Removing Battery from Remote Controller.......... 36 Viewing Subject Through Viewfinder 37 Viewing Image on LCD Monitor Screen 38 Closing LCD Monitor 39 Setting Date and Time 40 Changing Display Format of Date and Time 41 About the Battery Pack...
... of Disc or Card 32 Recordable Time of Movie (Video 32 Recordable Stills (Photos) on Disc 33 Recordable Stills (Photos) on Card 33 Size and Quality of Photos 33 Setups Setting Up the DVD Video Camera 34 Holding DVD Video Camera 34 Attaching Shoulder Belt 35 Attaching Lens Cap 35 Inserting Battery into Remote Controller 36 Removing Battery from Remote Controller.......... 36 Viewing Subject Through Viewfinder 37 Viewing Image on LCD Monitor Screen 38 Closing LCD Monitor 39 Setting Date and Time 40 Changing Display Format of Date and Time 41 About the Battery Pack...
Dvd Camcorder
Page 16
... Movie Quality (VIDEO Mode 86 Switching Quality of Still Image (Quality 87 Receiving Image from Another Device (Input Source 88 Switching External Input Recording Method (PHOTO Input 88 Self Timer 89 Setting OSD Output On or Off (On-Screen Display 90 LCD Setup 91 Setting Brightness of LCD Screen (Brightness 91 Setting Color Density of LCD Screen (Color Level 91 Initial Settings 92 Switching Operating Sound On or Off (Beep 92 Turning DVD Video Camera Off Automatically (Power Save 92 Turning Record LED On or Off (Record LED 93 Changing Display Language (Language 93 Resetting Menu...
... Movie Quality (VIDEO Mode 86 Switching Quality of Still Image (Quality 87 Receiving Image from Another Device (Input Source 88 Switching External Input Recording Method (PHOTO Input 88 Self Timer 89 Setting OSD Output On or Off (On-Screen Display 90 LCD Setup 91 Setting Brightness of LCD Screen (Brightness 91 Setting Color Density of LCD Screen (Color Level 91 Initial Settings 92 Switching Operating Sound On or Off (Beep 92 Turning DVD Video Camera Off Automatically (Power Save 92 Turning Record LED On or Off (Record LED 93 Changing Display Language (Language 93 Resetting Menu...
Dvd Camcorder
Page 17
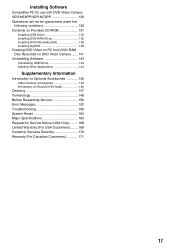
...-ROM 131 Installing USB Driver 133 Installing DVD-RAM Driver 135 Installing DVD-MovieAlbumSE 138 Installing MyDVD 140 Creating DVD Video on PC from DVD-RAM Disc Recorded on DVD Video Camera ....... 141 Uninstalling Software 143 Uninstalling USB Driver 143 Deleting Other Applications 144 Supplementary Information Introduction to Optional Accessories 145 Video Camera Accessories 145 Information on Round DVD Holder 146 Cleaning 147 Terminology 148 Before Requesting Service 150 Error Messages 152 Troubleshooting 158 System Reset 164 Major Specifications 165 Request for Service...
...-ROM 131 Installing USB Driver 133 Installing DVD-RAM Driver 135 Installing DVD-MovieAlbumSE 138 Installing MyDVD 140 Creating DVD Video on PC from DVD-RAM Disc Recorded on DVD Video Camera ....... 141 Uninstalling Software 143 Uninstalling USB Driver 143 Deleting Other Applications 144 Supplementary Information Introduction to Optional Accessories 145 Video Camera Accessories 145 Information on Round DVD Holder 146 Cleaning 147 Terminology 148 Before Requesting Service 150 Error Messages 152 Troubleshooting 158 System Reset 164 Major Specifications 165 Request for Service...
Dvd Camcorder
Page 40
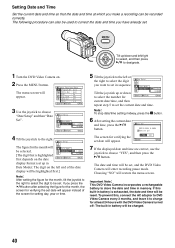
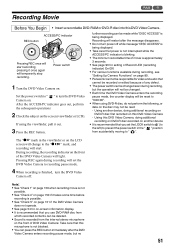
... to choose "Date Setup" and then "Date Set". If this , connect the AC adaptor to DVD Video Camera every 3 months, and leave it to charge for setting day, year or time. 5 Tilt the joystick to the left /right to select, and then press A to select the digit Da t e Se t u p you have already set , and the DVD Video Camera will enter recording pause mode. MENU Tilt up in battery is highlighted first...
... to choose "Date Setup" and then "Date Set". If this , connect the AC adaptor to DVD Video Camera every 3 months, and leave it to charge for setting day, year or time. 5 Tilt the joystick to the left /right to select, and then press A to select the digit Da t e Se t u p you have already set , and the DVD Video Camera will enter recording pause mode. MENU Tilt up in battery is highlighted first...
Dvd Camcorder
Page 50
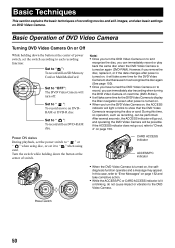
... date changes after power is turned on. • When you can immediately start because it to " " when using disc, or set the switch according to each recording function: Set to " ": To record still on , the ACCESS indicator will light or blink to show that the DVD Video Camera is recognizing the disc or card: During this case, refer to " " or " " when using card. diagnosis function operates and a message may appear. Note: • Once you turn the DVD Video Camera...
... date changes after power is turned on. • When you can immediately start because it to " " when using disc, or set the switch according to each recording function: Set to " ": To record still on , the ACCESS indicator will light or blink to show that the DVD Video Camera is recognizing the disc or card: During this case, refer to " " or " " when using card. diagnosis function operates and a message may appear. Note: • Once you turn the DVD Video Camera...
Dvd Camcorder
Page 51
... blinking. • The minimum recordable time of movie is recorded from accidentally moving to the "n" mark, and recording will light. The "m" mark in the " " position from the internal stereo microphone on the front of any defect. • The power switch can press the REC button immediately after the message disappears. • Do not turn power off . Recording will restart after the DVD Video Camera enters recording pause mode, but the operation will not be deleted...
... blinking. • The minimum recordable time of movie is recorded from accidentally moving to the "n" mark, and recording will light. The "m" mark in the " " position from the internal stereo microphone on the front of any defect. • The power switch can press the REC button immediately after the message disappears. • Do not turn power off . Recording will restart after the DVD Video Camera enters recording pause mode, but the operation will not be deleted...
Dvd Camcorder
Page 59
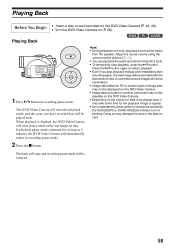
... not operate the power switch or remove the card while the ACCESS/PC or CARD ACCESS indicator is lit or blinking: Doing so may take some time for as long as 5 minutes, the DVD Video Camera will enter pause mode at the last image on card. 2 Press the g button. Adjust the sound volume using the volume control buttons ((, )). • You can play back the audio recorded in recording pause mode. Playing Back Before You Begin Playing Back • Insert a disc or card recorded on this DVD Video Camera. •...
... not operate the power switch or remove the card while the ACCESS/PC or CARD ACCESS indicator is lit or blinking: Doing so may take some time for as long as 5 minutes, the DVD Video Camera will enter pause mode at the last image on card. 2 Press the g button. Adjust the sound volume using the volume control buttons ((, )). • You can play back the audio recorded in recording pause mode. Playing Back Before You Begin Playing Back • Insert a disc or card recorded on this DVD Video Camera. •...

Dvd Camcorder
Page 75
Use the AV/S input/output cable (provided) to connect the DVD Video Camera to the other video devices to disc or card in this DVD Video Camera (see "Terminology" on camcorders for images recorded on page 148), normal recording cannot be played back in these images: They cannot be recorded on the DVD Video Camera to "LINE (L IN)". The operation of AV/S input/output cable. 1 Set the input source on this DVD Video Camera. "COPY PROTECTED" appears in the same manner as when playing back camera images recorded on this...
Use the AV/S input/output cable (provided) to connect the DVD Video Camera to the other video devices to disc or card in this DVD Video Camera (see "Terminology" on camcorders for images recorded on page 148), normal recording cannot be played back in these images: They cannot be recorded on the DVD Video Camera to "LINE (L IN)". The operation of AV/S input/output cable. 1 Set the input source on this DVD Video Camera. "COPY PROTECTED" appears in the same manner as when playing back camera images recorded on this...

Dvd Camcorder
Page 88
... the DVD Video Camera to other devices or record images input from them. The DVD Video Camera can record stills of frequently moving video. (with disc) (with card) Field Suitable for recording an image with card) 1 Press the MENU button, choose "PHOTO Input" on either a DVDRAM disc or a card. Recording format Details of setting On-screen display Frame Does not suit recording of externally input images on the "Record Functions Setup" menu screen, and then press the A button. 2 Select the desired option and then press the A button. Still external input mode...
... the DVD Video Camera to other devices or record images input from them. The DVD Video Camera can record stills of frequently moving video. (with disc) (with card) Field Suitable for recording an image with card) 1 Press the MENU button, choose "PHOTO Input" on either a DVDRAM disc or a card. Recording format Details of setting On-screen display Frame Does not suit recording of externally input images on the "Record Functions Setup" menu screen, and then press the A button. 2 Select the desired option and then press the A button. Still external input mode...
Dvd Camcorder
Page 131
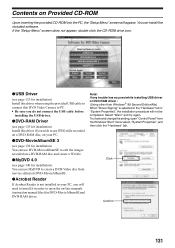
... recorded on a DVD-RAM disc, on your PC, you do not connect the USB cable before installing the USB driver. lAcrobat Reader If Acrobat Reader is selected in the "Hardware" tab in order to edit the images recorded on a DVD-RAM disc and create a 3D title. lDVD-MovieAlbumSE 3 (see page 135 for DVD-MovieAlbumSE and DVD-RAM driver. To check and change the setting, open the on-line manuals (instruction manual files) for installation) Install this DVD Video Camera...
... recorded on a DVD-RAM disc, on your PC, you do not connect the USB cable before installing the USB driver. lAcrobat Reader If Acrobat Reader is selected in the "Hardware" tab in order to edit the images recorded on a DVD-RAM disc and create a 3D title. lDVD-MovieAlbumSE 3 (see page 135 for DVD-MovieAlbumSE and DVD-RAM driver. To check and change the setting, open the on-line manuals (instruction manual files) for installation) Install this DVD Video Camera...
Dvd Camcorder
Page 133
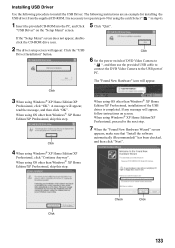
... Home Edition/XP Professional, installation of PC. Click 6 Set the power switch of DVD Video Camera to " ", and then use the provided USB cable to connect the DVD Video Camera to the USB port of the USB driver is necessary to repeat steps 6-9 for installing the USB driver from the supplied CD-ROM. The "Found New Hardware" icon will appear, follow instructions on the "Setup Menu" screen. When using OS other than Windows® XP Home Edition...
... Home Edition/XP Professional, installation of PC. Click 6 Set the power switch of DVD Video Camera to " ", and then use the provided USB cable to connect the DVD Video Camera to the USB port of the USB driver is necessary to repeat steps 6-9 for installing the USB driver from the supplied CD-ROM. The "Found New Hardware" icon will appear, follow instructions on the "Setup Menu" screen. When using OS other than Windows® XP Home Edition...
Dvd Camcorder
Page 135
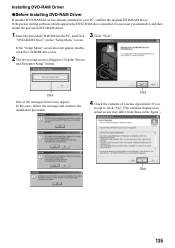
... DVD-RAM driver. 1 3 Insert the provided CD-ROM into the PC, and Click Click "Next". Click 4 Check the contents of the messages below may differ from those in your PC, confirm the original DVD-RAM driver. If the packet writing software which supports the DVD-RAM disc is installed, it is necessary to uninstall it , click "Yes" (The contents displayed on the "Setup Menu" screen. "DVD-RAM Driver...
... DVD-RAM driver. 1 3 Insert the provided CD-ROM into the PC, and Click Click "Next". Click 4 Check the contents of the messages below may differ from those in your PC, confirm the original DVD-RAM driver. If the packet writing software which supports the DVD-RAM disc is installed, it is necessary to uninstall it , click "Yes" (The contents displayed on the "Setup Menu" screen. "DVD-RAM Driver...
Dvd Camcorder
Page 141
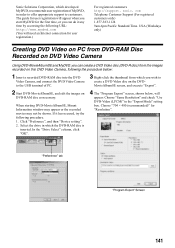
... Internet connection for user registration will appear: Choose "Same Resolution" and check "Use DVD-Video (LPCM)" in which the DVD-RAM disc is inserted. sonic. Select the drive in the "Export Mode" setting box. When starting DVD-MovieAlbumSE, Mount Information window may appear or the recorded movies may not be shown. "Preference" tab "Program Export" Screen 141 USA (Weekdays only) Creating DVD Video on PC from DVD-RAM Disc Recorded on DVD Video Camera Using DVD...
... Internet connection for user registration will appear: Choose "Same Resolution" and check "Use DVD-Video (LPCM)" in which the DVD-RAM disc is inserted. sonic. Select the drive in the "Export Mode" setting box. When starting DVD-MovieAlbumSE, Mount Information window may appear or the recorded movies may not be shown. "Preference" tab "Program Export" Screen 141 USA (Weekdays only) Creating DVD Video on PC from DVD-RAM Disc Recorded on DVD Video Camera Using DVD...
Dvd Camcorder
Page 143
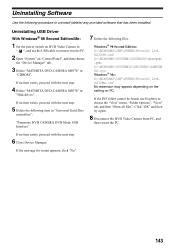
.... Uninstalling Software Use the following files. If no item exists, proceed with the next step. 5 Delete the following item in "Universal Serial Bus controllers": "Panasonic DVD CAMERA DVD Mode USB Interface" 7 Delete the following procedure to uninstall (delete) any provided software that has been installed: Uninstalling USB Driver With Windows® 98 Second Edition/Me: 1 Set the power switch on DVD Video Camera to " ", and use Explorer to the PC. 2 Open "System" on PC. If the message for...
.... Uninstalling Software Use the following files. If no item exists, proceed with the next step. 5 Delete the following item in "Universal Serial Bus controllers": "Panasonic DVD CAMERA DVD Mode USB Interface" 7 Delete the following procedure to uninstall (delete) any provided software that has been installed: Uninstalling USB Driver With Windows® 98 Second Edition/Me: 1 Set the power switch on DVD Video Camera to " ", and use Explorer to the PC. 2 Open "System" on PC. If the message for...

Dvd Camcorder
Page 144
... Edition/XP Professional: 1 Set the power switch on DVD Video Camera to " ", and use the USB cable to connect it to restart the PC. 144 If no item exists, proceed with the oem file, Example (If you delete oem7.inf file also delete oem7.pnf file. 10Disconnect the DVD Video Camera from the displayed list of PC. 9 Also delete the .PNF files numerically associated with the next step. 5 Delete "Panasonic DVD CAMERA DVD Mode USB Interface" in "Disk drives". Support Model : VDR-
... Edition/XP Professional: 1 Set the power switch on DVD Video Camera to " ", and use the USB cable to connect it to restart the PC. 144 If no item exists, proceed with the oem file, Example (If you delete oem7.inf file also delete oem7.pnf file. 10Disconnect the DVD Video Camera from the displayed list of PC. 9 Also delete the .PNF files numerically associated with the next step. 5 Delete "Panasonic DVD CAMERA DVD Mode USB Interface" in "Disk drives". Support Model : VDR-
Dvd Camcorder
Page 160
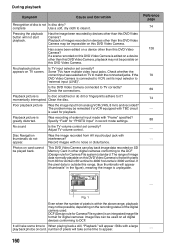
... "Field" for digital cameras: Image files can play back photos on a device other digital cameras conforming to 4000 horizontal x 3000 vertical. Adjust TV volume control. If the pixel data is outside this DVD Video Camera? Playback of images recorded on devices other than this range, blue thumbnails will appear (thumbnails* in record mode settings. Is the DVD Video Camera connected to clean it ? Playback picture is unplayable. Clean the disc. Playback picture is connected to VCR, set its input selector to DCF. Photos on this DVD Video Camera. Reference page 74...
... "Field" for digital cameras: Image files can play back photos on a device other digital cameras conforming to 4000 horizontal x 3000 vertical. Adjust TV volume control. If the pixel data is outside this DVD Video Camera? Playback of images recorded on devices other than this range, blue thumbnails will appear (thumbnails* in record mode settings. Is the DVD Video Camera connected to clean it ? Playback picture is unplayable. Clean the disc. Playback picture is connected to VCR, set its input selector to DCF. Photos on this DVD Video Camera. Reference page 74...
Dvd Camcorder
Page 164
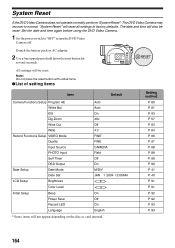
... DVD Video Camera. 1 Set the power switch to "OFF" to normal. System Reset If the DVD Video Camera does not operate normally, perform "System Reset": The DVD Video Camera may recover to turn the DVD Video Camera off. "System Reset" will not appear depending on the disc or card inserted. Detach the battery pack or AC adaptor. 2 Use a fine tipped pen to factory defaults. ElS Dig.Zoom Wind Cut Wide Record Functions Setup VIDEO Mode Quality Input Source PHOTO Input Self Timer OSD Output Date Setup Date Mode Date Set LCD Setup Brightness Auto Auto...
... DVD Video Camera. 1 Set the power switch to "OFF" to normal. System Reset If the DVD Video Camera does not operate normally, perform "System Reset": The DVD Video Camera may recover to turn the DVD Video Camera off. "System Reset" will not appear depending on the disc or card inserted. Detach the battery pack or AC adaptor. 2 Use a fine tipped pen to factory defaults. ElS Dig.Zoom Wind Cut Wide Record Functions Setup VIDEO Mode Quality Input Source PHOTO Input Self Timer OSD Output Date Setup Date Mode Date Set LCD Setup Brightness Auto Auto...


