
Dvd Camcorder
Page 8
...; If the DVD Video Camera is not a compensable part. Do not use the DVD Video Camera near strong radio waves or magnetism, such as hydrogen sulfide, the external or internal terminals could corrode, disabling normal operation, or the battery connecting terminals could dirty the lens in the laser pickup block, and in radio broadcasts. Screen on connected TV: • Never leave the disc navigation screen, still image or camera image displayed on the...
...; If the DVD Video Camera is not a compensable part. Do not use the DVD Video Camera near strong radio waves or magnetism, such as hydrogen sulfide, the external or internal terminals could corrode, disabling normal operation, or the battery connecting terminals could dirty the lens in the laser pickup block, and in radio broadcasts. Screen on connected TV: • Never leave the disc navigation screen, still image or camera image displayed on the...

Dvd Camcorder
Page 13
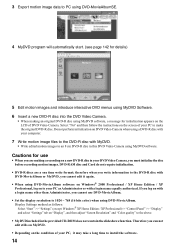
... DVD Video Camera to connect this software when creating a DVD-Video disc from motion images edited using stills and images recorded on a DVD-RAM disc on a PC. By combining DVD-MovieAlbumSE with VDR-M50PP/VDR-M70PP DVD Video Camera, it is also possible to the PC as illustrated below. • Please ensure a DVD-RAM disc with the USB cable. 2 Install the software (DVD-RAM Driver, MyDVD and DVD-MovieAlbumSE). • The software can also be installed from the "Setup Menu". Install this DVD Video Camera to transfer...
... DVD Video Camera to connect this software when creating a DVD-Video disc from motion images edited using stills and images recorded on a DVD-RAM disc on a PC. By combining DVD-MovieAlbumSE with VDR-M50PP/VDR-M70PP DVD Video Camera, it is also possible to the PC as illustrated below. • Please ensure a DVD-RAM disc with the USB cable. 2 Install the software (DVD-RAM Driver, MyDVD and DVD-MovieAlbumSE). • The software can also be installed from the "Setup Menu". Install this DVD Video Camera to transfer...
Dvd Camcorder
Page 14
...-ROM does not contain the slideshows function. DVD-RAM disc and Card do not require initialization. • DVD-R discs are making an original DVD-R disc using MyDVD software, a message for use DVD-MovieAlbum. • Set the display resolution to 1024 ~ 768 (16 bits color) when using DVD-MovieAlbum. therefore when you write information to the DVD-R disc with DVD-MovieAlbum or MyDVD, you log on DVD Video Camera when using a DVD-R disc with your computer. 7 Write motion image files to the DVD-R disc...
...-ROM does not contain the slideshows function. DVD-RAM disc and Card do not require initialization. • DVD-R discs are making an original DVD-R disc using MyDVD software, a message for use DVD-MovieAlbum. • Set the display resolution to 1024 ~ 768 (16 bits color) when using DVD-MovieAlbum. therefore when you write information to the DVD-R disc with DVD-MovieAlbum or MyDVD, you log on DVD Video Camera when using a DVD-R disc with your computer. 7 Write motion image files to the DVD-R disc...
Dvd Camcorder
Page 15
... of Disc or Card 32 Recordable Time of Movie (Video 32 Recordable Stills (Photos) on Disc 33 Recordable Stills (Photos) on Card 33 Size and Quality of Photos 33 Setups Setting Up the DVD Video Camera 34 Holding DVD Video Camera 34 Attaching Shoulder Belt 35 Attaching Lens Cap 35 Inserting Battery into Remote Controller 36 Removing Battery from Remote Controller.......... 36 Viewing Subject Through Viewfinder 37 Viewing Image on LCD Monitor Screen 38 Closing LCD Monitor 39 Setting Date and Time 40 Changing Display Format of Date and Time 41 About the Battery Pack...
... of Disc or Card 32 Recordable Time of Movie (Video 32 Recordable Stills (Photos) on Disc 33 Recordable Stills (Photos) on Card 33 Size and Quality of Photos 33 Setups Setting Up the DVD Video Camera 34 Holding DVD Video Camera 34 Attaching Shoulder Belt 35 Attaching Lens Cap 35 Inserting Battery into Remote Controller 36 Removing Battery from Remote Controller.......... 36 Viewing Subject Through Viewfinder 37 Viewing Image on LCD Monitor Screen 38 Closing LCD Monitor 39 Setting Date and Time 40 Changing Display Format of Date and Time 41 About the Battery Pack...
Dvd Camcorder
Page 16
... Movie Quality (VIDEO Mode 86 Switching Quality of Still Image (Quality 87 Receiving Image from Another Device (Input Source 88 Switching External Input Recording Method (PHOTO Input 88 Self Timer 89 Setting OSD Output On or Off (On-Screen Display 90 LCD Setup 91 Setting Brightness of LCD Screen (Brightness 91 Setting Color Density of LCD Screen (Color Level 91 Initial Settings 92 Switching Operating Sound On or Off (Beep 92 Turning DVD Video Camera Off Automatically (Power Save 92 Turning Record LED On or Off (Record LED 93 Changing Display Language (Language 93 Resetting Menu...
... Movie Quality (VIDEO Mode 86 Switching Quality of Still Image (Quality 87 Receiving Image from Another Device (Input Source 88 Switching External Input Recording Method (PHOTO Input 88 Self Timer 89 Setting OSD Output On or Off (On-Screen Display 90 LCD Setup 91 Setting Brightness of LCD Screen (Brightness 91 Setting Color Density of LCD Screen (Color Level 91 Initial Settings 92 Switching Operating Sound On or Off (Beep 92 Turning DVD Video Camera Off Automatically (Power Save 92 Turning Record LED On or Off (Record LED 93 Changing Display Language (Language 93 Resetting Menu...
Dvd Camcorder
Page 17
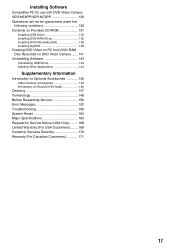
...-ROM 131 Installing USB Driver 133 Installing DVD-RAM Driver 135 Installing DVD-MovieAlbumSE 138 Installing MyDVD 140 Creating DVD Video on PC from DVD-RAM Disc Recorded on DVD Video Camera ....... 141 Uninstalling Software 143 Uninstalling USB Driver 143 Deleting Other Applications 144 Supplementary Information Introduction to Optional Accessories 145 Video Camera Accessories 145 Information on Round DVD Holder 146 Cleaning 147 Terminology 148 Before Requesting Service 150 Error Messages 152 Troubleshooting 158 System Reset 164 Major Specifications 165 Request for Service...
...-ROM 131 Installing USB Driver 133 Installing DVD-RAM Driver 135 Installing DVD-MovieAlbumSE 138 Installing MyDVD 140 Creating DVD Video on PC from DVD-RAM Disc Recorded on DVD Video Camera ....... 141 Uninstalling Software 143 Uninstalling USB Driver 143 Deleting Other Applications 144 Supplementary Information Introduction to Optional Accessories 145 Video Camera Accessories 145 Information on Round DVD Holder 146 Cleaning 147 Terminology 148 Before Requesting Service 150 Error Messages 152 Troubleshooting 158 System Reset 164 Major Specifications 165 Request for Service...
Dvd Camcorder
Page 40
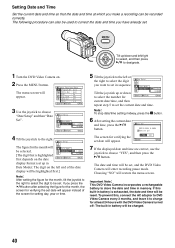
... time. If this , connect the AC adaptor to DVD Video Camera every 3 months, and leave it to charge for at which you make a recording can also be used to correct the date and time you have already set. The date and time will be set, and the DVD Video Camera will appear. Setting Date and Time Set the current date and time so that is exhausted, the date and time will appear. The menu screen will enter recording pause mode...
... time. If this , connect the AC adaptor to DVD Video Camera every 3 months, and leave it to charge for at which you make a recording can also be used to correct the date and time you have already set. The date and time will be set, and the DVD Video Camera will appear. Setting Date and Time Set the current date and time so that is exhausted, the date and time will appear. The menu screen will enter recording pause mode...
Dvd Camcorder
Page 50
... of power switch, set the switch according to each recording function: Set to " ": To record still on SD Memory Card or MultiMediaCard Set to "OFF": The DVD Video Camera will turn off. Set to " ": To record movie on DVDRAM or DVD-R disc Set to "Error Messages" on DVD Video Camera. Turn the switch while holding down the button at the center of recording movies and still images, and also basic settings on page 152 and take some time for the DVD Video Camera to start recording when turning the DVD Video Camera...
... of power switch, set the switch according to each recording function: Set to " ": To record still on SD Memory Card or MultiMediaCard Set to "OFF": The DVD Video Camera will turn off. Set to " ": To record movie on DVDRAM or DVD-R disc Set to "Error Messages" on DVD Video Camera. Turn the switch while holding down the button at the center of recording movies and still images, and also basic settings on page 152 and take some time for the DVD Video Camera to start recording when turning the DVD Video Camera...
Dvd Camcorder
Page 51
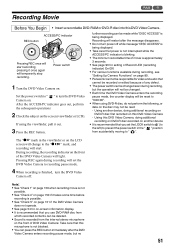
... prevent the power switch in the viewfinder or on the front of DVD Video Camera: Take care that cannot be deleted. • Sound is recorded from accidentally moving to turn the DVD Video Camera off while message "DISC ACCESS" is being displayed. The "m" mark in the " " position from the internal stereo microphone on the LCD screen will change to recording pause mode. 4 When recording is being displayed. • Take care that you use DVD-RAM disc from which recorded contents...
... prevent the power switch in the viewfinder or on the front of DVD Video Camera: Take care that cannot be deleted. • Sound is recorded from accidentally moving to turn the DVD Video Camera off while message "DISC ACCESS" is being displayed. The "m" mark in the " " position from the internal stereo microphone on the LCD screen will change to recording pause mode. 4 When recording is being displayed. • Take care that you use DVD-RAM disc from which recorded contents...
Dvd Camcorder
Page 59
... operate the power switch or remove the card while the ACCESS/PC or CARD ACCESS indicator is finished, the DVD Video Camera will be played back, it may damage the card or the data on card. 2 Press the g button. Press the A button again to restart playback. • Even if you have recorded last will enter pause mode at the last image on disc. If playback pause mode continues for the playback image to recording pause mode. Playback will stop playback, press the A button. Adjust the sound volume using the volume control buttons...
... operate the power switch or remove the card while the ACCESS/PC or CARD ACCESS indicator is finished, the DVD Video Camera will be played back, it may damage the card or the data on card. 2 Press the g button. Press the A button again to restart playback. • Even if you have recorded last will enter pause mode at the last image on disc. If playback pause mode continues for the playback image to recording pause mode. Playback will stop playback, press the A button. Adjust the sound volume using the volume control buttons...

Dvd Camcorder
Page 75
... S-video output jack* To video/ audio output jacks AV/S input/output cable (provided) Yellow White Red * If you are using video selector (see P. 28, 31). The operation of most images is interrupted by this line-input recording is present - See "Switching External Input Recording Method (PHOTO Input)" on page 88 for recording movie. Typical copyright protected images include those of DVD video, LD, recorded video tapes, some parts of AV/S input/output cable. 1 Set the input source on page 88. Recording (Dubbing) Images from Other Video Device You can connect the S-VIDEO...
... S-video output jack* To video/ audio output jacks AV/S input/output cable (provided) Yellow White Red * If you are using video selector (see P. 28, 31). The operation of most images is interrupted by this line-input recording is present - See "Switching External Input Recording Method (PHOTO Input)" on page 88 for recording movie. Typical copyright protected images include those of DVD video, LD, recorded video tapes, some parts of AV/S input/output cable. 1 Set the input source on page 88. Recording (Dubbing) Images from Other Video Device You can connect the S-VIDEO...

Dvd Camcorder
Page 88
.... 1 Press the MENU button, choose "Input Source" on how to connect the DVD Video Camera to "CAMERA". Recording format Details of setting On-screen display Frame Does not suit recording of less moving video. (with disc) (with card) Field Suitable for recording an image with card) 1 Press the MENU button, choose "PHOTO Input" on " " mode, "Input Source" setting will FINE return to end setting. Frame suits recording of frequently moving video subjects. (with disc) (with movement. Record Func t i ons Setup Input Source PHOTO I NE S LINE...
.... 1 Press the MENU button, choose "Input Source" on how to connect the DVD Video Camera to "CAMERA". Recording format Details of setting On-screen display Frame Does not suit recording of less moving video. (with disc) (with card) Field Suitable for recording an image with card) 1 Press the MENU button, choose "PHOTO Input" on " " mode, "Input Source" setting will FINE return to end setting. Frame suits recording of frequently moving video subjects. (with disc) (with movement. Record Func t i ons Setup Input Source PHOTO I NE S LINE...
Dvd Camcorder
Page 131
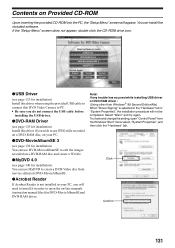
You can use MyDVD to connect this driver if you do not connect the USB cable before installing the USB driver. Click Confirm 131 If the "Setup Menu" screen does not appear, double-click the CD-ROM drive icon. lDVD-MovieAlbumSE 3 (see page 140 for DVD-MovieAlbumSE and DVD-RAM driver. To check and change the setting, open the on-line manuals (instruction manual files) for installation). Note: If any trouble has occured while installing USB driver or DVD-RAM driver : (Using other than...
You can use MyDVD to connect this driver if you do not connect the USB cable before installing the USB driver. Click Confirm 131 If the "Setup Menu" screen does not appear, double-click the CD-ROM drive icon. lDVD-MovieAlbumSE 3 (see page 140 for DVD-MovieAlbumSE and DVD-RAM driver. To check and change the setting, open the on-line manuals (instruction manual files) for installation). Note: If any trouble has occured while installing USB driver or DVD-RAM driver : (Using other than...
Dvd Camcorder
Page 133
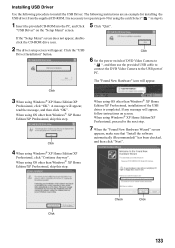
... appear: Click the "USB Driver Installation" button. If the "Setup Menu" screen does not appear, doubleclick the CD-ROM drive icon. 2 The driver setup screen will appear, follow instructions on the "Setup Menu" screen. Click 6 Set the power switch of DVD Video Camera to " ", and then use the provided USB cable to connect the DVD Video Camera to the next step. 7 When the "Found New Hardware Wizard" screen appears, make sure that "Install the software automatically (Recommended)" has been checked, and then click...
... appear: Click the "USB Driver Installation" button. If the "Setup Menu" screen does not appear, doubleclick the CD-ROM drive icon. 2 The driver setup screen will appear, follow instructions on the "Setup Menu" screen. Click 6 Set the power switch of DVD Video Camera to " ", and then use the provided USB cable to connect the DVD Video Camera to the next step. 7 When the "Found New Hardware Wizard" screen appears, make sure that "Install the software automatically (Recommended)" has been checked, and then click...
Dvd Camcorder
Page 135
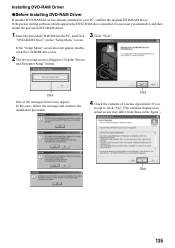
... CD-ROM drive icon. 2 The driver setup screen will appear: Click the "Driver and Formatter Setup" button. Click 4 Check the contents of the messages below may differ from those in your PC, confirm the original DVD-RAM driver. Installing DVD-RAM Driver lBefore Installing DVD-RAM Driver If another DVD-RAM driver has already installed in the figure.). "DVD-RAM Driver" on actual screen may appear. If the packet writing software which supports the DVD-RAM disc is installed...
... CD-ROM drive icon. 2 The driver setup screen will appear: Click the "Driver and Formatter Setup" button. Click 4 Check the contents of the messages below may differ from those in your PC, confirm the original DVD-RAM driver. Installing DVD-RAM Driver lBefore Installing DVD-RAM Driver If another DVD-RAM driver has already installed in the figure.). "DVD-RAM Driver" on actual screen may appear. If the packet writing software which supports the DVD-RAM disc is installed...
Dvd Camcorder
Page 141
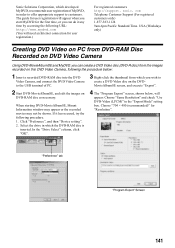
... Standard Time. In the "Drive Select" column, click "OK". 4 The "Program Export" screen, shown below : 1 Insert a recorded DVD-RAM disc into the DVD Video Camera, and connect the DVD Video Camera to the USB terminal of MyDVD, in which you can do it has occured, try the following URL: http://www.mydvd.com (You will appear: Choose "Same Resolution" and check "Use DVD-Video (LPCM)" in the "Export Mode" setting...
... Standard Time. In the "Drive Select" column, click "OK". 4 The "Program Export" screen, shown below : 1 Insert a recorded DVD-RAM disc into the DVD Video Camera, and connect the DVD Video Camera to the USB terminal of MyDVD, in which you can do it has occured, try the following URL: http://www.mydvd.com (You will appear: Choose "Same Resolution" and check "Use DVD-Video (LPCM)" in the "Export Mode" setting...
Dvd Camcorder
Page 143
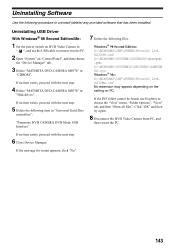
....sys Windows® Me: C:\WINDOWS\INF\OTHER\Hitachi Ltd. Uninstalling Software Use the following procedure to uninstall (delete) any provided software that has been installed: Uninstalling USB Driver With Windows® 98 Second Edition/Me: 1 Set the power switch on DVD Video Camera to " ", and use Explorer to the PC. 2 Open "System" on "Control Panel", and then choose the "Device Manager" tab. 3 Delete "MATSHITA DVD-CAMERA M5070" in "Universal Serial Bus controllers": "Panasonic DVD CAMERA DVD Mode USB Interface" 7 Delete the following files.
....sys Windows® Me: C:\WINDOWS\INF\OTHER\Hitachi Ltd. Uninstalling Software Use the following procedure to uninstall (delete) any provided software that has been installed: Uninstalling USB Driver With Windows® 98 Second Edition/Me: 1 Set the power switch on DVD Video Camera to " ", and use Explorer to the PC. 2 Open "System" on "Control Panel", and then choose the "Device Manager" tab. 3 Delete "MATSHITA DVD-CAMERA M5070" in "Universal Serial Bus controllers": "Panasonic DVD CAMERA DVD Mode USB Interface" 7 Delete the following files.

Dvd Camcorder
Page 144
... next step. 5 Delete "Panasonic DVD CAMERA DVD Mode USB Interface" in "Disk drives". Deleting Other Applications Figure 2. If your PC uses Windows® XP Home Edition/XP Professional or no item exists, proceed with the next step. 6 Close Device Manager. With Windows® 2000 Professional/XP Home Edition/XP Professional: 1 Set the power switch on DVD Video Camera to " ", and use the USB cable to connect it to the PC. 2 Open "System" on "Control Panel", and...
... next step. 5 Delete "Panasonic DVD CAMERA DVD Mode USB Interface" in "Disk drives". Deleting Other Applications Figure 2. If your PC uses Windows® XP Home Edition/XP Professional or no item exists, proceed with the next step. 6 Close Device Manager. With Windows® 2000 Professional/XP Home Edition/XP Professional: 1 Set the power switch on DVD Video Camera to " ", and use the USB cable to connect it to the PC. 2 Open "System" on "Control Panel", and...
Dvd Camcorder
Page 160
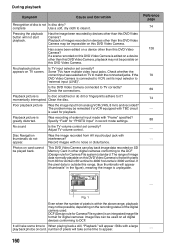
... used . Adjust TV volume control. Photos on a device other than this DVD Video Camera? Playback picture is connected to it . momentarily interrupted. The range of disc is an integrated image file format for playback. DCF (Design rule for Camera File system) is not Is disc dirty? Check the connections. Was recording of images recorded on this DVD Video Camera. It will take some time to match the connected jacks. Pressing the playback button will appear (thumbnails* in record mode settings. Clean the disc. Was the image recorded from analog VCR...
... used . Adjust TV volume control. Photos on a device other than this DVD Video Camera? Playback picture is connected to it . momentarily interrupted. The range of disc is an integrated image file format for playback. DCF (Design rule for Camera File system) is not Is disc dirty? Check the connections. Was recording of images recorded on this DVD Video Camera. It will take some time to match the connected jacks. Pressing the playback button will appear (thumbnails* in record mode settings. Clean the disc. Was the image recorded from analog VCR...
Dvd Camcorder
Page 164
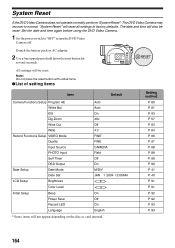
... of setting items Item Default Camera Functions Setup Program AE White Bal. The date and time will be reset: Set the date and time again before using the DVD Video Camera. 1 Set the power switch to "OFF" to factory defaults. Note: Do not press the reset button with undue force. "System Reset" will not appear depending on the disc or card inserted. ElS Dig.Zoom Wind Cut Wide Record Functions Setup VIDEO Mode Quality Input Source PHOTO Input Self Timer OSD Output Date Setup Date Mode Date Set LCD Setup Brightness Auto Auto On...
... of setting items Item Default Camera Functions Setup Program AE White Bal. The date and time will be reset: Set the date and time again before using the DVD Video Camera. 1 Set the power switch to "OFF" to factory defaults. Note: Do not press the reset button with undue force. "System Reset" will not appear depending on the disc or card inserted. ElS Dig.Zoom Wind Cut Wide Record Functions Setup VIDEO Mode Quality Input Source PHOTO Input Self Timer OSD Output Date Setup Date Mode Date Set LCD Setup Brightness Auto Auto On...


