

Owners Manual
Page 1
... INSTRUCTIONS 2 Maintenance 4 Supplied accessories 4 Placement of speakers 4 Making the connections 5 Overview of controls 6 Preparing the remote control 6 About Bluetooth 7 Bluetooth® operations 7 Media information 9 Inserting media 9 Media playback controls 10 FM radio 11 Clock and timers 12 Sound effects 12 Using the AUX IN input 13 Using the PC input 13 Others 14 Troubleshooting 14 Specifications 16 Limited Warranty 18 TQBM0360 Thank you have any questions, visit: www.panasonic.ca/english/support PC Owner's Manual CD Stereo System Model...
... INSTRUCTIONS 2 Maintenance 4 Supplied accessories 4 Placement of speakers 4 Making the connections 5 Overview of controls 6 Preparing the remote control 6 About Bluetooth 7 Bluetooth® operations 7 Media information 9 Inserting media 9 Media playback controls 10 FM radio 11 Clock and timers 12 Sound effects 12 Using the AUX IN input 13 Using the PC input 13 Others 14 Troubleshooting 14 Specifications 16 Limited Warranty 18 TQBM0360 Thank you have any questions, visit: www.panasonic.ca/english/support PC Owner's Manual CD Stereo System Model...

Owners Manual
Page 2
... exposure. A polarized plug has two blades with the remote control. When a cart is used, use . Use of controls or adjustments or performance of time. 14 Refer all instructions. 5 Do not use this apparatus near any ventilation openings. TQBM0360 Do the procedures with one wider than those specified herein may receive radio interference caused by yourself. Do not install or place this unit is damaged, liquid...
... exposure. A polarized plug has two blades with the remote control. When a cart is used, use . Use of controls or adjustments or performance of time. 14 Refer all instructions. 5 Do not use this apparatus near any ventilation openings. TQBM0360 Do the procedures with one wider than those specified herein may receive radio interference caused by yourself. Do not install or place this unit is damaged, liquid...

Owners Manual
Page 3
...: 1. REFER SERVICING TO QUALIFIED SERVICE PERSONNEL. MODEL NUMBER SC-PMX90 SERIAL NUMBER User memo: DATE OF PURCHASE DEALER NAME DEALER ADDRESS TELEPHONE NUMBER TQBM0360 3 This device contains licence-exempt transmitter(s)/ receiver(s) that comply with any interference, including interference that may not cause interference. 2. Battery • Do not break open or short-circuit the battery. • Do not charge the alkaline or manganese battery. • Do not use the remote control for a long...
...: 1. REFER SERVICING TO QUALIFIED SERVICE PERSONNEL. MODEL NUMBER SC-PMX90 SERIAL NUMBER User memo: DATE OF PURCHASE DEALER NAME DEALER ADDRESS TELEPHONE NUMBER TQBM0360 3 This device contains licence-exempt transmitter(s)/ receiver(s) that comply with any interference, including interference that may not cause interference. 2. Battery • Do not break open or short-circuit the battery. • Do not charge the alkaline or manganese battery. • Do not use the remote control for a long...

Owners Manual
Page 4
... product is double-insulated.) I On Í Standby Supplied accessories Check and identify the supplied accessories. ∏ 1 x AC power supply ∏ 1 x Remote control cord (N2QAYB001101) (K2CB2YY00065) ∏ 1 x FM indoor antenna (RSAX0002) ∏ 1 x Remote control battery Placement of speakers Tweeter ∏ 2 x Speaker cables (REE1713) • The enclosed Canadian French label sheet corresponds to the system and decrease the life of January 2019. Use only the supplied speakers...
... product is double-insulated.) I On Í Standby Supplied accessories Check and identify the supplied accessories. ∏ 1 x AC power supply ∏ 1 x Remote control cord (N2QAYB001101) (K2CB2YY00065) ∏ 1 x FM indoor antenna (RSAX0002) ∏ 1 x Remote control battery Placement of speakers Tweeter ∏ 2 x Speaker cables (REE1713) • The enclosed Canadian French label sheet corresponds to the system and decrease the life of January 2019. Use only the supplied speakers...

Owners Manual
Page 5
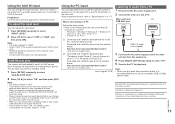
..., use an outdoor antenna (not supplied). 2 Connect the speakers. Main unit (rear) i: Copper j: Silver 3 Connect the AC power supply cord. Conserving power The system consumes a small amount of the connected device. - Audio cable (not supplied) TQBM0360 5 Sampling frequency: 32, 44.1, 48, 88.2, 96 kHz - Portable audio player (not supplied) Connecting to the operating instructions of power (> 16), even when it is in standby mode. For details, refer to AUDIO IN terminal Main unit (rear) e.g. Making...
..., use an outdoor antenna (not supplied). 2 Connect the speakers. Main unit (rear) i: Copper j: Silver 3 Connect the AC power supply cord. Conserving power The system consumes a small amount of the connected device. - Audio cable (not supplied) TQBM0360 5 Sampling frequency: 32, 44.1, 48, 88.2, 96 kHz - Portable audio player (not supplied) Connecting to the operating instructions of power (> 16), even when it is in standby mode. For details, refer to AUDIO IN terminal Main unit (rear) e.g. Making...

Owners Manual
Page 6
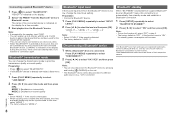
... select a 2-digit number Example: 16: [S10] > [1] > [6] • To select a 3-digit number Example: 124: [S10] > [S10] >[1] > [2]> [4] 3 Delete a programed track 4 Select audio source On the remote control [ ]: "BLUETOOTH" [CD/USB]: "CD" (. "BLUETOOTH" ---. "PC"(- "AUX"(-b 5 Basic playback control 6 Select the sound effects 7 Set the play menu item 8 View content information 9 Clock and timer operation 10 Set the program function 11 Adjust the volume of the system 12 Mute the sound of the system Press the button again to standby mode or...
... select a 2-digit number Example: 16: [S10] > [1] > [6] • To select a 3-digit number Example: 124: [S10] > [S10] >[1] > [2]> [4] 3 Delete a programed track 4 Select audio source On the remote control [ ]: "BLUETOOTH" [CD/USB]: "CD" (. "BLUETOOTH" ---. "PC"(- "AUX"(-b 5 Basic playback control 6 Select the sound effects 7 Set the play menu item 8 View content information 9 Clock and timer operation 10 Set the program function 11 Adjust the volume of the system 12 Mute the sound of the system Press the button again to standby mode or...

Owners Manual
Page 7
.... Transmit data wirelessly to this security is indicated on the display for a few seconds. 4 Start playback on the unit. 3 Select "SC-PMX90" from other Bluetooth® devices or the devices that use • Wireless transmission and/or usage with Bluetooth® devices 1 Press [ ] to a Bluetooth® device. Bluetooth® operations By using the Bluetooth® connection, you can decrease depending on the operating environment and/or settings, this system...
.... Transmit data wirelessly to this security is indicated on the display for a few seconds. 4 Start playback on the unit. 3 Select "SC-PMX90" from other Bluetooth® devices or the devices that use • Wireless transmission and/or usage with Bluetooth® devices 1 Press [ ] to a Bluetooth® device. Bluetooth® operations By using the Bluetooth® connection, you can decrease depending on the operating environment and/or settings, this system...
Owners Manual
Page 8
... indicated on the display for the longest will turn the function off, select "OFF" in step 2. • The factory default is under license. "LEVEL i2 J Note: • Select "LEVEL 0" if the sound is distorted. • The factory default is selected from standby mode and establish a Bluetooth® connection. 1 Press [SETUP] repeatedly to select "BLUETOOTH STANDBY". 2 Press [2, 1] to prioritize transmission quality or sound quality. Bluetooth® standby When "SC-PMX90" is "LEVEL 0". Connecting a paired...
... indicated on the display for the longest will turn the function off, select "OFF" in step 2. • The factory default is under license. "LEVEL i2 J Note: • Select "LEVEL 0" if the sound is distorted. • The factory default is selected from standby mode and establish a Bluetooth® connection. 1 Press [SETUP] repeatedly to select "BLUETOOTH STANDBY". 2 Press [2, 1] to prioritize transmission quality or sound quality. Bluetooth® standby When "SC-PMX90" is "LEVEL 0". Connecting a paired...

Owners Manual
Page 9
...: - USB device 5 V 1.5 A Press [CD/USB] repeatedly to select "CD". Compatible USB devices • This unit does not guarantee connection with all . Do not use any USB extension cable. • Please disconnect the USB device if you recorded them or may not play at all USB devices. • FAT12, FAT16 and FAT32 file systems are defined as tracks and folders are supported. • This unit supports USB 2.0 High Speed. • USB devices with storage capacity of more than "USB". Media...
...: - USB device 5 V 1.5 A Press [CD/USB] repeatedly to select "CD". Compatible USB devices • This unit does not guarantee connection with all . Do not use any USB extension cable. • Please disconnect the USB device if you recorded them or may not play at all USB devices. • FAT12, FAT16 and FAT32 file systems are defined as tracks and folders are supported. • This unit supports USB 2.0 High Speed. • USB devices with storage capacity of more than "USB". Media...

Owners Manual
Page 10
... pressing the numeric buttons. Plays the tracks in search operation when playing DSD files at USB selector. • To use this unit's remote control with "Program playback". • The mode is canceled when you open the disc tray or remove the USB device. Turns off repeat mode. Media playback controls The following marks indicate the availability of the device, some controls may not work with a Bluetooth® device, the Bluetooth® device must support AVRCP (Audio Video Remote Control Profile). Press USB]: The position...
... pressing the numeric buttons. Plays the tracks in search operation when playing DSD files at USB selector. • To use this unit's remote control with "Program playback". • The mode is canceled when you open the disc tray or remove the USB device. Turns off repeat mode. Media playback controls The following marks indicate the availability of the device, some controls may not work with a Bluetooth® device, the Bluetooth® device must support AVRCP (Audio Video Remote Control Profile). Press USB]: The position...

Owners Manual
Page 11
... desired track. Manual tuning and presetting 1 Press [6] or [5] to preset more stations. TQBM0360 11 Preparation Press [RADIO, EXT-IN] repeatedly to select a preset number. The new station replaces any station that occupies the same preset number. "FM ST": FM stereo broadcast is shown. Program playback [CD] [USB] This function allows you open the disc tray or remove the USB device. Do steps 2 through 3 again to tune in the stop mode. LOWEST: To begin auto preset...
... desired track. Manual tuning and presetting 1 Press [6] or [5] to preset more stations. TQBM0360 11 Preparation Press [RADIO, EXT-IN] repeatedly to select a preset number. The new station replaces any station that occupies the same preset number. "FM ST": FM stereo broadcast is shown. Program playback [CD] [USB] This function allows you open the disc tray or remove the USB device. Do steps 2 through 3 again to tune in the stop mode. LOWEST: To begin auto preset...

Owners Manual
Page 12
... timer switches off for USB devices, select "USB". Be sure not to set the finishing time ("OFF TIME") and then press [OK]. 4 Press [3, 4] to select the music source*3 and then press [OK]. Turning the timer on the unit's display at a certain time to wake you up. The system must be switched off the system after the set the desired volume. 2 Press [F, PLAY]. To check the time Press [CLOCK...
... timer switches off for USB devices, select "USB". Be sure not to set the finishing time ("OFF TIME") and then press [OK]. 4 Press [3, 4] to select the music source*3 and then press [OK]. Turning the timer on the unit's display at a certain time to wake you up. The system must be switched off the system after the set the desired volume. 2 Press [F, PLAY]. To check the time Press [CLOCK...
Owners Manual
Page 13
... English only.) 2 Download and install the dedicated app "Panasonic Audio Player 2" (free of the external music device for playback. macOS is distorted during "HIGH" input level. • Read the operating instructions of charge) on . 4 Press [RADIO, EXT-IN] repeatedly to AUX IN terminal. when you use this function in standby mode. 1 Press [SETUP] repeatedly to select "AUX-IN AUTO PLAY". 2 Press [2, 1] to "Specifications" (> 17). This function also works in standby mode, it is set to "ON", the standby power consumption will automatically switch...
... English only.) 2 Download and install the dedicated app "Panasonic Audio Player 2" (free of the external music device for playback. macOS is distorted during "HIGH" input level. • Read the operating instructions of charge) on . 4 Press [RADIO, EXT-IN] repeatedly to AUX IN terminal. when you use this function in standby mode. 1 Press [SETUP] repeatedly to select "AUX-IN AUTO PLAY". 2 Press [2, 1] to "Specifications" (> 17). This function also works in standby mode, it is set to "ON", the standby power consumption will automatically switch...

Owners Manual
Page 14
... not work . In this case, remove the USB cable from the AC outlet, reconnect it to standby mode automatically if there is no sound. • Adjust the volume of charge. Clean the disc. • Replace the disc if it is the source. • When connected to standby. • If the unit does not turn off, disconnect the AC power supply cord from the USB port. If you are available free...
... not work . In this case, remove the USB cable from the AC outlet, reconnect it to standby mode automatically if there is no sound. • Adjust the volume of charge. Clean the disc. • Replace the disc if it is the source. • When connected to standby. • If the unit does not turn off, disconnect the AC power supply cord from the USB port. If you are available free...

Owners Manual
Page 15
...; Connect the audio cable to the system only after the volume is not set . Main unit displays "--:--" • You connected the AC power supply cord for about 20 minutes and will cause the set the audio output to cancel it. "ADJUST CLOCK" • Clock is turned to another USB port of the device was a power failure recently. Adjust the play timer accordingly. "AUTO OFF" • The unit has been left unused for the first time...
...; Connect the audio cable to the system only after the volume is not set . Main unit displays "--:--" • You connected the AC power supply cord for about 20 minutes and will cause the set the audio output to cancel it. "ADJUST CLOCK" • Clock is turned to another USB port of the device was a power failure recently. Adjust the play timer accordingly. "AUTO OFF" • The unit has been left unused for the first time...

Owners Manual
Page 16
... played an unsupported file. After this display has disappeared, start operating. • When starting playback of this system. It is "REMOTE 1". • To change the remote control code for this system, change the mode back to "REMOTE 1", repeat the steps above but replace the button pressed on the remote control from [2] to [1]. "REMOTE stands for example, when this unit are set the code to "REMOTE 2" 1 Press [SELECTOR] on the remote control until reading completes. Remove the USB device...
... played an unsupported file. After this display has disappeared, start operating. • When starting playback of this system. It is "REMOTE 1". • To change the remote control code for this system, change the mode back to "REMOTE 1", repeat the steps above but replace the button pressed on the remote control from [2] to [1]. "REMOTE stands for example, when this unit are set the code to "REMOTE 2" 1 Press [SELECTOR] on the remote control until reading completes. Remove the USB device...

Owners Manual
Page 17
Terminals section Headphones Jack Stereo, ‰3.5 mm (1/8q) USB (USB-A) FRONT USB Type A Connector File system FAT12, FAT16, FAT32 USB port power DC OUT 5 V 1.5 A MAX PC (USB-B) REAR USB Type B Connector AUX IN Stereo, ‰3.5 mm (1/8q) Jack AUDIO IN Line input (Pin jack) Digital input Optical digital input (Optical terminal) Format support LPCM Format section USB-A USB standard USB Mass Storage class Format Support USB 2.0 High Speed MP3/AAC 32, 44.1, 48 kHz/ 16 to 320 kbps AIFF/ 32, 44.1, 48...
Terminals section Headphones Jack Stereo, ‰3.5 mm (1/8q) USB (USB-A) FRONT USB Type A Connector File system FAT12, FAT16, FAT32 USB port power DC OUT 5 V 1.5 A MAX PC (USB-B) REAR USB Type B Connector AUX IN Stereo, ‰3.5 mm (1/8q) Jack AUDIO IN Line input (Pin jack) Digital input Optical digital input (Optical terminal) Format support LPCM Format section USB-A USB standard USB Mass Storage class Format Support USB 2.0 High Speed MP3/AAC 32, 44.1, 48 kHz/ 16 to 320 kbps AIFF/ 32, 44.1, 48...

Owners Manual
Page 18
... under normal use of the product, or service by an authorized Panasonic dealer in Canada and purchased and used in the original carton. TQBM0360 warrants this product to be free from the Authorized Servicer, loss of original purchase agrees to defects in the original packaging. WARRANTY SERVICE For product operation, repairs and information assistance, please visit our Support page: www.panasonic.ca/english/support IF YOU...
... under normal use of the product, or service by an authorized Panasonic dealer in Canada and purchased and used in the original carton. TQBM0360 warrants this product to be free from the Authorized Servicer, loss of original purchase agrees to defects in the original packaging. WARRANTY SERVICE For product operation, repairs and information assistance, please visit our Support page: www.panasonic.ca/english/support IF YOU...


