

PVGS36 User Guide
Page 6
... and Handling 10 Power Supply 11 Charging Time and Available Recording Time .. 12 To Use as a Grip Belt 13 Re-attaching the Lens Cap 13 Attaching the Shoulder Strap 13 Inserting/Removing a Cassette 14 Using a Memory Card (Optional 15 Turning on the Camcorder 15 Setting Date and Time 16 Using the Viewfinder/LCD Monitor 17 Easy to Use Mode Dial 18 How to Use the Joystick Control 18 Using the Menu Screen 20 Selecting Language 21 List...
... and Handling 10 Power Supply 11 Charging Time and Available Recording Time .. 12 To Use as a Grip Belt 13 Re-attaching the Lens Cap 13 Attaching the Shoulder Strap 13 Inserting/Removing a Cassette 14 Using a Memory Card (Optional 15 Turning on the Camcorder 15 Setting Date and Time 16 Using the Viewfinder/LCD Monitor 17 Easy to Use Mode Dial 18 How to Use the Joystick Control 18 Using the Menu Screen 20 Selecting Language 21 List...
PVGS36 User Guide
Page 10
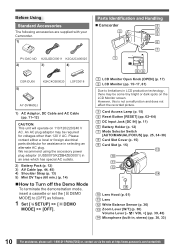
... recorded picture. 3 Card Access Lamp (p. 15) 4 Reset Button [RESET] (pp. 62~64) 5 DC Input Jack [DC IN] (p. 11) 6 Battery Holder (p. 12) 7 Mode Selector Switch [AUTO/MANUAL/FOCUS] (pp. 25, 34~38) 8 Card Slot Cover (p. 15) 9 Card Slot (p. 15) 13 10 11 12 14 A/V 15 10 Lens Hood (p. 61) 11 Lens 12 White Balance Sensor (p. 36) 13 Zoom Lever [W/T] (p. 30) Volume Lever [- / VOL +] (pp. 39, 40) 14 Microphone (built-in selecting an alternate AC plug...
... recorded picture. 3 Card Access Lamp (p. 15) 4 Reset Button [RESET] (pp. 62~64) 5 DC Input Jack [DC IN] (p. 11) 6 Battery Holder (p. 12) 7 Mode Selector Switch [AUTO/MANUAL/FOCUS] (pp. 25, 34~38) 8 Card Slot Cover (p. 15) 9 Card Slot (p. 15) 13 10 11 12 14 A/V 15 10 Lens Hood (p. 61) 11 Lens 12 White Balance Sensor (p. 36) 13 Zoom Lever [W/T] (p. 30) Volume Lever [- / VOL +] (pp. 39, 40) 14 Microphone (built-in selecting an alternate AC plug...

PVGS36 User Guide
Page 11
Insert the card first and then attach the tripod. 36 Battery Eject Switch [BATTERY RELEASE] (p. 12) Power Supply Using the AC Adaptor • Before connecting or disconnecting the power supply, set the [OFF/ON] Switch on the Viewfinder screen. Before Using 15 Audio-Video Output Jack [AV OUT] (pp. 44, 45) • Connecting an AV Cable to this jack activates the Camcorder's built-in speaker. • When connecting the pin plug of...
Insert the card first and then attach the tripod. 36 Battery Eject Switch [BATTERY RELEASE] (p. 12) Power Supply Using the AC Adaptor • Before connecting or disconnecting the power supply, set the [OFF/ON] Switch on the Viewfinder screen. Before Using 15 Audio-Video Output Jack [AV OUT] (pp. 44, 45) • Connecting an AV Cable to this jack activates the Camcorder's built-in speaker. • When connecting the pin plug of...
PVGS36 User Guide
Page 17
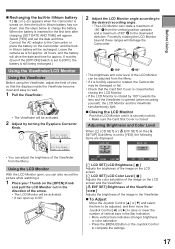
... image on the LCD screen. [ LCD SET] LCD Color Level [ ] Adjusts the color saturation of the image on the [ SETUP] Sub-Menu is set the date and time. When the battery is inserted for approx. 6 months. (Even if the [OFF/ON] Switch is set to [OFF], the battery is still being recharged.) Using the Viewfinder/LCD Monitor Using the Viewfinder Before using the Viewfinder, adjust the field of view so that the Card Slot Cover is closed . LCD SET...
... image on the LCD screen. [ LCD SET] LCD Color Level [ ] Adjusts the color saturation of the image on the [ SETUP] Sub-Menu is set the date and time. When the battery is inserted for approx. 6 months. (Even if the [OFF/ON] Switch is set to [OFF], the battery is still being recharged.) Using the Viewfinder/LCD Monitor Using the Viewfinder Before using the Viewfinder, adjust the field of view so that the Card Slot Cover is closed . LCD SET...
PVGS36 User Guide
Page 21
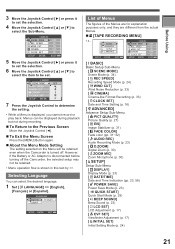
...-like Format Recording (p. 33) [ CLOCK SET] Date and Time Setting (p. 16) [ ADVANCED] Advance Setup Sub-Menu [ PICT.QUALITY] Picture Quality (p. 27) [ EIS] Image Stabilizer (p. 31) [ FADE COLOR] Fade color (pp. 31~32) [ AUDIO REC] Audio Recording Mode (p. 23) [ D.ZOOM] Digital Zoom (p. 30) [ ZOOM MIC] Zoom Microphone (p. 30) [ SETUP] Setup Sub-Menu [ DISPLAY] Display Mode (p. 23) [ DATE/TIME] Date and Time Indication (pp. 23, 56) [ POWER SAVE] Power Save Mode (p. 23) [ QUICK START] Quick Start Mode (p. 29) [ BEEP SOUND] Beep Sound (p. 23) [ LCD SET] LCD Adjustment (p. 17) [ EVF SET] Viewfinder...
...-like Format Recording (p. 33) [ CLOCK SET] Date and Time Setting (p. 16) [ ADVANCED] Advance Setup Sub-Menu [ PICT.QUALITY] Picture Quality (p. 27) [ EIS] Image Stabilizer (p. 31) [ FADE COLOR] Fade color (pp. 31~32) [ AUDIO REC] Audio Recording Mode (p. 23) [ D.ZOOM] Digital Zoom (p. 30) [ ZOOM MIC] Zoom Microphone (p. 30) [ SETUP] Setup Sub-Menu [ DISPLAY] Display Mode (p. 23) [ DATE/TIME] Date and Time Indication (pp. 23, 56) [ POWER SAVE] Power Save Mode (p. 23) [ QUICK START] Quick Start Mode (p. 29) [ BEEP SOUND] Beep Sound (p. 23) [ LCD SET] LCD Adjustment (p. 17) [ EVF SET] Viewfinder...
PVGS36 User Guide
Page 23
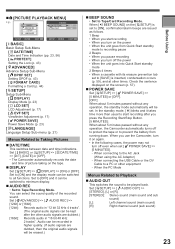
... select the sound quality of picture taking on the screen (p. 57). „ POWER SAVE Set [ SETUP] >> [ POWER SAVE] >> [5 MINUTES] or [OFF]. [OFF]: When about 5 minutes passed without any operation, the Camcorder automatically turns off even when set . Check the sentence displayed on the tape. „ DISPLAY Set [ SETUP] >> [ DISPLAY] >> [ON] or [OFF]. Before Using „ [PICTURE PLAYBACK MENU] e.g., BASIC ADVANCED SETUP LANGUAGE BASIC DATE/TIME D/T PROTECT NO SETUP ENTER EXIT SETUP ENTER EXIT [ BASIC] Basic Setup Sub-Menu [ DATE/TIME] Date and Time Indication (pp...
... select the sound quality of picture taking on the screen (p. 57). „ POWER SAVE Set [ SETUP] >> [ POWER SAVE] >> [5 MINUTES] or [OFF]. [OFF]: When about 5 minutes passed without any operation, the Camcorder automatically turns off even when set . Check the sentence displayed on the tape. „ DISPLAY Set [ SETUP] >> [ DISPLAY] >> [ON] or [OFF]. Before Using „ [PICTURE PLAYBACK MENU] e.g., BASIC ADVANCED SETUP LANGUAGE BASIC DATE/TIME D/T PROTECT NO SETUP ENTER EXIT SETUP ENTER EXIT [ BASIC] Basic Setup Sub-Menu [ DATE/TIME] Date and Time Indication (pp...
PVGS36 User Guide
Page 24
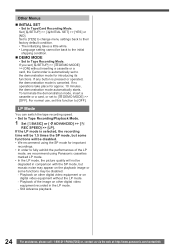
... SP mode, but some functions may be disabled. - If no operations take place for introducing its functions. If the LP mode is selected, the recording time will be 1.5 times the SP mode, but mosaic noise may appear on digital video equipment without inserting a cassette or a card, the Camcorder is canceled. Other Menus „ INITIAL SET • Set to [ DEMO MODE] >> [OFF]. Playback of the LP mode, we recommend using Panasonic cassettes marked LP mode. •...
... SP mode, but some functions may be disabled. - If no operations take place for introducing its functions. If the LP mode is selected, the recording time will be 1.5 times the SP mode, but mosaic noise may appear on digital video equipment without inserting a cassette or a card, the Camcorder is canceled. Other Menus „ INITIAL SET • Set to [ DEMO MODE] >> [OFF]. Playback of the LP mode, we recommend using Panasonic cassettes marked LP mode. •...

PVGS36 User Guide
Page 26
... a card, the Recording Start/Stop Button is disabled. • You can be recorded. (p. 27) • In order to record higher quality still pictures, you in the Recording Pause Mode. • Set to Tape Recording Mode. 1 Press the Joystick Control to display the One-Touch Navigation icon on the Memory Card from the Camcorder. • Open the LCD Monitor or extend the Viewfinder before the last recorded scene, the Camcorder switches to the Recording Pause Mode or the Still Playback Mode...
... a card, the Recording Start/Stop Button is disabled. • You can be recorded. (p. 27) • In order to record higher quality still pictures, you in the Recording Pause Mode. • Set to Tape Recording Mode. 1 Press the Joystick Control to display the One-Touch Navigation icon on the Memory Card from the Camcorder. • Open the LCD Monitor or extend the Viewfinder before the last recorded scene, the Camcorder switches to the Recording Pause Mode or the Still Playback Mode...

PVGS36 User Guide
Page 27
... play back data recorded on this Camcorder. • If set to [ON], the Shutter Effect cannot be recorded on the picture. • When the color of the screen changes or blurs, adjust the shutter speed manually to 1/60 or 1/100. • Photoshot Recording results in slightly inferior image quality. • For the number of still pictures to be recorded on a card, refer to page 27. • The sound cannot be recorded. • While data...
... play back data recorded on this Camcorder. • If set to [ON], the Shutter Effect cannot be recorded on the picture. • When the color of the screen changes or blurs, adjust the shutter speed manually to 1/60 or 1/100. • Photoshot Recording results in slightly inferior image quality. • For the number of still pictures to be recorded on a card, refer to page 27. • The sound cannot be recorded. • While data...

PVGS36 User Guide
Page 29
... the power is turned on the screen. • Using the MagicPix Function at the same time will be completely turned off. The Camcorder will reduce the battery recording/playback time. • This function is displayed. [One-Touch Navigation icon] 1/2 NEXT 3 Move the Joystick Control [◄] to select [ ]. • The [SELF-TIMER ON] and the [ ] Indication appears. 4 Press the [PHOTO SHOT] Button. • The [ ] Indication flashes and the recording starts...
... the power is turned on the screen. • Using the MagicPix Function at the same time will be completely turned off. The Camcorder will reduce the battery recording/playback time. • This function is displayed. [One-Touch Navigation icon] 1/2 NEXT 3 Move the Joystick Control [◄] to select [ ]. • The [SELF-TIMER ON] and the [ ] Indication appears. 4 Press the [PHOTO SHOT] Button. • The [ ] Indication flashes and the recording starts...

PVGS36 User Guide
Page 43
... the Card is formatted.) • Set to Picture Playback Mode. • The One-Touch Navigation icon is displayed. Notes: • The Lock Setting carried out by Camcorder. Notes: • Do not turn off the power while deleting. • To delete files, use the AC Adapter or a sufficiently charged battery. • In case of [ALL FILES], the deletion may take time if there are many files on another camera may take a little time. If the switch...
... the Card is formatted.) • Set to Picture Playback Mode. • The One-Touch Navigation icon is displayed. Notes: • The Lock Setting carried out by Camcorder. Notes: • Do not turn off the power while deleting. • To delete files, use the AC Adapter or a sufficiently charged battery. • In case of [ALL FILES], the deletion may take time if there are many files on another camera may take a little time. If the switch...

PVGS36 User Guide
Page 45
... input/output Terminal, and using the AV Cable 1 . „ Connecting with the optional DV cable (Only for equipment with a DV terminal) 2 Turn on the Camcorder and set to Tape Playback Mode. 3 Select the input channel on a DVD-RAM or other digital video equipment (such as another Camcorder of the same format/model) that the plugs are reproduced. 5 Start recording. 6 Move the Joystick Control [▼] to stop playback. 7 Stop recording. • For more information, refer to the operating instructions...
... input/output Terminal, and using the AV Cable 1 . „ Connecting with the optional DV cable (Only for equipment with a DV terminal) 2 Turn on the Camcorder and set to Tape Playback Mode. 3 Select the input channel on a DVD-RAM or other digital video equipment (such as another Camcorder of the same format/model) that the plugs are reproduced. 5 Start recording. 6 Move the Joystick Control [▼] to stop playback. 7 Stop recording. • For more information, refer to the operating instructions...

PVGS36 User Guide
Page 46
...; If you use a device equipped with any OHCI compliant Firewire Card/video - Recording from a Tape onto a Card Still pictures can be transferred directly to record, and press the [PHOTO SHOT] Button. • Audio will not be recorded. PC Connection With DV Interface Cable A video clip can be recorded on the Memory Card from scenes that have no problem working with DV Terminals such as the [ AUDIO REC] mode of the playback tape. • The images on the recorder monitor may be...
...; If you use a device equipped with any OHCI compliant Firewire Card/video - Recording from a Tape onto a Card Still pictures can be transferred directly to record, and press the [PHOTO SHOT] Button. • Audio will not be recorded. PC Connection With DV Interface Cable A video clip can be recorded on the Memory Card from scenes that have no problem working with DV Terminals such as the [ AUDIO REC] mode of the playback tape. • The images on the recorder monitor may be...

PVGS36 User Guide
Page 47
... send video from the Web Site. Installing the USB Driver • For Windows XP users, the USB equipment operates with the driver installed standard on your OS. • If you have Internet access, please download the USB Driver. 1 To download and install the Driver, go to: http://www.panasonic.com/consumerdownloads 2 Click the software to be downloaded. With a PC 47 With a PC Using Camcorder with a PC An image stored on the DV Cassette or Memory Card...
... send video from the Web Site. Installing the USB Driver • For Windows XP users, the USB equipment operates with the driver installed standard on your OS. • If you have Internet access, please download the USB Driver. 1 To download and install the Driver, go to: http://www.panasonic.com/consumerdownloads 2 Click the software to be downloaded. With a PC 47 With a PC Using Camcorder with a PC An image stored on the DV Cassette or Memory Card...

PVGS36 User Guide
Page 50
... more recommended) Free hard disk space: At least 250 MB or more Interface: USB 1.1 or more Communication Speed: 56 kbps or faster is not needed. Necessary software: Windows Messenger 5.0/5.1 (Windows XP) MSN Messenger 7.0/7.5 (Windows XP/2000) *1 When your OS is Windows XP SP2, the USB Driver is recommended. Connecting the Camcorder to Personal Computer (For Using as a Web Camera) 1 Install the USB Driver. (pp. 47~48) 2 Set the Camcorder to Tape Recording Mode or Tape Playback Mode. •...
... more recommended) Free hard disk space: At least 250 MB or more Interface: USB 1.1 or more Communication Speed: 56 kbps or faster is not needed. Necessary software: Windows Messenger 5.0/5.1 (Windows XP) MSN Messenger 7.0/7.5 (Windows XP/2000) *1 When your OS is Windows XP SP2, the USB Driver is recommended. Connecting the Camcorder to Personal Computer (For Using as a Web Camera) 1 Install the USB Driver. (pp. 47~48) 2 Set the Camcorder to Tape Recording Mode or Tape Playback Mode. •...

PVGS36 User Guide
Page 54
... to as well. • In this Manual, the Panasonic make digital video camera with USB Jack is connected to Help. Switch the operation mode of the Camcorder and reconnect the Cable. • When the Tape Recording Mode of Camcorder is switched to the Operating Instructions which to save the motion pictures. • "Camera connected" is displayed. • Confirm the [ ] is selected. 6 Click [ ] to playback the tape. 7 Click [Import] to capture the motion pictures you may install or uninstall this information, refer to the...
... to as well. • In this Manual, the Panasonic make digital video camera with USB Jack is connected to Help. Switch the operation mode of the Camcorder and reconnect the Cable. • When the Tape Recording Mode of Camcorder is switched to the Operating Instructions which to save the motion pictures. • "Camera connected" is displayed. • Confirm the [ ] is selected. 6 Click [ ] to playback the tape. 7 Click [Import] to capture the motion pictures you may install or uninstall this information, refer to the...
PVGS36 User Guide
Page 57
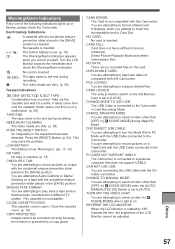
Turn the LCD Monitor towards the lens, the brightness of the following indications lights up or flashes, please check the Camcorder. NEED HEAD CLEANING: The video heads are connecting the USB Cable with the DV Cable connected. This may solve the problem. LOW BATTERY: The Battery is incompatible. This cassette is low. CAN NOT USE USB: You are dirty. (p. 59) PUSH THE RESET SWITCH: An irregularity in the equipment has been detected. CHANGE TO MANUAL MODE: You are attempting...
Turn the LCD Monitor towards the lens, the brightness of the following indications lights up or flashes, please check the Camcorder. NEED HEAD CLEANING: The video heads are connecting the USB Cable with the DV Cable connected. This may solve the problem. LOW BATTERY: The Battery is incompatible. This cassette is low. CAN NOT USE USB: You are dirty. (p. 59) PUSH THE RESET SWITCH: An irregularity in the equipment has been detected. CHANGE TO MANUAL MODE: You are attempting...
PVGS36 User Guide
Page 62
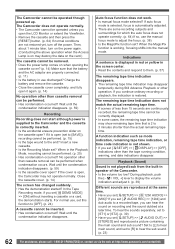
... screen has changed suddenly. • Has the demonstration started? Auto focus function does not work. • Is manual focus mode selected? If auto focus mode is selected, focus is working, focusing shifts into the manual mode. Indications A sentence is 2 to display the volume indication and adjust it. (p. 39) Different sounds are not restored yet, turn on the power again. (Conducting the above operation when the Access Lamp is on may show remaining tape time that the battery and...
... screen has changed suddenly. • Has the demonstration started? Auto focus function does not work. • Is manual focus mode selected? If auto focus mode is selected, focus is working, focusing shifts into the manual mode. Indications A sentence is 2 to display the volume indication and adjust it. (p. 39) Different sounds are not restored yet, turn on the power again. (Conducting the above operation when the Access Lamp is on may show remaining tape time that the battery and...

PVGS36 User Guide
Page 63
... instructions on the screen. Remove the cassette or the card for data protection and then press the [RESET] Button. Do not attempt to [LOCK], then deletion is displayed. • The image was either recorded in the Camcorder has been automatically detected. When the USB cable is soiled, noises may be performed. • Turn off the terminal with the protection on the Lens Cap. Please read the operating instructions of digital video...
... instructions on the screen. Remove the cassette or the card for data protection and then press the [RESET] Button. Do not attempt to [LOCK], then deletion is displayed. • The image was either recorded in the Camcorder has been automatically detected. When the USB cable is soiled, noises may be performed. • Turn off the terminal with the protection on the Lens Cap. Please read the operating instructions of digital video...

PVGS36 User Guide
Page 64
... copyright protection (copy guard)? However, the Auto Focus System does not function properly for recording image and sound data, it automatically records data, such as Time Code and Date/Time, as conventional video systems), this Camcorder employs a digital system for the following subjects or under the following recording conditions. Insert a tape. • Did you press the [MENU] Button, the Recording Start/Stop Button or the [PHOTO SHOT] Button? Compatibility with S-VHS or VHS Cassettes Because this Camcorder can be...
... copyright protection (copy guard)? However, the Auto Focus System does not function properly for recording image and sound data, it automatically records data, such as Time Code and Date/Time, as conventional video systems), this Camcorder employs a digital system for the following subjects or under the following recording conditions. Insert a tape. • Did you press the [MENU] Button, the Recording Start/Stop Button or the [PHOTO SHOT] Button? Compatibility with S-VHS or VHS Cassettes Because this Camcorder can be...


