
PVDV73 User Guide
Page 1
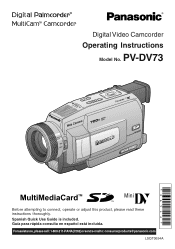
PV-DV73 Mini Before attempting to : consumerproducts@panasonic.com LSQT0654A Spanish Quick Use Guide is included. For assistance, please call : 1-800-211-PANA(7262) or send e-mail to connect, operate or adjust this product, please read these instructions thoroughly. Guía para rápida consulta en español está incluida. R Digital Video Camcorder Operating Instructions Model No.
PV-DV73 Mini Before attempting to : consumerproducts@panasonic.com LSQT0654A Spanish Quick Use Guide is included. For assistance, please call : 1-800-211-PANA(7262) or send e-mail to connect, operate or adjust this product, please read these instructions thoroughly. Guía para rápida consulta en español está incluida. R Digital Video Camcorder Operating Instructions Model No.
PVDV73 User Guide
Page 2
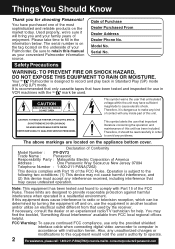
... Panasonic Way Secaucus New Jersey 07094 Telephone Number : 1-800-211-PANA(7262) This device complies with the Mini mark be read carefully in the information below. Your Mini Palmcorder is recommended that only cassette tapes that have been tested and inspected for help. CAUTION: TO REDUCE THE RISK OF ELECTRIC SHOCK, DO NOT REMOVE COVER (OR BACK) NO USER-SERVICEABLE PARTS INSIDE...
... Panasonic Way Secaucus New Jersey 07094 Telephone Number : 1-800-211-PANA(7262) This device complies with the Mini mark be read carefully in the information below. Your Mini Palmcorder is recommended that only cassette tapes that have been tested and inspected for help. CAUTION: TO REDUCE THE RISK OF ELECTRIC SHOCK, DO NOT REMOVE COVER (OR BACK) NO USER-SERVICEABLE PARTS INSIDE...
PVDV73 User Guide
Page 3
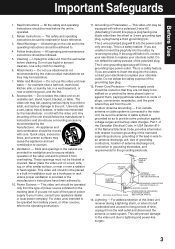
... safety purpose of the polarized plug. Power-supply cords should be read before cleaning. All the safety and operating instructions should be operated only from the wall outlet and disconnect the antenna or cable system. Heed Warnings - Do not use this video unit on the unit and in the operating instructions should be followed. 5. Accessories - Slots and openings in a wet basement, or near...
... safety purpose of the polarized plug. Power-supply cords should be read before cleaning. All the safety and operating instructions should be operated only from the wall outlet and disconnect the antenna or cable system. Heed Warnings - Do not use this video unit on the unit and in the operating instructions should be followed. 5. Accessories - Slots and openings in a wet basement, or near...
PVDV73 User Guide
Page 4
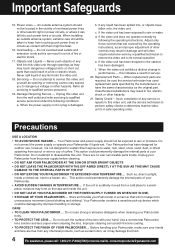
Servicing - When the power-supply cord or plug is in a manner that are no user serviceable parts inside. c. this indicates a need for outdoor use strong or abrasive detergents when cleaning your Palmcorder if it gets wet. Do not attempt to rain or water. There are covered by the operating instructions, as the original part. Unplug your hands and face are required, be fatal. 16...
Servicing - When the power-supply cord or plug is in a manner that are no user serviceable parts inside. c. this indicates a need for outdoor use strong or abrasive detergents when cleaning your Palmcorder if it gets wet. Do not attempt to rain or water. There are covered by the operating instructions, as the original part. Unplug your hands and face are required, be fatal. 16...
PVDV73 User Guide
Page 5
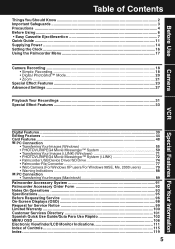
... Know 2 Important Safeguards ...3 Precautions ...4 Before Using ...6 • Easy Cassette Eject/Insertion 7 Quick Guide ...11 Supplying Power ...14 Setting the Clock ...16 Using the Palmcorder Menu 17 Camera Recording ...18 • Simple Recording 18 • Digital PhotoShot™ Mode 20 • Zoom ...21 Special Effect Features 23 Advanced Settings ...27 Playback Your Recordings 31 Special Effect Features 33 Digital Features ...39 Editing Features ...44 Card Features ...48 PC Connection • Transferring Your Images (Windows 55 •...
... Know 2 Important Safeguards ...3 Precautions ...4 Before Using ...6 • Easy Cassette Eject/Insertion 7 Quick Guide ...11 Supplying Power ...14 Setting the Clock ...16 Using the Palmcorder Menu 17 Camera Recording ...18 • Simple Recording 18 • Digital PhotoShot™ Mode 20 • Zoom ...21 Special Effect Features 23 Advanced Settings ...27 Playback Your Recordings 31 Special Effect Features 33 Digital Features ...39 Editing Features ...44 Card Features ...48 PC Connection • Transferring Your Images (Windows 55 •...
PVDV73 User Guide
Page 7
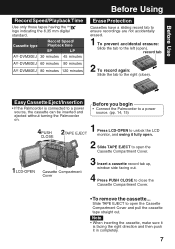
.... 7 Slide TAPE EJECT to close ). Before Use Before Using Record Speed/Playback Time Use only those tapes having the Mini logo indicating the 6.35 mm digital standard. Note • When inserting the cassette, make sure it is connected to the right (close the Cassette Compartment Cover. • To remove the cassette... record tab 2 To record again: Slide the tab to a power source, the cassette can be inserted and ejected without turning the Palmcorder...
.... 7 Slide TAPE EJECT to close ). Before Use Before Using Record Speed/Playback Time Use only those tapes having the Mini logo indicating the 6.35 mm digital standard. Note • When inserting the cassette, make sure it is connected to the right (close the Cassette Compartment Cover. • To remove the cassette... record tab 2 To record again: Slide the tab to a power source, the cassette can be inserted and ejected without turning the Palmcorder...
PVDV73 User Guide
Page 17
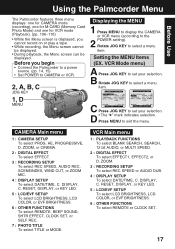
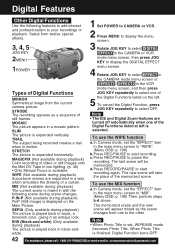
... ZOOM MIC. 4 : DISPLAY SETUP To select DATE/TIME, C. ZOOM. 3 : RECORDING SETUP To select REC SPEED or AUDIO DUB. 4 : DISPLAY SETUP To select DATE/TIME, C. RESET, DISPLAY, or KEY LED. 5 : LCD/EVF SETUP To select LCD BRIGHTNESS, LCD COLOR, or EVF BRIGHTNESS. 6 : OTHER FUNCTIONS To select REMOTE or CLOCK SET. 17 VCR Main menu 1 : PLAYBACK FUNCTIONS To select BLANK SEARCH, SEARCH, 12 bit AUDIO, or MULTI SPEED. 2 : DIGITAL EFFECT To select EFFECT1, EFFECT2, or D. Before you cannot record on or play a tape. • While recording, the Menu screen cannot be displayed...
... ZOOM MIC. 4 : DISPLAY SETUP To select DATE/TIME, C. ZOOM. 3 : RECORDING SETUP To select REC SPEED or AUDIO DUB. 4 : DISPLAY SETUP To select DATE/TIME, C. RESET, DISPLAY, or KEY LED. 5 : LCD/EVF SETUP To select LCD BRIGHTNESS, LCD COLOR, or EVF BRIGHTNESS. 6 : OTHER FUNCTIONS To select REMOTE or CLOCK SET. 17 VCR Main menu 1 : PLAYBACK FUNCTIONS To select BLANK SEARCH, SEARCH, 12 bit AUDIO, or MULTI SPEED. 2 : DIGITAL EFFECT To select EFFECT1, EFFECT2, or D. Before you cannot record on or play a tape. • While recording, the Menu screen cannot be displayed...
PVDV73 User Guide
Page 24
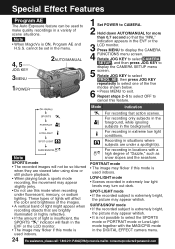
... the menu. 4, 5 JOG KEY 3MENU 1POWER 2AUTO/MANUAL 1 Set POWER to CAMERA. 2 Hold down AUTO/MANUAL for more than 0.7 second so that are under fluorescent, mercury, or sodium lighting. cannot be so blurred when they are viewed later using slow or still picture playback. • When playing back a sports mode recording, the movement may turn out dark. • Do not use this feature. (No display) SPORTS PORTRAIT Mode Indication For recording...
... the menu. 4, 5 JOG KEY 3MENU 1POWER 2AUTO/MANUAL 1 Set POWER to CAMERA. 2 Hold down AUTO/MANUAL for more than 0.7 second so that are under fluorescent, mercury, or sodium lighting. cannot be so blurred when they are viewed later using slow or still picture playback. • When playing back a sports mode recording, the movement may turn out dark. • Do not use this feature. (No display) SPORTS PORTRAIT Mode Indication For recording...
PVDV73 User Guide
Page 26
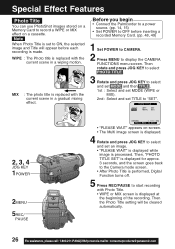
WIPE : The Photo title is replaced with Photo Title. • WIPE or MIX screen is displayed at the beginning of the recording. Then the Photo Title setting will appear before inserting a recorded Memory Card. (pp. 48, 49) 1 Set POWER to CAMERA. 2 Press MENU to display the CAMERA FUNCTIONS menu screen. Special Effect Features Photo Title You can use PhotoShot images stored on a Memory Card to record a WIPE or MIX effect on -screen. • The Multi image screen is displayed. 4 Rotate and...
WIPE : The Photo title is replaced with Photo Title. • WIPE or MIX screen is displayed at the beginning of the recording. Then the Photo Title setting will appear before inserting a recorded Memory Card. (pp. 48, 49) 1 Set POWER to CAMERA. 2 Press MENU to display the CAMERA FUNCTIONS menu screen. Special Effect Features Photo Title You can use PhotoShot images stored on a Memory Card to record a WIPE or MIX effect on -screen. • The Multi image screen is displayed. 4 Rotate and...

PVDV73 User Guide
Page 28
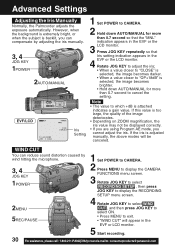
...-mailto:consumerproducts@panasonic.com Auto Focus will remain in front of POWER ZOOM to "W" or "T" as 25 mm (1 inch) in focus over the entire zoom range. Advanced Settings Auto Focus The Palmcorder automatically adjusts the focus over 2AUTO/MANUAL the entire zooming range. • It may be necessary to back away from the subject to focus the image properly. 5 3 M.FOCUS FOCUS RING Macro Focus (for more foreground. Set POWER to CAMERA. •...
...-mailto:consumerproducts@panasonic.com Auto Focus will remain in front of POWER ZOOM to "W" or "T" as 25 mm (1 inch) in focus over the entire zoom range. Advanced Settings Auto Focus The Palmcorder automatically adjusts the focus over 2AUTO/MANUAL the entire zooming range. • It may be necessary to back away from the subject to focus the image properly. 5 3 M.FOCUS FOCUS RING Macro Focus (for more foreground. Set POWER to CAMERA. •...
PVDV73 User Guide
Page 30
... of the image deteriorates. • Depending on ZOOM magnification, the iris value may not be canceled. If this value is backlit, you cannot adjust the iris....adjusting the iris manually. 3, 4 JOG KEY 1POWER 2AUTO/MANUAL EVF/LCD Iris Setting 1 Set POWER to exit. • "WIND CUT" will be displayed correctly. • If you are using Program AE mode, you can reduce sound distortion caused by wind hitting the microphone. 3, 4 JOG KEY 1POWER 2MENU 5REC/PAUSE 1 Set POWER to CAMERA. 2 Press MENU to display the CAMERA FUNCTIONS menu screen. 3 Rotate JOG KEY to select RECORDING SETUP...
... of the image deteriorates. • Depending on ZOOM magnification, the iris value may not be canceled. If this value is backlit, you cannot adjust the iris....adjusting the iris manually. 3, 4 JOG KEY 1POWER 2AUTO/MANUAL EVF/LCD Iris Setting 1 Set POWER to exit. • "WIND CUT" will be displayed correctly. • If you are using Program AE mode, you can reduce sound distortion caused by wind hitting the microphone. 3, 4 JOG KEY 1POWER 2MENU 5REC/PAUSE 1 Set POWER to CAMERA. 2 Press MENU to display the CAMERA FUNCTIONS menu screen. 3 Rotate JOG KEY to select RECORDING SETUP...
PVDV73 User Guide
Page 31
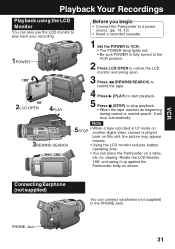
... a recorded cassette. 1POWER 1 Set the POWER to VCR. • The POWER lamp lights red. • Be sure POWER is fully turned to the VCR position. 2 Press LCD-OPEN to unlock the LCD monitor and swing open. 180° 90° 3 Press (REWIND/SEARCH) to rewind the tape. 4 Press (PLAY) to start playback. 90° 2LCD-OPEN 4PLAY 5 Press (STOP) to stop automatically. 3REWIND SEARCH Note 5 • When a tape recorded in LP mode on STOP another digital video camera...
... a recorded cassette. 1POWER 1 Set the POWER to VCR. • The POWER lamp lights red. • Be sure POWER is fully turned to the VCR position. 2 Press LCD-OPEN to unlock the LCD monitor and swing open. 180° 90° 3 Press (REWIND/SEARCH) to rewind the tape. 4 Press (PLAY) to start playback. 90° 2LCD-OPEN 4PLAY 5 Press (STOP) to stop automatically. 3REWIND SEARCH Note 5 • When a tape recorded in LP mode on STOP another digital video camera...
PVDV73 User Guide
Page 42
... Photo Title is finished, Digital Function turns OFF. 42 Forassistance, pleasecall: 1-800-211-PANA(7262)orsende-mailto:consumerproducts@panasonic.com MOSAIC The picture appears in motion. When Photo Title is set the "EFFECT" item in the CAMERA or VCR 2MENU mode menu screen, then press JOG KEY to display the DIGITAL EFFECT 1POWER menu screen. 4 Rotate JOG KEY to your recordings or playback. Digital Features Other Digital Functions Use the following scene during scene changes...
... Photo Title is finished, Digital Function turns OFF. 42 Forassistance, pleasecall: 1-800-211-PANA(7262)orsende-mailto:consumerproducts@panasonic.com MOSAIC The picture appears in motion. When Photo Title is set the "EFFECT" item in the CAMERA or VCR 2MENU mode menu screen, then press JOG KEY to display the DIGITAL EFFECT 1POWER menu screen. 4 Rotate JOG KEY to your recordings or playback. Digital Features Other Digital Functions Use the following scene during scene changes...
PVDV73 User Guide
Page 44
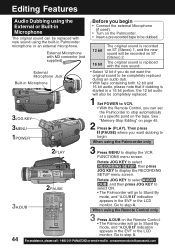
... go to display the VCR FUNCTIONS menu screen. The original sound is recorded on ST (Stereo) 1, and the new sound will also be replaced with new sound using the built-in the EVF or the LCD monitor. Then press (PAUSE) where you begin . When using the Palmcorder only 2PLAY 3 Press MENU to Stand By mode, and "A.DUB " indication appears in Palmcorder microphone or an external microphone. When using the Remote Control only...
... go to display the VCR FUNCTIONS menu screen. The original sound is recorded on ST (Stereo) 1, and the new sound will also be replaced with new sound using the built-in the EVF or the LCD monitor. Then press (PAUSE) where you begin . When using the Palmcorder only 2PLAY 3 Press MENU to Stand By mode, and "A.DUB " indication appears in Palmcorder microphone or an external microphone. When using the Remote Control only...
PVDV73 User Guide
Page 57
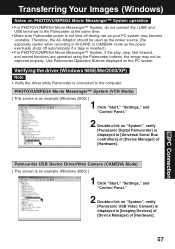
Use Palmcorder Operation Buttons displayed on "System", verify [Panasonic USB Video Camera] is displayed in [Imaging Devices] of [Device Manager] of [Hardware]. Palmcorder USB Device Driver/Web Camera (CAMERA Mode) [ This screen is an example (Windows 2000) ] 1 Click "Start," "Settings," and "Control Panel." 2 Double-click on the PC screen. Verifying the driver (Windows 98SE/Me/2000/XP) Note • Verify the driver while Palmcorder is connected to the Palmcorder at the same time. • Make sure Palmcorder power is not...
Use Palmcorder Operation Buttons displayed on "System", verify [Panasonic USB Video Camera] is displayed in [Imaging Devices] of [Device Manager] of [Hardware]. Palmcorder USB Device Driver/Web Camera (CAMERA Mode) [ This screen is an example (Windows 2000) ] 1 Click "Start," "Settings," and "Control Panel." 2 Double-click on the PC screen. Verifying the driver (Windows 98SE/Me/2000/XP) Note • Verify the driver while Palmcorder is connected to the Palmcorder at the same time. • Make sure Palmcorder power is not...
PVDV73 User Guide
Page 61
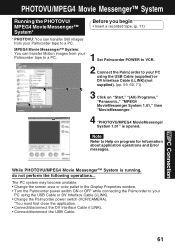
... a recorded tape. (p. 11) 1 Set Palmcorder POWER to VCR. 2 Connect the Palmcorder to your PC using the USB Cable or DV Interface Cable (i.LINK). • Change the Palmcorder power switch (VCR/CAMERA). *You must first close the application. • Connect/disconnect the DV Interface Cable (i.LINK). • Connect/disconnect the USB Cable. Note Refer to a PC. The PC system may become unstable. • Change the screen area or color pallet in the Display Properties window. • Turn...
... a recorded tape. (p. 11) 1 Set Palmcorder POWER to VCR. 2 Connect the Palmcorder to your PC using the USB Cable or DV Interface Cable (i.LINK). • Change the Palmcorder power switch (VCR/CAMERA). *You must first close the application. • Connect/disconnect the DV Interface Cable (i.LINK). • Connect/disconnect the USB Cable. Note Refer to a PC. The PC system may become unstable. • Change the screen area or color pallet in the Display Properties window. • Turn...
PVDV73 User Guide
Page 63
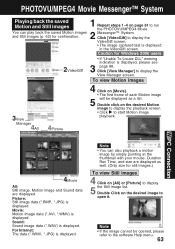
... image cannot be displayed as well. (Only size for Windows 2000 users 2VideoGift • If "Unable To Locate DLL" warning indication is displayed in the VideoGift screen. For Internet: The data (*.WMV, *.JPG) is displayed. PHOTOVU/MPEG4 Movie Messenger™ System Playing back the saved Motion and Still images 1 Repeat steps 1~4 on the desired image to open it. Duration Rec Time, and size are displayed. PC Connection 4Movie All: Still image, Motion image and Sound data...
... image cannot be displayed as well. (Only size for Windows 2000 users 2VideoGift • If "Unable To Locate DLL" warning indication is displayed in the VideoGift screen. For Internet: The data (*.WMV, *.JPG) is displayed. PHOTOVU/MPEG4 Movie Messenger™ System Playing back the saved Motion and Still images 1 Repeat steps 1~4 on the desired image to open it. Duration Rec Time, and size are displayed. PC Connection 4Movie All: Still image, Motion image and Sound data...
PVDV73 User Guide
Page 64
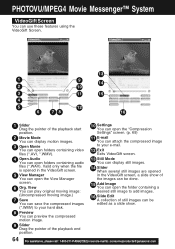
... of the playback start position. 2 Movie Mode You can display motion images. 3 Open Movie You can open folders containing video files (*.AVI, *.WMV). 4 Open Audio You can open the View Manager screen. 6 Org. View You can play original moving image: (Uncompressed moving image.) 7 Save You can save the compressed images (*.WMV) to your hard disk. 8 Preview You can preview the compressed motion image. 9 Slider Drag the pointer of the playback end position. 10 Settings You can open the "Compression Settings" screen. (p. 69...
... of the playback start position. 2 Movie Mode You can display motion images. 3 Open Movie You can open folders containing video files (*.AVI, *.WMV). 4 Open Audio You can open the View Manager screen. 6 Org. View You can play original moving image: (Uncompressed moving image.) 7 Save You can save the compressed images (*.WMV) to your hard disk. 8 Preview You can preview the compressed motion image. 9 Slider Drag the pointer of the playback end position. 10 Settings You can open the "Compression Settings" screen. (p. 69...
PVDV73 User Guide
Page 106
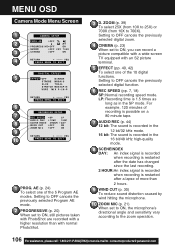
... digital function. 6 REC SPEED (pp. 7, 18) SP: Normal recording speed mode. For example, 120 minutes of recording is possible on a 80 minute tape. 7 AUDIO REC (p. 44) 12 bit: The sound is recorded in the 12 bit/32 kHz mode. 16 bit: The sound is restarted after a lapse of more than 2 hours. 9 WIND CUT (p. 30) To reduce sound distortion caused by wind hitting the microphone. 10 ZOOM MIC (p. 21) When set...
... digital function. 6 REC SPEED (pp. 7, 18) SP: Normal recording speed mode. For example, 120 minutes of recording is possible on a 80 minute tape. 7 AUDIO REC (p. 44) 12 bit: The sound is recorded in the 12 bit/32 kHz mode. 16 bit: The sound is restarted after a lapse of more than 2 hours. 9 WIND CUT (p. 30) To reduce sound distortion caused by wind hitting the microphone. 10 ZOOM MIC (p. 21) When set...
PVDV73 User Guide
Page 119
... CD-ROM 6, 56 CINEMA Mode 23 Cleaning Care for Video Heads 96 Clock Battery 98 Clock Set 16 Connecting Earphone ... 31 Copying from Digital Equipment 47 Copying your Tapes ...... 46 Customer Services Directory 101 D Date and Time Indication 111 DC Power Cable . 6, 15, 91 Delete All Image Pages 52 Delete Specific Images . 51 DEW Indication 98 Digital E.I.S 41 Digital Functions 42 Digital PhotoShot™ Mode 20 Digital Video Cassette Tape 7 Digital Zoom 39, 40 DV Interface Cable (i.LINK 47, 71, 91 DPOF Setting 54 E Easy Cassette Eject ....... 7 Erase...
... CD-ROM 6, 56 CINEMA Mode 23 Cleaning Care for Video Heads 96 Clock Battery 98 Clock Set 16 Connecting Earphone ... 31 Copying from Digital Equipment 47 Copying your Tapes ...... 46 Customer Services Directory 101 D Date and Time Indication 111 DC Power Cable . 6, 15, 91 Delete All Image Pages 52 Delete Specific Images . 51 DEW Indication 98 Digital E.I.S 41 Digital Functions 42 Digital PhotoShot™ Mode 20 Digital Video Cassette Tape 7 Digital Zoom 39, 40 DV Interface Cable (i.LINK 47, 71, 91 DPOF Setting 54 E Easy Cassette Eject ....... 7 Erase...


