
PVDV53 User Guide
Page 1
Guía para rápida consulta en español está incluida. For assistance, please call : 1-800-211-PANA(7262) or send e-mail to connect, operate or adjust this product, please read these instructions thoroughly. R Digital Video Camcorder Operating Instructions Model No. PV-DV53 Mini Before attempting to : consumerproducts@panasonic.com LSQT0650B Spanish Quick Use Guide is included.
Guía para rápida consulta en español está incluida. For assistance, please call : 1-800-211-PANA(7262) or send e-mail to connect, operate or adjust this product, please read these instructions thoroughly. R Digital Video Camcorder Operating Instructions Model No. PV-DV53 Mini Before attempting to : consumerproducts@panasonic.com LSQT0650B Spanish Quick Use Guide is included.
PVDV53 User Guide
Page 2
... kind of this equipment does cause interference to comply with Part 15 of the FCC Rules. FCC Warning: To assure continued FCC compliance, use only the specifed shielded interface cable when connecting digital video camcorder to computer in order to avoid any problems. The above markings are designed to : consumerproducts@panasonic.com Things You Should Know Thank you and your...
... kind of this equipment does cause interference to comply with Part 15 of the FCC Rules. FCC Warning: To assure continued FCC compliance, use only the specifed shielded interface cable when connecting digital video camcorder to computer in order to avoid any problems. The above markings are designed to : consumerproducts@panasonic.com Things You Should Know Thank you and your...

PVDV53 User Guide
Page 3
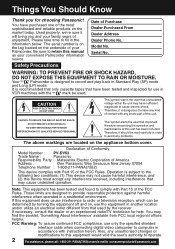
... - NATIONAL ELECTRICAL CODE ANTENNA DISCHARGE UNIT (NEC SECTION 810-20) GROUNDING CONDUCTORS (NEC SECTION 810-21) GROUND CLAMPS POWER SERVICE GROUNDING ELECTRODE SYSTEM (NEC ART 250, PART H) 14. Heed Warnings - Part 1 of the Canadian Electrical Code, in the operating instructions should be blocked or covered. The 3-wire grounding type plug will prevent damage to the video unit due to replace your obsolete...
... - NATIONAL ELECTRICAL CODE ANTENNA DISCHARGE UNIT (NEC SECTION 810-20) GROUNDING CONDUCTORS (NEC SECTION 810-21) GROUND CLAMPS POWER SERVICE GROUNDING ELECTRODE SYSTEM (NEC ART 250, PART H) 14. Heed Warnings - Part 1 of the Canadian Electrical Code, in the operating instructions should be blocked or covered. The 3-wire grounding type plug will prevent damage to the video unit due to replace your obsolete...

PVDV53 User Guide
Page 4
... cord or plug is in a risk of any service or repairs to this video unit, ask the service technician to perform safety checks to determine that could be taken to its normal operation. c. e. this video unit through openings as contact with your Palmcorder if it to dangerous voltage or other electric light or power circuits, or where it may form on the tape...
... cord or plug is in a risk of any service or repairs to this video unit, ask the service technician to perform safety checks to determine that could be taken to its normal operation. c. e. this video unit through openings as contact with your Palmcorder if it to dangerous voltage or other electric light or power circuits, or where it may form on the tape...

PVDV53 User Guide
Page 5
... Use Camera VCR Special Features For Your Information Table of Contents Things You Should Know 2 Important Safeguards ...3 Precautions ...4 Before Using ...6 • Easy Cassette Eject/Insertion 7 • Self Demo Mode ...8 Quick Guide ...9 Supplying Power ...11 Setting the Clock ...13 Using the Palmcorder Menu 14 Camera Recording ...15 • Simple Recording 15 • Digital PhotoShot™ Mode 17 • Zoom ...18 Special Effect Features 20 Advanced Settings ...23 Playback Your Recordings 27 Special Effect Features 29 Digital...
... Use Camera VCR Special Features For Your Information Table of Contents Things You Should Know 2 Important Safeguards ...3 Precautions ...4 Before Using ...6 • Easy Cassette Eject/Insertion 7 • Self Demo Mode ...8 Quick Guide ...9 Supplying Power ...11 Setting the Clock ...13 Using the Palmcorder Menu 14 Camera Recording ...15 • Simple Recording 15 • Digital PhotoShot™ Mode 17 • Zoom ...18 Special Effect Features 20 Advanced Settings ...23 Playback Your Recordings 27 Special Effect Features 29 Digital...
PVDV53 User Guide
Page 6
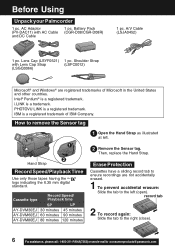
...@panasonic.com Cassette type Record Speed/ Playback time SP LP AY-DVM30EJ 30 minutes 45 minutes AY-DVM60EJ 60 minutes 90 minutes AY-DVM80EJ 80 minutes 120 minutes 1 Open the Hand Strap as illustrated at left (open). Then, replace the Hand Strap. A/V Cable (LSJA0452) 1 pc. i.LINK is a registered trademark. Shoulder Strap with AC Cable and DC Cable 1 pc. IBM is a registered trademark. Erase Protection Cassettes...
...@panasonic.com Cassette type Record Speed/ Playback time SP LP AY-DVM30EJ 30 minutes 45 minutes AY-DVM60EJ 60 minutes 90 minutes AY-DVM80EJ 80 minutes 120 minutes 1 Open the Hand Strap as illustrated at left (open). Then, replace the Hand Strap. A/V Cable (LSJA0452) 1 pc. i.LINK is a registered trademark. Shoulder Strap with AC Cable and DC Cable 1 pc. IBM is a registered trademark. Erase Protection Cassettes...

PVDV53 User Guide
Page 7
... and ejected without turning the Palmcorder on. 4 2 PUSH TAPE EJECT CLOSE 1LCD-OPEN Cassette Compartment Cover Before you begin • Connect the Palmcorder to a power source. (pp. 11, 12) 1 Press LCD-OPEN to open the 3 Cassette Compartment Cover. Attaching the Shoulder Strap 1 Undo the two strap ends from the Buckle and 2 create a loop. Insert a cassette record tab up, 4 window side facing out. Before Use Before Using Easy Cassette Eject...
... and ejected without turning the Palmcorder on. 4 2 PUSH TAPE EJECT CLOSE 1LCD-OPEN Cassette Compartment Cover Before you begin • Connect the Palmcorder to a power source. (pp. 11, 12) 1 Press LCD-OPEN to open the 3 Cassette Compartment Cover. Attaching the Shoulder Strap 1 Undo the two strap ends from the Buckle and 2 create a loop. Insert a cassette record tab up, 4 window side facing out. Before Use Before Using Easy Cassette Eject...
PVDV53 User Guide
Page 14
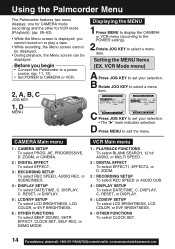
... playback, the Menu screen can be displayed. C Press JOG KEY to set your selection. • The " " mark indicates selection. RESET, or DISPLAY. 5 : LCD/EVF SETUP To select LCD BRIGHTNESS, LCD COLOR, or EVF BRIGHTNESS. 6 : OTHER FUNCTIONS To select BEEP SOUND, SHTR EFFECT, CLOCK SET, SELF REC, or DEMO MODE. VCR Mode menu) A Press JOG KEY to select a menu item. ZOOM, or CINEMA. 2 : DIGITAL EFFECT To select EFFECT. 3 : RECORDING SETUP To select REC SPEED, AUDIO REC, or SCENEINDEX. 4 : DISPLAY SETUP To select DATE/TIME, C. VCR Main menu 1 : PLAYBACK FUNCTIONS...
... playback, the Menu screen can be displayed. C Press JOG KEY to set your selection. • The " " mark indicates selection. RESET, or DISPLAY. 5 : LCD/EVF SETUP To select LCD BRIGHTNESS, LCD COLOR, or EVF BRIGHTNESS. 6 : OTHER FUNCTIONS To select BEEP SOUND, SHTR EFFECT, CLOCK SET, SELF REC, or DEMO MODE. VCR Mode menu) A Press JOG KEY to select a menu item. ZOOM, or CINEMA. 2 : DIGITAL EFFECT To select EFFECT. 3 : RECORDING SETUP To select REC SPEED, AUDIO REC, or SCENEINDEX. 4 : DISPLAY SETUP To select DATE/TIME, C. VCR Main menu 1 : PLAYBACK FUNCTIONS...

PVDV53 User Guide
Page 16
...:consumerproducts@panasonic.com Camera Recording Using the LCD Monitor The LCD (Liquid Crystal Display) monitor can be used while recording. 180° 90° 90° 1LCD-OPEN 1Press LCD-OPEN to unlock the LCD monitor. 2 Swing the LCD monitor fully open and adjust the viewing angle. • The LCD monitor will automatically turn on. • When the LCD monitor is completely closed, it will reduce battery operating time. • Close the LCD monitor...
...:consumerproducts@panasonic.com Camera Recording Using the LCD Monitor The LCD (Liquid Crystal Display) monitor can be used while recording. 180° 90° 90° 1LCD-OPEN 1Press LCD-OPEN to unlock the LCD monitor. 2 Swing the LCD monitor fully open and adjust the viewing angle. • The LCD monitor will automatically turn on. • When the LCD monitor is completely closed, it will reduce battery operating time. • Close the LCD monitor...

PVDV53 User Guide
Page 20
... Features CINEMA Mode You can record a picture compatible with a wide-screen TV equipped with an S-Video picture terminal and Zoom/Wide features. 3, 4 JOG KEY 1POWER 2MENU 5REC/PAUSE 1 Set POWER to CAMERA. 2 Press MENU to display the CAMERA FUNCTIONS menu screen. 3 Rotate JOG KEY to select CAMERA SETUP , then press JOG KEY to display the CAMERA SETUP menu screen. 4 Rotate JOG KEY to select CINEMA , and then press JOG KEY to select ON. • A black strip...
... Features CINEMA Mode You can record a picture compatible with a wide-screen TV equipped with an S-Video picture terminal and Zoom/Wide features. 3, 4 JOG KEY 1POWER 2MENU 5REC/PAUSE 1 Set POWER to CAMERA. 2 Press MENU to display the CAMERA FUNCTIONS menu screen. 3 Rotate JOG KEY to select CAMERA SETUP , then press JOG KEY to display the CAMERA SETUP menu screen. 4 Rotate JOG KEY to select CINEMA , and then press JOG KEY to select ON. • A black strip...
PVDV53 User Guide
Page 21
... used indoors. 1 Set POWER to CAMERA. 2 Hold down AUTO/MANUAL for more than 0.7 second so that are brightly illuminated or highly reflective. • If the amount of the five modes shown below. 6 • Press MENU to exit. PORTRAIT mode • The image may not come out properly. Rotate JOG KEY to display the CAMERA 4 FUNCTIONS menu screen. For recording in locations with the MAGICPIX mode in the DIGITAL...
... used indoors. 1 Set POWER to CAMERA. 2 Hold down AUTO/MANUAL for more than 0.7 second so that are brightly illuminated or highly reflective. • If the amount of the five modes shown below. 6 • Press MENU to exit. PORTRAIT mode • The image may not come out properly. Rotate JOG KEY to display the CAMERA 4 FUNCTIONS menu screen. For recording in locations with the MAGICPIX mode in the DIGITAL...
PVDV53 User Guide
Page 24
... image properly. 6 Press POWER ZOOM to "W" or "T" 2AUTO/MANUAL as 25 mm (1 inch) in focus over the entire zoom range. LCD monitor. • subjects with the subject as a white wall. Re-focusing may be required • when your Palmcorder is aimed at a new scene. 4, 6POWER ZOOM 4 Press and hold POWER ZOOM, "T" side (Telephoto), until the lens is at maximum zoom in. 5 Turn M.FOCUS DIAL until the picture...
... image properly. 6 Press POWER ZOOM to "W" or "T" 2AUTO/MANUAL as 25 mm (1 inch) in focus over the entire zoom range. LCD monitor. • subjects with the subject as a white wall. Re-focusing may be required • when your Palmcorder is aimed at a new scene. 4, 6POWER ZOOM 4 Press and hold POWER ZOOM, "T" side (Telephoto), until the lens is at maximum zoom in. 5 Turn M.FOCUS DIAL until the picture...

PVDV53 User Guide
Page 27
... a recorded cassette. 1 Set the POWER to VCR. • The POWER lamp lights red. • Be sure POWER is fully turned to the VCR position. 2 Press LCD-OPEN to unlock the LCD monitor and swing open. 180° 90° 3 Press (REWIND/SEARCH) to rewind the tape. 4 Press (PLAY) to start playback. 90° 2LCD-OPEN 4PLAY 5 Press (STOP) to stop automatically. 3REWIND SEARCH Note 5 • When a tape recorded in LP mode on STOP another digital video camera is played...
... a recorded cassette. 1 Set the POWER to VCR. • The POWER lamp lights red. • Be sure POWER is fully turned to the VCR position. 2 Press LCD-OPEN to unlock the LCD monitor and swing open. 180° 90° 3 Press (REWIND/SEARCH) to rewind the tape. 4 Press (PLAY) to start playback. 90° 2LCD-OPEN 4PLAY 5 Press (STOP) to stop automatically. 3REWIND SEARCH Note 5 • When a tape recorded in LP mode on STOP another digital video camera is played...

PVDV53 User Guide
Page 35
... Digital Zoom are turned off when not needed . Note • When using a tripod. 3 Press REC/PAUSE to cancel. • Be sure that D.E.I .S. Note • Other Digital Functions are selected. Digital Features 3REC/PAUSE BPLAY 2, 4, C, DEIS VCR mode A Set POWER to stabilize the picture. It can be observed when taping under a great amount of fluorescent light. • Recording a scene with very fast motions. B Press (PLAY) to start recording. 4 Press EIS again to start playback...
... Digital Zoom are turned off when not needed . Note • When using a tripod. 3 Press REC/PAUSE to cancel. • Be sure that D.E.I .S. Note • Other Digital Functions are selected. Digital Features 3REC/PAUSE BPLAY 2, 4, C, DEIS VCR mode A Set POWER to stabilize the picture. It can be observed when taping under a great amount of fluorescent light. • Recording a scene with very fast motions. B Press (PLAY) to start recording. 4 Press EIS again to start playback...

PVDV53 User Guide
Page 36
... of video or still images onto the Mini DV in low lighting. (p. 34) • Only Manual Focus is mixed in the main menu screen to "WIPE". (Menu OSD: p. 59) b.Press REC/PAUSE to start recording again. SLIM The picture is displayed on the left is played back in black-andwhite. 3 Rotate JOG KEY to select DIGITAL EFFECT in the CAMERA or VCR mode menu screen, then press JOG KEY to display the DIGITAL EFFECT menu screen...
... of video or still images onto the Mini DV in low lighting. (p. 34) • Only Manual Focus is mixed in the main menu screen to "WIPE". (Menu OSD: p. 59) b.Press REC/PAUSE to start recording again. SLIM The picture is displayed on the left is played back in black-andwhite. 3 Rotate JOG KEY to select DIGITAL EFFECT in the CAMERA or VCR mode menu screen, then press JOG KEY to display the DIGITAL EFFECT menu screen...
PVDV53 User Guide
Page 40
... VCR. Editing Features Copying your TV • Turn the TV ON and select its quality. • If the Time Code is completed. A/V Cable (Supplied) To Audio In To Video In A/V OUT TV (To View) VHF Connecting Cable (not supplied) Recording: VCR (Rear) Audio In Video In 1 Insert a pre-recorded tape into REC/PAUSE mode. (See VCR manual.) 4 Simultaneously, press PAUSE on both units to begin • Connect both Palmcorder and VCR to their power sources. • Connect...
... VCR. Editing Features Copying your TV • Turn the TV ON and select its quality. • If the Time Code is completed. A/V Cable (Supplied) To Audio In To Video In A/V OUT TV (To View) VHF Connecting Cable (not supplied) Recording: VCR (Rear) Audio In Video In 1 Insert a pre-recorded tape into REC/PAUSE mode. (See VCR manual.) 4 Simultaneously, press PAUSE on both units to begin • Connect both Palmcorder and VCR to their power sources. • Connect...

PVDV53 User Guide
Page 52
... charged. (p. 11) • Make sure all necessary cables are connected correctly and firmly. (p. 12) • Make sure the Lens Cap is removed. (p. 15) Video cassette cannot be inserted... • Make sure the Power Source is connected. (pp. 11, 12) • Insert the cassette record tab up, window side facing out. (p. 9) Video cassette cannot be heard... • Make sure the Audio on the VCR MENU is set to REC or REC/ PAUSE mode...
... charged. (p. 11) • Make sure all necessary cables are connected correctly and firmly. (p. 12) • Make sure the Lens Cap is removed. (p. 15) Video cassette cannot be inserted... • Make sure the Power Source is connected. (pp. 11, 12) • Insert the cassette record tab up, window side facing out. (p. 9) Video cassette cannot be heard... • Make sure the Audio on the VCR MENU is set to REC or REC/ PAUSE mode...
PVDV53 User Guide
Page 54
..., mishandling, misapplication, alteration, faulty installation, set-up adjustments, misadjustment of consumer controls, improper maintenance, power line surge, lightning damage, modification, or commercial use of the product, service by the authorized servicer and does not include removal or re-installation of original purchase ("warranty period"), at the addresses listed for parts. A purchase receipt or other proof of media or images, data or other rights which...
..., mishandling, misapplication, alteration, faulty installation, set-up adjustments, misadjustment of consumer controls, improper maintenance, power line surge, lightning damage, modification, or commercial use of the product, service by the authorized servicer and does not include removal or re-installation of original purchase ("warranty period"), at the addresses listed for parts. A purchase receipt or other proof of media or images, data or other rights which...

PVDV53 User Guide
Page 62
...@panasonic.com For example, 120 minutes of display changes to all function display, Partial display, and Minimum display. 13 LCD/EVF SETUP (p. 16) Setting to ON displays the menu for adjusting the LCD brightness, color level, and the EVF brightness. 14 CLOCK SET (p. 13) When set to AUDIO DUB "ON" in the SP mode. MENU OSD 7 8 9 10 11 12 13 14 7 REC SPEED (p. 6) SP: Normal recording speed mode. DISPLAY (p. 63) To select the desired type of counter indication displayed...
...@panasonic.com For example, 120 minutes of display changes to all function display, Partial display, and Minimum display. 13 LCD/EVF SETUP (p. 16) Setting to ON displays the menu for adjusting the LCD brightness, color level, and the EVF brightness. 14 CLOCK SET (p. 13) When set to AUDIO DUB "ON" in the SP mode. MENU OSD 7 8 9 10 11 12 13 14 7 REC SPEED (p. 6) SP: Normal recording speed mode. DISPLAY (p. 63) To select the desired type of counter indication displayed...

PVDV53 User Guide
Page 68
... Clock Set 13 Connecting Earphone ... 27 Copying from Digital Equipment 41 Copying your Tapes ...... 40 Customer Services Directory 55 D Date and Time Indication 64 DC Power Cable . 6, 12, 46 DEW Indication 53 Digital E.I.S 35 Digital Functions 36 Digital PhotoShot™ Mode 17 Digital Video Cassette Tape 6 Digital Zoom 33, 34 DV Interface Cable (i.LINK 41, 42, 46 E Easy Cassette Eject ....... 7 Erase Protection Tab ....... 6 EVF/LCD Monitor Indications 63~64 F Fast Forward/Rewind Check .. 29 Focus 24 H Hand Strap 7 High Speed Shutter...
... Clock Set 13 Connecting Earphone ... 27 Copying from Digital Equipment 41 Copying your Tapes ...... 40 Customer Services Directory 55 D Date and Time Indication 64 DC Power Cable . 6, 12, 46 DEW Indication 53 Digital E.I.S 35 Digital Functions 36 Digital PhotoShot™ Mode 17 Digital Video Cassette Tape 6 Digital Zoom 33, 34 DV Interface Cable (i.LINK 41, 42, 46 E Easy Cassette Eject ....... 7 Erase Protection Tab ....... 6 EVF/LCD Monitor Indications 63~64 F Fast Forward/Rewind Check .. 29 Focus 24 H Hand Strap 7 High Speed Shutter...


