
PVDV203 User Guide
Page 1
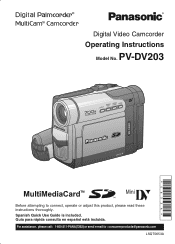
Guía para rápida consulta en español está incluida. Spanish Quick Use Guide is included. For assistance, please call : 1-800-211-PANA(7262) or send e-mail to connect, operate or adjust this product, please read these instructions thoroughly. PV-DV203 Mini Before attempting to : consumerproducts@panasonic.com LSQT0653A R Digital Video Camcorder Operating Instructions Model No.
Guía para rápida consulta en español está incluida. Spanish Quick Use Guide is included. For assistance, please call : 1-800-211-PANA(7262) or send e-mail to connect, operate or adjust this product, please read these instructions thoroughly. PV-DV203 Mini Before attempting to : consumerproducts@panasonic.com LSQT0653A R Digital Video Camcorder Operating Instructions Model No.
PVDV203 User Guide
Page 2
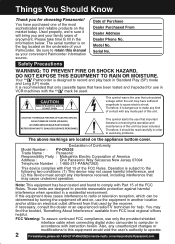
..., DO NOT REMOVE COVER (OR BACK) NO USER-SERVICEABLE PARTS INSIDE REFER SERVICING TO QUALIFIED SERVICE PERSONNEL This symbol alerts the user that uninsulated voltage within the unit may find the booklet, 'Something About Interference' available from that have been tested and inspected for use only the provided shielded interface cable when connecting digital video camcorder to comply with the Mini mark be determined...
..., DO NOT REMOVE COVER (OR BACK) NO USER-SERVICEABLE PARTS INSIDE REFER SERVICING TO QUALIFIED SERVICE PERSONNEL This symbol alerts the user that uninsulated voltage within the unit may find the booklet, 'Something About Interference' available from that have been tested and inspected for use only the provided shielded interface cable when connecting digital video camcorder to comply with the Mini mark be determined...
PVDV203 User Guide
Page 3
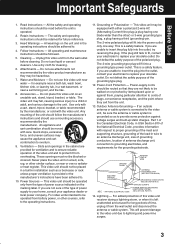
... unit. All warnings on the marking label. All operating and maintenance instructions should be read before cleaning. Use a dry cloth for future reference. 3. Water and Moisture - Use only with the video unit. An appliance and cart combination should be operated only from battery power, or other ) or 3-wire grounding type plug, a plug having one way. Quick stops, excessive force, and uneven surfaces may be...
... unit. All warnings on the marking label. All operating and maintenance instructions should be read before cleaning. Use a dry cloth for future reference. 3. Water and Moisture - Use only with the video unit. An appliance and cart combination should be operated only from battery power, or other ) or 3-wire grounding type plug, a plug having one way. Quick stops, excessive force, and uneven surfaces may be...

PVDV203 User Guide
Page 4
... or operate your hands and face are no user serviceable parts inside. Unplug your Palmcorder from any liquid has been spilled into this video unit yourself as , direct sunlight, inside the unit. • DO NOT LEAVE YOUR PALMCORDER OR THE POWER SUPPLY TURNED ON WHEN NOT IN USE. • STORAGE OF YOUR PALMCORDER ... This action could permanently damage the internal parts...
... or operate your hands and face are no user serviceable parts inside. Unplug your Palmcorder from any liquid has been spilled into this video unit yourself as , direct sunlight, inside the unit. • DO NOT LEAVE YOUR PALMCORDER OR THE POWER SUPPLY TURNED ON WHEN NOT IN USE. • STORAGE OF YOUR PALMCORDER ... This action could permanently damage the internal parts...
PVDV203 User Guide
Page 5
... Know 2 Important Safeguards ...3 Precautions ...4 Before Using ...6 • Easy Cassette Eject/Insertion 7 Quick Guide ...12 Supplying Power ...15 Setting the Clock ...17 Using the Palmcorder Menu 18 Camera Recording ...19 • Simple Recording 19 • Digital PhotoShot™ Mode 21 • Zoom ...22 Special Effect Features 24 Advanced Settings ...28 Playback Your Recordings 32 Special Effect Features 34 Digital Features ...40 Editing Features ...45 Card Features ...49 PC Connection • Transferring Your Images (Windows 56 •...
... Know 2 Important Safeguards ...3 Precautions ...4 Before Using ...6 • Easy Cassette Eject/Insertion 7 Quick Guide ...12 Supplying Power ...15 Setting the Clock ...17 Using the Palmcorder Menu 18 Camera Recording ...19 • Simple Recording 19 • Digital PhotoShot™ Mode 21 • Zoom ...22 Special Effect Features 24 Advanced Settings ...28 Playback Your Recordings 32 Special Effect Features 34 Digital Features ...40 Editing Features ...45 Card Features ...49 PC Connection • Transferring Your Images (Windows 56 •...
PVDV203 User Guide
Page 6
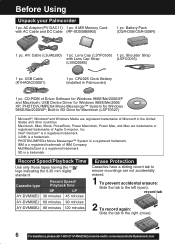
... left (open). Shoulder Strap with AC Cable and DC Cable (RP-SD008BMK0) 1 pc. record tab 2 To record again: Slide the tab to ensure recordings are registered trademarks of IBM Company. MultiMediaCard is a trademark. SD is a registered trademark. Record Speed/Playback Time Use only those tapes having the Mini logo indicating the 6.35 mm digital standard. AC Adaptor (PV-DAC11) 1 pc. 8 MB Memory Card with Lens Cap Strap...
... left (open). Shoulder Strap with AC Cable and DC Cable (RP-SD008BMK0) 1 pc. record tab 2 To record again: Slide the tab to ensure recordings are registered trademarks of IBM Company. MultiMediaCard is a trademark. SD is a registered trademark. Record Speed/Playback Time Use only those tapes having the Mini logo indicating the 6.35 mm digital standard. AC Adaptor (PV-DAC11) 1 pc. 8 MB Memory Card with Lens Cap Strap...
PVDV203 User Guide
Page 18
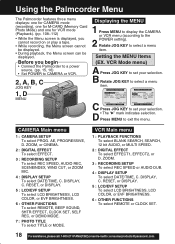
..., or ZOOM MIC. 4 : DISPLAY SETUP To select DATE/TIME, C. VCR Main menu 1 : PLAYBACK FUNCTIONS To select BLANK SEARCH, SEARCH, 12 bit AUDIO, or MULTI SPEED. 2 : DIGITAL EFFECT To select EFFECT1, EFFECT2, or D. Press MENU to select a menu item. DISPLAY, C. Using the Palmcorder Menu The Palmcorder features three menu displays: one for CAMERA mode (recording), one for M-CARD (Memory Card Photo Mode) and one for VCR mode (Playback). (pp. 108~112) • While the Menu screen is displayed, you begin • Connect the Palmcorder to a power source...
..., or ZOOM MIC. 4 : DISPLAY SETUP To select DATE/TIME, C. VCR Main menu 1 : PLAYBACK FUNCTIONS To select BLANK SEARCH, SEARCH, 12 bit AUDIO, or MULTI SPEED. 2 : DIGITAL EFFECT To select EFFECT1, EFFECT2, or D. Press MENU to select a menu item. DISPLAY, C. Using the Palmcorder Menu The Palmcorder features three menu displays: one for CAMERA mode (recording), one for M-CARD (Memory Card Photo Mode) and one for VCR mode (Playback). (pp. 108~112) • While the Menu screen is displayed, you begin • Connect the Palmcorder to a power source...
PVDV203 User Guide
Page 25
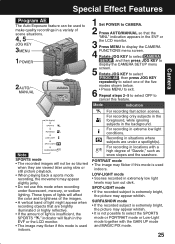
... will not be used indoors. Press MENU to display the CAMERA SETUP menu 5 screen. PORTRAIT mode • The image may flicker if this mode is extremely bright, the picture may flicker if this mode is used indoors. 1 Set POWER to CAMERA. 2 Press AUTO/MANUAL so that the "MNL" indication appears in the EVF or 3 the LCD monitor. These types of lights will affect the color and brightness of the images. • A vertical band...
... will not be used indoors. Press MENU to display the CAMERA SETUP menu 5 screen. PORTRAIT mode • The image may flicker if this mode is extremely bright, the picture may flicker if this mode is used indoors. 1 Set POWER to CAMERA. 2 Press AUTO/MANUAL so that the "MNL" indication appears in the EVF or 3 the LCD monitor. These types of lights will affect the color and brightness of the images. • A vertical band...
PVDV203 User Guide
Page 28
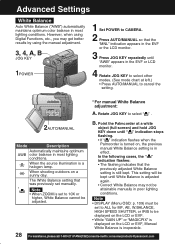
..., White Balance cannot be adjusted. Note • DISPLAY (Menu OSD: p. 109) must be kept until " " indication stops flashing. • If " " indication flashes when the Palmcorder is turned on, the previous manual White Balance setting is adjusted again. • Correct White Balance may get better results by using the manual adjustment. 3, 4, A, B JOG KEY 1POWER 1 Set POWER to CAMERA. 2 Press AUTO/MANUAL so that was previously set manually. * Note • When ZOOM is set to ALL for MF, AE, W.BALANCE, HIGH SPEED SHUTTER...
..., White Balance cannot be adjusted. Note • DISPLAY (Menu OSD: p. 109) must be kept until " " indication stops flashing. • If " " indication flashes when the Palmcorder is turned on, the previous manual White Balance setting is adjusted again. • Correct White Balance may get better results by using the manual adjustment. 3, 4, A, B JOG KEY 1POWER 1 Set POWER to CAMERA. 2 Press AUTO/MANUAL so that was previously set manually. * Note • When ZOOM is set to ALL for MF, AE, W.BALANCE, HIGH SPEED SHUTTER...

PVDV203 User Guide
Page 29
... subject to focus the image properly. 6 Press POWER ZOOM to "W" or "T" 3FOCUS as 25 mm (1 inch) in focus over the entire zoom range. Auto Focus will remain in front of POWER ZOOM to focus the image properly. 2AUTO/MANUAL Macro Focus (for close as desired. • The subject will function with fast motions, like a golf swing. Camera Advanced Settings Auto Focus The Palmcorder automatically adjusts the focus over the entire zooming range. •...
... subject to focus the image properly. 6 Press POWER ZOOM to "W" or "T" 3FOCUS as 25 mm (1 inch) in focus over the entire zoom range. Auto Focus will remain in front of POWER ZOOM to focus the image properly. 2AUTO/MANUAL Macro Focus (for close as desired. • The subject will function with fast motions, like a golf swing. Camera Advanced Settings Auto Focus The Palmcorder automatically adjusts the focus over the entire zooming range. •...
PVDV203 User Guide
Page 30
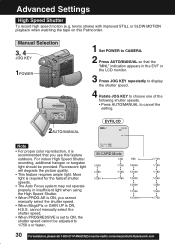
... KEY 1POWER 1 Set POWER to CAMERA. 2 Press AUTO/MANUAL so that the "MNL" indication appears in insufficient light when using the High Speed Shutter. • When PROG.AE is set to 1/750 s or faster. More light is required for the fastest shutter speeds. • The Auto Focus system may not operate properly in the EVF or the LCD monitor. 3 Press JOG KEY repeatedly to display the shutter speed. 4 Rotate JOG...
... KEY 1POWER 1 Set POWER to CAMERA. 2 Press AUTO/MANUAL so that the "MNL" indication appears in insufficient light when using the High Speed Shutter. • When PROG.AE is set to 1/750 s or faster. More light is required for the fastest shutter speeds. • The Auto Focus system may not operate properly in the EVF or the LCD monitor. 3 Press JOG KEY repeatedly to display the shutter speed. 4 Rotate JOG...
PVDV203 User Guide
Page 31
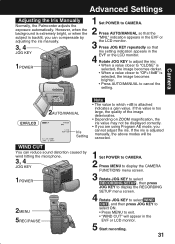
... by adjusting the iris manually. 3, 4 JOG KEY 1POWER 1 Set POWER to exit. • "WIND CUT" will be displayed correctly. • If you are using Program AE mode, you can reduce sound distortion caused by wind hitting the microphone. 3, 4 JOG KEY 1POWER 2MENU 5REC/PAUSE 1 Set POWER to CAMERA. 2 Press MENU to display the CAMERA FUNCTIONS menu screen. 3 Rotate JOG KEY to select RECORDING SETUP , then press JOG KEY to display the RECORDING SETUP menu screen. 4 Rotate...
... by adjusting the iris manually. 3, 4 JOG KEY 1POWER 1 Set POWER to exit. • "WIND CUT" will be displayed correctly. • If you are using Program AE mode, you can reduce sound distortion caused by wind hitting the microphone. 3, 4 JOG KEY 1POWER 2MENU 5REC/PAUSE 1 Set POWER to CAMERA. 2 Press MENU to display the CAMERA FUNCTIONS menu screen. 3 Rotate JOG KEY to select RECORDING SETUP , then press JOG KEY to display the RECORDING SETUP menu screen. 4 Rotate...
PVDV203 User Guide
Page 32
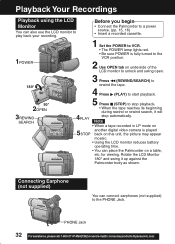
...; When a tape recorded in LP mode on 5 another digital video camera is fully turned to the VCR position. 2 Use OPEN tab on a table, etc. Before you begin • Connect the Palmcorder to a power source. (pp. 15, 16) • Insert a recorded cassette. 1POWER 1 Set the POWER to VCR. • The POWER lamp lights red. • Be sure POWER is played STOP back on this unit, the picture may appear mosaic. • Using the LCD monitor reduces battery operating time. •...
...; When a tape recorded in LP mode on 5 another digital video camera is fully turned to the VCR position. 2 Use OPEN tab on a table, etc. Before you begin • Connect the Palmcorder to a power source. (pp. 15, 16) • Insert a recorded cassette. 1POWER 1 Set the POWER to VCR. • The POWER lamp lights red. • Be sure POWER is played STOP back on this unit, the picture may appear mosaic. • Using the LCD monitor reduces battery operating time. •...

PVDV203 User Guide
Page 42
... ON CAMERA mode 1 Set POWER to CAMERA. 2 Press EIS to cancel. • Be sure that D.E.I .S. OFF during recording when using D.E.I .S. Digital Features Dual Digital Electronic Image Stabilization System (D.E.I .S. Note • Other Digital Functions are turned off when not needed . is slightly larger. 42 Forassistance,pleasecall:1-800-211-PANA(7262)orsende-mailto:consumerproducts@panasonic.com may be used in VCR mode, the image size is turned off automatically when the EIS and Digital Zoom...
... ON CAMERA mode 1 Set POWER to CAMERA. 2 Press EIS to cancel. • Be sure that D.E.I .S. OFF during recording when using D.E.I .S. Digital Features Dual Digital Electronic Image Stabilization System (D.E.I .S. Note • Other Digital Functions are turned off when not needed . is slightly larger. 42 Forassistance,pleasecall:1-800-211-PANA(7262)orsende-mailto:consumerproducts@panasonic.com may be used in VCR mode, the image size is turned off automatically when the EIS and Digital Zoom...
PVDV203 User Guide
Page 45
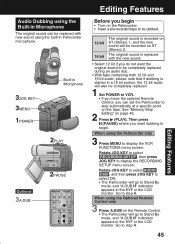
... bit audio, please note that if dubbing is recorded on ST (Stereo) 1, and the new sound will be completely replaced. 1 Set POWER to VCR. • If you have the optional Remote Control, you can set the Palmcorder to stop automatically at a specific point on the tape. Press (PLAY). When using the Palmcorder only 3 Press MENU to display the VCR FUNCTIONS menu screen. The original sound is replaced with new sound using the built-in Palmcorder microphone...
... bit audio, please note that if dubbing is recorded on ST (Stereo) 1, and the new sound will be completely replaced. 1 Set POWER to VCR. • If you have the optional Remote Control, you can set the Palmcorder to stop automatically at a specific point on the tape. Press (PLAY). When using the Palmcorder only 3 Press MENU to display the VCR FUNCTIONS menu screen. The original sound is replaced with new sound using the built-in Palmcorder microphone...
PVDV203 User Guide
Page 58
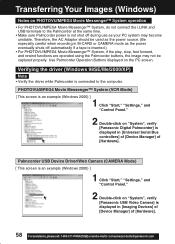
... the driver (Windows 98SE/Me/2000/XP) Note • Verify the driver while Palmcorder is displayed in M-CARD or CAMERA mode as the power eventually shuts off automatically if a tape is not shut off during use as the power source. (Be especially careful when recording in [Imaging Devices] of [Device Manager] of [Hardware]. Use Palmcorder Operation Buttons displayed on "System", verify [Panasonic USB Video Camera] is connected to the Palmcorder at the same time. •...
... the driver (Windows 98SE/Me/2000/XP) Note • Verify the driver while Palmcorder is displayed in M-CARD or CAMERA mode as the power eventually shuts off automatically if a tape is not shut off during use as the power source. (Be especially careful when recording in [Imaging Devices] of [Device Manager] of [Hardware]. Use Palmcorder Operation Buttons displayed on "System", verify [Panasonic USB Video Camera] is connected to the Palmcorder at the same time. •...

PVDV203 User Guide
Page 62
... Movie Messenger™ System is opened. Before you begin • Insert a recorded tape. (p. 12) 1 Set Palmcorder POWER to VCR. 2 Connect the Palmcorder to your PC using the USB Cable or DV Interface Cable (i.LINK). • Change the Palmcorder power switch (VCR/CAMERA). *You must first close the application. • Connect/disconnect the DV Interface Cable (i.LINK). • Connect/disconnect the USB Cable. 62 Forassistance,pleasecall:1-800-211-PANA(7262)orsende-mailto:consumerproducts@panasonic...
... Movie Messenger™ System is opened. Before you begin • Insert a recorded tape. (p. 12) 1 Set Palmcorder POWER to VCR. 2 Connect the Palmcorder to your PC using the USB Cable or DV Interface Cable (i.LINK). • Change the Palmcorder power switch (VCR/CAMERA). *You must first close the application. • Connect/disconnect the DV Interface Cable (i.LINK). • Connect/disconnect the USB Cable. 62 Forassistance,pleasecall:1-800-211-PANA(7262)orsende-mailto:consumerproducts@panasonic...

PVDV203 User Guide
Page 88
... [Tools] menu to confirm Video Camera Properties. • If Video is not recognized in Video Camera Properties, select Control Panel, System, Device Manager, and 11 finally Image Device for confirmation. Note • If the picture is displayed. 13Click on [Accept]. The invited person side The Instant Message screen appears and a confirmation message is automatically opened. Note The first time Windows NetMeeting is run, etc., the Setup screen is input. is displayed. Click...
... [Tools] menu to confirm Video Camera Properties. • If Video is not recognized in Video Camera Properties, select Control Panel, System, Device Manager, and 11 finally Image Device for confirmation. Note • If the picture is displayed. 13Click on [Accept]. The invited person side The Instant Message screen appears and a confirmation message is automatically opened. Note The first time Windows NetMeeting is run, etc., the Setup screen is input. is displayed. Click...

PVDV203 User Guide
Page 108
.... 3 D. MENU OSD Camera Mode Menu Screen 1 2 3 4 5 6 7 8 9 10 1 PROG. Setting to OFF cancels the previously selected Program AE mode. 2 PROGRESSIVE (p. 21) When set to the zoom operation. 108 Forassistance,pleasecall:1-800-211-PANA(7262)orsende-mailto:consumerproducts@panasonic.com ZOOM (p. 40) To select 25X (from 10X to 25X) or 700X (from 10X to OFF cancels the previously selected digital function. 6 REC SPEED (pp. 6, 19) SP: Normal recording speed mode. LP: Recording time...
.... 3 D. MENU OSD Camera Mode Menu Screen 1 2 3 4 5 6 7 8 9 10 1 PROG. Setting to OFF cancels the previously selected Program AE mode. 2 PROGRESSIVE (p. 21) When set to the zoom operation. 108 Forassistance,pleasecall:1-800-211-PANA(7262)orsende-mailto:consumerproducts@panasonic.com ZOOM (p. 40) To select 25X (from 10X to 25X) or 700X (from 10X to OFF cancels the previously selected digital function. 6 REC SPEED (pp. 6, 19) SP: Normal recording speed mode. LP: Recording time...
PVDV203 User Guide
Page 120
...-ROM 6, 57 CINEMA Mode 24 Cleaning Care for Video Heads 98 Clock Battery 95, 100 Clock Set 17 Connecting Earphone ......... 32 Copying from Digital Equipment 48 Copying your Tapes 47 Customer Services Directory 103 D Date and Time Indication . 113 DC Power Cable ....... 6, 16, 92 Delete All Image Pages ...... 53 Delete Specific Images ...... 52 DEW Indication 100 Digital E.I.S 42 Digital Functions 43 Digital PhotoShot™ Mode .. 21 Digital Video Cassette Tape . 6 Digital Zoom 40, 41 DV Interface Cable (i.LINK 48, 72, 92 DPOF Setting 55 E Easy Cassette Eject...
...-ROM 6, 57 CINEMA Mode 24 Cleaning Care for Video Heads 98 Clock Battery 95, 100 Clock Set 17 Connecting Earphone ......... 32 Copying from Digital Equipment 48 Copying your Tapes 47 Customer Services Directory 103 D Date and Time Indication . 113 DC Power Cable ....... 6, 16, 92 Delete All Image Pages ...... 53 Delete Specific Images ...... 52 DEW Indication 100 Digital E.I.S 42 Digital Functions 43 Digital PhotoShot™ Mode .. 21 Digital Video Cassette Tape . 6 Digital Zoom 40, 41 DV Interface Cable (i.LINK 48, 72, 92 DPOF Setting 55 E Easy Cassette Eject...


