

Digital Video Camcorder
Page 5
... technician to restore the video unit to qualified service personnel under the following the operating instructions. When replacement parts are free from any liquid has been spilled into this unit. Safety Check- This action could result in performance - This product incorporates copyright protection technology that will often require extensive work by following conditions: a. Power Lines - Store and handle...
... technician to restore the video unit to qualified service personnel under the following the operating instructions. When replacement parts are free from any liquid has been spilled into this unit. Safety Check- This action could result in performance - This product incorporates copyright protection technology that will often require extensive work by following conditions: a. Power Lines - Store and handle...
Digital Video Camcorder
Page 8
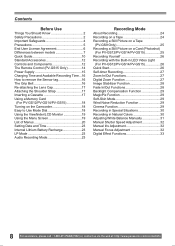
... a Cassette 17 Using a Memory Card (For PV-GS12/PV-GS14/PV-GS15 18 Turning on the Camcorder 18 Easy to Use Mode Dial 18 Using the Viewfinder/LCD Monitor 19 Using the Menu Screen 19 List of Menus 20 Setting Date and Time 23 Internal Lithium Battery Recharge 23 LP Mode 23 Audio Recording Mode 23 Recording Mode About Recording 24 Recording on a Tape 24 Recording a Still Picture on a Tape (PV-GS9 Only 25 Recording a Still Picture on a Card (Photoshot) (For PV-GS12/PV-GS14/PV-GS15 25 Recording Yourself 26 Recording with...
... a Cassette 17 Using a Memory Card (For PV-GS12/PV-GS14/PV-GS15 18 Turning on the Camcorder 18 Easy to Use Mode Dial 18 Using the Viewfinder/LCD Monitor 19 Using the Menu Screen 19 List of Menus 20 Setting Date and Time 23 Internal Lithium Battery Recharge 23 LP Mode 23 Audio Recording Mode 23 Recording Mode About Recording 24 Recording on a Tape 24 Recording a Still Picture on a Tape (PV-GS9 Only 25 Recording a Still Picture on a Card (Photoshot) (For PV-GS12/PV-GS14/PV-GS15 25 Recording Yourself 26 Recording with...
Digital Video Camcorder
Page 12
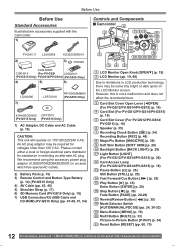
... LIGHT] (p. 29) 11 Light Button [LIGHT] (For PV-GS12/PV-GS14/PV-GS15) (p. 26) 12 Card Access Lamp (For PV-GS12/PV-GS14/PV-GS15) (p. 18) 13 Pause Button [ ] (p. 25) Still Button [STILL] (p. 25) 14 Fast Forward/Cue Button [ ] (p. 35) 15 Play Button [►] (p. 35) Enter Button [ENTER] (p. 20) 16 Stop Button [ ] (p. 35) Fade Button [FADE] (pp. 28-29) 17 Rewind/Review Button [ ] (p. 35) 18 Mode Selector Switch [AUTO/MANUAL/FOCUS] (pp. 24, 30-32) 19 Menu Button [MENU] (p. 19) 20 Multi Button [MULTI] (p. 33) Picture...
... LIGHT] (p. 29) 11 Light Button [LIGHT] (For PV-GS12/PV-GS14/PV-GS15) (p. 26) 12 Card Access Lamp (For PV-GS12/PV-GS14/PV-GS15) (p. 18) 13 Pause Button [ ] (p. 25) Still Button [STILL] (p. 25) 14 Fast Forward/Cue Button [ ] (p. 35) 15 Play Button [►] (p. 35) Enter Button [ENTER] (p. 20) 16 Stop Button [ ] (p. 35) Fade Button [FADE] (pp. 28-29) 17 Rewind/Review Button [ ] (p. 35) 18 Mode Selector Switch [AUTO/MANUAL/FOCUS] (pp. 24, 30-32) 19 Menu Button [MENU] (p. 19) 20 Multi Button [MULTI] (p. 33) Picture...

Digital Video Camcorder
Page 13
... Input/Output Terminal (pp. 45-46) • Connect this to the digital video equipment. 31 White Balance Sensor (p. 31) Remote Control Sensor (p. 15) 32 Audio-Video Output Jack [AV OUT] (pp. 43, 45) Headphone Jack [PHONES] • Connecting an AV Cable to limitations in LCD production technology, there may make noises depending on the type used . Please consult your dealer for mounting the Camcorder on the Viewfinder screen...
... Input/Output Terminal (pp. 45-46) • Connect this to the digital video equipment. 31 White Balance Sensor (p. 31) Remote Control Sensor (p. 15) 32 Audio-Video Output Jack [AV OUT] (pp. 43, 45) Headphone Jack [PHONES] • Connecting an AV Cable to limitations in LCD production technology, there may make noises depending on the type used . Please consult your dealer for mounting the Camcorder on the Viewfinder screen...

Digital Video Camcorder
Page 18
... removing a Card, be sure to Use Mode Dial You can choose a desired mode by Panasonic only. Turning on the Camcorder Turn on a tape. Inserting a Card 1 Slide the [OPEN] Lever 3 to open the Card Slot Cover, to pull out the Card, to turn off the Camcorder, or to turn off the Power 2 Set the [OFF/ON] Switch 44 to [OFF] while pressing the button 1 . 44 1 Easy to turn the Mode Dial. Before Use Using a Memory Card (For PV-GS12/ PV-GS14/PV-GS15) A Card...
... removing a Card, be sure to Use Mode Dial You can choose a desired mode by Panasonic only. Turning on the Camcorder Turn on a tape. Inserting a Card 1 Slide the [OPEN] Lever 3 to open the Card Slot Cover, to pull out the Card, to turn off the Camcorder, or to turn off the Power 2 Set the [OFF/ON] Switch 44 to [OFF] while pressing the button 1 . 44 1 Easy to turn the Mode Dial. Before Use Using a Memory Card (For PV-GS12/ PV-GS14/PV-GS15) A Card...

Digital Video Camcorder
Page 20
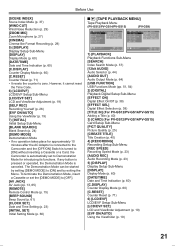
...determine the setting. • While a Menu is displayed, you press the [ ] Button, the menu changes back to the previous screen. 2) [DIGITAL] Digital Setup Sub-Menu [EFFECT1] Digital Effects 1 (p. 33) [EFFECT2] Digital Effects 2 (p. 33) [MULTI MODE] Multi-Picture Mode (p. 33) [TITLE IN] (For PV-GS12/PV-GS14/PV-GS15) Adding a Title (p. 40) 3) [CARD] (For PV-GS12/PV-GS14/PV-GS15) Card Setup Sub-Menu [PICT QUALITY] Picture Quality (p. 25) [CREATE TITLE] Title Creation (p. 40) 4) [RECORDING] Recording Setup Sub-Menu [REC SPEED] Recording Speed Mode (p. 23) [AUDIO REC] Audio Recording Mode (p. 23...
...determine the setting. • While a Menu is displayed, you press the [ ] Button, the menu changes back to the previous screen. 2) [DIGITAL] Digital Setup Sub-Menu [EFFECT1] Digital Effects 1 (p. 33) [EFFECT2] Digital Effects 2 (p. 33) [MULTI MODE] Multi-Picture Mode (p. 33) [TITLE IN] (For PV-GS12/PV-GS14/PV-GS15) Adding a Title (p. 40) 3) [CARD] (For PV-GS12/PV-GS14/PV-GS15) Card Setup Sub-Menu [PICT QUALITY] Picture Quality (p. 25) [CREATE TITLE] Title Creation (p. 40) 4) [RECORDING] Recording Setup Sub-Menu [REC SPEED] Recording Speed Mode (p. 23) [AUDIO REC] Audio Recording Mode (p. 23...
Digital Video Camcorder
Page 21
... is connected to the Camcorder and the [OFF/ON] Switch is turned to [ON] without inserting a Cassette or a Card, the Camcorder is canceled. However, it cannot reset the Time Code. 6) [LCD/EVF] LCD/EVF Setup Sub-Menu [LCD/EVF SET] LCD and Viewfinder Adjustment (p. 19) [SELF REC] Recording Yourself (p. 26) [EVF ON/AUTO] Using the Viewfinder (p. 19) 7) [INITIAL] Initial Setup Sub-Menu [BLANK SEARCH] Blank Search (p. 24) [DEMO MODE] Demonstration Mode • If no operation takes...
... is connected to the Camcorder and the [OFF/ON] Switch is turned to [ON] without inserting a Cassette or a Card, the Camcorder is canceled. However, it cannot reset the Time Code. 6) [LCD/EVF] LCD/EVF Setup Sub-Menu [LCD/EVF SET] LCD and Viewfinder Adjustment (p. 19) [SELF REC] Recording Yourself (p. 26) [EVF ON/AUTO] Using the Viewfinder (p. 19) 7) [INITIAL] Initial Setup Sub-Menu [BLANK SEARCH] Blank Search (p. 24) [DEMO MODE] Demonstration Mode • If no operation takes...
Digital Video Camcorder
Page 24
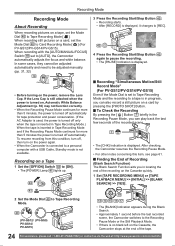
... Camcorder switches to Tape Recording Mode [ ]. When recording with a USB Cable, Standby mode is inserted in locating the end of the recording on the Cassette, the Camcorder stops at : http://www.panasonic.com/contactinfo If the Lens Cap is still attached when the power is turned on, Automatic White Balance Adjustment (p. 30) may not function correctly. • When the Recording Pause Mode continues for more than 5 minutes, the power is turned off automatically for tape protection and power...
... Camcorder switches to Tape Recording Mode [ ]. When recording with a USB Cable, Standby mode is inserted in locating the end of the recording on the Cassette, the Camcorder stops at : http://www.panasonic.com/contactinfo If the Lens Cap is still attached when the power is turned on, Automatic White Balance Adjustment (p. 30) may not function correctly. • When the Recording Pause Mode continues for more than 5 minutes, the power is turned off automatically for tape protection and power...
Digital Video Camcorder
Page 40
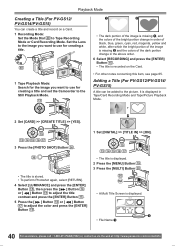
... to use for creating a title and set the Camcorder to the Still Playback Mode. 13 1 2 • The dark portion of the image is missing 1 , and the colors of the bright portion change in order of black, blue, green, cyan, red, magenta, yellow and white, after which the bright portion of the image is missing 2 and the colors of the dark portion change in Tape/Card Recording Mode and Tape/Picture Playback Mode. 2 Set [CARD...
... to use for creating a title and set the Camcorder to the Still Playback Mode. 13 1 2 • The dark portion of the image is missing 1 , and the colors of the bright portion change in order of black, blue, green, cyan, red, magenta, yellow and white, after which the bright portion of the image is missing 2 and the colors of the dark portion change in Tape/Card Recording Mode and Tape/Picture Playback Mode. 2 Set [CARD...

Digital Video Camcorder
Page 44
... Set [TAPE PLAYBACK MENU] >> [PLAYBACK] >> [12bit AUDIO] >> [ST1], [ST2] or [MIX]. Editing Mode Editing Mode Recording from a Tape onto a Card (For PV-GS12/PV-GS14/PV-GS15) Still pictures can be recorded on the Memory Card from a Card onto a Tape (For PV-GS12/PV-GS14/ PV-GS15) Card Images can add music or narration to the recorded Cassette. • If the tape recorded in LP Mode. (p. 23) 1 Press the [ ] Button 69 on the Remote Control where you wish to preserve the original sound, use the [12bit] Mode when recording...
... Set [TAPE PLAYBACK MENU] >> [PLAYBACK] >> [12bit AUDIO] >> [ST1], [ST2] or [MIX]. Editing Mode Editing Mode Recording from a Tape onto a Card (For PV-GS12/PV-GS14/PV-GS15) Still pictures can be recorded on the Memory Card from a Card onto a Tape (For PV-GS12/PV-GS14/ PV-GS15) Card Images can add music or narration to the recorded Cassette. • If the tape recorded in LP Mode. (p. 23) 1 Press the [ ] Button 69 on the Remote Control where you wish to preserve the original sound, use the [12bit] Mode when recording...
Digital Video Camcorder
Page 47
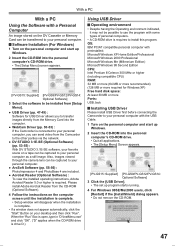
...'s CD-ROM drive. • The [Setup Menu] screen appears. [PV-GS15: Supplied] [PV-GS9/PV-GS12/PV-GS14: Optional Software] 3 Select the software to be installed from [Setup Menu]. ● USB Driver (pp. 47-49) : Software for Windows XP) Free hard disk space: At least 30 MB or more Ports: USB Jack Installing USB Driver Please install USB Driver first before connecting the Camcorder to your personal computer with a Personal Computer An image stored on the DV Cassette or Memory Card can be transferred to...
...'s CD-ROM drive. • The [Setup Menu] screen appears. [PV-GS15: Supplied] [PV-GS9/PV-GS12/PV-GS14: Optional Software] 3 Select the software to be installed from [Setup Menu]. ● USB Driver (pp. 47-49) : Software for Windows XP) Free hard disk space: At least 30 MB or more Ports: USB Jack Installing USB Driver Please install USB Driver first before connecting the Camcorder to your personal computer with a Personal Computer An image stored on the DV Cassette or Memory Card can be transferred to...

Digital Video Camcorder
Page 48
... Memory Card into the Camcorder. 2 Set the Camcorder to be found ..." This will not cause a problem. Before making these connections, turn off all devices which are to PC Mode. 1) The message "The file 'kstvtune.ax' on [Unknown] cannot be connected. • When using Windows Explorer] 2 and then [OK] (For Windows XP users). 48 For assistance, please call : 1-800-211-PANA(7262) or, contact us via USB Cable...
... Memory Card into the Camcorder. 2 Set the Camcorder to be found ..." This will not cause a problem. Before making these connections, turn off all devices which are to PC Mode. 1) The message "The file 'kstvtune.ax' on [Unknown] cannot be connected. • When using Windows Explorer] 2 and then [OK] (For Windows XP users). 48 For assistance, please call : 1-800-211-PANA(7262) or, contact us via USB Cable...
Digital Video Camcorder
Page 56
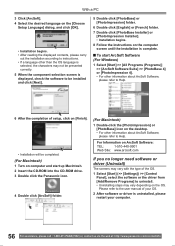
... the user manual of the OS. 1 Select [Start] (>> [Settings]) >> [Control Panel], select the software or the driver from [Add/Remove Programs] to uninstall. • Uninstalling steps may not be presented correctly. 5 When the component selection screen is displayed, check the software to be completed. (For Macintosh) 1 Turn on computer and start up Macintosh. 2 Insert the CD-ROM into the CD-ROM drive. 3 Double click the Panasonic...
... the user manual of the OS. 1 Select [Start] (>> [Settings]) >> [Control Panel], select the software or the driver from [Add/Remove Programs] to uninstall. • Uninstalling steps may not be presented correctly. 5 When the component selection screen is displayed, check the software to be completed. (For Macintosh) 1 Turn on computer and start up Macintosh. 2 Insert the CD-ROM into the CD-ROM drive. 3 Double click the Panasonic...
Digital Video Camcorder
Page 57
... this reason, check the compatibility of their respective corporations. To change modes, disconnect the USB cable, switch the Camcorder Mode Dial, then reconnect the USB cable. • When the Tape Recording Mode of the Camcorder is switched to the PC Mode, a warning message may freeze the software or destroy the data in transfer. • We recommend using USB Connection Kit. It has a write protect switch to other modes. For this information, refer to the Operating Instructions which accompany...
... this reason, check the compatibility of their respective corporations. To change modes, disconnect the USB cable, switch the Camcorder Mode Dial, then reconnect the USB cable. • When the Tape Recording Mode of the Camcorder is switched to the PC Mode, a warning message may freeze the software or destroy the data in transfer. • We recommend using USB Connection Kit. It has a write protect switch to other modes. For this information, refer to the Operating Instructions which accompany...

Digital Video Camcorder
Page 61
... Cassette Compartment Cover, do not get anything caught in PC Mode while connecting the USB cable to the PC in the card. UNABLE TO WRITE (WIDE MODE): You are recording still pictures on a Tape while setting the Digital Effect [MULTI] of the screen changes or blurs, adjust the shutter speed manually to [ON] 2 Beeps • When you pause recording 2 Beeps 4 times • If you are not recorded. UNABLE TO WRITE: The Recording Start/Stop Button...
... Cassette Compartment Cover, do not get anything caught in PC Mode while connecting the USB cable to the PC in the card. UNABLE TO WRITE (WIDE MODE): You are recording still pictures on a Tape while setting the Digital Effect [MULTI] of the screen changes or blurs, adjust the shutter speed manually to [ON] 2 Beeps • When you pause recording 2 Beeps 4 times • If you are not recorded. UNABLE TO WRITE: The Recording Start/Stop Button...

Digital Video Camcorder
Page 62
... Automatic White Balance Mode, the color may become whitish. • In a dark place, the recorded picture is presented in a time-lapse-like manner. • Adjust the Focus manually. • The Progressive Photoshot Function is canceled. To turn the Image Stabilizer off. • Within the digital zoom range, or when recording with the external microphone (For PV-GS14/PV-GS15). Zoom Microphone Function • The Zoom Microphone Function may become large. • If you repeatedly record or erase pictures, intervals between recorded pictures...
... Automatic White Balance Mode, the color may become whitish. • In a dark place, the recorded picture is presented in a time-lapse-like manner. • Adjust the Focus manually. • The Progressive Photoshot Function is canceled. To turn the Image Stabilizer off. • Within the digital zoom range, or when recording with the external microphone (For PV-GS14/PV-GS15). Zoom Microphone Function • The Zoom Microphone Function may become large. • If you repeatedly record or erase pictures, intervals between recorded pictures...

Digital Video Camcorder
Page 64
... slightly. Playback Zoom Function • You cannot adjust the sound volume with the Remote Control in Playback Zoom Mode. • If you turn off the Camcorder power or if you operate the Mode Dial, Playback Zoom Mode is automatically canceled. • Even if Playback Zoom Functions are being used . • Set another Digital Effect item • Operate the [OFF/ON] switch or Mode Dial • Insert or eject a cassette Playing Back Repeat Playback If you continue to press the [►] Button for 5 seconds...
... slightly. Playback Zoom Function • You cannot adjust the sound volume with the Remote Control in Playback Zoom Mode. • If you turn off the Camcorder power or if you operate the Mode Dial, Playback Zoom Mode is automatically canceled. • Even if Playback Zoom Functions are being used . • Set another Digital Effect item • Operate the [OFF/ON] switch or Mode Dial • Insert or eject a cassette Playing Back Repeat Playback If you continue to press the [►] Button for 5 seconds...

Digital Video Camcorder
Page 65
... the setting, digital dubbing is carried out automatically in some cases. • Date or other equipment cannot be played back or added to the picture with this Camcorder. • A title with Audio Dubbing to a PC using the PC's software, only the original sound (ST1) may not be imported, depending on the Multi screen, the recording and the playback cannot be displayed if the software of importing data recorded with a size...
... the setting, digital dubbing is carried out automatically in some cases. • Date or other equipment cannot be played back or added to the picture with this Camcorder. • A title with Audio Dubbing to a PC using the PC's software, only the original sound (ST1) may not be imported, depending on the Multi screen, the recording and the playback cannot be displayed if the software of importing data recorded with a size...

Digital Video Camcorder
Page 69
... direction in front of digital video systems. It is open ? If not, the playback function cannot be used for which the Auto Focus Function does not operate correctly. Charge it is not a malfunction. 69 there is not a malfunction. Others Battery Power Lens Hood • Do not attach other conversion lenses in Slow Motion Playback Mode, but this is no mount to be used . (p. 35) Mosaic-pattern noise appears on images during recording...
... direction in front of digital video systems. It is open ? If not, the playback function cannot be used for which the Auto Focus Function does not operate correctly. Charge it is not a malfunction. 69 there is not a malfunction. Others Battery Power Lens Hood • Do not attach other conversion lenses in Slow Motion Playback Mode, but this is no mount to be used . (p. 35) Mosaic-pattern noise appears on images during recording...

Digital Video Camcorder
Page 70
... Camcorder is not turned off . During playback, push the [W/T] Lever to [OUT]. Others 2 1 3 Use projection 3 on the [INITIAL] Sub-Menu to display the [VOLUME] Indication and adjust the volume. (p. 35) Different sounds are not clear. • Is [PICT QUALITY] on the screen. (p. 49) Using the RESET button 1 Open the LCD Monitor. (p. 19) 2 Undo Grip Belt end 1 and pull Lens Cap Cord 2 downward to select [12bit] Mode at the same time...
... Camcorder is not turned off . During playback, push the [W/T] Lever to [OUT]. Others 2 1 3 Use projection 3 on the [INITIAL] Sub-Menu to display the [VOLUME] Indication and adjust the volume. (p. 35) Different sounds are not clear. • Is [PICT QUALITY] on the screen. (p. 49) Using the RESET button 1 Open the LCD Monitor. (p. 19) 2 Undo Grip Belt end 1 and pull Lens Cap Cord 2 downward to select [12bit] Mode at the same time...


