
PTST10U User Guide
Page 1
TQBJ0332 ENGLISH PT-ST10U AUTO SETUP MENU RETURN FREEZE ENTER AV MUTE COMPUTER VIDEO DEFAULT FUNCTION INDEX- WIN. DIGITAL ZOOM VOLUME Thank you for purchasing a Panasonic Projector. „„ Before operating this product, please read the instructions carefully, and save this manual for future use. „„ Before using your projector, be sure to read "Precautions with regard to safety" (pages 5 to 9). „„ For network operation, please read the Network Operation Manual. Operating Instructions Basic Manual LCD Projector Commercial Use Model No.
TQBJ0332 ENGLISH PT-ST10U AUTO SETUP MENU RETURN FREEZE ENTER AV MUTE COMPUTER VIDEO DEFAULT FUNCTION INDEX- WIN. DIGITAL ZOOM VOLUME Thank you for purchasing a Panasonic Projector. „„ Before operating this product, please read the instructions carefully, and save this manual for future use. „„ Before using your projector, be sure to read "Precautions with regard to safety" (pages 5 to 9). „„ For network operation, please read the Network Operation Manual. Operating Instructions Basic Manual LCD Projector Commercial Use Model No.

PTST10U User Guide
Page 12
...IN COMPUTER 2 IN 1 VIDEO IN 2 AUDIO IN ⑤ ⑥ ① Connect to a network cable. (See "Network Operation Manual".) ② Connect to a computer to control the projector's operation. ( page 17, 51) ③ Connect to a computer or YPBPR signal cable. ( page 17) ④ Connect... output to the connected equipment. If it is connected to this terminal, no sound comes out of the air intake port. Preparation Details of your projector (continued) Rear and bottom view ① ⑨ ② ⑧ ③ ⑦ ④ ⑤ ⑥ ① Terminals &#...
...IN COMPUTER 2 IN 1 VIDEO IN 2 AUDIO IN ⑤ ⑥ ① Connect to a network cable. (See "Network Operation Manual".) ② Connect to a computer to control the projector's operation. ( page 17, 51) ③ Connect to a computer or YPBPR signal cable. ( page 17) ④ Connect... output to the connected equipment. If it is connected to this terminal, no sound comes out of the air intake port. Preparation Details of your projector (continued) Rear and bottom view ① ⑨ ② ⑧ ③ ⑦ ④ ⑤ ⑥ ① Terminals &#...

PTST10U User Guide
Page 16
... and turn the peripheral devices off prior to making any connections. • Prepare the selected peripheral devices with the connection cables that correspond to the projector's terminals. • All peripheral devices and cables used for the connections are sold separately unless indicated otherwise. • If the input signal is affected ... VIDEO IN 2 AUDIO IN To audio input To video output or audio output DVD player or To S-VIDEO output NOTE: • Switch the audio connection manually for more than one AV equipment connections. Video player Getting started 16 ENGLISH
... and turn the peripheral devices off prior to making any connections. • Prepare the selected peripheral devices with the connection cables that correspond to the projector's terminals. • All peripheral devices and cables used for the connections are sold separately unless indicated otherwise. • If the input signal is affected ... VIDEO IN 2 AUDIO IN To audio input To video output or audio output DVD player or To S-VIDEO output NOTE: • Switch the audio connection manually for more than one AV equipment connections. Video player Getting started 16 ENGLISH

PTST10U User Guide
Page 17
If any other cables are necessary, purchase them from the market. ENGLISH 17 Getting started Connections (continued) Example: Computers Computer (Controlling a projector) Computer Audio system LAN SERIAL S-VIDEO IN AAUUDDIOIO OUT COMPUTER 1 IN COMPUTER 2 IN 1 VIDEO IN 2 AUDIO IN Computer Computer (Controlling a projector) NOTE: • For the network connection between the projector and computers, see "Network Operation Manual" in the CD-ROM provided. • Only the RGB signal cable (1 piece) is attached.
If any other cables are necessary, purchase them from the market. ENGLISH 17 Getting started Connections (continued) Example: Computers Computer (Controlling a projector) Computer Audio system LAN SERIAL S-VIDEO IN AAUUDDIOIO OUT COMPUTER 1 IN COMPUTER 2 IN 1 VIDEO IN 2 AUDIO IN Computer Computer (Controlling a projector) NOTE: • For the network connection between the projector and computers, see "Network Operation Manual" in the CD-ROM provided. • Only the RGB signal cable (1 piece) is attached.

PTST10U User Guide
Page 26
... menu mode and return to the projection. • Called up while other functions from the screen. Adjust each menu item manually. Current setting SELECT RETURN ENTER FUNCTION 3 Select the sub-menu item. Settings Menu operation OPERATE THE MENU Depending on the ...Press [MENU] or [RETURN] to return to the factory default setting. Main menu Sub-menu PICTURE POSITION LANGUAGE DISPLAY OPTION PROJECTOR SETUP SECURITY NETWORK SELECT RETURN ENTER FUNCTION PICTURE MODE CONTRAST BRIGHTNESS COLOR TINT SHARPNESS COLOR TEMPERATURE DAYLIGHT VIEW NOISE REDUCTION TV-SYSTEM STANDARD...
... menu mode and return to the projection. • Called up while other functions from the screen. Adjust each menu item manually. Current setting SELECT RETURN ENTER FUNCTION 3 Select the sub-menu item. Settings Menu operation OPERATE THE MENU Depending on the ...Press [MENU] or [RETURN] to return to the factory default setting. Main menu Sub-menu PICTURE POSITION LANGUAGE DISPLAY OPTION PROJECTOR SETUP SECURITY NETWORK SELECT RETURN ENTER FUNCTION PICTURE MODE CONTRAST BRIGHTNESS COLOR TINT SHARPNESS COLOR TEMPERATURE DAYLIGHT VIEW NOISE REDUCTION TV-SYSTEM STANDARD...

PTST10U User Guide
Page 28
... the projection's environment. TEST PATTERN - Page 40 40 40 40 41 41 42 NETWORK menu For details of the projected image. ON - - Menu operation (continued) PROJECTOR SETUP menu Sub-menu item Default STATUS - PICTURE MENU Remote control Control panel MENU MENU RETURN RETURN FREEZE ENTER FREEZE ENTER AV MUTE COMPUTER COMPUTEVRIDEO... MENU LOCK MENU LOCK PASSWORD CONTROL DEVICE SETUP Default OFF - CsLheoatwtningegre CsHehitgatihnneggre ▌▌BRIGHTNESS You can adjust the contrast of items, see "Network Operation Manual".
... the projection's environment. TEST PATTERN - Page 40 40 40 40 41 41 42 NETWORK menu For details of the projected image. ON - - Menu operation (continued) PROJECTOR SETUP menu Sub-menu item Default STATUS - PICTURE MENU Remote control Control panel MENU MENU RETURN RETURN FREEZE ENTER FREEZE ENTER AV MUTE COMPUTER COMPUTEVRIDEO... MENU LOCK MENU LOCK PASSWORD CONTROL DEVICE SETUP Default OFF - CsLheoatwtningegre CsHehitgatihnneggre ▌▌BRIGHTNESS You can adjust the contrast of items, see "Network Operation Manual".

PTST10U User Guide
Page 29
... from the true image. Settings ENGLISH 29 If so, set to OFF. ▌▌TV-SYSTEM Switch the setting manually to match the video data. (For S-VIDEO/VIDEO input signal only) ChangeCssheeattttniinnggge CsCehhtatainnngggee setting ▌▌COLOR TEMPERATURE You can switch...WHITE BALANCE BLUE 0 AUTO ON OFF Automatic adjustment Active Deactive NOTE: • Do not cover the Ambient Luminance Sensor(ALS) of the projector, otherwise the AUTO mode may look different from NTSC/NTSC 4.43/PAL/PAL60/PAL-M/PAL-N/ SECAM. Menu operation (continued) ▌▌...
... from the true image. Settings ENGLISH 29 If so, set to OFF. ▌▌TV-SYSTEM Switch the setting manually to match the video data. (For S-VIDEO/VIDEO input signal only) ChangeCssheeattttniinnggge CsCehhtatainnngggee setting ▌▌COLOR TEMPERATURE You can switch...WHITE BALANCE BLUE 0 AUTO ON OFF Automatic adjustment Active Deactive NOTE: • Do not cover the Ambient Luminance Sensor(ALS) of the projector, otherwise the AUTO mode may look different from NTSC/NTSC 4.43/PAL/PAL60/PAL-M/PAL-N/ SECAM. Menu operation (continued) ▌▌...

PTST10U User Guide
Page 30
... activated, you can be input to move the image horizontally. Set the selected item with ▌▌REALTIME KEYSTONE If the projector is aligned non-perpendicularly to the input signal if the image is corrected. ▌▌SHIFT SHIFT H0 V0 Horizontal (H): Press... the projector to minimize distortion. • The result of the keystone correction will be adjusted before adjusting the CLOCK PHASE. WIN. Vertical (V): Press [] to the COMPUTER 1 IN and COMPUTER 2 IN terminals. NOTE: • This function can correct the distortion manually by ...
... activated, you can be input to move the image horizontally. Set the selected item with ▌▌REALTIME KEYSTONE If the projector is aligned non-perpendicularly to the input signal if the image is corrected. ▌▌SHIFT SHIFT H0 V0 Horizontal (H): Press... the projector to minimize distortion. • The result of the keystone correction will be adjusted before adjusting the CLOCK PHASE. WIN. Vertical (V): Press [] to the COMPUTER 1 IN and COMPUTER 2 IN terminals. NOTE: • This function can correct the distortion manually by ...

PTST10U User Guide
Page 31
... input signal only) ZoCoshmeattnoinguget CsZehotaotinmnggein 16:9 Standard input signal*1 projection is displayed only for the same reason as the DOT CLOCK adjustment, you can manually switch to the desired aspect ratio. Input signal: XGA Image: ▌▌OVER SCAN Use this function when characters or pictures are cropped near the...
... input signal only) ZoCoshmeattnoinguget CsZehotaotinmnggein 16:9 Standard input signal*1 projection is displayed only for the same reason as the DOT CLOCK adjustment, you can manually switch to the desired aspect ratio. Input signal: XGA Image: ▌▌OVER SCAN Use this function when characters or pictures are cropped near the...

PTST10U User Guide
Page 42
...least 2 seconds, and CONTROL PANEL is pressed, the confirmation screen appears. For details of the projector. STATUS You can enable/disable the button operations of the control panel and remote control. TION INDEX- NETWORK CONTROL ...When controlling the projector with a computer. Set the selected item with the control panel. WIN. NOTE: • If PASSWORD ... the name of the PJ Link and network, see "Network Operation Manual". NAME CHANGE You can set to ENABLE.
...least 2 seconds, and CONTROL PANEL is pressed, the confirmation screen appears. For details of the projector. STATUS You can enable/disable the button operations of the control panel and remote control. TION INDEX- NETWORK CONTROL ...When controlling the projector with a computer. Set the selected item with the control panel. WIN. NOTE: • If PASSWORD ... the name of the PJ Link and network, see "Network Operation Manual". NAME CHANGE You can set to ENABLE.
PTST10U User Guide
Page 53
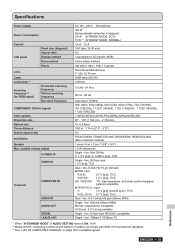
References ENGLISH 53 Specifications Power supply Power consumption Current LCD panel Lens Lamp Luminosity *2 Scanning frequency *3 (for available signals. line, 0.5 V [rms], M3 jack (Stereo MINI) Single - line, D-Sub 9-pin RS-232C compatible Single - line,... menu is stopped): 0.4 W (STANDBY MODE: ECO) 15 W *1 (STANDBY MODE: NORMAL) 3.5 A - 1.2 A 0.63 type (16.00 mm) 4:3 3 transparent LCD panels (RGB) Active matrix method 786 432 (1 024 × 768) × 3 panels Fixed focus/Manual focus F 1.80, f 6.74 mm UHM lamp (220 W) 2 800 lm 15 kHz - 91 kHz 50 Hz - 85 Hz Less...
References ENGLISH 53 Specifications Power supply Power consumption Current LCD panel Lens Lamp Luminosity *2 Scanning frequency *3 (for available signals. line, 0.5 V [rms], M3 jack (Stereo MINI) Single - line, D-Sub 9-pin RS-232C compatible Single - line,... menu is stopped): 0.4 W (STANDBY MODE: ECO) 15 W *1 (STANDBY MODE: NORMAL) 3.5 A - 1.2 A 0.63 type (16.00 mm) 4:3 3 transparent LCD panels (RGB) Active matrix method 786 432 (1 024 × 768) × 3 panels Fixed focus/Manual focus F 1.80, f 6.74 mm UHM lamp (220 W) 2 800 lm 15 kHz - 91 kHz 50 Hz - 85 Hz Less...

PTST10U User Guide
Page 55
... with a latch through the ring ENGLISH 55 References zzFor how to install wire ropes to the ceiling, see the installation manual for the projector installation. Pass through the loop on it. of ceiling mount bracket: ET-PKB2 Installation work of the ceiling mount bracket should be ...components are not used for any losses or damage occurring as a result of using a ceiling mount bracket not manufactured by Panasonic, or if damage to the projector occurs as electric screwdrivers or impact screwdrivers. Do not use the screw holes of the front leg adjusters for the ceiling ...
... with a latch through the ring ENGLISH 55 References zzFor how to install wire ropes to the ceiling, see the installation manual for the projector installation. Pass through the loop on it. of ceiling mount bracket: ET-PKB2 Installation work of the ceiling mount bracket should be ...components are not used for any losses or damage occurring as a result of using a ceiling mount bracket not manufactured by Panasonic, or if damage to the projector occurs as electric screwdrivers or impact screwdrivers. Do not use the screw holes of the front leg adjusters for the ceiling ...


