
PTP1SDU User Guide
Page 1
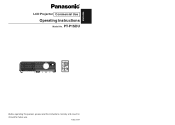
PT-P1SDU POWER INPUT MENU ENTER AUTO SETUP STD SHUTTER RETURN ENTER VOLUME ROTATE Before operating this product, please read the instructions carefully and save this manual for future use. TQBJ 0184 ENGLISH R LCD Projector Commercial Use Operating Instructions Model No.
PT-P1SDU POWER INPUT MENU ENTER AUTO SETUP STD SHUTTER RETURN ENTER VOLUME ROTATE Before operating this product, please read the instructions carefully and save this manual for future use. TQBJ 0184 ENGLISH R LCD Projector Commercial Use Operating Instructions Model No.
PTP1SDU User Guide
Page 2
... the product's enclosure that to which can only be found to comply with the projector as defined in the Standard for a Class B digital device, pursuant to constitute a risk of your Panasonic LCD projector. This is encouraged to try to correct the interference by one or more of.... These limits are unable to radio communications. Any unauthorized changes or modifications to operate on the power plug. Power Supply: This LCD Projector is emitted from that may result. Do not defeat the purpose of Electronic Computer/Data Processing Equipment, ANSI/NFPA 75. Reorient or...
... the product's enclosure that to which can only be found to comply with the projector as defined in the Standard for a Class B digital device, pursuant to constitute a risk of your Panasonic LCD projector. This is encouraged to try to correct the interference by one or more of.... These limits are unable to radio communications. Any unauthorized changes or modifications to operate on the power plug. Power Supply: This LCD Projector is emitted from that may result. Do not defeat the purpose of Electronic Computer/Data Processing Equipment, ANSI/NFPA 75. Reorient or...
PTP1SDU User Guide
Page 3
... it with a dry cloth. B Check that injury or electric shocks may result in this condition may occur. Do not install this projector in a place which could result in such cases, otherwise fire or electric shocks could result. B If not using too many adapters),...FRONT/REAR, DESK/CEILING, HIGHLAND, LAMP RUNTIME, SXGA MODE, CTRL PANEL, NR Changing the display language 51 Setting up 20 Projection methods, Projector position, Projection distances Connections 22 Connecting to computer, Connecting to video equipment, Preparation for repairs. B If the installation location is broken, ...
... it with a dry cloth. B Check that injury or electric shocks may result in this condition may occur. Do not install this projector in a place which could result in such cases, otherwise fire or electric shocks could result. B If not using too many adapters),...FRONT/REAR, DESK/CEILING, HIGHLAND, LAMP RUNTIME, SXGA MODE, CTRL PANEL, NR Changing the display language 51 Setting up 20 Projection methods, Projector position, Projection distances Connections 22 Connecting to computer, Connecting to video equipment, Preparation for repairs. B If the installation location is broken, ...

PTP1SDU User Guide
Page 4
..., and injury or malfunctions may result. B Doing so may have been swallowed, seek medical advice immediately. Do not place the projector into the projector. Do not use plugs which are swallowed, death by a qualified technician. If you believe that the SD memory card and batteries...shocks or explosions can cause fire or damage to this may come into contact with wet hands. B Do not place the projector on top of the projector. B Using the projector under such conditions may result in a bath or shower. B Fire or electric shocks can result. B Do not insert any...
..., and injury or malfunctions may result. B Doing so may have been swallowed, seek medical advice immediately. Do not place the projector into the projector. Do not use plugs which are swallowed, death by a qualified technician. If you believe that the SD memory card and batteries...shocks or explosions can cause fire or damage to this may come into contact with wet hands. B Do not place the projector on top of the projector. B Using the projector under such conditions may result in a bath or shower. B Fire or electric shocks can result. B Do not insert any...

PTP1SDU User Guide
Page 5
...contains a small amount of mercury as a safety precaution before disposal. B Electric shocks can result in fire. B Failure to clean the inside the projector at least once a year. NOTICE: B This product has a High Intensity Discharge (HID) lamp that all of the accessories shown below have absorbed ...the gas or that the gas has got into water or fire. Use only the specified batteries. B You could fall or the projector could result in some components. We are correct. For disposal or recycling information please contact your eyes or mouth, seek medical advice immediately...
...contains a small amount of mercury as a safety precaution before disposal. B Electric shocks can result in fire. B Failure to clean the inside the projector at least once a year. NOTICE: B This product has a High Intensity Discharge (HID) lamp that all of the accessories shown below have absorbed ...the gas or that the gas has got into water or fire. Use only the specified batteries. B You could fall or the projector could result in some components. We are correct. For disposal or recycling information please contact your eyes or mouth, seek medical advice immediately...
PTP1SDU User Guide
Page 6
...Furthermore, all installation work should only be replaced earlier due to variables such as fixed points of your bare hands. If using this projector at high elevations (above 1 400 m), set up in the softcase other than 10 hours or the power is extremely susceptible to purchase... Lamp The lamp may appear on the screen as individual lamp characteristics, usage conditions and the installation environment, especially when the projector is built with your LCD. 10-ENGLISH ENGLISH-11 Liquid crystal panel The liquid crystal panel of the lamp may damage the card and the slot. ...
...Furthermore, all installation work should only be replaced earlier due to variables such as fixed points of your bare hands. If using this projector at high elevations (above 1 400 m), set up in the softcase other than 10 hours or the power is extremely susceptible to purchase... Lamp The lamp may appear on the screen as individual lamp characteristics, usage conditions and the installation environment, especially when the projector is built with your LCD. 10-ENGLISH ENGLISH-11 Liquid crystal panel The liquid crystal panel of the lamp may damage the card and the slot. ...

PTP1SDU User Guide
Page 7
.... B The confirmation screen will be displayed. B Press the MENU button to return to page 20.) FRONT When the projector is placed in accordance with the projector setting-up method. (Refer to the language selection screen. LANGUAGE SETUP LANGUAGE SETUP ENGLISH DEUTSCH FRANÇAIS ESPAÑ...). DESK/CEILING DESK/CEILING DESK [ CEILING This setting should be displayed. $ Press the ENTER button again. CEILING When the projector is placed on a desk or similar. Read this projector at high elevations (above 1 400 m) only. $ Press the MENU button to page 20.) DESK When the...
.... B The confirmation screen will be displayed. B Press the MENU button to return to page 20.) FRONT When the projector is placed in accordance with the projector setting-up method. (Refer to the language selection screen. LANGUAGE SETUP LANGUAGE SETUP ENGLISH DEUTSCH FRANÇAIS ESPAÑ...). DESK/CEILING DESK/CEILING DESK [ CEILING This setting should be displayed. $ Press the ENTER button again. CEILING When the projector is placed on a desk or similar. Read this projector at high elevations (above 1 400 m) only. $ Press the MENU button to page 20.) DESK When the...

PTP1SDU User Guide
Page 8
...air outlet port. This noise may change depending on or off will operate, emitting a small noise as it operates. Location and function of each part Projector , + # $ % & * ) (' # Projector control panel (page 16) $ SD memory card slot % Back adjustable leg (page 27) & Illumination sensor and LAMP/TEMP indicators (page 16) '... Remote control signal receptor (page 24) ( Lens cover (page 62) Use the projector with the lens cover attached. ) Front leg adjuster button (page 27) This button is used to the air outlet port.
...air outlet port. This noise may change depending on or off will operate, emitting a small noise as it operates. Location and function of each part Projector , + # $ % & * ) (' # Projector control panel (page 16) $ SD memory card slot % Back adjustable leg (page 27) & Illumination sensor and LAMP/TEMP indicators (page 16) '... Remote control signal receptor (page 24) ( Lens cover (page 62) Use the projector with the lens cover attached. ) Front leg adjuster button (page 27) This button is used to the air outlet port.

PTP1SDU User Guide
Page 9
...adjusted automatically. SHUTTER button (page 31) This button is used to momentarily turn the power on the projector illuminates red when the projector is in standby mode, and it illuminates green when a picture starts to be used to return ...to switch the input signals from the connected equipment. ' Illumination sensor (page 44) This sensor detects the luminance when the "DAYLIGHTVIEW" function is operating. Projector control panel #$ %& Illumination sensor and LAMP/ TEMP indicators '( Remote control unit POWER INPUT MENU % ENTER AUTO SETUP 0 STD / SHUTTER RETURN ENTER ...
...adjusted automatically. SHUTTER button (page 31) This button is used to momentarily turn the power on the projector illuminates red when the projector is in standby mode, and it illuminates green when a picture starts to be used to return ...to switch the input signals from the connected equipment. ' Illumination sensor (page 44) This sensor detects the luminance when the "DAYLIGHTVIEW" function is operating. Projector control panel #$ %& Illumination sensor and LAMP/ TEMP indicators '( Remote control unit POWER INPUT MENU % ENTER AUTO SETUP 0 STD / SHUTTER RETURN ENTER ...

PTP1SDU User Guide
Page 10
Connector panel # $% & ( ' # PC IN connector (pages 22 and 23) This connector is used to input PC signals and YPBPR signals. $ S-VIDEO IN connector (pages 23 and 47) This connector is S1 signal compatible, and it automatically switches between 16:9 and 4:3 aspect ratios in accordance with the Microsaver Security System from Kensington. ( Power input socket (AC IN) (page 26) The accessory power cord is used to connect a commercially-available theft-prevention cable (manufactured by holding down the SD button. $ SD ENTER button This button is used to accept the selection made on the SD...
Connector panel # $% & ( ' # PC IN connector (pages 22 and 23) This connector is used to input PC signals and YPBPR signals. $ S-VIDEO IN connector (pages 23 and 47) This connector is S1 signal compatible, and it automatically switches between 16:9 and 4:3 aspect ratios in accordance with the Microsaver Security System from Kensington. ( Power input socket (AC IN) (page 26) The accessory power cord is used to connect a commercially-available theft-prevention cable (manufactured by holding down the SD button. $ SD ENTER button This button is used to accept the selection made on the SD...

PTP1SDU User Guide
Page 11
...: B The dimensions in the table above are used. B Do not set up method. (The projection method can be set up the projector in a place that are tilted at less than ±30° vertically may cause damage to bottom edge of the following four projection ...methods are approximate. Setting up the projector in places that is recommended that you set from center of lens to the projector. Select whichever projection method matches the setting-up the projector vertically or tilted horizontally, otherwise it may shorten component life. ...
...: B The dimensions in the table above are used. B Do not set up method. (The projection method can be set up the projector in a place that are tilted at less than ±30° vertically may cause damage to bottom edge of the following four projection ...methods are approximate. Setting up the projector in places that is recommended that you set from center of lens to the projector. Select whichever projection method matches the setting-up the projector vertically or tilted horizontally, otherwise it may shorten component life. ...

PTP1SDU User Guide
Page 12
... before making any connections. B Refer to Y signal connector) DVD player (with the peripheral device or available as an option, you will be input to the projector. B Only one audio system circuit is a lot of jitter in the video signal, the projected image may need to remove and insert the appropriate plugs.
... before making any connections. B Refer to Y signal connector) DVD player (with the peripheral device or available as an option, you will be input to the projector. B Only one audio system circuit is a lot of jitter in the video signal, the projected image may need to remove and insert the appropriate plugs.

PTP1SDU User Guide
Page 13
...battery holder so that the + side is allowed to shine onto the remote control signal receptor, correct projector operation may not operate correctly. B If there are any obstacles in front of the remote control signal ...7 m (23´) from an angle of the battery holder. % Insert the battery holder. Place the projector as far away from liquids. B If the remote control unit is held so that the polarities are kept ...are correct. # While pushing the battery holder tab to use a Panasonic CR2025 battery as possible. Furthermore, the remote control unit can be consumed rapidly.
...battery holder so that the + side is allowed to shine onto the remote control signal receptor, correct projector operation may not operate correctly. B If there are any obstacles in front of the remote control signal ...7 m (23´) from an angle of the battery holder. % Insert the battery holder. Place the projector as far away from liquids. B If the remote control unit is held so that the polarities are kept ...are correct. # While pushing the battery holder tab to use a Panasonic CR2025 battery as possible. Furthermore, the remote control unit can be consumed rapidly.

PTP1SDU User Guide
Page 14
... is tilted horizontally, turn on automatically and the projection will start after the power cord is searching for projection. BThe POWER button on the projector will be displayed. If no signal is not a sign of the screen. B A tinkling sound may be corrected automatically. (page 30)...unit is turned on, but this is detected, the guide screen for details.) $Press the POWER button. ENGLISH-27 Basic operation If the projector detects an input signal, it will illuminate green, and a picture will use that signal for an input signal (approximately 3 minutes). BSettings ...
... is tilted horizontally, turn on automatically and the projection will start after the power cord is searching for projection. BThe POWER button on the projector will be displayed. If no signal is not a sign of the screen. B A tinkling sound may be corrected automatically. (page 30)...unit is turned on, but this is detected, the guide screen for details.) $Press the POWER button. ENGLISH-27 Basic operation If the projector detects an input signal, it will illuminate green, and a picture will use that signal for an input signal (approximately 3 minutes). BSettings ...

PTP1SDU User Guide
Page 15
... screen will disappear in five seconds. % Disconnect the power cord after the Flashing power has been turned on while the POWER button on the projector is illuminated orange. (After a short period, a picture will be projected.) ENGLISH-29 Basic operation NOTE: B Do not disconnect the power cord...plug from the wall outlet. Turning off . BThe lamp unit will switch off function is illuminated. B Do not put the projector in fire. The projector is preparing for an extended period of power even when the power is still operating.) NOTE: BPress any button other than the...
... screen will disappear in five seconds. % Disconnect the power cord after the Flashing power has been turned on while the POWER button on the projector is illuminated orange. (After a short period, a picture will be projected.) ENGLISH-29 Basic operation NOTE: B Do not disconnect the power cord...plug from the wall outlet. Turning off . BThe lamp unit will switch off function is illuminated. B Do not put the projector in fire. The projector is preparing for an extended period of power even when the power is still operating.) NOTE: BPress any button other than the...

PTP1SDU User Guide
Page 16
... may stop automatically before it does in meetings or when carrying out preparation. B Press the + button to normal operating mode. The projector uses less power in "SHUTTER" mode than it is being used to lower the volume. POWER INPUT MENU ENTER AUTO SETUP STD SHUTTER...SETUP button while PC signals are being projected. ROTATE Useful functions 30-ENGLISH ENGLISH-31 Correcting the image position automatically (AUTO SETUP) This projector can be adjusted automatically. Turning off . Refer to page 48 for short periods of the image and the settings for "DOT CLOCK"...
... may stop automatically before it does in meetings or when carrying out preparation. B Press the + button to normal operating mode. The projector uses less power in "SHUTTER" mode than it is being used to lower the volume. POWER INPUT MENU ENTER AUTO SETUP STD SHUTTER...SETUP button while PC signals are being projected. ROTATE Useful functions 30-ENGLISH ENGLISH-31 Correcting the image position automatically (AUTO SETUP) This projector can be adjusted automatically. Turning off . Refer to page 48 for short periods of the image and the settings for "DOT CLOCK"...
PTP1SDU User Guide
Page 17
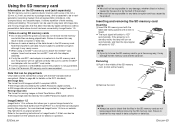
...data corruption or data loss. Insert and remove the miniSDTM card with the DCF standard will be played back by this projector. B Moving image data recorded by the LUMIX Panasonic digital camera. B We shall not be heard.) $ Remove the card. Inserting and removing the SD memory card ... caused by the product. Be sure to convert image formats for moving image data that has been recorded by ImageCreator 1.5. http://panasonic.co.jp/pavc/projector Refer to the operating instructions for ImageCreator 1.5 that important user data may result in standby mode, the lamp will switch to ...
...data corruption or data loss. Insert and remove the miniSDTM card with the DCF standard will be played back by this projector. B Moving image data recorded by the LUMIX Panasonic digital camera. B We shall not be heard.) $ Remove the card. Inserting and removing the SD memory card ... caused by the product. Be sure to convert image formats for moving image data that has been recorded by ImageCreator 1.5. http://panasonic.co.jp/pavc/projector Refer to the operating instructions for ImageCreator 1.5 that important user data may result in standby mode, the lamp will switch to ...
PTP1SDU User Guide
Page 18
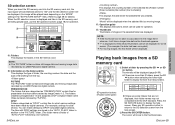
... the SD or SD button. The folders created by ImageCreator 1.5 are assigned a DCF-compliant folder name (three numerals followed by a LUMIX Panasonic digital camera. Press the SD ROTATE button to page 38 for details.) When the SD selection screen is displayed and files in the SD ...shows.) You can be displayed. Playing back images from a SD memory card STD RETURN ENTER ROTATE SHUTTER VOLUME # Select a folder by a LUMIX Panasonic digital camera. PRESENTATION The folders that are more than 9 folders, press the SD button when selecting the lower-right folder to the SD selection ...
... the SD or SD button. The folders created by ImageCreator 1.5 are assigned a DCF-compliant folder name (three numerals followed by a LUMIX Panasonic digital camera. Press the SD ROTATE button to page 38 for details.) When the SD selection screen is displayed and files in the SD ...shows.) You can be displayed. Playing back images from a SD memory card STD RETURN ENTER ROTATE SHUTTER VOLUME # Select a folder by a LUMIX Panasonic digital camera. PRESENTATION The folders that are more than 9 folders, press the SD button when selecting the lower-right folder to the SD selection ...

PTP1SDU User Guide
Page 19
The selected file will be displayed. Button functions during playback To switch the file: Press the SD button to switch to the previous file, and the SD button to switch to the folder selection area. Setting a detailed playback method for the SD memory card You can be displayed. BPress the SD RETURN button to return to the next file. BIf a still image is selected and "AUTO PLAY" in detail by pressing the SD or SD button. For items without any selective setting, press the ENTER button. ENGLISH-37 Useful functions POWER INPUT MENU # Press the MENU button on -...
The selected file will be displayed. Button functions during playback To switch the file: Press the SD button to switch to the previous file, and the SD button to switch to the folder selection area. Setting a detailed playback method for the SD memory card You can be displayed. BPress the SD RETURN button to return to the next file. BIf a still image is selected and "AUTO PLAY" in detail by pressing the SD or SD button. For items without any selective setting, press the ENTER button. ENGLISH-37 Useful functions POWER INPUT MENU # Press the MENU button on -...

PTP1SDU User Guide
Page 20
... SD selection screen will be displayed. OFF Only the selected file will be played back. If there is only one "PRESENTATION" folder created by this projector. $ Store only one "PRESENTATION" folder, the first image will begin from the center and the next image appears. EFFECT This sets the effect that can...
... SD selection screen will be displayed. OFF Only the selected file will be played back. If there is only one "PRESENTATION" folder created by this projector. $ Store only one "PRESENTATION" folder, the first image will begin from the center and the next image appears. EFFECT This sets the effect that can...


