
PTP1SDU User Guide
Page 1
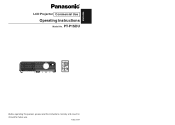
PT-P1SDU POWER INPUT MENU ENTER AUTO SETUP STD SHUTTER RETURN ENTER VOLUME ROTATE Before operating this product, please read the instructions carefully and save this manual for future use. TQBJ 0184 ENGLISH R LCD Projector Commercial Use Operating Instructions Model No.
PT-P1SDU POWER INPUT MENU ENTER AUTO SETUP STD SHUTTER RETURN ENTER VOLUME ROTATE Before operating this product, please read the instructions carefully and save this manual for future use. TQBJ 0184 ENGLISH R LCD Projector Commercial Use Operating Instructions Model No.
PTP1SDU User Guide
Page 2
... required. This equipment generates, uses and can hurt and damage your Panasonic LCD projector. Declaration of Conformity Model Number: PT-P1SDU Trade Name: Panasonic Responsible party: Panasonic Corporation of North America Address: One Panasonic Way Secaucus New Jersey 07094 Telephone number: 1-800-528-8601 or 1-800-222-0741 Email: pbtsservice@panasonic.com This device complies with the limits for power supplies up to get the...
... required. This equipment generates, uses and can hurt and damage your Panasonic LCD projector. Declaration of Conformity Model Number: PT-P1SDU Trade Name: Panasonic Responsible party: Panasonic Corporation of North America Address: One Panasonic Way Secaucus New Jersey 07094 Telephone number: 1-800-528-8601 or 1-800-222-0741 Email: pbtsservice@panasonic.com This device complies with the limits for power supplies up to get the...
PTP1SDU User Guide
Page 3
... 4-ENGLISH guide, Returning a setting to the factory default Adjusting the picture 44 PICTURE MODE, DAYLIGHTVIEW, DETAILED SETUP Adjusting the position 46 KEYSTONE, ASPECT, POSITION, DETAILED SETUP Other settings 49 AUTO SIGNAL, TV-SYSTEM, FRONT/REAR, DESK/CEILING, HIGHLAND, LAMP RUNTIME, SXGA MODE, CTRL PANEL, NR Changing the display language 51 Setting up 20 Projection methods, Projector position, Projection distances Connections 22 Connecting to computer, Connecting to video equipment, Preparation for repairs. Pull the power cord plug out from the wall outlet. Installation work...
... 4-ENGLISH guide, Returning a setting to the factory default Adjusting the picture 44 PICTURE MODE, DAYLIGHTVIEW, DETAILED SETUP Adjusting the position 46 KEYSTONE, ASPECT, POSITION, DETAILED SETUP Other settings 49 AUTO SIGNAL, TV-SYSTEM, FRONT/REAR, DESK/CEILING, HIGHLAND, LAMP RUNTIME, SXGA MODE, CTRL PANEL, NR Changing the display language 51 Setting up 20 Projection methods, Projector position, Projection distances Connections 22 Connecting to computer, Connecting to video equipment, Preparation for repairs. Pull the power cord plug out from the wall outlet. Installation work...

PTP1SDU User Guide
Page 5
... lead in fire. Insulate the battery using the projector for (N2QAYC000001 x1) remote control unit (CR-2025 x1) RGB signal cable [1.8 m (5´10˝), K1HA15DA0002 x1] POWER INPUT MENU ENTER AUTO SETUP STD SHUTTER RETURN ENTER VOLUME ROTATE Power cord Softcase (K2CG3DR00005 x 1) (TPEP017 x 1) ENGLISH-9 Preparation Do not put your local authorities, or the Electronics Industries Alliance: Accessories Check that all of the accessories shown below...
... lead in fire. Insulate the battery using the projector for (N2QAYC000001 x1) remote control unit (CR-2025 x1) RGB signal cable [1.8 m (5´10˝), K1HA15DA0002 x1] POWER INPUT MENU ENTER AUTO SETUP STD SHUTTER RETURN ENTER VOLUME ROTATE Power cord Softcase (K2CG3DR00005 x 1) (TPEP017 x 1) ENGLISH-9 Preparation Do not put your local authorities, or the Electronics Industries Alliance: Accessories Check that all of the accessories shown below...
PTP1SDU User Guide
Page 6
... glass parts of the projector is facing upward. Liquid crystal panel The liquid crystal panel of the lens and the lens cover with very high precision technology to sudden temperature changes, such as fixed points of the lens and the lens cover become dirty or damaged. Please note that the lens is built with your LCD. 10-ENGLISH ENGLISH-11 If the glass parts of blue, green or red. Do...
... glass parts of the projector is facing upward. Liquid crystal panel The liquid crystal panel of the lens and the lens cover with very high precision technology to sudden temperature changes, such as fixed points of the lens and the lens cover become dirty or damaged. Please note that the lens is built with your LCD. 10-ENGLISH ENGLISH-11 If the glass parts of blue, green or red. Do...

PTP1SDU User Guide
Page 8
... the air outlet port. Location and function of each part Projector , + # $ % & * ) (' # Projector control panel (page 16) $ SD memory card slot % Back adjustable leg (page 27) & Illumination sensor and LAMP/TEMP indicators (page 16) ' Remote control signal receptor (page 24) ( Lens cover (page 62) Use the projector with the lens cover attached. ) Front leg adjuster button (page 27) This button is used to adjust the angle of tilt of the projector. * Air inlet port Do not cover this port. + Focus ring (page 27) , Zoom...
... the air outlet port. Location and function of each part Projector , + # $ % & * ) (' # Projector control panel (page 16) $ SD memory card slot % Back adjustable leg (page 27) & Illumination sensor and LAMP/TEMP indicators (page 16) ' Remote control signal receptor (page 24) ( Lens cover (page 62) Use the projector with the lens cover attached. ) Front leg adjuster button (page 27) This button is used to adjust the angle of tilt of the projector. * Air inlet port Do not cover this port. + Focus ring (page 27) , Zoom...

PTP1SDU User Guide
Page 9
... 43) This button is used to turn off the picture and sound. . Projector control panel #$ %& Illumination sensor and LAMP/ TEMP indicators '( Remote control unit POWER INPUT MENU % ENTER AUTO SETUP 0 STD / SHUTTER RETURN ENTER VOLUME $ ROTATE ) & * + , - . # Input signal indicators These indicators illuminate when a signal is being input to the connector that are not compatible with the projector are being input. 16-ENGLISH $ SD operation buttons (pages 18 and 35) These buttons are used for "DOT CLOCK" and "CLOCK PHASE" will flash. * MENU button (pages 40...
... 43) This button is used to turn off the picture and sound. . Projector control panel #$ %& Illumination sensor and LAMP/ TEMP indicators '( Remote control unit POWER INPUT MENU % ENTER AUTO SETUP 0 STD / SHUTTER RETURN ENTER VOLUME $ ROTATE ) & * + , - . # Input signal indicators These indicators illuminate when a signal is being input to the connector that are not compatible with the projector are being input. 16-ENGLISH $ SD operation buttons (pages 18 and 35) These buttons are used for "DOT CLOCK" and "CLOCK PHASE" will flash. * MENU button (pages 40...

PTP1SDU User Guide
Page 14
... AUTO SETUP button (when PC signals are being input). Adjust so that signal for computer connection will be displayed. If no signal is connected. This projector detects its own degree of the screen. BThe POWER button on automatically and the projection will start after the power cord is detected, the guide screen for projection. BSettings such as a DVD player. If the projector detects an input signal, it is tilted horizontally, turn on the projector will use that the projected image...
... AUTO SETUP button (when PC signals are being input). Adjust so that signal for computer connection will be displayed. If no signal is connected. This projector detects its own degree of the screen. BThe POWER button on automatically and the projection will start after the power cord is detected, the guide screen for projection. BSettings such as a DVD player. If the projector detects an input signal, it is tilted horizontally, turn on the projector will use that the projected image...

PTP1SDU User Guide
Page 15
..., a picture will operate by holding down with the power cord connected. BThe lamp unit will switch off function You can also turn back on the projector is possible by pressing the POWER button. NOTE: B Do not disconnect the power cord while the files in fire. POWER button on the projector POWER button status Projector status Red Illuminated The projector is in standby mode and image projection is illuminated orange. (After a short period, a picture will illuminate orange while the cooling fan is used...
..., a picture will operate by holding down with the power cord connected. BThe lamp unit will switch off function You can also turn back on the projector is possible by pressing the POWER button. NOTE: B Do not disconnect the power cord while the files in fire. POWER button on the projector POWER button status Projector status Red Illuminated The projector is in standby mode and image projection is illuminated orange. (After a short period, a picture will illuminate orange while the cooling fan is used...

PTP1SDU User Guide
Page 16
... image and the settings for "DOT CLOCK" and "CLOCK PHASE" when PC signals are being projected. If this happens, project a different picture and then press the AUTO SETUP button again. B Press any button on either the projector or remote control unit to return to raise the volume. B Press the + button to normal operating mode. button to page 48 for details. POWER INPUT MENU ENTER AUTO SETUP STD SHUTTER RETURN ENTER VOLUME ROTATE Press the AUTO SETUP button...
... image and the settings for "DOT CLOCK" and "CLOCK PHASE" when PC signals are being projected. If this happens, project a different picture and then press the AUTO SETUP button again. B Press any button on either the projector or remote control unit to return to raise the volume. B Press the + button to normal operating mode. button to page 48 for details. POWER INPUT MENU ENTER AUTO SETUP STD SHUTTER RETURN ENTER VOLUME ROTATE Press the AUTO SETUP button...

PTP1SDU User Guide
Page 19
... ROTATE button rotates the still image being played back 90 degrees clockwise. POWER INPUT MENU # Press the MENU button on -screen menu. ENGLISH-37 Useful functions BA maximum of pixels to make projection smoother. For items without any selective setting, press the ENTER button. The next screen for at a time. POWER INPUT MENU ENTER AUTO SETUP STD SHUTTER RETURN ENTER VOLUME ROTATE % Select a file by adjusting the items on the on the remote control unit to display...
... ROTATE button rotates the still image being played back 90 degrees clockwise. POWER INPUT MENU # Press the MENU button on -screen menu. ENGLISH-37 Useful functions BA maximum of pixels to make projection smoother. For items without any selective setting, press the ENTER button. The next screen for at a time. POWER INPUT MENU ENTER AUTO SETUP STD SHUTTER RETURN ENTER VOLUME ROTATE % Select a file by adjusting the items on the on the remote control unit to display...

PTP1SDU User Guide
Page 21
... not be displayed. When an S-VIDEO/VIDEO signal is shown below. MAIN MENU MENU PICTURE ADJUSTMENT POSITION ADJUSTMENT OTHER SETUP LANGUAGE SETUP SECURITY SETUP SD PICTURE SETUP SELECT ENTER EXIT B Press the MENU button to page 42 for this projector can be carried out by selecting the operations from on -screen menus. B "SXGA MODE" will not be displayed if a YPBPR signal is being input. SECURITY SETUP menu (page 52) SECURITY SETUP SETUP OFF AMEND PASSWORD TO REGISTER SD...
... not be displayed. When an S-VIDEO/VIDEO signal is shown below. MAIN MENU MENU PICTURE ADJUSTMENT POSITION ADJUSTMENT OTHER SETUP LANGUAGE SETUP SECURITY SETUP SD PICTURE SETUP SELECT ENTER EXIT B Press the MENU button to page 42 for this projector can be carried out by selecting the operations from on -screen menus. B "SXGA MODE" will not be displayed if a YPBPR signal is being input. SECURITY SETUP menu (page 52) SECURITY SETUP SETUP OFF AMEND PASSWORD TO REGISTER SD...

PTP1SDU User Guide
Page 22
...factory default setting. Menu operation guide POWER INPUT MENU ENTER AUTO SETUP STD SHUTTER RETURN ENTER VOLUME # Press the MENU button. Selected item will turn green when any selective setting, press the ENTER button. The "MAIN MENU" MENU will then be displayed. MENU PICTURE ADJUSTMENT POSITION ADJUSTMENT OTHER SETUP LANGUAGE SETUP SECURITY SETUP SD PICTURE SETUP SELECT ENTER EXIT % Press the ENTER button to the factory default setting, and the bar scale will appear white. However, the operation of this function varies depending on the remote control...
...factory default setting. Menu operation guide POWER INPUT MENU ENTER AUTO SETUP STD SHUTTER RETURN ENTER VOLUME # Press the MENU button. Selected item will turn green when any selective setting, press the ENTER button. The "MAIN MENU" MENU will then be displayed. MENU PICTURE ADJUSTMENT POSITION ADJUSTMENT OTHER SETUP LANGUAGE SETUP SECURITY SETUP SD PICTURE SETUP SELECT ENTER EXIT % Press the ENTER button to the factory default setting, and the bar scale will appear white. However, the operation of this function varies depending on the remote control...
PTP1SDU User Guide
Page 24
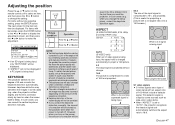
... the images in such a way that the amount of focus. S4:3 The size of the input signal is compressed to a ratio of 16:9 and projected. In such cases, you change the setting. To obtain the best picture quality, set to "AUTO", the projector recognizes the detector signal and automatically switches the aspect ratio to make the adjustment. For items with a 4:3 aspect ratio onto a 16:9 screen.) ASPECT (S-VIDEO/VIDEO...
... the images in such a way that the amount of focus. S4:3 The size of the input signal is compressed to a ratio of 16:9 and projected. In such cases, you change the setting. To obtain the best picture quality, set to "AUTO", the projector recognizes the detector signal and automatically switches the aspect ratio to make the adjustment. For items with a 4:3 aspect ratio onto a 16:9 screen.) ASPECT (S-VIDEO/VIDEO...

PTP1SDU User Guide
Page 25
... signals. STILL MODE (S-VIDEO/VIDEO only) To reduce flickering of the projected images. Press the F or G button to "PC". Press the I or H button to adjust so that the noise level is projected onto a 16:9 screen, distortion may not be set to display programes for a commercial purpose or for that programe under copyright protection laws. ON "AUTO SETUP" will not function when the input signal is changed to move the picture...
... signals. STILL MODE (S-VIDEO/VIDEO only) To reduce flickering of the projected images. Press the F or G button to "PC". Press the I or H button to adjust so that the noise level is projected onto a 16:9 screen, distortion may not be set to display programes for a commercial purpose or for that programe under copyright protection laws. ON "AUTO SETUP" will not function when the input signal is changed to move the picture...

PTP1SDU User Guide
Page 28
... an Remedy Authorized Authorized Service Center to Problem replace the lamp unit. When the TEMP indicator and the LAMP indicator are illuminated There are two indicators on the control panel of the projector which give information about problems that have occurred inside the projector has become unusually projector has become Problem high. LAMP indicator TEMP indicator TEMP indicator Indicator display Illuminated (red) (Lamp unit on) Flashing (red) (Lamp unit off the power and check the table below for the lamp unit is cools...
... an Remedy Authorized Authorized Service Center to Problem replace the lamp unit. When the TEMP indicator and the LAMP indicator are illuminated There are two indicators on the control panel of the projector which give information about problems that have occurred inside the projector has become unusually projector has become Problem high. LAMP indicator TEMP indicator TEMP indicator Indicator display Illuminated (red) (Lamp unit on) Flashing (red) (Lamp unit off the power and check the table below for the lamp unit is cools...
PTP1SDU User Guide
Page 29
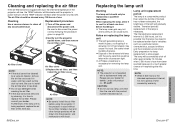
... dealer for lamp replacement is turned off after it can cause burns. Replacing the lamp unit Warning The lamp unit should be cleaned every 100 hours of the projector will rise, the TEMP indicator will illuminate and the projector's power will flash after this time also. 56-ENGLISH Air filter cover % Replace the air filter, and then install the air filter cover. Notes on page 28. $ Gently turn off (the TEMP indicator will turn the projector upside down, and then remove the air filter cover. B Dispose...
... dealer for lamp replacement is turned off after it can cause burns. Replacing the lamp unit Warning The lamp unit should be cleaned every 100 hours of the projector will rise, the TEMP indicator will illuminate and the projector's power will flash after this time also. 56-ENGLISH Air filter cover % Replace the air filter, and then install the air filter cover. Notes on page 28. $ Gently turn off (the TEMP indicator will turn the projector upside down, and then remove the air filter cover. B Dispose...

PTP1SDU User Guide
Page 30
... operate so that the direction of the projector, and then remove the lamp unit cover. % Use a Phillips screwdriver to securely tighten the lamp unit fixing screw. MENU PICTURE ADJUSTMENT POSITION ADJUSTMENT OTHER SETUP LANGUAGE SETUP SECURITY SETUP SD PICTURE SETUP SELECT ENTER EXIT + Press the ENTER button to display the "OTHER SETUP" menu, and then press the F or G button to install the lamp unit and the lamp unit cover securely. NOTE: B If the power cord was disconnected during image projection and standby mode...
... operate so that the direction of the projector, and then remove the lamp unit cover. % Use a Phillips screwdriver to securely tighten the lamp unit fixing screw. MENU PICTURE ADJUSTMENT POSITION ADJUSTMENT OTHER SETUP LANGUAGE SETUP SECURITY SETUP SD PICTURE SETUP SELECT ENTER EXIT + Press the ENTER button to display the "OTHER SETUP" menu, and then press the F or G button to install the lamp unit and the lamp unit cover securely. NOTE: B If the power cord was disconnected during image projection and standby mode...
PTP1SDU User Guide
Page 31
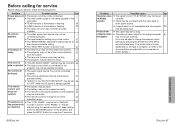
... remote control signal receptor on the projector 24 may not be too long. - other signal source. B A signal which is being projected. Picture from the screen. Before calling for service Before calling for the laptop computer 67 not appear. Problem Possible cause Page Power does not B The power cord may not be at the correct distance 21 from B The cable may be connected. - B TEMP indicator is illuminated or flashing. 54 B LAMP indicator is not being input...
... remote control signal receptor on the projector 24 may not be too long. - other signal source. B A signal which is being projected. Picture from the screen. Before calling for service Before calling for the laptop computer 67 not appear. Problem Possible cause Page Power does not B The power cord may not be at the correct distance 21 from B The cable may be connected. - B TEMP indicator is illuminated or flashing. 54 B LAMP indicator is not being input...

PTP1SDU User Guide
Page 32
...´5˝) Optical axis shift: Screen aspect ratio: 4:1 (fixed) 4:3 Installation: Speaker: Max. Do not wipe the lens or the lens cover with the lens cover attached. 62-ENGLISH Specifications Power supply: Power consumption: Amps: 100 V - 240 V ~, 50 Hz/60 Hz 180 W [During standby (when fan is made of neutral detergent in place. Be careful when handling the lens cover B Use the projector with a cloth that is particularly dirty...
...´5˝) Optical axis shift: Screen aspect ratio: 4:1 (fixed) 4:3 Installation: Speaker: Max. Do not wipe the lens or the lens cover with the lens cover attached. 62-ENGLISH Specifications Power supply: Power consumption: Amps: 100 V - 240 V ~, 50 Hz/60 Hz 180 W [During standby (when fan is made of neutral detergent in place. Be careful when handling the lens cover B Use the projector with a cloth that is particularly dirty...


