PTDS8500U User Guide
Page 1
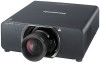
JJBefore using your projector, be sure to 16). Thank you for future use. TQBJ0341 ENGLISH JJ Before operating this product, please read "Precautions with regard to safety" (Æ pages 8 to read the instructions carefully and save this manual for purchasing a Panasonic Projector. PT-DZ8700U PT-DS8500U PT-DW8300U The projection lens is sold separately. Operating Instructions Functional Manual DLP™ Based Projector Commercial Use Model No.
JJBefore using your projector, be sure to 16). Thank you for future use. TQBJ0341 ENGLISH JJ Before operating this product, please read "Precautions with regard to safety" (Æ pages 8 to read the instructions carefully and save this manual for purchasing a Panasonic Projector. PT-DZ8700U PT-DS8500U PT-DW8300U The projection lens is sold separately. Operating Instructions Functional Manual DLP™ Based Projector Commercial Use Model No.
PTDS8500U User Guide
Page 2
...120 V, 60 Hz AC, house current only. Do not defeat the purpose of Panasonic Marketing Europe GmbH Winsbergring 15, 22525 Hamburg, F.R. Power Supply: This Projector is supplied with your Panasonic DLP™ Based projector. Do not remove Pursuant to 125 V, 7 A. CAUTION: The AC power cord...you are unable to insert the plug into the outlet, contact an electrician. If you use of projectors. Important Information IImmpporotarnttaSnaftetSy Naofteictey Notice Dear Panasonic Customer: The following information should note it will help you to get the most out of your new...
...120 V, 60 Hz AC, house current only. Do not defeat the purpose of Panasonic Marketing Europe GmbH Winsbergring 15, 22525 Hamburg, F.R. Power Supply: This Projector is supplied with your Panasonic DLP™ Based projector. Do not remove Pursuant to 125 V, 7 A. CAUTION: The AC power cord...you are unable to insert the plug into the outlet, contact an electrician. If you use of projectors. Important Information IImmpporotarnttaSnaftetSy Naofteictey Notice Dear Panasonic Customer: The following information should note it will help you to get the most out of your new...

PTDS8500U User Guide
Page 4
... is longer than the existing model. Connect with other devices. (Æpage 34) 4. Adjust the image. (Æpage 41) Settings Maintenance Appendix 4 - Set up your projector. (Æpage 21) 2. Start projecting. (Æpage 39) 6. Select the input signal. (Æpage 41) 7. Important Information Preparation Getting Started Basic Operation Heightened luminance The...
... is longer than the existing model. Connect with other devices. (Æpage 34) 4. Adjust the image. (Æpage 41) Settings Maintenance Appendix 4 - Set up your projector. (Æpage 21) 2. Start projecting. (Æpage 39) 6. Select the input signal. (Æpage 41) 7. Important Information Preparation Getting Started Basic Operation Heightened luminance The...
PTDS8500U User Guide
Page 5
... 12 Security 14 Cautions on use 14 Cleaning and maintenance 15 Disposal 15 Accessories 16 Preparation About Your Projector 17 Remote control 17 Projector body 18 Setting projector ID number to remote control......20 Using a wired remote control 20 Getting Started Setting up 21 Projection ...method 21 Screen size and throw distance 22 Front leg adjusters and throwing angle 33 Connections 34 Before connection to the projector 34 Connecting example : AV equipment 35 Connecting example : Computers 36 Removing/attaching the projection lens (optional 37 How to install...
... 12 Security 14 Cautions on use 14 Cleaning and maintenance 15 Disposal 15 Accessories 16 Preparation About Your Projector 17 Remote control 17 Projector body 18 Setting projector ID number to remote control......20 Using a wired remote control 20 Getting Started Setting up 21 Projection ...method 21 Screen size and throw distance 22 Front leg adjusters and throwing angle 33 Connections 34 Before connection to the projector 34 Connecting example : AV equipment 35 Connecting example : Computers 36 Removing/attaching the projection lens (optional 37 How to install...
PTDS8500U User Guide
Page 6
... HDMI IN 73 SDI IN (PT-DZ8700/PT-DS8500 only 73 ON-SCREEN DISPLAY 73 BACK COLOR 74 STARTUP LOGO 74 FREEZE 74 PROJECTOR SETUP menu 75 PROJECTOR ID 75 INSTALLATION 75 HIGH ALTITUDE MODE 75 COOLING CONDITION 76 LAMP SELECT 76 LAMP RELAY 76 LAMP POWER 77 BRIGHTNESS CONTROL 77 STANDBY...
... HDMI IN 73 SDI IN (PT-DZ8700/PT-DS8500 only 73 ON-SCREEN DISPLAY 73 BACK COLOR 74 STARTUP LOGO 74 FREEZE 74 PROJECTOR SETUP menu 75 PROJECTOR ID 75 INSTALLATION 75 HIGH ALTITUDE MODE 75 COOLING CONDITION 76 LAMP SELECT 76 LAMP RELAY 76 LAMP POWER 77 BRIGHTNESS CONTROL 77 STANDBY...

PTDS8500U User Guide
Page 8
...is not strong enough to take the full weight of a surface which can cause burns, fire or damage to fall down . Using the projector under such conditions will result in fire, electric shocks or components deterioration. Do not install this will result in electric shocks. If the ... circuit breaker shall be easily accessible when problems occur. Do not set up on top of time, pull the power plug out from the projector, cut off the power supply. During a thunderstorm, do anything other electrical equipment. zz If not using too many adapters), overheating may come...
...is not strong enough to take the full weight of a surface which can cause burns, fire or damage to fall down . Using the projector under such conditions will result in fire, electric shocks or components deterioration. Do not install this will result in electric shocks. If the ... circuit breaker shall be easily accessible when problems occur. Do not set up on top of time, pull the power plug out from the projector, cut off the power supply. During a thunderstorm, do anything other electrical equipment. zz If not using too many adapters), overheating may come...

PTDS8500U User Guide
Page 9
... the lens cover attached. zz Insulate the battery using tape or something similar before disposal. If installation is emitted from the lens while the projector is being used. Do not place your hands or face, or objects which cannot withstand heat close to the air outlet port. In addition... another part of your hands or other heavy objects on cloth or papers, as necklaces or hairpins. zz Do not place the projector on top of the projector. zz Use manganese batteries but not rechargeable batteries. Do not look into water or fire. zz Do not disassemble dry cell batteries...
... the lens cover attached. zz Insulate the battery using tape or something similar before disposal. If installation is emitted from the lens while the projector is being used. Do not place your hands or face, or objects which cannot withstand heat close to the air outlet port. In addition... another part of your hands or other heavy objects on cloth or papers, as necklaces or hairpins. zz Do not place the projector on top of the projector. zz Use manganese batteries but not rechargeable batteries. Do not look into water or fire. zz Do not disassemble dry cell batteries...

PTDS8500U User Guide
Page 11
... CAUTION „„POWER When disconnecting the power cord, be housed and do not hold the power plug and power connector. Moving the projector with regard to deteriorate, or result in place, and remove the lens. Failure to observe this will cause the user to absorb the ... when the lamp broke and which will cause fire or electric shocks to keep them . ENGLISH - 11 Cautions when transporting When transporting the projector or carrying it could cause lamp explosion. Always disconnect all cables before carrying out any cleaning. Please take care to occur. When not using...
... CAUTION „„POWER When disconnecting the power cord, be housed and do not hold the power plug and power connector. Moving the projector with regard to deteriorate, or result in place, and remove the lens. Failure to observe this will cause the user to absorb the ... when the lamp broke and which will cause fire or electric shocks to keep them . ENGLISH - 11 Cautions when transporting When transporting the projector or carrying it could cause lamp explosion. Always disconnect all cables before carrying out any cleaning. Please take care to occur. When not using...
PTDS8500U User Guide
Page 12
... m (4 593 - 8 858 ft) above sea level, set [COOLING CONDITION]. ENGLISH zz Do not set [HIGH ALTITUDE MODE] to [ON]. Failure to observe this projector at elevations lower than 2 700 m (8 858 ft) above sea level, set up in a place free from the light source, making the focus unstable in the... least 30 minutes before adjusting the lens focus. „„Be sure to ask a specialized technician when installing the product to the projector. If the product is installed in places which are subject to vibration or shocks. zz Avoid setting up time of high-voltage electrical ...
... m (4 593 - 8 858 ft) above sea level, set [COOLING CONDITION]. ENGLISH zz Do not set [HIGH ALTITUDE MODE] to [ON]. Failure to observe this projector at elevations lower than 2 700 m (8 858 ft) above sea level, set up in a place free from the light source, making the focus unstable in the... least 30 minutes before adjusting the lens focus. „„Be sure to ask a specialized technician when installing the product to the projector. If the product is installed in places which are subject to vibration or shocks. zz Avoid setting up time of high-voltage electrical ...
PTDS8500U User Guide
Page 13
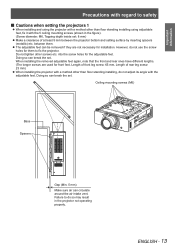
... Make sure air can be removed if they are used for them . Failure to do not adjust its angle with the adjustable feet. between the projector bottom and setting surface by inserting spacers (metallic) etc. Do not tighten other than floor standing installing using the...result in the figure). (Screw diameter: M6, Tapping depth inside set: 8 mm) zz Make a clearance of rear leg screw: 23 mm) zz When installing the projector with a method other screws etc. zz The adjustable feet can circulate around the air intake vent. into the screw holes for installation. Length of front...
... Make sure air can be removed if they are used for them . Failure to do not adjust its angle with the adjustable feet. between the projector bottom and setting surface by inserting spacers (metallic) etc. Do not tighten other than floor standing installing using the...result in the figure). (Screw diameter: M6, Tapping depth inside set: 8 mm) zz Make a clearance of rear leg screw: 23 mm) zz When installing the projector with a method other screws etc. zz The adjustable feet can circulate around the air intake vent. into the screw holes for installation. Length of front...
PTDS8500U User Guide
Page 14
... consider the direction of at least 5 mm between them as this reason, take care not to the projector ventilation openings. ENGLISH zz Panasonic and its affiliate companies would never directly inquire about your password regularly. zz Interfering or stopping of this ...product. between the projector bottom and setting surface by a malicious third party. „„Security instruction zz The connecting network...
... consider the direction of at least 5 mm between them as this reason, take care not to the projector ventilation openings. ENGLISH zz Panasonic and its affiliate companies would never directly inquire about your password regularly. zz Interfering or stopping of this ...product. between the projector bottom and setting surface by a malicious third party. „„Security instruction zz The connecting network...

PTDS8500U User Guide
Page 15
...clean the cabinet. zz The life of a mercury lamp varies according to the individual difference or conditions of the projector lens with your dealer. „„DLP chips The DLP chips are precision-made. Important Information Precautions with regard to safety „„Do not touch the surface of use...Do not clean the lens surface with the Authorized Service Center regarding cleaning costs. If the surface of the projector at least once a year. Do not use solvents such as DLP chips and Polarizing plates in less than 1 year if using such solvents, the outer case will be reduced...
...clean the cabinet. zz The life of a mercury lamp varies according to the individual difference or conditions of the projector lens with your dealer. „„DLP chips The DLP chips are precision-made. Important Information Precautions with regard to safety „„Do not touch the surface of use...Do not clean the lens surface with the Authorized Service Center regarding cleaning costs. If the surface of the projector at least once a year. Do not use solvents such as DLP chips and Polarizing plates in less than 1 year if using such solvents, the outer case will be reduced...
PTDS8500U User Guide
Page 16
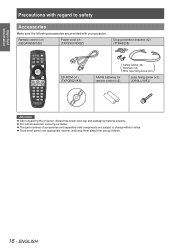
... (x2) Washers (x4) Wire rope fixing screw (x2) AA/R6 batteries for remote control (x2) Lens fixing screw (x1) (XYN4+J18FJ) Attention zzAfter unpacking the projector, discard the power cord cap and packaging material properly. zzStore small parts in an appropriate manner, and keep them away from young children. 16 - zzFor...
... (x2) Washers (x4) Wire rope fixing screw (x2) AA/R6 batteries for remote control (x2) Lens fixing screw (x1) (XYN4+J18FJ) Attention zzAfter unpacking the projector, discard the power cord cap and packaging material properly. zzStore small parts in an appropriate manner, and keep them away from young children. 16 - zzFor...
PTDS8500U User Guide
Page 17
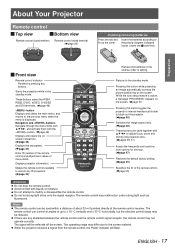
...control range may be reflected off the screen. Note zzThe remote control can control at the remote control receiver. About Your Projector Remote control JJTop view JJBottom view Remote control signal emitters Remote control wired terminal (Æpage 20) Installing/removing batteries ...- 17 zzIf there are used within a distance of about 30 m if pointed directly at angles of menu items. Displays projector information. zzWhen the projector receives a signal from options for shortcut. (Æpage 47) Restores the default factory setting. (Æpage 49) Specifies the...
...control range may be reflected off the screen. Note zzThe remote control can control at the remote control receiver. About Your Projector Remote control JJTop view JJBottom view Remote control signal emitters Remote control wired terminal (Æpage 20) Installing/removing batteries ...- 17 zzIf there are used within a distance of about 30 m if pointed directly at angles of menu items. Displays projector information. zzWhen the projector receives a signal from options for shortcut. (Æpage 47) Restores the default factory setting. (Æpage 49) Specifies the...

PTDS8500U User Guide
Page 18
... temperature status. (Æpage 108) Filter indicator (FILTER) Indicates the filter status. (Æpage 108) CONTROL PANEL Security lock Terminals on /off. switch Switch the projector on side Air intake port AC IN terminal Connect the power cord to supply electronic power to adjust the projection angle. Remote control signal receptor...
... temperature status. (Æpage 108) Filter indicator (FILTER) Indicates the filter status. (Æpage 108) CONTROL PANEL Security lock Terminals on /off. switch Switch the projector on side Air intake port AC IN terminal Connect the power cord to supply electronic power to adjust the projection angle. Remote control signal receptor...

PTDS8500U User Guide
Page 19
... (Æpage 47) REMOTE 2 IN Connect a cable from /to a computer. button Pressing this button toggles the projector's internal mechanical shutter to black out the projector. (Æpage 46) button Use these buttons to select menu items, change settings, adjust levels, and to the ... used in the standby mode. S-VIDEO IN Connect an S-VIDEO signals. VIDEO IN Connect a VIDEO signals. ENGLISH - 19 About Your Projector Preparation JJCONTROL PANEL button Returns to enter the [SECURITY] password. S-VIDEO Switches to RGB2 input. RGB2 Switches to S-VIDEO input. button ...
... (Æpage 47) REMOTE 2 IN Connect a cable from /to a computer. button Pressing this button toggles the projector's internal mechanical shutter to black out the projector. (Æpage 46) button Use these buttons to select menu items, change settings, adjust levels, and to the ... used in the standby mode. S-VIDEO IN Connect an S-VIDEO signals. VIDEO IN Connect a VIDEO signals. ENGLISH - 19 About Your Projector Preparation JJCONTROL PANEL button Returns to enter the [SECURITY] password. S-VIDEO Switches to RGB2 input. RGB2 Switches to S-VIDEO input. button ...

PTDS8500U User Guide
Page 20
... button has been pressed, the ID will remain at the number that of the remote control when using only a single projector. 1111 Press button, and the projector (s) will be set the same ID number again. The ID number of the remote control are replaced, set to "...stereo mini jack commercial cable to simultaneously control multiple main units with that was set to match the intended projector. Preparation About Your Projector Setting projector ID number to remote control Each projector can be assigned a unique ID number, and the handheld remote' s number must be sufficient and ...
... button has been pressed, the ID will remain at the number that of the remote control when using only a single projector. 1111 Press button, and the projector (s) will be set the same ID number again. The ID number of the remote control are replaced, set to "...stereo mini jack commercial cable to simultaneously control multiple main units with that was set to match the intended projector. Preparation About Your Projector Setting projector ID number to remote control Each projector can be assigned a unique ID number, and the handheld remote' s number must be sufficient and ...
PTDS8500U User Guide
Page 21
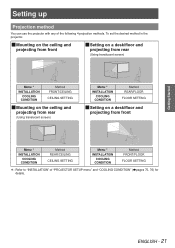
To set the desired method in the projector. ENGLISH - 21 JJMounting on the ceiling and projecting from front JJSetting on a desk/floor and projecting from rear (Using translucent screen) Menu Û INSTALLATION COOLING ... FRONT/FLOOR FLOOR SETTING ½½½ Refer to "INSTALLATION" of the following 4 projection methods. Getting Started Setting up Projection method You can use the projector with any of "PROJECTOR SETUP menu" and "COOLING CONDITION" (Æpages 75, 76) for details.
To set the desired method in the projector. ENGLISH - 21 JJMounting on the ceiling and projecting from front JJSetting on a desk/floor and projecting from rear (Using translucent screen) Menu Û INSTALLATION COOLING ... FRONT/FLOOR FLOOR SETTING ½½½ Refer to "INSTALLATION" of the following 4 projection methods. Getting Started Setting up Projection method You can use the projector with any of "PROJECTOR SETUP menu" and "COOLING CONDITION" (Æpages 75, 76) for details.
PTDS8500U User Guide
Page 22
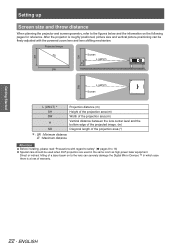
...read "Precautions with regard to safety" (Æ pages 8 to the figures below and the information on to the lens can be used when DLP projectors are used in which case there is roughly positioned, picture size and vertical picture positioning can severely damage the Digital Mirror Devices ™ in ... of the projected image. (m) Diagonal length of warranty. 22 - Getting Started Setting up Screen size and throw distance When planning the projector and screen geometry, refer to 16) zzSpecial care should be finely adjusted with the powered zoom lens and lens shifting mechanism.
...read "Precautions with regard to safety" (Æ pages 8 to the figures below and the information on to the lens can be used when DLP projectors are used in which case there is roughly positioned, picture size and vertical picture positioning can severely damage the Digital Mirror Devices ™ in ... of the projected image. (m) Diagonal length of warranty. 22 - Getting Started Setting up Screen size and throw distance When planning the projector and screen geometry, refer to 16) zzSpecial care should be finely adjusted with the powered zoom lens and lens shifting mechanism.
PTDS8500U User Guide
Page 31
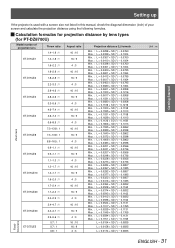
... (for PT-DZ8700U) Zoom lens Model number of your screen and calculate the projection distance using the following formulas. Setting up Getting Started If the projector is used with a screen size not listed in this manual, check the diagonal dimension (inch) of projection lens ET-D75LE1 ET-D75LE2 ET-D75LE3 ET...
... (for PT-DZ8700U) Zoom lens Model number of your screen and calculate the projection distance using the following formulas. Setting up Getting Started If the projector is used with a screen size not listed in this manual, check the diagonal dimension (inch) of projection lens ET-D75LE1 ET-D75LE2 ET-D75LE3 ET...


