
PTAX200U User Guide
Page 2
... the user to persons. Important Information Important Safety Notice Dear Panasonic Customer: This instruction booklet provides all the necessary operating information that you use higher voltages or currents than this booklet in case service is required. The lightning flash with your new product, and that contains mercury. This is supplied with a three-pin grounding-type power plug. Do not remove the...
... the user to persons. Important Information Important Safety Notice Dear Panasonic Customer: This instruction booklet provides all the necessary operating information that you use higher voltages or currents than this booklet in case service is required. The lightning flash with your new product, and that contains mercury. This is supplied with a three-pin grounding-type power plug. Do not remove the...

PTAX200U User Guide
Page 3
.... - Germany WARNING: Not for use only shielded interface cables when connecting to operate. Declaration of Conformity Model Number: PT-AX200U Trade Name: Panasonic Responsible party: Panasonic Corporation of Electronic Computer/Data Processing Equipment, ANSI/NFPA 75. ENGLISH - 3 Consult the dealer or an experienced radio/TV technician for the Protection of North America Address: One Panasonic Way, Secaucus, New Jersey 07094 Telephone number: (888) 411...
.... - Germany WARNING: Not for use only shielded interface cables when connecting to operate. Declaration of Conformity Model Number: PT-AX200U Trade Name: Panasonic Responsible party: Panasonic Corporation of Electronic Computer/Data Processing Equipment, ANSI/NFPA 75. ENGLISH - 3 Consult the dealer or an experienced radio/TV technician for the Protection of North America Address: One Panasonic Way, Secaucus, New Jersey 07094 Telephone number: (888) 411...

PTAX200U User Guide
Page 4
... to safety 6 WARNINGS 6 CAUTIONS 7 Cautions when transporting 8 Cautions when installing 8 Cautions on use 9 Accessories 10 Preparation About Your Projector 11 Remote control 11 Projector body 12 Getting Started Setting up " on the button backlight 22 Switching the preset settings 22 Adjusting the image 23 Switching the aspect ratio 23 Resetting to the factory default settings 23 Capturing an image 23 Setting your projector See "Setting up 14 Screen size and throw distance 14 Projection method 15 Front...
... to safety 6 WARNINGS 6 CAUTIONS 7 Cautions when transporting 8 Cautions when installing 8 Cautions on use 9 Accessories 10 Preparation About Your Projector 11 Remote control 11 Projector body 12 Getting Started Setting up " on the button backlight 22 Switching the preset settings 22 Adjusting the image 23 Switching the aspect ratio 23 Resetting to the factory default settings 23 Capturing an image 23 Setting your projector See "Setting up 14 Screen size and throw distance 14 Projection method 15 Front...
PTAX200U User Guide
Page 5
... KEYSTONE 36 AUTO SETUP 36 FUNCTION BUTTON 37 FUNCTION BUTTON 37 OPTION menu 38 INPUT GUIDE 38 OSD DESIGN 38 OSD POSITION 38 BACK COLOR 38 STARTUP LOGO 38 AUTO SEARCH 38 HDMI SIGNAL LEVEL 38 INSTALLATION 38 SLEEP 39 ALTITUDE 39 LAMP POWER 39 LAMP RUNTIME 39 TEST PATTERN 39 Contents Maintenance TEMP and LAMP Indicators 40 Managing the indicated problems 40 Care and Replacement 41 Cleaning the projector 41 Replacing the lamp unit 42 Troubleshooting...
... KEYSTONE 36 AUTO SETUP 36 FUNCTION BUTTON 37 FUNCTION BUTTON 37 OPTION menu 38 INPUT GUIDE 38 OSD DESIGN 38 OSD POSITION 38 BACK COLOR 38 STARTUP LOGO 38 AUTO SEARCH 38 HDMI SIGNAL LEVEL 38 INSTALLATION 38 SLEEP 39 ALTITUDE 39 LAMP POWER 39 LAMP RUNTIME 39 TEST PATTERN 39 Contents Maintenance TEMP and LAMP Indicators 40 Managing the indicated problems 40 Care and Replacement 41 Cleaning the projector 41 Replacing the lamp unit 42 Troubleshooting...

PTAX200U User Guide
Page 7
... a qualified technician. Keep the remote control unit out of the reach of the air outlet port. CAUTIONS Do not cover the air inlet port or the air outlet port. Do not place the projector in the ceiling. Do not place the projector on top of the projector which could result in places where the projector may result. Do not set up the projector in a high temperature environment, such as...
... a qualified technician. Keep the remote control unit out of the reach of the air outlet port. CAUTIONS Do not cover the air inlet port or the air outlet port. Do not place the projector in the ceiling. Do not place the projector on top of the projector which could result in places where the projector may result. Do not set up the projector in a high temperature environment, such as...
PTAX200U User Guide
Page 8
... adjuster legs or the top cover to purchase the separate installation kit (Model No. Avoid setting up the projector near high-voltage power lines or near an air conditioner or lighting equipment. See "TEMP indicator" on page 39. ET-PKX100). Failure to vibration or shocks. You could fall or the projector could result in fire. Ask your nearest Authorized Service Center to carry out all installation work...
... adjuster legs or the top cover to purchase the separate installation kit (Model No. Avoid setting up the projector near high-voltage power lines or near an air conditioner or lighting equipment. See "TEMP indicator" on page 39. ET-PKX100). Failure to vibration or shocks. You could fall or the projector could result in fire. Ask your nearest Authorized Service Center to carry out all installation work...
PTAX200U User Guide
Page 9
... using the projector after using the projector, attach the lens cover. Important Information Precautions with regard to safety Cautions on use In order to get the best picture quality Draw curtains or blinds over any windows and turn off may greatly affect on the lamp life. Especially the consecutive use . If the surface of blue, green or red. Moreover, when not using the projector. Screen Do not apply any lights...
... using the projector after using the projector, attach the lens cover. Important Information Precautions with regard to safety Cautions on use In order to get the best picture quality Draw curtains or blinds over any windows and turn off may greatly affect on the lamp life. Especially the consecutive use . If the surface of blue, green or red. Moreover, when not using the projector. Screen Do not apply any lights...

PTAX200U User Guide
Page 11
... through the input method. (page 26) Remote control signal emitter Remote control signal. (page 22) Turn the button backlight of the remote control on/ off. (page 22) Display the COLOR MANAGEMENT menu. (page 24) Display the PICTURE menu. (page 23) Return to the previous menu. (page 27) Capture the projected image as this may shorten battery life. • See "Remote control operation" on , switch between stand-by mode and projection mode. (page 19) PICTURE MODE buttons Switch to the best setting for a darker...
... through the input method. (page 26) Remote control signal emitter Remote control signal. (page 22) Turn the button backlight of the remote control on/ off. (page 22) Display the COLOR MANAGEMENT menu. (page 24) Display the PICTURE menu. (page 23) Return to the previous menu. (page 27) Capture the projected image as this may shorten battery life. • See "Remote control operation" on , switch between stand-by mode and projection mode. (page 19) PICTURE MODE buttons Switch to the best setting for a darker...

PTAX200U User Guide
Page 19
... or electrical hazards. • Switch off Power cord J Connecting 1. POWER indicator POWER indicator Indicator status No illumination or flashing Red Lit Green Flashing Lit Orange Lit Flashing Status The MAIN POWER button is 0.08 W. NOTE: • While the projector is cooling the lamp, do not switch the MAIN POWER button off or unplug the power cord. • The electric consumption in standby mode is switched off. Connect the power cord to the projector when not in use other than the provided power cord. • Ensure all...
... or electrical hazards. • Switch off Power cord J Connecting 1. POWER indicator POWER indicator Indicator status No illumination or flashing Red Lit Green Flashing Lit Orange Lit Flashing Status The MAIN POWER button is 0.08 W. NOTE: • While the projector is cooling the lamp, do not switch the MAIN POWER button off or unplug the power cord. • The electric consumption in standby mode is switched off. Connect the power cord to the projector when not in use other than the provided power cord. • Ensure all...

PTAX200U User Guide
Page 20
... the POWER button. Switch the MAIN POWER button on page 38. Switching off . 20 - ENGLISH The power indicator lights up in orange while cooling the lamp, then illuminates red when it is displayed on the screen. The power indicator lights up the projector, some small rattling or tinkling sound may be heard, or the display may cause burns, fire or damage to switch the power off the projector Basic Operation POWER indicator 1. NOTE: • • When starting...
... the POWER button. Switch the MAIN POWER button on page 38. Switching off . 20 - ENGLISH The power indicator lights up in orange while cooling the lamp, then illuminates red when it is displayed on the screen. The power indicator lights up the projector, some small rattling or tinkling sound may be heard, or the display may cause burns, fire or damage to switch the power off the projector Basic Operation POWER indicator 1. NOTE: • • When starting...

PTAX200U User Guide
Page 21
... play button of the projector. See "Lens shift and positioning" on the connected devices. Adjust the focus and the projected image size. Adjust the angle of the required device. 2. Switch on page 16. Turn the focus ring and zoom ring to select the required input method if needed. See "Front leg adjusters and throwing angle" on page 23. 2. Projecting an image Selecting the input signal 1. Press the INPUT SELECT button to adjust. You...
... play button of the projector. See "Lens shift and positioning" on the connected devices. Adjust the focus and the projected image size. Adjust the angle of the required device. 2. Switch on page 16. Turn the focus ring and zoom ring to select the required input method if needed. See "Front leg adjusters and throwing angle" on page 23. 2. Projecting an image Selecting the input signal 1. Press the INPUT SELECT button to adjust. You...

PTAX200U User Guide
Page 24
... and press ENTER. The LOG menu is displayed. Select OK to open the menu. Press the COLOR MANAGEMENT button to delete all logs. The projected image is captured, and the target cursor is displayed. Setting range: -30 to delete the log. Select DELETE to +30 TINT Adjust the color tone. The confirmation screen will not be displayed. screen is displayed and you select ALL DELETE, the...
... and press ENTER. The LOG menu is displayed. Select OK to open the menu. Press the COLOR MANAGEMENT button to delete all logs. The projected image is captured, and the target cursor is displayed. Setting range: -30 to delete the log. Select DELETE to +30 TINT Adjust the color tone. The confirmation screen will not be displayed. screen is displayed and you select ALL DELETE, the...

PTAX200U User Guide
Page 25
... screen is not switched. 1. Press the COLOR MANAGEMENT button and select the PROFILE menu. NORMAL Return to set the entered text as a profile. Select OK and press the ENTER button to the default setting of the selected PICTURE MODE will be displayed. 3. The profile settings of the PICTURE MODE menu. Repeat step 3 until the PROFILE is displayed. Press ENTER again to delete all the entered text line. Use...
... screen is not switched. 1. Press the COLOR MANAGEMENT button and select the PROFILE menu. NORMAL Return to set the entered text as a profile. Select OK and press the ENTER button to the default setting of the selected PICTURE MODE will be displayed. 3. The profile settings of the PICTURE MODE menu. Repeat step 3 until the PROFILE is displayed. Press ENTER again to delete all the entered text line. Use...

PTAX200U User Guide
Page 27
... indicates factory default setting and the square indicates the current setting. Press MENU or RETURN to return to adjust the settings. You can cycle through the MENU J Displaying the main menu Press the MENU button to the projection. Press repeatedly to reset each menu items. Settings ENGLISH - 27 PICTURE H-POSITION POSITION V-POSITION ASPECT LANGUAGE WSS ON FUNCTION BUTTON OVER SCAN OPTION KEYSTONE SELECT RETURN ENTER 2. For items using a bar scale, the current settings...
... indicates factory default setting and the square indicates the current setting. Press MENU or RETURN to return to adjust the settings. You can cycle through the MENU J Displaying the main menu Press the MENU button to the projection. Press repeatedly to reset each menu items. Settings ENGLISH - 27 PICTURE H-POSITION POSITION V-POSITION ASPECT LANGUAGE WSS ON FUNCTION BUTTON OVER SCAN OPTION KEYSTONE SELECT RETURN ENTER 2. For items using a bar scale, the current settings...

PTAX200U User Guide
Page 31
... effective only with COMPUTER/ HDMI (VGA480) signals. ON: Automatic adjustment OFF: No adjustment LIGHT HARMONIZER The luminance sensor detects the brightness of the projected image. Press I H to +16 J COLOR MANAGEMENT You can adjust the white balance of the room and keeps the luminance in RGB colors individually. ADVANCED MENU You can adjust the amount of the lamp and the lens iris, which control the contrast and black...
... effective only with COMPUTER/ HDMI (VGA480) signals. ON: Automatic adjustment OFF: No adjustment LIGHT HARMONIZER The luminance sensor detects the brightness of the projected image. Press I H to +16 J COLOR MANAGEMENT You can adjust the white balance of the room and keeps the luminance in RGB colors individually. ADVANCED MENU You can adjust the amount of the lamp and the lens iris, which control the contrast and black...

PTAX200U User Guide
Page 32
... to DEL ALL and press the ENTER button to activate. ENGLISH Use F G I H to select the required place and press G then perform step 4. 6. PICTURE menu J TV-SYSTEM When the video signal is empty. 4. Select OK and press the ENTER button. Indicated with cursor in use, and ✩ is changed, the setting switches automatically. FAVORITE LOAD You can save , the default memory number will not be displayed.
... to DEL ALL and press the ENTER button to activate. ENGLISH Use F G I H to select the required place and press G then perform step 4. 6. PICTURE menu J TV-SYSTEM When the video signal is empty. 4. Select OK and press the ENTER button. Indicated with cursor in use, and ✩ is changed, the setting switches automatically. FAVORITE LOAD You can save , the default memory number will not be displayed.

PTAX200U User Guide
Page 38
... dark blue OSD POSITION You can switch the logo on/off the guidance. Press I H to the projector position. Press I H to select. OPTION menu Remote control Control panel BACK COLOR You can choose a screen color from rear Settings 38 - LOWER LEFT LOWER CENTER LOWER RIGHT FRONT/DESK FRONT/CEILING REAR/DESK REAR/CEILING Setting on a desk/floor and projecting from front Mounting in the ceiling and projecting from front Setting on...
... dark blue OSD POSITION You can switch the logo on/off the guidance. Press I H to the projector position. Press I H to select. OPTION menu Remote control Control panel BACK COLOR You can choose a screen color from rear Settings 38 - LOWER LEFT LOWER CENTER LOWER RIGHT FRONT/DESK FRONT/CEILING REAR/DESK REAR/CEILING Setting on a desk/floor and projecting from front Mounting in the ceiling and projecting from front Setting on...

PTAX200U User Guide
Page 40
... LAMP RUNTIME has reached 1 800 hours. damaged. ENGLISH TEMP and LAMP Indicators Managing the indicated problems If a problem should occur with the projector, the LAMP and/or TEMP indicators will run out soon and needs to be replaced. The lamp unit will inform you. J TEMP indicator Indicator Illuminating red and still projecting Flashing red and the POWER button is turned off the projector in the correct way and confirm the indicator is not indicating a problem any longer. The air filter...
... LAMP RUNTIME has reached 1 800 hours. damaged. ENGLISH TEMP and LAMP Indicators Managing the indicated problems If a problem should occur with the projector, the LAMP and/or TEMP indicators will run out soon and needs to be replaced. The lamp unit will inform you. J TEMP indicator Indicator Illuminating red and still projecting Flashing red and the POWER button is turned off the projector in the correct way and confirm the indicator is not indicating a problem any longer. The air filter...
PTAX200U User Guide
Page 43
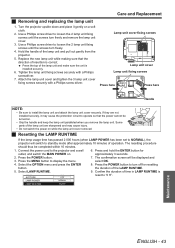
Use a Phillips screw driver to standby mode after approximately 10 minutes of operation. Hold the handle of the LAMP RUNTIME. 5. The resetting procedure should thus be turned on a soft cloth. 2. approximately 3 seconds. 2. select OK. 4. LAMP POWER NORMAL LAMP RUNTIME 1820H Maintenance ENGLISH - 43 J Resetting the LAMP RUNTIME If the lamp usage time has passed 2 000 hours (when LAMP POWER has been set to NORMAL), the projector will be displayed and 3. Press the MENU button to...
Use a Phillips screw driver to standby mode after approximately 10 minutes of operation. Hold the handle of the LAMP RUNTIME. 5. The resetting procedure should thus be turned on a soft cloth. 2. approximately 3 seconds. 2. select OK. 4. LAMP POWER NORMAL LAMP RUNTIME 1820H Maintenance ENGLISH - 43 J Resetting the LAMP RUNTIME If the lamp usage time has passed 2 000 hours (when LAMP POWER has been set to NORMAL), the projector will be displayed and 3. Press the MENU button to...

PTAX200U User Guide
Page 44
... not operate. The lens cover may be out of computer; The lens may still be incorrect. The remote control unit may be correct. There may be dirty. ENGLISH TEMP indicator is pale or greyish. The video signal input source may be connected to the lens. The lens focus may not have been set correctly. The batteries may not have been inserted correctly. The picture is lit or flashes. The projector...
... not operate. The lens cover may be out of computer; The lens may still be incorrect. The remote control unit may be correct. There may be dirty. ENGLISH TEMP indicator is pale or greyish. The video signal input source may be connected to the lens. The lens focus may not have been set correctly. The batteries may not have been inserted correctly. The picture is lit or flashes. The projector...


