
Brochure
Page 3
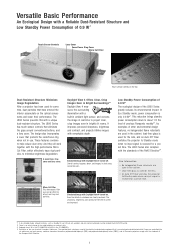
... previous Panasonic models*3. The LB90 Series prevents this with Daylight View 4 turned off. A zoom/focus ring cover and lens cover. Simulated image with a unique dust-resistant structure. This reduction brings standby power consumption down to attract and trap dust particles. The LB90 Series also complies with the standards of the LB90 Series greatly reduces its environmental impact. Micro Cut Filter This electrostatic filter uses an...
... previous Panasonic models*3. The LB90 Series prevents this with Daylight View 4 turned off. A zoom/focus ring cover and lens cover. Simulated image with a unique dust-resistant structure. This reduction brings standby power consumption down to attract and trap dust particles. The LB90 Series also complies with the standards of the LB90 Series greatly reduces its environmental impact. Micro Cut Filter This electrostatic filter uses an...

Brochure
Page 4
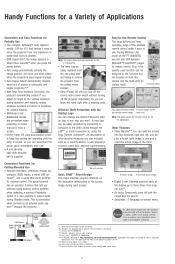
... are connected to a wireless LAN*5 system, you when a lamp needs replacement, and indicate the overall projector status. PT-LB90NTEA remote control PC LAN e-mail PC internet e-mail PC PC LAN e-mail PC Remote operation using a Web browser. Ideal for displaying a list of computers. • Projector Signal Map (S-MAP) The Projector Signal Map graphically displays all members of the wireless signals between the projectors and your computer does not have a wireless LAN function, it easy to send and display a computer screen...
... are connected to a wireless LAN*5 system, you when a lamp needs replacement, and indicate the overall projector status. PT-LB90NTEA remote control PC LAN e-mail PC internet e-mail PC PC LAN e-mail PC Remote operation using a Web browser. Ideal for displaying a list of computers. • Projector Signal Map (S-MAP) The Projector Signal Map graphically displays all members of the wireless signals between the projectors and your computer does not have a wireless LAN function, it easy to send and display a computer screen...
Brochure
Page 5
... panel without turning off the room's main power switch without having to the Function but- NOTE: The photo shows the remote control for external control. Easy-to-Use Remote Control The large buttons and long operating range of source is compatible. *14 If required, download at the Panasonic factory in rooms that lets you can change the default Panasonic start up to three times their original size when using existing control systems when replacing a previous Panasonic model...
... panel without turning off the room's main power switch without having to the Function but- NOTE: The photo shows the remote control for external control. Easy-to-Use Remote Control The large buttons and long operating range of source is compatible. *14 If required, download at the Panasonic factory in rooms that lets you can change the default Panasonic start up to three times their original size when using existing control systems when replacing a previous Panasonic model...

Brochure
Page 6
... wireless remote control, batteries for remote control (R6/LR6 type battery x 2), VGA cable, carrying bag Wireless Manager ME 5.5 (CD-ROM) - *1: In eco standby mode, network functions such as product development proceeds.) Models Power supply Power consumption Optical system LCD panel Lens Throw ratio Lamp Projection size (diagonally) Colours Brightness*3 Centre-to-corner uniformity*3 Contrast ratio*3 Resolution (RGB) Scanning frequency Panel size Display method Drive method Pixels RGB YPBPR/ YCBCR S-Video/Video Optical axis shift Keystone correction range On-screen menu Installation...
... wireless remote control, batteries for remote control (R6/LR6 type battery x 2), VGA cable, carrying bag Wireless Manager ME 5.5 (CD-ROM) - *1: In eco standby mode, network functions such as product development proceeds.) Models Power supply Power consumption Optical system LCD panel Lens Throw ratio Lamp Projection size (diagonally) Colours Brightness*3 Centre-to-corner uniformity*3 Contrast ratio*3 Resolution (RGB) Scanning frequency Panel size Display method Drive method Pixels RGB YPBPR/ YCBCR S-Video/Video Optical axis shift Keystone correction range On-screen menu Installation...
User Manual
Page 7
... HIGH ALTITUDE MODE 41 STANDBY MODE 42 LAMP POWER 42 LAMP RUNTIME 42 EMULATE 42 FUNCTION BUTTON 43 AUDIO SETTING 43 TEST PATTERN 44 INITIALIZE ALL 44 SECURITY menu 45 PASSWORD 45 PASSWORD CHANGE 45 TEXT DISPLAY 45 TEXT CHANGE 45 MENU LOCK 46 MENU LOCK PASSWORD 46 CONTROL DEVICE SETUP 46 NETWORK menu (PT-LB90NTE only 47 Maintenance LAMP and TEMP Indicators 48 Managing the indicated problems 48 Care and Replacement 49 Before Care and Replacement 49 Cleaning the projector 49 Replacing the Lamp unit 50 Troubleshooting...
... HIGH ALTITUDE MODE 41 STANDBY MODE 42 LAMP POWER 42 LAMP RUNTIME 42 EMULATE 42 FUNCTION BUTTON 43 AUDIO SETTING 43 TEST PATTERN 44 INITIALIZE ALL 44 SECURITY menu 45 PASSWORD 45 PASSWORD CHANGE 45 TEXT DISPLAY 45 TEXT CHANGE 45 MENU LOCK 46 MENU LOCK PASSWORD 46 CONTROL DEVICE SETUP 46 NETWORK menu (PT-LB90NTE only 47 Maintenance LAMP and TEMP Indicators 48 Managing the indicated problems 48 Care and Replacement 49 Before Care and Replacement 49 Cleaning the projector 49 Replacing the Lamp unit 50 Troubleshooting...

User Manual
Page 10
... in malfunctions or the lamp life will result in an upward direc- Failure to a ceiling. Always disconnect all cables before adjusting the lens focus. 10 - If the lamp has broken, ventilate the room immediately. Ask your dealer about replacing the lamp unit and check the inside of the projector in malfunctions or the lamp life or life of high-voltage electrical power lines or power sources. Cautions when transporting When...
... in malfunctions or the lamp life will result in an upward direc- Failure to a ceiling. Always disconnect all cables before adjusting the lens focus. 10 - If the lamp has broken, ventilate the room immediately. Ask your dealer about replacing the lamp unit and check the inside of the projector in malfunctions or the lamp life or life of high-voltage electrical power lines or power sources. Cautions when transporting When...

User Manual
Page 11
... by shocks or chipping damage. Do not project the same image for more details, please contact your password regularly. Display the white screen test pattern for long periods of this product. zzUnauthorised operation of time, as this product by a malicious third party. „„Security instruction zzThe connecting network must be necessary to replace the optical components such as continuous use for replacement in advance...
... by shocks or chipping damage. Do not project the same image for more details, please contact your password regularly. Display the white screen test pattern for long periods of this product. zzUnauthorised operation of time, as this product by a malicious third party. „„Security instruction zzThe connecting network must be necessary to replace the optical components such as continuous use for replacement in advance...

User Manual
Page 14
...22) Air intake port Lens cover Adjuster button (Æpage 18) Zoom-Focus ring cover Cover the zoom and focus rings to protect from dust. Preparation AAbbouotuYotuYr oPruojrecPtorrojector Projector body JJTop and front view Control panel Adjuster button (Æpage 18) Zoom ring Adjust the projection size. (Æpage 25) Focus ring Adjust the focus. (Æpage 25) Remote control signal receptor Ambient Luminance Sensor (ALS) TEMP indicator Indicates the temperature status. (Æpage 48) LAMP indicator Indicates the lamp unit status. (Æpage 48) POWER indicator Indicates the power...
...22) Air intake port Lens cover Adjuster button (Æpage 18) Zoom-Focus ring cover Cover the zoom and focus rings to protect from dust. Preparation AAbbouotuYotuYr oPruojrecPtorrojector Projector body JJTop and front view Control panel Adjuster button (Æpage 18) Zoom ring Adjust the projection size. (Æpage 25) Focus ring Adjust the focus. (Æpage 25) Remote control signal receptor Ambient Luminance Sensor (ALS) TEMP indicator Indicates the temperature status. (Æpage 48) LAMP indicator Indicates the lamp unit status. (Æpage 48) POWER indicator Indicates the power...

User Manual
Page 16
... operate correctly. Preparation JJFront view POWER button Switch between the remote control emitter and the remote control signal receptor, the remote control may malfunction under strong light such as a frozen picture. (Æpage 26) Reset some of the settings to the factory default settings. (Æpage 27) The MULTI-LIVE button is only for PT-LB90NTE. (See CD-ROM contents.) Assign a useful function for PT-LB90NTE) (See CD-ROM contents.) (Æpage 26) Display...
... operate correctly. Preparation JJFront view POWER button Switch between the remote control emitter and the remote control signal receptor, the remote control may malfunction under strong light such as a frozen picture. (Æpage 26) Reset some of the settings to the factory default settings. (Æpage 27) The MULTI-LIVE button is only for PT-LB90NTE. (See CD-ROM contents.) Assign a useful function for PT-LB90NTE) (See CD-ROM contents.) (Æpage 26) Display...

User Manual
Page 23
... POWER LOCK indicator and POWER indicator light in green several times, then the POWER indicator lights up the projector, some operational sound may flicker for the characteristics of the lamp. See "STARTUP LOGO" in the "DISPLAY OPTION" menu. (Æpage 38) Note zzOperating the control panel buttons with the remote control, you press the POWER button by the internal power supply, the display may be heard. zzIf INITIAL START UP in red and the POWER button remains locked. zzWhen the internal cooling fan is operating...
... POWER LOCK indicator and POWER indicator light in green several times, then the POWER indicator lights up the projector, some operational sound may flicker for the characteristics of the lamp. See "STARTUP LOGO" in the "DISPLAY OPTION" menu. (Æpage 38) Note zzOperating the control panel buttons with the remote control, you press the POWER button by the internal power supply, the display may be heard. zzIf INITIAL START UP in red and the POWER button remains locked. zzWhen the internal cooling fan is operating...

User Manual
Page 24
... projection. 2222 Press the POWER button again. Basic Operation 24 - ENGLISH Wait until the POWER LOCK indicator and POWER indicator turn into red. zzIf STANDBY MODE is set to NORMAL, the POWER indicator flashes in red. (Æpage 42) zzYou can set to ON or OFF the beeping sound that CONTROL PANEL (when operating with the projector body) or REMOTE CONTROLLER (when operating with the remote control) under CONTROL DEVICE SETUP in the SECURITY menu is installed. Remarks zzConfirm that occurs when the POWER button...
... projection. 2222 Press the POWER button again. Basic Operation 24 - ENGLISH Wait until the POWER LOCK indicator and POWER indicator turn into red. zzIf STANDBY MODE is set to NORMAL, the POWER indicator flashes in red. (Æpage 42) zzYou can set to ON or OFF the beeping sound that CONTROL PANEL (when operating with the projector body) or REMOTE CONTROLLER (when operating with the remote control) under CONTROL DEVICE SETUP in the SECURITY menu is installed. Remarks zzConfirm that occurs when the POWER button...
User Manual
Page 29
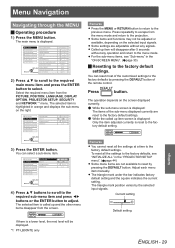
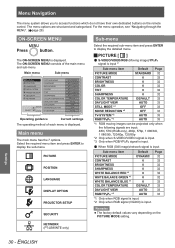
... menu mode and return to the previous menu. You can reset most of the remote control. Press repeatedly to the factory defaults by pressing the DEFAULT button of the customised settings to escape from the PICTURE, POSITION, LANGUAGE, DISPLAY OPTION, PROJECTOR SETUP, SECURITY and NETWORK *1 menu. zzFor the sub-menu items, see "INITIALIZE ALL" in orange and displays the sub-menu on the right. The operation depends on the selected input signals. Adjust each menu item manually...
... menu mode and return to the previous menu. You can reset most of the remote control. Press repeatedly to the factory defaults by pressing the DEFAULT button of the customised settings to escape from the PICTURE, POSITION, LANGUAGE, DISPLAY OPTION, PROJECTOR SETUP, SECURITY and NETWORK *1 menu. zzFor the sub-menu items, see "INITIALIZE ALL" in orange and displays the sub-menu on the right. The operation depends on the selected input signals. Adjust each menu item manually...
User Manual
Page 30
...menu PICTURE POSITION LANGUAGE DISPLAY OPTION PROJECTOR SETUP SECURITY NETWORK SELECT RETURN ENTER PICTURE MODE CONTRAST BRIGHTNESS COLOR TINT SHARPNESS COLOR TEMPERATURE DAYLIGHT VIEW STILL MODE NOISE REDUCTION TV-SYSTEM STANDARD DEFAULT AUTO OFF OFF AUTO Operating guidance Current settings The operating method of the main menu and sub-menu. QQ When RGB (Still image)/network signal is input Sub-menu item Default Page PICTURE MODE DYNAMIC 32 CONTRAST 0 32 BRIGHTNESS 0 32 SHARPNESS 0 32 WHITE BALANCE RED *1 0 32 WHITE BALANCE GREEN *1 0 32 WHITE BALANCE BLUE...
...menu PICTURE POSITION LANGUAGE DISPLAY OPTION PROJECTOR SETUP SECURITY NETWORK SELECT RETURN ENTER PICTURE MODE CONTRAST BRIGHTNESS COLOR TINT SHARPNESS COLOR TEMPERATURE DAYLIGHT VIEW STILL MODE NOISE REDUCTION TV-SYSTEM STANDARD DEFAULT AUTO OFF OFF AUTO Operating guidance Current settings The operating method of the main menu and sub-menu. QQ When RGB (Still image)/network signal is input Sub-menu item Default Page PICTURE MODE DYNAMIC 32 CONTRAST 0 32 BRIGHTNESS 0 32 SHARPNESS 0 32 WHITE BALANCE RED *1 0 32 WHITE BALANCE GREEN *1 0 32 WHITE BALANCE BLUE...

User Manual
Page 33
... when window coverings fail to block out sunlight. Change setting Change setting AUTO RGB YPBPR Automatic adjustment For RGB signals For YPBPR signals Settings ENGLISH - 33 zzAUTO is not available when INSTALLATION in well-lit rooms where the ambient light sources cannot be input to OFF. RGB/YPBPR AUTO mode is set to the COMPUTER1 and COMPUTER2 IN terminal. NOISE REDUCTION You can switch the setting manually to OFF when projecting a moving image...
... when window coverings fail to block out sunlight. Change setting Change setting AUTO RGB YPBPR Automatic adjustment For RGB signals For YPBPR signals Settings ENGLISH - 33 zzAUTO is not available when INSTALLATION in well-lit rooms where the ambient light sources cannot be input to OFF. RGB/YPBPR AUTO mode is set to the COMPUTER1 and COMPUTER2 IN terminal. NOISE REDUCTION You can switch the setting manually to OFF when projecting a moving image...

User Manual
Page 44
... factory default setting and PASSWORD setting is turned OFF. INITIALIZE ALL You can use the 7 different test patterns to the factory defaults. Select OK and press the ENTER button, NOW INITIALIZING... PROJECTOR SETUP menu TEST PATTERN You can reset all white pattern. is displayed. Then, POWER OFF is displayed. zzAfter INITIALIZE ALL operation is completed, the password is an all of the customised settings in the initial screen. Remarks zzThe initial screen is reset...
... factory default setting and PASSWORD setting is turned OFF. INITIALIZE ALL You can use the 7 different test patterns to the factory defaults. Select OK and press the ENTER button, NOW INITIALIZING... PROJECTOR SETUP menu TEST PATTERN You can reset all white pattern. is displayed. Then, POWER OFF is displayed. zzAfter INITIALIZE ALL operation is completed, the password is an all of the customised settings in the initial screen. Remarks zzThe initial screen is reset...
User Manual
Page 46
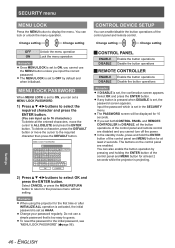
.... zzThe PASSWORD screen will be displayed for the first time or after INITIALIZE ALL operation is activated, the initial password is set to ON, you can set both CONTROL PANEL and REMOTE CONTROLLER to DISABLE, all the entered characters, move the cursor to OFF by pressing and holding the ENTER button of the control panel and remote control. Remarks zzWhen using the projector for 10 seconds. MENU LOCK PASSWORD When MENU LOCK is set to...
.... zzThe PASSWORD screen will be displayed for the first time or after INITIALIZE ALL operation is activated, the initial password is set to ON, you can set both CONTROL PANEL and REMOTE CONTROLLER to DISABLE, all the entered characters, move the cursor to OFF by pressing and holding the ENTER button of the control panel and remote control. Remarks zzWhen using the projector for 10 seconds. MENU LOCK PASSWORD When MENU LOCK is set to...

User Manual
Page 48
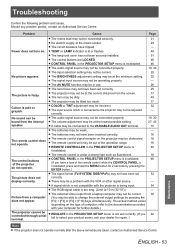
... air outlet port and air intake ports are covered. The room temperature is exces- ENGLISH zzFlashing red and power is abnormally high. The projector is located at high elevation. Problem The temperature inside and/or outside the projector is turned off the projector". (Æpage 24) Remarks zzConfirm the power supply status by the POWER indicator. (Æpage 22) LAMP indicator TEMP indicator FOCUS ZOOM POWER STANDBY(RED)/ LOCK ON(GREEN) LAMP TEMP RELEASE INPUT SELECT FUNCTION MENU ENTER RETURN JJLAMP indicator Indicator Problem zzIlluminating red LAMP...
... air outlet port and air intake ports are covered. The room temperature is exces- ENGLISH zzFlashing red and power is abnormally high. The projector is located at high elevation. Problem The temperature inside and/or outside the projector is turned off the projector". (Æpage 24) Remarks zzConfirm the power supply status by the POWER indicator. (Æpage 22) LAMP indicator TEMP indicator FOCUS ZOOM POWER STANDBY(RED)/ LOCK ON(GREEN) LAMP TEMP RELEASE INPUT SELECT FUNCTION MENU ENTER RETURN JJLAMP indicator Indicator Problem zzIlluminating red LAMP...

User Manual
Page 51
... projector. Lamp unit cover fixing screws ENGLISH - 51 Maintenance Pull the used lamp unit gently from the mains socket according to "Switching off the projector" (Æpage 24), wait for at least 1 hour, and check if the lamp unit bottom is installed securely. Care and Replacement JJLamp replacement procedure zzWhen the projector is mounted in particular press the portion of the projector until the screws turn loose, and remove the lamp unit cover...
... projector. Lamp unit cover fixing screws ENGLISH - 51 Maintenance Pull the used lamp unit gently from the mains socket according to "Switching off the projector" (Æpage 24), wait for at least 1 hour, and check if the lamp unit bottom is installed securely. Care and Replacement JJLamp replacement procedure zzWhen the projector is mounted in particular press the portion of the projector until the screws turn loose, and remove the lamp unit cover...
User Manual
Page 53
... . zzThe lamp unit cover has not been securely installed. zzThe input selection setting may be at the minimum setting. zzCOLOR or TINT adjustment may be in the PROJECTOR SETUP menu is invalidated. The control buttons of the remote control while the CONTROL PANEL is invalidated, press and hold the MENU button for further details.) zzEMULATE in the PROJECTOR SETUP menu is not compatible with the VCR or other signal source. zzNo electric supply at...
... . zzThe lamp unit cover has not been securely installed. zzThe input selection setting may be at the minimum setting. zzCOLOR or TINT adjustment may be in the PROJECTOR SETUP menu is invalidated. The control buttons of the remote control while the CONTROL PANEL is invalidated, press and hold the MENU button for further details.) zzEMULATE in the PROJECTOR SETUP menu is not compatible with the VCR or other signal source. zzNo electric supply at...

User Manual
Page 59
... P PASSWORD 45 PASSWORD CHANGE 45 PICTURE menu 32 PICTURE MODE 32 Positioning the image 25 POSITION menu 34 POWER indicator status 22 POWER LOCK indicator status......22 Projection method 18 Projector body 14 PROJECTOR SETUP menu..........41 R Read this first 13 REALTIME KEYSTONE 34 Remote control 16 Replacing the Lamp unit 50 RGB/YPBPR 33 S Screen size and throw distance.....17 Security 11 SECURITY menu 45 Selecting the input signal 25 Serial terminal 55 SHARPNESS 32 SHIFT 34 SHIFT V 34 SIGNAL SEARCH 39 Specifications 57 STANDBY MODE...
... P PASSWORD 45 PASSWORD CHANGE 45 PICTURE menu 32 PICTURE MODE 32 Positioning the image 25 POSITION menu 34 POWER indicator status 22 POWER LOCK indicator status......22 Projection method 18 Projector body 14 PROJECTOR SETUP menu..........41 R Read this first 13 REALTIME KEYSTONE 34 Remote control 16 Replacing the Lamp unit 50 RGB/YPBPR 33 S Screen size and throw distance.....17 Security 11 SECURITY menu 45 Selecting the input signal 25 Serial terminal 55 SHARPNESS 32 SHIFT 34 SHIFT V 34 SIGNAL SEARCH 39 Specifications 57 STANDBY MODE...


