PTD6000U User Guide
Page 1
TQBJ0295 ENGLISH PT-DZ6710U PT-DZ6700U PT-DW6300U PT-D6000U STANDBY(RED)/ ON(GREEN) LAMP TEMP FILTER Before operating this product, please read the instructions carefully and save this manual for future use with multiple models of these instructions are shared use . The information of DZ6710 series, DZ6700 series, DW6300 series and D6000 series. Operating Instructions DLP™Based Projector Commercial Use Model No.
TQBJ0295 ENGLISH PT-DZ6710U PT-DZ6700U PT-DW6300U PT-D6000U STANDBY(RED)/ ON(GREEN) LAMP TEMP FILTER Before operating this product, please read the instructions carefully and save this manual for future use with multiple models of these instructions are shared use . The information of DZ6710 series, DZ6700 series, DW6300 series and D6000 series. Operating Instructions DLP™Based Projector Commercial Use Model No.
PTD6000U User Guide
Page 5
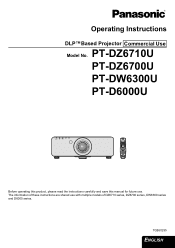
...Replacing the Lamp unit 30 Replacing the Auto Cleaning Filter (ACF 31 Troubleshooting 33 Appendix 5. Adjust the image See "Menu Navigation" on page 14. Important Information Important Safety Notice 2 Precautions with the projector. 3. Connect with other devices See the functional ...transporting 9 Cautions when installing 9 Cautions on use 9 Others 10 Security 10 Accessories 11 Preparation Technical Information 34 List of the projector 23 Resetting to the factory default 23 Menu Navigation 24 Main menu and Sub-menu 24 Navigating through the menu 27 Maintenance ...
...Replacing the Lamp unit 30 Replacing the Auto Cleaning Filter (ACF 31 Troubleshooting 33 Appendix 5. Adjust the image See "Menu Navigation" on page 14. Important Information Important Safety Notice 2 Precautions with the projector. 3. Connect with other devices See the functional ...transporting 9 Cautions when installing 9 Cautions on use 9 Others 10 Security 10 Accessories 11 Preparation Technical Information 34 List of the projector 23 Resetting to the factory default 23 Menu Navigation 24 Main menu and Sub-menu 24 Navigating through the menu 27 Maintenance ...
PTD6000U User Guide
Page 12
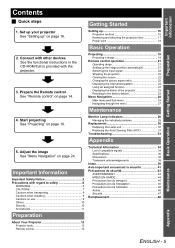
Input select buttons These buttons select the RGB1, RGB2, DVI-D, VIDEO, S-VIDEO and SDI (PT-DZ6710U only) terminals. (page 19) MENU button Displays and clears the main menu, and returns to the previous menu when the menu is ..." appears on the screen. Preparation About Your Projector Projector body J Top, front and bottom view Indicators Power indicator Lamp1 (LAMP1) indicator (page 28) Lamp2 (LAMP2) indicator (page 28) Temperature (TEMP) indicator (page 28) Filter (FILTER) indicator (page 29) STANDBY(RED)/ ON(GREEN) LAMP TEMP FILTER Lamp unit compartment (page 30) Air exhaust ...
Input select buttons These buttons select the RGB1, RGB2, DVI-D, VIDEO, S-VIDEO and SDI (PT-DZ6710U only) terminals. (page 19) MENU button Displays and clears the main menu, and returns to the previous menu when the menu is ..." appears on the screen. Preparation About Your Projector Projector body J Top, front and bottom view Indicators Power indicator Lamp1 (LAMP1) indicator (page 28) Lamp2 (LAMP2) indicator (page 28) Temperature (TEMP) indicator (page 28) Filter (FILTER) indicator (page 29) STANDBY(RED)/ ON(GREEN) LAMP TEMP FILTER Lamp unit compartment (page 30) Air exhaust ...
PTD6000U User Guide
Page 13
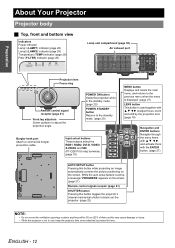
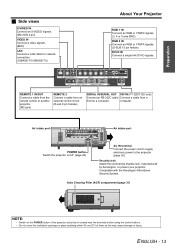
.... (BNC) LAN Connect a LAN cable for network connection. (10BASE-T/100BASE-TX) About Your Projector RGB 1 IN Connect an RGB or YPBPR signals. (3, 4 or 5 wire BNC) RGB ... Filter (ACF) compartment (page 31) NOTE: • Switch on /off. (page 20) AC IN terminal Connect the power cord to supply electronic power to the projector.... port Air intake port POWER button Switch the projector on the POWER button of the projector body that is located near the terminals before using...a cable from the remote control or another projector. (M3 jack) REMOTE 2 Connect a cable from an external control circuit. ...
.... (BNC) LAN Connect a LAN cable for network connection. (10BASE-T/100BASE-TX) About Your Projector RGB 1 IN Connect an RGB or YPBPR signals. (3, 4 or 5 wire BNC) RGB ... Filter (ACF) compartment (page 31) NOTE: • Switch on /off. (page 20) AC IN terminal Connect the power cord to supply electronic power to the projector.... port Air intake port POWER button Switch the projector on the POWER button of the projector body that is located near the terminals before using...a cable from the remote control or another projector. (M3 jack) REMOTE 2 Connect a cable from an external control circuit. ...
PTD6000U User Guide
Page 25
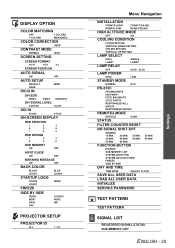
... ON OFF BACK COLOR BLACK LOGO1 BLUE LOGO2 STARTUP LOGO LOGO2 LOGO1 NONE FREEZE SIDE BY SIDE VIDEO RGB1 DVI-D OFF S-VIDEO RGB2 SDI PROJECTOR SETUP PROJECTOR ID ALL 1 - 64 Menu Navigation INSTALLATION FRONT/FLOOR FRONT/CEILING REAR/FLOOR REAR/CEILING HIGH ALTITUDE MODE OFF ON COOLING CONDITION FLOOR SETTING ... ECO RS-232C (IN) BAUDRATE (IN) PARITY (OUT) BAUDRATE (OUT) PARITY RESPONSE(ID ALL) GROUP RESPONSE(ID GROUP) REMOTE2 MODE DEFAULT STATUS USER FILTER COUNTER RESET NO SIGNAL SHUT-OFF DISABLE 15 MIN. 20 MIN. 25 MIN. 35 MIN. 40 MIN. 45 MIN. 55 MIN. 60 MIN.
... ON OFF BACK COLOR BLACK LOGO1 BLUE LOGO2 STARTUP LOGO LOGO2 LOGO1 NONE FREEZE SIDE BY SIDE VIDEO RGB1 DVI-D OFF S-VIDEO RGB2 SDI PROJECTOR SETUP PROJECTOR ID ALL 1 - 64 Menu Navigation INSTALLATION FRONT/FLOOR FRONT/CEILING REAR/FLOOR REAR/CEILING HIGH ALTITUDE MODE OFF ON COOLING CONDITION FLOOR SETTING ... ECO RS-232C (IN) BAUDRATE (IN) PARITY (OUT) BAUDRATE (OUT) PARITY RESPONSE(ID ALL) GROUP RESPONSE(ID GROUP) REMOTE2 MODE DEFAULT STATUS USER FILTER COUNTER RESET NO SIGNAL SHUT-OFF DISABLE 15 MIN. 20 MIN. 25 MIN. 35 MIN. 40 MIN. 45 MIN. 55 MIN. 60 MIN.
PTD6000U User Guide
Page 28
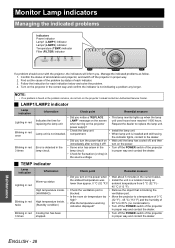
... Warm-up when the lamp Indicates the time for fluctuation (or drop) in the source voltage. Confirm the status of all indicators and projector, and switch off the POWER switch of • Was the temperature warning 20 % to the dealer. • Did you notice ...Power indicator Lamp1 (LAMP1) indicator Lamp2 (LAMP2) indicator Temperature (TEMP) indicator Filter (FILTER) indicator STANDBY(RED)/ ON(GREEN) LAMP TEMP FILTER STANDBY(RED)/ ON(GREEN) LAMP TEMP FILTER If a problem should occur with the projector, the indicators will inform you turn on the power when • Wait ...
... Warm-up when the lamp Indicates the time for fluctuation (or drop) in the source voltage. Confirm the status of all indicators and projector, and switch off the POWER switch of • Was the temperature warning 20 % to the dealer. • Did you notice ...Power indicator Lamp1 (LAMP1) indicator Lamp2 (LAMP2) indicator Temperature (TEMP) indicator Filter (FILTER) indicator STANDBY(RED)/ ON(GREEN) LAMP TEMP FILTER STANDBY(RED)/ ON(GREEN) LAMP TEMP FILTER If a problem should occur with the projector, the indicators will inform you turn on the power when • Wait ...

PTD6000U User Guide
Page 29
...ACF unit has run out. Contact the dealer to purchase the new of STATUS in red • Check the REMAINING FILTER • Replace the ACF unit. of STATUS in PROJECTOR SETUP menu is the roughly guided time. Maintenance ENGLISH - 29 The remaining use time of the ACF unit. NOTE:... properly. • Check the ACF unit compartment. • Replace the ACF unit. • Check the REMAINING FILTER • Request the dealer to purchase the new ACF unit earlier. • If using the projector at high elevations 1 400 - 2 700 m (4 593 - 8 858 ft) sea level and HIGH ALTITUDE ...
...ACF unit has run out. Contact the dealer to purchase the new of STATUS in red • Check the REMAINING FILTER • Replace the ACF unit. of STATUS in PROJECTOR SETUP menu is the roughly guided time. Maintenance ENGLISH - 29 The remaining use time of the ACF unit. NOTE:... properly. • Check the ACF unit compartment. • Replace the ACF unit. • Check the REMAINING FILTER • Request the dealer to purchase the new ACF unit earlier. • If using the projector at high elevations 1 400 - 2 700 m (4 593 - 8 858 ft) sea level and HIGH ALTITUDE ...
PTD6000U User Guide
Page 31
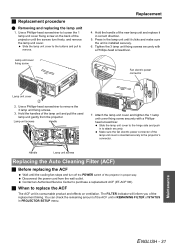
... to attach securely. You can check the remaining amount of the ACF unit in PROJECTOR SETUP menu. J Replacement procedure Q Removing and replacing the lamp unit 1. Handle Lamp unit screws Replacing the Auto Cleaning Filter (ACF) J Before replacing the ACF Wait until the screws turn off the POWER...the new lamp unit and replace it clicks and make sure the unit is inserted securely to the projector's connector. Maintenance ENGLISH - 31 Hold the handles of STATUS in REMAINING FILTER of the lamp unit and pull the used lamp unit gently from the wall outlet. Disconnect the...
... to attach securely. You can check the remaining amount of the ACF unit in PROJECTOR SETUP menu. J Replacement procedure Q Removing and replacing the lamp unit 1. Handle Lamp unit screws Replacing the Auto Cleaning Filter (ACF) J Before replacing the ACF Wait until the screws turn off the POWER...the new lamp unit and replace it clicks and make sure the unit is inserted securely to the projector's connector. Maintenance ENGLISH - 31 Hold the handles of STATUS in REMAINING FILTER of the lamp unit and pull the used lamp unit gently from the wall outlet. Disconnect the...
PTD6000U User Guide
Page 32
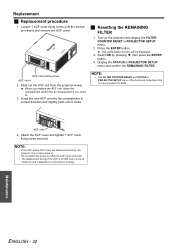
...Maintenance ENGLISH - 32 Loosen 1 ACF cover fixing screw until it depends on the projector and display the FILTER COUNTER RESET in PROJECTOR SETUP menu and confirm the REMAINING FILTER. NOTE: • See FILTER COUNTER RESET and STATUS in correct direction and slightly push until the screws turn freely... cover. Insert the new ACF unit into the compartment in PROJECTOR SETUP menu of the functional instructions that is 36 000 hours of usage. Display the STATUS in PROJECTOR SETUP menu. 2. J Resetting the REMAINING FILTER 1. When you replace the ACF unit, clean the compartment...
...Maintenance ENGLISH - 32 Loosen 1 ACF cover fixing screw until it depends on the projector and display the FILTER COUNTER RESET in PROJECTOR SETUP menu and confirm the REMAINING FILTER. NOTE: • See FILTER COUNTER RESET and STATUS in correct direction and slightly push until the screws turn freely... cover. Insert the new ACF unit into the compartment in PROJECTOR SETUP menu of the functional instructions that is 36 000 hours of usage. Display the STATUS in PROJECTOR SETUP menu. 2. J Resetting the REMAINING FILTER 1. When you replace the ACF unit, clean the compartment...
PTD6000U User Guide
Page 39
... panel button 12 Remote control button 14 Terminal 13 E ENTER Control panel button 12 Menu navigation 27 Remote control button 14 F FILTER Compartment 13 Indicator 12 Indicator status 29 Replacing 31 FOCUS Adjusting 19 Remote control button 14 Focus ring 12 Front leg adjusters 12 ...ON Control panel button 12 Remote control button 14 Switching on/off 19 POWER STANDBY Control panel button 12 Remote control button 14 Projector lens cover Accessories 11 R Remote control 14 Accessories 11 Signal receptor 12 Wired connection 15 REMOTE1 Terminal 13 Wired connection 15 REMOTE2...
... panel button 12 Remote control button 14 Terminal 13 E ENTER Control panel button 12 Menu navigation 27 Remote control button 14 F FILTER Compartment 13 Indicator 12 Indicator status 29 Replacing 31 FOCUS Adjusting 19 Remote control button 14 Focus ring 12 Front leg adjusters 12 ...ON Control panel button 12 Remote control button 14 Switching on/off 19 POWER STANDBY Control panel button 12 Remote control button 14 Projector lens cover Accessories 11 R Remote control 14 Accessories 11 Signal receptor 12 Wired connection 15 REMOTE1 Terminal 13 Wired connection 15 REMOTE2...

