Functional Instructions
Page 3
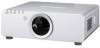
... hitting of a laser beam on to the figures below and the information on the value during projection onto an 80-inch screen size. • Lens shift is not available when using the ET-DLE055, and so the height position (H) is SH/2. • See the operating instructions that is roughly..., picture size and vertical picture positioning can be finely adjusted with the projector. • Special care should be used when DLP projectors are used in the same room as 16:10 SD SW Screen L (LW/LT) Projection distance SH Height of the projection area SW Width of the projection area Vertical ...
... hitting of a laser beam on to the figures below and the information on the value during projection onto an 80-inch screen size. • Lens shift is not available when using the ET-DLE055, and so the height position (H) is SH/2. • See the operating instructions that is roughly..., picture size and vertical picture positioning can be finely adjusted with the projector. • Special care should be used when DLP projectors are used in the same room as 16:10 SD SW Screen L (LW/LT) Projection distance SH Height of the projection area SW Width of the projection area Vertical ...
Functional Instructions
Page 4
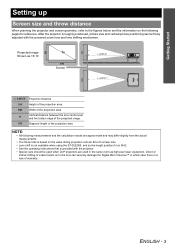
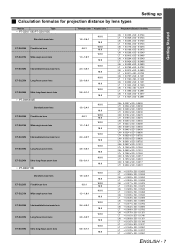
... Started Setting up J Projection distance by projection lens Q PT-DZ6710E/PT-DZ6700E 16:10 (Unit: m) Lens type Lens names Standard zoom lens ET-DLE055 Through ratio 1.8 - 2.4:1 0.8:1 SD...- 0.54 0 - 1'9'' 0 - 0.61 0 - 2' 0 - 0.67 0 - 2'2'' 0 - 0.81 0 - 2'7'' 0 - 1.01 0 - 3'3'' 0 - 1.35 0 - 4'5'' 0 - 1.68 0 - 5'6'' 0 - 2.02 0 - 6'7'' 0 - 2.36 0 - 7'8'' 0 - 2.69 0 - 8'9'' 0 - 3.37 0 - 11' 0 - 4.04 0 - 13'3'' 16:9 (Unit: m) Lens type Lens names Standard zoom lens ET-DLE055 Through ratio 1.8 - 2.4:1 0.8:1 SD 50'' 60'' 70'' 80'' 90'' 100'' 120'' 150'' 200'' 250'' 300 350'' 400'' 500...
... Started Setting up J Projection distance by projection lens Q PT-DZ6710E/PT-DZ6700E 16:10 (Unit: m) Lens type Lens names Standard zoom lens ET-DLE055 Through ratio 1.8 - 2.4:1 0.8:1 SD...- 0.54 0 - 1'9'' 0 - 0.61 0 - 2' 0 - 0.67 0 - 2'2'' 0 - 0.81 0 - 2'7'' 0 - 1.01 0 - 3'3'' 0 - 1.35 0 - 4'5'' 0 - 1.68 0 - 5'6'' 0 - 2.02 0 - 6'7'' 0 - 2.36 0 - 7'8'' 0 - 2.69 0 - 8'9'' 0 - 3.37 0 - 11' 0 - 4.04 0 - 13'3'' 16:9 (Unit: m) Lens type Lens names Standard zoom lens ET-DLE055 Through ratio 1.8 - 2.4:1 0.8:1 SD 50'' 60'' 70'' 80'' 90'' 100'' 120'' 150'' 200'' 250'' 300 350'' 400'' 500...

Functional Instructions
Page 5
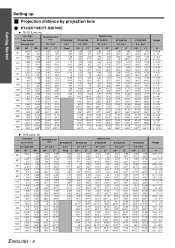
Getting Started Setting up Q PT-DW6300E 16:10 (Unit: m) Lens type Lens names Standard zoom lens ET-DLE055 Through ratio 1.8 - 2.4:1 0.8:1 SD 50...54 -4'' - 1'9'' -0.12 - 0.61 -4'' - 2' -0.14 - 0.67 -5'' - 2'2'' -0.16 - 0.81 -6'' - 2'7'' -0.2 - 1.01 -7'' - 3'3'' -0.27 - 1.35 -10'' - 4'5'' -0.34 - 1.68 -1'1'' - 5'6'' -0.4 - 2.02 -1'3'' - 6'7'' -0.47 - 2.36 -1'6'' - 7'8'' -0.54 - 2.69 -1'9'' - 8'9'' -0.67 - 3.37 -2'2'' - 11' -0.81 - 4.04 -2'7'' - 13'3'' 16:9 (Unit: m) Lens type Lens names Standard zoom lens ET-DLE055 Through ratio 1.8 - 2.4:1 0.8:1 SD 50'' 60'' 70'' 80'' 90'' 100''...
Getting Started Setting up Q PT-DW6300E 16:10 (Unit: m) Lens type Lens names Standard zoom lens ET-DLE055 Through ratio 1.8 - 2.4:1 0.8:1 SD 50...54 -4'' - 1'9'' -0.12 - 0.61 -4'' - 2' -0.14 - 0.67 -5'' - 2'2'' -0.16 - 0.81 -6'' - 2'7'' -0.2 - 1.01 -7'' - 3'3'' -0.27 - 1.35 -10'' - 4'5'' -0.34 - 1.68 -1'1'' - 5'6'' -0.4 - 2.02 -1'3'' - 6'7'' -0.47 - 2.36 -1'6'' - 7'8'' -0.54 - 2.69 -1'9'' - 8'9'' -0.67 - 3.37 -2'2'' - 11' -0.81 - 4.04 -2'7'' - 13'3'' 16:9 (Unit: m) Lens type Lens names Standard zoom lens ET-DLE055 Through ratio 1.8 - 2.4:1 0.8:1 SD 50'' 60'' 70'' 80'' 90'' 100''...
Functional Instructions
Page 6
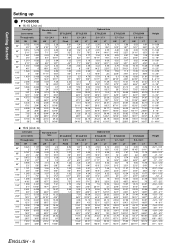
... Setting up Q PT-D6000E 16:10 (Unit: m) Lens type Lens names Standard zoom lens ET-DLE055 Through ratio 1.8 - 2.4:1 0.8:1 SD 50'' 60'' 70'' 80'' 90'' 100'' 120'' 150'' 200'' 250'' 300 350'' 400'' 500'' 600'' SH 0.762 2'6'' 0.914 2'11'' 1.067 3'6'' 1.219 3'11'' 1.372 4'6'' 1.524 5' 1.829 6' 2.286 7'6'' 3.048 10' 3.81 12'6''....069 36'3'' 13.283 43'6'' LW 1.95 6'4'' 2.35 7'8'' 2.76 9' 3.16 10'4'' 3.56 11'8'' 3.97 13' 4.77 15'7'' 5.98 19'7'' 8 26'2'' 10.01 32'10'' 12.03 39'5'' 14.04 46' 16.06 52'8'' 20.09 65'10'' 24.12 79'1'' LT 2.6 8'6'' 3.13 10'3'' 3.66 12' 4.19 13'8'' 4.72 15'5'' 5....
... Setting up Q PT-D6000E 16:10 (Unit: m) Lens type Lens names Standard zoom lens ET-DLE055 Through ratio 1.8 - 2.4:1 0.8:1 SD 50'' 60'' 70'' 80'' 90'' 100'' 120'' 150'' 200'' 250'' 300 350'' 400'' 500'' 600'' SH 0.762 2'6'' 0.914 2'11'' 1.067 3'6'' 1.219 3'11'' 1.372 4'6'' 1.524 5' 1.829 6' 2.286 7'6'' 3.048 10' 3.81 12'6''....069 36'3'' 13.283 43'6'' LW 1.95 6'4'' 2.35 7'8'' 2.76 9' 3.16 10'4'' 3.56 11'8'' 3.97 13' 4.77 15'7'' 5.98 19'7'' 8 26'2'' 10.01 32'10'' 12.03 39'5'' 14.04 46' 16.06 52'8'' 20.09 65'10'' 24.12 79'1'' LT 2.6 8'6'' 3.13 10'3'' 3.66 12' 4.19 13'8'' 4.72 15'5'' 5....
Functional Instructions
Page 7
...PT-DZ6710E Standard zoom lens ET-DLE055 Fixed-focus lens ET-DLE150 Wide-angle zoom lens ET-DLE250 Intermediate-focus zoom lens ET-DLE350 Long-focus zoom lens ET-DLE450 Ultra-long-focus zoom lens Through ratio Aspect ratio 1.8 - 2.4:1 0.8:1 1.3 - 1.8:1 2.4 - 4.0:1 3.8 - 6.0:1 5.8 - 8.1:1 16:10 16:9 16:10 16:9 16:10 16:9 16:10 16:9 16:10 16:9 16:10 16:9 1.8 - 2.4:1 0.8:1 1.3 - 1.8:1 2.4 - 4.0:1 3.8 - 6.0:1 5.8 - 8.1:1 16:10 16:9 16:10 16:9 16:10 16:9 16:10 16:9 16:10 16:9 16:10 16:9 1.8 - 2.4:1 0.8:1 1.3 - 1.8:1 2.4 - 4.0:1 3.8 - 6.0:1 5.8 - 8.1:1 16:10 16:9 16:10 16:9 16:10 16:9 16:10...
...PT-DZ6710E Standard zoom lens ET-DLE055 Fixed-focus lens ET-DLE150 Wide-angle zoom lens ET-DLE250 Intermediate-focus zoom lens ET-DLE350 Long-focus zoom lens ET-DLE450 Ultra-long-focus zoom lens Through ratio Aspect ratio 1.8 - 2.4:1 0.8:1 1.3 - 1.8:1 2.4 - 4.0:1 3.8 - 6.0:1 5.8 - 8.1:1 16:10 16:9 16:10 16:9 16:10 16:9 16:10 16:9 16:10 16:9 16:10 16:9 1.8 - 2.4:1 0.8:1 1.3 - 1.8:1 2.4 - 4.0:1 3.8 - 6.0:1 5.8 - 8.1:1 16:10 16:9 16:10 16:9 16:10 16:9 16:10 16:9 16:10 16:9 16:10 16:9 1.8 - 2.4:1 0.8:1 1.3 - 1.8:1 2.4 - 4.0:1 3.8 - 6.0:1 5.8 - 8.1:1 16:10 16:9 16:10 16:9 16:10 16:9 16:10...
Functional Instructions
Page 12
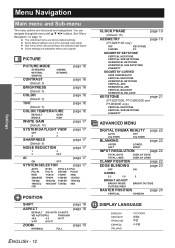
...16 (Default: 0) BRIGHTNESS page 16 (Default: 0) COLOR page 16 (Default: 0) TINT page 16 (Default: 0) COLOR TEMPERATURE page 16 DEFAULT MIDDLE USER HIGH WHITE GAIN page 17 (Default: 10) SYSTEM DAYLIGHT VIEW page 17 OFF 1 2 3 SHARPNESS page 17 (Default: 6) NOISE REDUCTION page 17 1 2 3 OFF AI page 17 ON OFF SYSTEM SELECTOR page 17 AUTO PAL-M RGB...: 16) GEOMETRY page 19 (PT-DZ6710E only) OFF CURVED KEYSTONE PC GEOMETRY:KEYSTONE VERTICAL KEYSTONE VERTICAL SUB KEYSTONE HORIZONTAL KEYSTONE HORIZONTAL SUB KEYSTONE LINEARITY GEOMETRY:CURVED LENS THROW...
...16 (Default: 0) BRIGHTNESS page 16 (Default: 0) COLOR page 16 (Default: 0) TINT page 16 (Default: 0) COLOR TEMPERATURE page 16 DEFAULT MIDDLE USER HIGH WHITE GAIN page 17 (Default: 10) SYSTEM DAYLIGHT VIEW page 17 OFF 1 2 3 SHARPNESS page 17 (Default: 6) NOISE REDUCTION page 17 1 2 3 OFF AI page 17 ON OFF SYSTEM SELECTOR page 17 AUTO PAL-M RGB...: 16) GEOMETRY page 19 (PT-DZ6710E only) OFF CURVED KEYSTONE PC GEOMETRY:KEYSTONE VERTICAL KEYSTONE VERTICAL SUB KEYSTONE HORIZONTAL KEYSTONE HORIZONTAL SUB KEYSTONE LINEARITY GEOMETRY:CURVED LENS THROW...

Functional Instructions
Page 20
...: • When GEOMETRY setting is set, displayed menu or startup logo might be projected outside of the attached lens. POSITION menu Q GEOMETRY:KEYSTONE Select KEYSTONE and press the ENTER button to display the options. LENS THROW RATIO Press I H to adjust throw ratio of the actual image area. • When GEOMETRY is selected...
...: • When GEOMETRY setting is set, displayed menu or startup logo might be projected outside of the attached lens. POSITION menu Q GEOMETRY:KEYSTONE Select KEYSTONE and press the ENTER button to display the options. LENS THROW RATIO Press I H to adjust throw ratio of the actual image area. • When GEOMETRY is selected...
Functional Instructions
Page 21
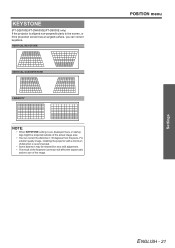
... of distortion is recommended. • Some distortion may be projected outside of the image. POSITION menu Settings ENGLISH - 21 KEYSTONE (PT-DZ6700E/PT-DW6300E/PT-D6000E only) If the projector is aligned non-perpendicularly to the screen, or if the projection screen has an angled surface, you ... VERTICAL KEYSTONE VERTICAL SUB KEYSTONE LINEARITY NOTE: • When KEYSTONE setting is set, displayed menu or startup logo might be retained for lens shift adjustment. • The result of the keystone correction will affect the aspect ratio and the size of the actual image area. &#...
... of distortion is recommended. • Some distortion may be projected outside of the image. POSITION menu Settings ENGLISH - 21 KEYSTONE (PT-DZ6700E/PT-DW6300E/PT-D6000E only) If the projector is aligned non-perpendicularly to the screen, or if the projection screen has an angled surface, you ... VERTICAL KEYSTONE VERTICAL SUB KEYSTONE LINEARITY NOTE: • When KEYSTONE setting is set, displayed menu or startup logo might be retained for lens shift adjustment. • The result of the keystone correction will affect the aspect ratio and the size of the actual image area. &#...
Functional Instructions
Page 40
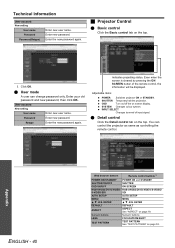
.... Retype Enter the new password again. SHUTTER Temporary halt the projection. Q Detail control Click the Detail control tab on the top. 3. Numeric buttons Numeric buttons LENS FOCUS/ZOOM/SHIFT TEST PATTERN TEST PATTERN See "TEST PATTERN" on page 18. INPUT SELECT Changes terminal of the remote control, the information will be...
.... Retype Enter the new password again. SHUTTER Temporary halt the projection. Q Detail control Click the Detail control tab on the top. 3. Numeric buttons Numeric buttons LENS FOCUS/ZOOM/SHIFT TEST PATTERN TEST PATTERN See "TEST PATTERN" on page 18. INPUT SELECT Changes terminal of the remote control, the information will be...
Operating Instructions
Page 5
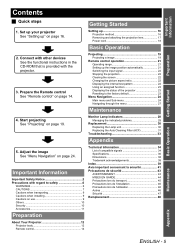
...image 19 Remote control operation 21 Operating range 21 Setting up " on page 16. Adjust the image See "Menu Navigation" on page 19. Setting up 16 Projection method 16 Removing and attaching the projection lens 17 Power cord 18 Basic Operation 2. Connect with other devices See the ... and Sub-menu 24 Navigating through the menu 27 Maintenance 4. Prepare the Remote control See "Remote control" on use 9 Others 10 Security 10 Accessories 11 Preparation Technical Information 34 List of the projector 23 Resetting to safety 6 WARNINGS 6 CAUTIONS 7 Cautions when transporting 9 ...
...image 19 Remote control operation 21 Operating range 21 Setting up " on page 16. Adjust the image See "Menu Navigation" on page 19. Setting up 16 Projection method 16 Removing and attaching the projection lens 17 Power cord 18 Basic Operation 2. Connect with other devices See the ... and Sub-menu 24 Navigating through the menu 27 Maintenance 4. Prepare the Remote control See "Remote control" on use 9 Others 10 Security 10 Accessories 11 Preparation Technical Information 34 List of the projector 23 Resetting to safety 6 WARNINGS 6 CAUTIONS 7 Cautions when transporting 9 ...
Operating Instructions
Page 7
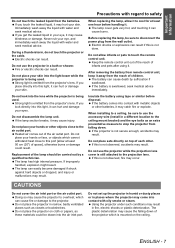
...should be sure to use the accessory wire (install in a bath or shower. ENGLISH - 7 Do not use the projector while the projection lens cover is being used . Important Information Precautions with regard to safety Do not touch the leaked liquid from the wall outlet. If you look into...in a different location to the ceiling mount bracket) and the eye bolts as an extra preventative measure to stop the projector from the projector's lens. Doing so may hurt your skin. Strong light is mounted on cloth or papers, as closets or bookshelves. When installing to overheat, which...
...should be sure to use the accessory wire (install in a bath or shower. ENGLISH - 7 Do not use the projector while the projection lens cover is being used . Important Information Precautions with regard to safety Do not touch the leaked liquid from the wall outlet. If you look into...in a different location to the ceiling mount bracket) and the eye bolts as an extra preventative measure to stop the projector from the projector's lens. Doing so may hurt your skin. Strong light is mounted on cloth or papers, as closets or bookshelves. When installing to overheat, which...
Operating Instructions
Page 9
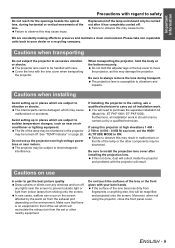
...installation work is should only be handled with the projector will be subject to electromagnetic interference. Do not touch the surfaces of the lens. The projector lens need to purchase the separate installation kit (Model No. Do not hold the body at high elevations 1 400 2 700 m (4...rare cases, wafture can be shortened. Important Information Precautions with regard to safety Do not reach for the openings beside the optical lens, during transport. If installing the projector to the ceiling, ask a qualified technician to observe this projector at the bottom securely....
...installation work is should only be handled with the projector will be subject to electromagnetic interference. Do not touch the surfaces of the lens. The projector lens need to purchase the separate installation kit (Model No. Do not hold the body at high elevations 1 400 2 700 m (4...rare cases, wafture can be shortened. Important Information Precautions with regard to safety Do not reach for the openings beside the optical lens, during transport. If installing the projector to the ceiling, ask a qualified technician to observe this projector at the bottom securely....
Operating Instructions
Page 10
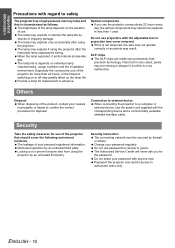
...computer or external device, use the power cord supplied with the adjustable feet or projection lens cover removed. Security Take the safety measures for replacement in advance. The leakage of ...municipality or dealer to confirm the correct procedure for more than 1 year. ENGLISH - 10 The brightness of the projector that should cover the following envisioned incidents. Especially the consecutive ... the duration of the product, contact your password regularly. Do not use . DLP chips The DLP chips are made using the projector. Others Disposal When disposing of use password too...
...computer or external device, use the power cord supplied with the adjustable feet or projection lens cover removed. Security Take the safety measures for replacement in advance. The leakage of ...municipality or dealer to confirm the correct procedure for more than 1 year. ENGLISH - 10 The brightness of the projector that should cover the following envisioned incidents. Especially the consecutive ... the duration of the product, contact your password regularly. Do not use . DLP chips The DLP chips are made using the projector. Others Disposal When disposing of use password too...

Operating Instructions
Page 11
Remote control (x1) N2QAYB000371 AA batteries for remote control (x2) Safety cable TTRA0214 Attachment screw (x1) Safety cable (x1) Power cord (x1) K2CG3FZ00008 Projector lens cover (x1) TKKL5244-1 CD-ROM (x1) TQBH9013 Power cord secure lock (x1) TTRA0182 * The protectors for enclosed products, such as a plug cover or foam cartons, must be treated properly. * Contact to safety Accessories Make sure the following accessories are provided with regard to an Authorized Service Center for lost accessories. ENGLISH - 11 Important Information Precautions with your projector.
Remote control (x1) N2QAYB000371 AA batteries for remote control (x2) Safety cable TTRA0214 Attachment screw (x1) Safety cable (x1) Power cord (x1) K2CG3FZ00008 Projector lens cover (x1) TKKL5244-1 CD-ROM (x1) TQBH9013 Power cord secure lock (x1) TTRA0182 * The protectors for enclosed products, such as a plug cover or foam cartons, must be treated properly. * Contact to safety Accessories Make sure the following accessories are provided with regard to an Authorized Service Center for lost accessories. ENGLISH - 11 Important Information Precautions with your projector.
Operating Instructions
Page 12
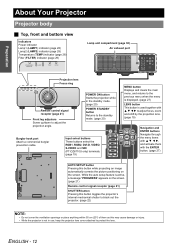
...STANDBY(RED)/ ON(GREEN) LAMP TEMP FILTER Lamp unit compartment (page 30) Air exhaust port STANDBY(RED)/ ON(GREEN) LAMP TEMP FILTER Projection lens Focus ring Remote control signal receptor (page 21) Front leg adjusters Screw up/down to the standby mode. (page 20) Burglar hook port Attach...message "PROGRESS" appears on the screen. ENGLISH - 12 Input select buttons These buttons select the RGB1, RGB2, DVI-D, VIDEO, S-VIDEO and SDI (PT-DZ6710U only) terminals. (page 19) MENU button Displays and clears the main menu, and returns to the previous menu when the menu is displayed. (...
...STANDBY(RED)/ ON(GREEN) LAMP TEMP FILTER Lamp unit compartment (page 30) Air exhaust port STANDBY(RED)/ ON(GREEN) LAMP TEMP FILTER Projection lens Focus ring Remote control signal receptor (page 21) Front leg adjusters Screw up/down to the standby mode. (page 20) Burglar hook port Attach...message "PROGRESS" appears on the screen. ENGLISH - 12 Input select buttons These buttons select the RGB1, RGB2, DVI-D, VIDEO, S-VIDEO and SDI (PT-DZ6710U only) terminals. (page 19) MENU button Displays and clears the main menu, and returns to the previous menu when the menu is displayed. (...

Operating Instructions
Page 14
... batteries or alkaline batteries with F G I H, and activate them with the ENTER button. (page 27) Remote control indicator Flashes by the projection lens. (page 19) FUNCTION button Assign the frequently use functions from options for repairs. • Do not keep pressing the remote control buttons as this...toggles the projector's internal mechanical shutter to black out the projector. (page 22) ASPECT button Switches the image aspect ratio. (page 22) LENS buttons These buttons are used together with the remote control. • Do not attempt to control any buttons. (page 21) AUTO SETUP...
... batteries or alkaline batteries with F G I H, and activate them with the ENTER button. (page 27) Remote control indicator Flashes by the projection lens. (page 19) FUNCTION button Assign the frequently use functions from options for repairs. • Do not keep pressing the remote control buttons as this...toggles the projector's internal mechanical shutter to black out the projector. (page 22) ASPECT button Switches the image aspect ratio. (page 22) LENS buttons These buttons are used together with the remote control. • Do not attempt to control any buttons. (page 21) AUTO SETUP...

Operating Instructions
Page 17
... securely by rotating the projection lens counterclockwise. Align the guide of the projection lens with the guide groove in the projector, and then insert the lens. While pressing the lens release button, rotate the projection lens counterclockwise, and remove the projection lens. 3. Lens release button Projection lens NOTE: • Do not touch the lens signal contact. Switch off the...
... securely by rotating the projection lens counterclockwise. Align the guide of the projection lens with the guide groove in the projector, and then insert the lens. While pressing the lens release button, rotate the projection lens counterclockwise, and remove the projection lens. 3. Lens release button Projection lens NOTE: • Do not touch the lens signal contact. Switch off the...
Operating Instructions
Page 19
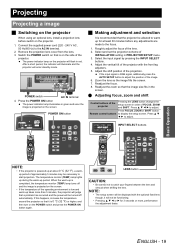
... set the projection scheme of FOCUS, ZOOM and SHIFT. If the input signal is on that is RGB signal, additionally press the AUTO SETUP button to start projection. Zoom the lens so the image fills the screen. 7. Q Adjusting focus, zoom and shift Control buttons of the ...pressing the INPUT SELECT buttons. 4. Press FOCUS, ZOOM or SHIFT button Remote control buttons to catch your fingers between the lens and shroud when shifting the lens. LENS button CAUTION: • Be careful not to display the setup screen. If this happens, increase the temperature around the ...
... set the projection scheme of FOCUS, ZOOM and SHIFT. If the input signal is on that is RGB signal, additionally press the AUTO SETUP button to start projection. Zoom the lens so the image fills the screen. 7. Q Adjusting focus, zoom and shift Control buttons of the ...pressing the INPUT SELECT buttons. 4. Press FOCUS, ZOOM or SHIFT button Remote control buttons to catch your fingers between the lens and shroud when shifting the lens. LENS button CAUTION: • Be careful not to display the setup screen. If this happens, increase the temperature around the ...
Operating Instructions
Page 20
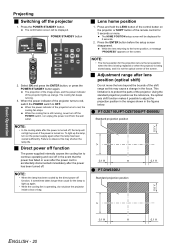
... the lens position when the lens is being replaced or when the projector is being stored away, and it is not the optical center of the projector lights up the lamp, turn off function, it possible to observe this may shorten the lamp life. Q PT-DW6300U Standard... projection of the image stops, and the power indicator of the screen. Press the ENTER button before the setup screen disappeared. Q PT-DZ6710U/PT-DZ6700U/PT-D6000U Standard projection position NOTE: • In the cooling state after the power has been turned off the projector 1. Projecting J Switching...
... the lens position when the lens is being replaced or when the projector is being stored away, and it is not the optical center of the projector lights up the lamp, turn off function, it possible to observe this may shorten the lamp life. Q PT-DW6300U Standard... projection of the image stops, and the power indicator of the screen. Press the ENTER button before the setup screen disappeared. Q PT-DZ6710U/PT-DZ6700U/PT-D6000U Standard projection position NOTE: • In the cooling state after the power has been turned off the projector 1. Projecting J Switching...

Operating Instructions
Page 24
...Default: 0) COLOR TEMPERATURE DEFAULT USER MIDDLE HIGH WHITE GAIN (Default: 10) SYSTEM DAYLIGHT VIEW OFF 1 2 3 SHARPNESS (Default: 6) NOISE REDUCTION 1 ...NTSC 4.43 PAL PAL-M PAL-N SECAM PAL60 RGB 480pRGB 720⁄60p 1080⁄25p YCBCR...16) GEOMETRY (PT-DZ6710U only) OFF CURVED KEYSTONE PC GEOMETRY:KEYSTONE VERTICAL KEYSTONE VERTICAL SUB KEYSTONE HORIZONTAL KEYSTONE HORIZONTAL SUB KEYSTONE LINEARITY GEOMETRY:CURVED LENS THROW RATIO VERTICAL KEYSTONE HORIZONTAL KEYSTONE VERTICAL ARC HORIZONTAL ARC VERTICAL BALANCE HORIZONTAL BALANCE KEYSTONE (PT-DZ6700U/PT-DW6300U/PT...
...Default: 0) COLOR TEMPERATURE DEFAULT USER MIDDLE HIGH WHITE GAIN (Default: 10) SYSTEM DAYLIGHT VIEW OFF 1 2 3 SHARPNESS (Default: 6) NOISE REDUCTION 1 ...NTSC 4.43 PAL PAL-M PAL-N SECAM PAL60 RGB 480pRGB 720⁄60p 1080⁄25p YCBCR...16) GEOMETRY (PT-DZ6710U only) OFF CURVED KEYSTONE PC GEOMETRY:KEYSTONE VERTICAL KEYSTONE VERTICAL SUB KEYSTONE HORIZONTAL KEYSTONE HORIZONTAL SUB KEYSTONE LINEARITY GEOMETRY:CURVED LENS THROW RATIO VERTICAL KEYSTONE HORIZONTAL KEYSTONE VERTICAL ARC HORIZONTAL ARC VERTICAL BALANCE HORIZONTAL BALANCE KEYSTONE (PT-DZ6700U/PT-DW6300U/PT...

