
User Manual
Page 4
... 32 How to use ADVANCED MENU 32 DIGITAL CINEMA REALITY 32 BLANKING 32 INPUT RESOLUTION 33 CLAMP POSITION 33 EDGE BLENDING 33 RASTER POSITION 34 XGA MODE 34 SXGA MODE 34 Changing the display language 34 OPTION1 settings 35 COLOR MATCHING 35 Adjusting the color matching using a colorimeter 35 4 ... DVI EDID 37 DVI SIGNAL LEVEL 37 FUNC1 37 OSD POSITION 37 OSD MEMORY 37 OPTION2 settings 38 PROJECTOR ID 38 INSTALLATION 38 ALTITUDE 38 DIRECTION 38 LAMP SELECT 39 LAMP RELAY 39 LAMP POWER 39 RS-232C 39 SYSTEM INFORMATION 40 AUTO POWER OFF 40 DATE AND TIME 40 PASSWORD 40 ...
... 32 How to use ADVANCED MENU 32 DIGITAL CINEMA REALITY 32 BLANKING 32 INPUT RESOLUTION 33 CLAMP POSITION 33 EDGE BLENDING 33 RASTER POSITION 34 XGA MODE 34 SXGA MODE 34 Changing the display language 34 OPTION1 settings 35 COLOR MATCHING 35 Adjusting the color matching using a colorimeter 35 4 ... DVI EDID 37 DVI SIGNAL LEVEL 37 FUNC1 37 OSD POSITION 37 OSD MEMORY 37 OPTION2 settings 38 PROJECTOR ID 38 INSTALLATION 38 ALTITUDE 38 DIRECTION 38 LAMP SELECT 39 LAMP RELAY 39 LAMP POWER 39 RS-232C 39 SYSTEM INFORMATION 40 AUTO POWER OFF 40 DATE AND TIME 40 PASSWORD 40 ...
User Manual
Page 6
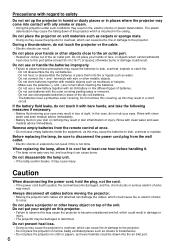
... ceiling. Always disconnect all cables before handling it. • The lamp cover gets very hot, and touching it may cause the batteries to the projector. The plastic deterioration may cause the falling down of the projector which cannot withstand heat close to the air outlet port. •... seek medical advice immediately. • Battery fluid on soft materials such as these precautions may result in damage or injury. • The projector may be sure to overheat, which could result. In this may cause injury. Rinse with the outer covering peeling away or removed. -...
... ceiling. Always disconnect all cables before handling it. • The lamp cover gets very hot, and touching it may cause the batteries to the projector. The plastic deterioration may cause the falling down of the projector which cannot withstand heat close to the air outlet port. •... seek medical advice immediately. • Battery fluid on soft materials such as these precautions may result in damage or injury. • The projector may be sure to overheat, which could result. In this may cause injury. Rinse with the outer covering peeling away or removed. -...
User Manual
Page 7
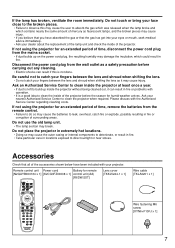
...any cleaning. • Electric shocks can result in fire. Do not touch or bring your dealer about the replacement of the lamp unit and check the inside the projector without being cleaned out, it may cause the batteries to leak, overheat, catch fire or explode, possibly resulting in locations ...from the remote control. • Failure to do so may cause injury. Please discuss with your projector. Do not use the old lamp unit. • The lamp section may cause the user to clean inside the projector at least once a year. • If dust is not done. Remote control unit Power ...
...any cleaning. • Electric shocks can result in fire. Do not touch or bring your dealer about the replacement of the lamp unit and check the inside the projector without being cleaned out, it may cause the batteries to leak, overheat, catch fire or explode, possibly resulting in locations ...from the remote control. • Failure to do so may cause injury. Please discuss with your projector. Do not use the old lamp unit. • The lamp section may cause the user to clean inside the projector at least once a year. • If dust is not done. Remote control unit Power ...
User Manual
Page 8
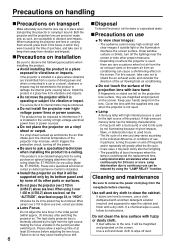
...", described on the screen. Lens Focus Do not adjust the lens focus in place when transporting the projector or carrying it around , place them around . For this product. Lamp deterioration due to wipe off the power. If stains are transmitted from the light source, making the...on the projection lens surface, they were housed at least 30 minutes before cleaning. Lamp A mercury lamp with the supplied lens cap when the projector is installed in the period just after switching the projector on. Cleaning and maintenance Be sure to vibration and impacts. Avoid installing the ...
...", described on the screen. Lens Focus Do not adjust the lens focus in place when transporting the projector or carrying it around , place them around . For this product. Lamp deterioration due to wipe off the power. If stains are transmitted from the light source, making the...on the projection lens surface, they were housed at least 30 minutes before cleaning. Lamp A mercury lamp with the supplied lens cap when the projector is installed in the period just after switching the projector on. Cleaning and maintenance Be sure to vibration and impacts. Avoid installing the ...
User Manual
Page 9
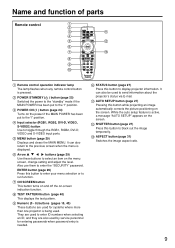
... ratio. 9 TEST PATTERN button (page 40) This displays the test pattern. STATUS button (page 27) Press this button to send information about the projector's status via E-mail. It can also return to enter the "SECURITY" password. SHUTTER button (page 27) Press this button to run function. POWER...toggle through the RGB1, RGB2, DVI-D, VIDEO and S-VIDEO input ports. Name and function of parts Remote control Remote control operation indicator lamp The lamp flashes when any remote control button is active, a message "AUTO SETUP" appears on the menu screen, change setting and adjust the ...
... ratio. 9 TEST PATTERN button (page 40) This displays the test pattern. STATUS button (page 27) Press this button to send information about the projector's status via E-mail. It can also return to enter the "SECURITY" password. SHUTTER button (page 27) Press this button to run function. POWER...toggle through the RGB1, RGB2, DVI-D, VIDEO and S-VIDEO input ports. Name and function of parts Remote control Remote control operation indicator lamp The lamp flashes when any remote control button is active, a message "AUTO SETUP" appears on the menu screen, change setting and adjust the ...
User Manual
Page 11
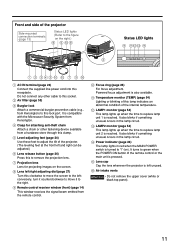
.... Level-adjusting feet (page 24) Use these feet to adjust the tilt of the projector. (The leveling feet at the front left ; It turns to remove the projection lens. conversely, turn it to replace lamp unit 1 is reached. Remote control receiver window (front) (page 14) This window ...Lens release button (page 26) Press this receptacle. Front and side of the projector Side-mounted connection terminals (page 13) Status LED lights (Refer to replace lamp unit 2 is reached. LAMP2 monitor (page 54) This lamp lights up when the time to the right. Lens cap Cap the lens whenever...
.... Level-adjusting feet (page 24) Use these feet to adjust the tilt of the projector. (The leveling feet at the front left ; It turns to remove the projection lens. conversely, turn it to replace lamp unit 1 is reached. Remote control receiver window (front) (page 14) This window ...Lens release button (page 26) Press this receptacle. Front and side of the projector Side-mounted connection terminals (page 13) Status LED lights (Refer to replace lamp unit 2 is reached. LAMP2 monitor (page 54) This lamp lights up when the time to the right. Lens cap Cap the lens whenever...
User Manual
Page 12
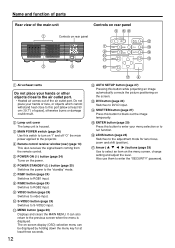
...selection menu can also return to the previous screen when the menu is housed. POWER ON ( I " and off "O" the main power applied to the projector. It can be displayed by holding down the menu key for lens focus, zoom and shift (position). RGB2 button (page 24) Switches to S-VIDEO input...at least 50 cm (19.7") of space], otherwise burns or damage could result. MENU button (page 29) Displays and clears the MAIN MENU. Lamp unit cover The lamp unit is displayed. POWER STANDBY ( ) button (page 25) Switches the power to select an item on the menu screen, change setting and...
...selection menu can also return to the previous screen when the menu is housed. POWER ON ( I " and off "O" the main power applied to the projector. It can be displayed by holding down the menu key for lens focus, zoom and shift (position). RGB2 button (page 24) Switches to S-VIDEO input...at least 50 cm (19.7") of space], otherwise burns or damage could result. MENU button (page 29) Displays and clears the MAIN MENU. Lamp unit cover The lamp unit is displayed. POWER STANDBY ( ) button (page 25) Switches the power to select an item on the menu screen, change setting and...
User Manual
Page 13
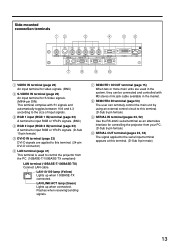
...) Lights up when connected. LAN LINK/ACT lamp (Green) Lights up when 100BASE-TX connected. RGB 1 input (RGB 1 IN) terminal (page ... input terminal for video signals. (BNC) S-VIDEO IN terminal (page 23) An input terminal for controlling the projector from the PC. (10BASE-T/100BASE-TX compliant) LAN terminal (10BASE-T/100BASE-TX) Connect LAN cable. REMOTE2 IN ...-pin DIN) This terminal complies with S1 signals and automatically toggles between 16:9 and 4:3 according to control the projector from your PC. (D-Sub 9-pin female) SERIAL OUT terminal (pages 23, 52) The signal applied to the...
...) Lights up when connected. LAN LINK/ACT lamp (Green) Lights up when 100BASE-TX connected. RGB 1 input (RGB 1 IN) terminal (page ... input terminal for video signals. (BNC) S-VIDEO IN terminal (page 23) An input terminal for controlling the projector from the PC. (10BASE-T/100BASE-TX compliant) LAN terminal (10BASE-T/100BASE-TX) Connect LAN cable. REMOTE2 IN ...-pin DIN) This terminal complies with S1 signals and automatically toggles between 16:9 and 4:3 according to control the projector from your PC. (D-Sub 9-pin female) SERIAL OUT terminal (pages 23, 52) The signal applied to the...
User Manual
Page 14
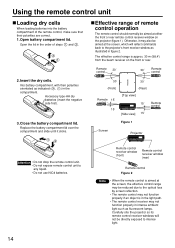
.... 30 m (98.4') from the beam receiver on the projector (figure 1). Close the battery compartment lid. Using the remote control unit Loading dry cells When loading batteries into the battery compartment of the remote control, make sure that their polarities orientated as fluorescent lamps. Accessory type-AA dry batteries (insert the negative side...
.... 30 m (98.4') from the beam receiver on the projector (figure 1). Close the battery compartment lid. Using the remote control unit Loading dry cells When loading batteries into the battery compartment of the remote control, make sure that their polarities orientated as fluorescent lamps. Accessory type-AA dry batteries (insert the negative side...
User Manual
Page 25
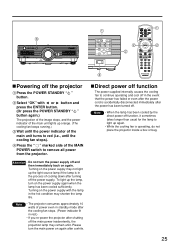
...supply may not light up the light source lamp if the lamp is in the event that the power has failed or even after the power cord is operating, do not place the projector inside a box or bag. 25 Please turn the power supply off the projector Press the POWER STANDBY " " button. ...on again after the power has been turned off. Turning on the power supply again when the lamp has been cooled sufficiently. Select "OK" with the lamp in red.) • If you re-power the projector after turning off function The power supplied internally causes the cooling fan to light up orange. ...
...supply may not light up the light source lamp if the lamp is in the event that the power has failed or even after the power cord is operating, do not place the projector inside a box or bag. 25 Please turn the power supply off the projector Press the POWER STANDBY " " button. ...on again after the power has been turned off. Turning on the power supply again when the lamp has been cooled sufficiently. Select "OK" with the lamp in red.) • If you re-power the projector after turning off function The power supplied internally causes the cooling fan to light up orange. ...
User Manual
Page 27
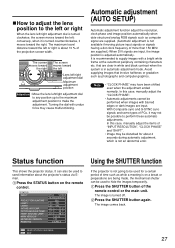
...blurred edges or dark images are input. Status function This shows the projector status. AROUND LAMP MAIN VERSION NETWORK VERSION REMOTE2 NTSC VIDEO 15.73kHz/59.94Hz 33h... 13h/ ON/ 13h/ ON/ 25 °C / 77 °F 37 °C / 98 °F 37 °C / 98 °F 1.00.00 1.00 DISABLE SEND STATUS VIA E-MAIL EXIT Using the SHUTTER function If the projector...and black contrast when the system is not an abnormal error. STATUS INPUT PROJECTOR RUNTIME LAMP1 LAMP2 INTAKE-AIR TEMP. The screen moves toward the right ...
...blurred edges or dark images are input. Status function This shows the projector status. AROUND LAMP MAIN VERSION NETWORK VERSION REMOTE2 NTSC VIDEO 15.73kHz/59.94Hz 33h... 13h/ ON/ 13h/ ON/ 25 °C / 77 °F 37 °C / 98 °F 37 °C / 98 °F 1.00.00 1.00 DISABLE SEND STATUS VIA E-MAIL EXIT Using the SHUTTER function If the projector...and black contrast when the system is not an abnormal error. STATUS INPUT PROJECTOR RUNTIME LAMP1 LAMP2 INTAKE-AIR TEMP. The screen moves toward the right ...
User Manual
Page 28
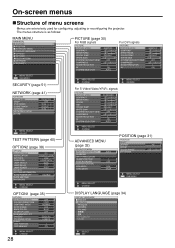
....255.255. 0 192.168. 0. 1 MENU SELECT ADJUST TEST PATTERN (page 40) OPTION2 (page 38) OPTION2 PROJECTOR ID INSTALLATION ALTITUDE DIRECTION LAMP SELECT LAMP RELAY LAMP POWER RS-232C SYSTEM INFORMATION AUTO POWER OFF DATE AND TIME PASSWORD ALL FRONT-FLOOR LOW HORIZONTAL DUAL OFF HIGH DISABLE MENU...SELECT CHANGE ADVANCED MENU (page 32) ADVANCED MENU DIGITAL CINEMA REALITY BLANKING INPUT RESOLUTION CLAMP POSITION EDGE BLENDING RASTER POSITION XGA MODE SXGA MODE AUTO 1 OFF XGA SXGA POSITION (page 31) POSITION SHIFT ASPECT ZOOM CLOCK PHASE KEYSTONE 4:3 +16 MENU SELECT SUB MENU MENU SELECT...
....255.255. 0 192.168. 0. 1 MENU SELECT ADJUST TEST PATTERN (page 40) OPTION2 (page 38) OPTION2 PROJECTOR ID INSTALLATION ALTITUDE DIRECTION LAMP SELECT LAMP RELAY LAMP POWER RS-232C SYSTEM INFORMATION AUTO POWER OFF DATE AND TIME PASSWORD ALL FRONT-FLOOR LOW HORIZONTAL DUAL OFF HIGH DISABLE MENU...SELECT CHANGE ADVANCED MENU (page 32) ADVANCED MENU DIGITAL CINEMA REALITY BLANKING INPUT RESOLUTION CLAMP POSITION EDGE BLENDING RASTER POSITION XGA MODE SXGA MODE AUTO 1 OFF XGA SXGA POSITION (page 31) POSITION SHIFT ASPECT ZOOM CLOCK PHASE KEYSTONE 4:3 +16 MENU SELECT SUB MENU MENU SELECT...
User Manual
Page 38
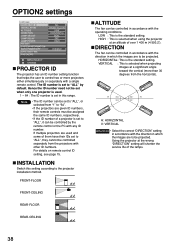
... PROJECTOR ID INSTALLATION ALTITUDE DIRECTION LAMP SELECT LAMP RELAY LAMP POWER RS-232C SYSTEM INFORMATION AUTO POWER OFF DATE AND TIME PASSWORD ALL FRONT-FLOOR LOW HORIZONTAL DUAL OFF HIGH DISABLE MENU SELECT CHANGE PROJECTOR ID The projector has an ID number setting function that helps the user to the projector... the direction in this setting according to control two or more than 30 degrees from "1" to be controlled separately from the projectors with other ID numbers. FRONT-FLOOR FRONT-CEILING REAR-FLOOR REAR-CEILING ALTITUDE The fan can be controlled in which the images...
... PROJECTOR ID INSTALLATION ALTITUDE DIRECTION LAMP SELECT LAMP RELAY LAMP POWER RS-232C SYSTEM INFORMATION AUTO POWER OFF DATE AND TIME PASSWORD ALL FRONT-FLOOR LOW HORIZONTAL DUAL OFF HIGH DISABLE MENU SELECT CHANGE PROJECTOR ID The projector has an ID number setting function that helps the user to the projector... the direction in this setting according to control two or more than 30 degrees from "1" to be controlled separately from the projectors with other ID numbers. FRONT-FLOOR FRONT-CEILING REAR-FLOOR REAR-CEILING ALTITUDE The fan can be controlled in which the images...

User Manual
Page 39
...: 9600, 19200 or 38400 is selected. (OUT) PARITY : NONE, EVEN or ODD is selected. In "SINGLE" mode, the projector may automatically select either lamps is used simultaneously. LAMP1 : Lamp Unit 1 is automatically selected). When one lamp remains off or the 2 000 hours of the items indicate the status. OFF : This is not necessary. LOW...
...: 9600, 19200 or 38400 is selected. (OUT) PARITY : NONE, EVEN or ODD is selected. In "SINGLE" mode, the projector may automatically select either lamps is used simultaneously. LAMP1 : Lamp Unit 1 is automatically selected). When one lamp remains off or the 2 000 hours of the items indicate the status. OFF : This is not necessary. LOW...
User Manual
Page 44
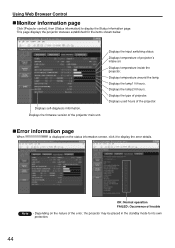
... click it to display the Status information page. Displays temperature of the projector main unit. Displays used hours of projector. OK: Normal operation FAILED: Occurrence of the error, the projector may be placed in the standby mode for the items shown below. ...Displays temperature around the lamp. Displays the type of the projector. Using Web Browser Control Monitor information page Click [Projector control], then [Status information] to...
... click it to display the Status information page. Displays temperature of the projector main unit. Displays used hours of projector. OK: Normal operation FAILED: Occurrence of the error, the projector may be placed in the standby mode for the items shown below. ...Displays temperature around the lamp. Displays the type of the projector. Using Web Browser Control Monitor information page Click [Projector control], then [Status information] to...

User Manual
Page 45
...mail even the set up page With this case, the user cannot send another mail for example, the installed projector so that the recipient may be sent to page 55). The lamp unit cover is 60 minutes. The default value is not properly fitted. Consult your dealer. Trouble has occurred ... cover. (page 57) E-mail set value, control sends temperature warning mail. It may be that the projector is high such as near the lamp has risen very high. Consult your dealer. The temperature near a heating appliance. Consult your dealer. Consult your dealer. Enter the IP address or ...
...mail even the set up page With this case, the user cannot send another mail for example, the installed projector so that the recipient may be sent to page 55). The lamp unit cover is 60 minutes. The default value is not properly fitted. Consult your dealer. Trouble has occurred ... cover. (page 57) E-mail set value, control sends temperature warning mail. It may be that the projector is high such as near the lamp has risen very high. Consult your dealer. The temperature near a heating appliance. Consult your dealer. Consult your dealer. Enter the IP address or ...

User Manual
Page 48
...to be changed . 48 MAIN CPU BUS [ OK ] FAN [ OK ] OPTICS MODULE TEMPERATURE [ OK ] INPUT AIR TEMPERATURE [ OK ] AROUND LAMP TEMPERATURE [ OK ] LAMP2 REMAIN TIME [ OK ] LAMP1 REMAIN TIME [ OK ] LAMP2 STATUS [ OK ] LAMP1 STATUS [ OK ] SHUTTER [...below is sent when an error has occurred. === Panasonic projector report(ERROR) === Projector Type : D5700 ----- Adjust clock page Click [Network set up], then [Adjust clock] to have been established. === Panasonic projector report(CONFIGURE) === Projector Type : D5700 ----- check system ----- Network configuration ...
...to be changed . 48 MAIN CPU BUS [ OK ] FAN [ OK ] OPTICS MODULE TEMPERATURE [ OK ] INPUT AIR TEMPERATURE [ OK ] AROUND LAMP TEMPERATURE [ OK ] LAMP2 REMAIN TIME [ OK ] LAMP1 REMAIN TIME [ OK ] LAMP2 STATUS [ OK ] LAMP1 STATUS [ OK ] SHUTTER [...below is sent when an error has occurred. === Panasonic projector report(ERROR) === Projector Type : D5700 ----- Adjust clock page Click [Network set up], then [Adjust clock] to have been established. === Panasonic projector report(CONFIGURE) === Projector Type : D5700 ----- check system ----- Network configuration ...

User Manual
Page 50
... INF1 ? INF2 ? Using the PJLink™ protocol The network functions of the projector are as the password set for WebBrowser control. Shutter status inquiry ERST ? The ...22 = S-VIDEO 31 = DVI-D Parameter 30 = Shutter mode OFF (Mute reset of "NETWORK" Responds with "Panasonic" Responds with "D5700" or "DW5100" Responds with version number and so on PJLink™ specifications, refer to ...for PJLink™ is http://pjlink.jbmia.or.jp/english/ 50 NAME ? CLSS ? Lamp status inquiry INST ? Command Control Description POWR Power control POWR ? Power status inquiry INPT...
... INF1 ? INF2 ? Using the PJLink™ protocol The network functions of the projector are as the password set for WebBrowser control. Shutter status inquiry ERST ? The ...22 = S-VIDEO 31 = DVI-D Parameter 30 = Shutter mode OFF (Mute reset of "NETWORK" Responds with "Panasonic" Responds with "D5700" or "DW5100" Responds with version number and so on PJLink™ specifications, refer to ...for PJLink™ is http://pjlink.jbmia.or.jp/english/ 50 NAME ? CLSS ? Lamp status inquiry INST ? Command Control Description POWR Power control POWR ? Power status inquiry INPT...

User Manual
Page 52
...after that period has elapsed. • When sending several commands, be sent or received for more than 0.5 seconds after the lamp starts lighting. Signal name Description NC RXD Receive data TXD Send data NC GND Ground NC RTS Connected internally CTS NC Communication conditions... Stop bit X parameter S parameter RS-232C compliant Start-stop synchronization 9 600 bps None 8 bits 1 bit None None Basic format Transmission from the projector, and then send the next command. Pn ETX (2 bytes) Two ID characters (2 bytes) Semicolon (1 byte) Colon (1 byte) Start ZZ, 1...
...after that period has elapsed. • When sending several commands, be sent or received for more than 0.5 seconds after the lamp starts lighting. Signal name Description NC RXD Receive data TXD Send data NC GND Ground NC RTS Connected internally CTS NC Communication conditions... Stop bit X parameter S parameter RS-232C compliant Start-stop synchronization 9 600 bps None 8 bits 1 bit None None Basic format Transmission from the projector, and then send the next command. Pn ETX (2 bytes) Two ID characters (2 bytes) Semicolon (1 byte) Colon (1 byte) Start ZZ, 1...

User Manual
Page 53
...DVI=DVI-D Parameter 0 = DUAL * "SINGLE" will it is ON, use 1 = SINGLE the lamp (LAMP 1 2 = LAMP 1 or LAMP 2) with shorter operating 3 = LAMP 2 hours. Parameter 0 = DUAL 1 = SINGLE 2 = Only LAMP 1 is on 3 = Only LAMP 2 is on the side of the main unit, it be received. Example of a control panel layout ...Remote terminal External control Remote terminal /External control STANDBY ON LAMP RGB1 VIDEO RGB2 Projector set up in a meeting room S-VIDEO DVI Control panel located in a distant location where infrared remote ...
...DVI=DVI-D Parameter 0 = DUAL * "SINGLE" will it is ON, use 1 = SINGLE the lamp (LAMP 1 2 = LAMP 1 or LAMP 2) with shorter operating 3 = LAMP 2 hours. Parameter 0 = DUAL 1 = SINGLE 2 = Only LAMP 1 is on 3 = Only LAMP 2 is on the side of the main unit, it be received. Example of a control panel layout ...Remote terminal External control Remote terminal /External control STANDBY ON LAMP RGB1 VIDEO RGB2 Projector set up in a meeting room S-VIDEO DVI Control panel located in a distant location where infrared remote ...


