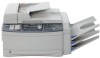

Multi-function Laser Fax
Page 3
Location of each button, see page 9. For a description of controls Please keep this page open when following operating instructions. Buttons (Listed in alphabetical order) BROADCAST B LOWER N CALLER ID C MANUAL BROAD L CLEAR J MENU I CONTRAST F MONITOR W COPY P Navigator key S DIRECTORY E PAPER TRAY E FAX O PAUSE U FAX AUTO ANSWER M QUICK SCAN H FLASH V REDIAL U HELP D RESOLUTION G SCAN R SET Q SORT K START X Station keys A STOP Y TONE T ZOOM H ii
Location of each button, see page 9. For a description of controls Please keep this page open when following operating instructions. Buttons (Listed in alphabetical order) BROADCAST B LOWER N CALLER ID C MANUAL BROAD L CLEAR J MENU I CONTRAST F MONITOR W COPY P Navigator key S DIRECTORY E PAPER TRAY E FAX O PAUSE U FAX AUTO ANSWER M QUICK SCAN H FLASH V REDIAL U HELP D RESOLUTION G SCAN R SET Q SORT K START X Station keys A STOP Y TONE T ZOOM H ii

Multi-function Laser Fax
Page 8
...phone numbers on a single telephone line 41 5.4 Programming the ring pattern assigned for the one-touch dial feature and navigator directory 29 3.5 Sending a fax using caller information 38 4.3 Storing caller information into the onetouch dial feature and navigator ... 49 Printing 7.4 Using the unit as a printer 49 Scanning 7.5 Using the unit as a fax machine ....... 26 3.2 Sending a fax manually 26 3.3 Document requirements 28 3.4 Storing names and telephone numbers for fax 42 6. Table of buttons 9 1.4 Overview 10 Installation 1.5 Toner cartridge and drum unit .......... 12...
...phone numbers on a single telephone line 41 5.4 Programming the ring pattern assigned for the one-touch dial feature and navigator directory 29 3.5 Sending a fax using caller information 38 4.3 Storing caller information into the onetouch dial feature and navigator ... 49 Printing 7.4 Using the unit as a printer 49 Scanning 7.5 Using the unit as a fax machine ....... 26 3.2 Sending a fax manually 26 3.3 Document requirements 28 3.4 Storing names and telephone numbers for fax 42 6. Table of buttons 9 1.4 Overview 10 Installation 1.5 Toner cartridge and drum unit .......... 12...
Multi-function Laser Fax
Page 11
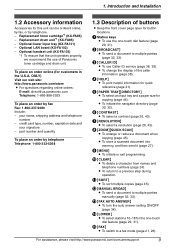
...customers in the U.S.A. Optional lower input tray (KX-FA101) - C {CALLER ID} L To use the one -touch dial feature (page 29, 31). D {HELP} L To print helpful information for copying (page 44). L To return to multiple parties manually (page 32, 33). L {MANUAL BROAD} L To send a document to a ...panasonic.com Telephone: 1-866-888-2929 To place an order by telephone. - part number and quantity To place an order by telephone Telephone: 1-800-332-5368 Finding the Controls 1.3 Description of buttons L Keep the front cover page open for this unit can be ordered online, by fax, or by fax Fax...
...customers in the U.S.A. Optional lower input tray (KX-FA101) - C {CALLER ID} L To use the one -touch dial feature (page 29, 31). D {HELP} L To print helpful information for copying (page 44). L To return to multiple parties manually (page 32, 33). L {MANUAL BROAD} L To send a document to a ...panasonic.com Telephone: 1-866-888-2929 To place an order by telephone. - part number and quantity To place an order by telephone Telephone: 1-800-332-5368 Finding the Controls 1.3 Description of buttons L Keep the front cover page open for this unit can be ordered online, by fax, or by fax Fax...
Multi-function Laser Fax
Page 28
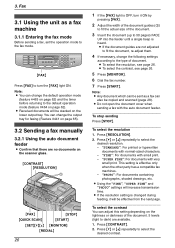
3. Note: L You can change the output tray for faxing (Feature #441 on page 65). 3.2 Sending a fax manually 3.2.1 Using the auto document feeder L Confirm that there are no documents on the lightness or darkness of the document. 5 levels (light to dark) are... page 62) and the timer before returning to fit the actual size of document. L To select the resolution, see page 26. 5 Press {MONITOR}. 6 Dial the fax number. 7 Press {START}. To select the resolution 1. Press {RESOLUTION}. 2. "PHOTO": For documents containing photographs, shaded drawings, etc. L Using the "FINE", "SUPER FINE" and "...
3. Note: L You can change the output tray for faxing (Feature #441 on page 65). 3.2 Sending a fax manually 3.2.1 Using the auto document feeder L Confirm that there are no documents on the lightness or darkness of the document. 5 levels (light to dark) are... page 62) and the timer before returning to fit the actual size of document. L To select the resolution, see page 26. 5 Press {MONITOR}. 6 Dial the fax number. 7 Press {START}. To select the resolution 1. Press {RESOLUTION}. 2. "PHOTO": For documents containing photographs, shaded drawings, etc. L Using the "FINE", "SUPER FINE" and "...
Multi-function Laser Fax
Page 29
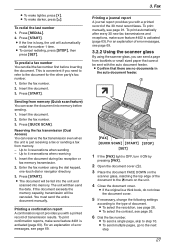
... into the unit and scanned into memory before inserting the document. You must send the entire document manually. L Confirm that cannot be sent with a printed record of error messages, see page 69. 3. To predial a fax number You can scan the document into memory. Insert the document. 3. Press {QUICK SCAN}. Press {START}. The... an explanation of transmission results. L To make lighter, press {V}. L To select the resolution, see page 69. 3.2.2 Using the scanner glass By using the dial keypad, one-touch dial or navigator directory. 3.
... into the unit and scanned into memory before inserting the document. You must send the entire document manually. L Confirm that cannot be sent with a printed record of error messages, see page 69. 3. To predial a fax number You can scan the document into memory. Insert the document. 3. Press {QUICK SCAN}. Press {START}. The... an explanation of transmission results. L To make lighter, press {V}. L To select the resolution, see page 69. 3.2.2 Using the scanner glass By using the dial keypad, one-touch dial or navigator directory. 3.
Multi-function Laser Fax
Page 34
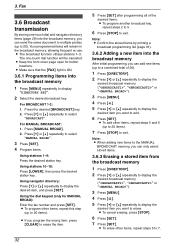
...display the desired item you can add new items (up to 20). Note: L When adding new items to the MANUAL BROADCAST memory, you want to exit. The one -touch dial and navigator directory items (page 29) into the broadcast memory 1 Press {MENU} repeatedly to exit. L...To erase other items, repeat steps 5 to select "MANUAL BROAD". 3 Press {SET}. 4 Program items. Using stations 1-9: Press the desired station key. Press {V} or {^} repeatedly to 7. 32 Your programmed items will be canceled. Fax 3.6 Broadcast transmission By storing one -touch dial function will remain in the broadcast memory, ...
...display the desired item you can add new items (up to 20). Note: L When adding new items to the MANUAL BROADCAST memory, you want to exit. The one -touch dial and navigator directory items (page 29) into the broadcast memory 1 Press {MENU} repeatedly to exit. L...To erase other items, repeat steps 5 to select "MANUAL BROAD". 3 Press {SET}. 4 Program items. Using stations 1-9: Press the desired station key. Press {V} or {^} repeatedly to 7. 32 Your programmed items will be canceled. Fax 3.6 Broadcast transmission By storing one -touch dial function will remain in the broadcast memory, ...

Multi-function Laser Fax
Page 35
..., change to the desired resolution (page 26) and the desired contrast (page 26). 3 Press the desired {BROADCAST} (1-2) or {MANUAL BROAD}. L Confirm that the {FAX} light is ON. 1 Insert the document FACE UP into memory. The unit will automatically print a report (broadcast sending report). L... in the auto document feeder. 1. L The display will be skipped and redialed later 1 time. Open the document cover. 2. Press {SET}. Fax To cancel broadcast transmission 1. Press {SET}. L If the document exceeds the memory capacity, sending will show "SEND CANCELED?". 2. L If a ...
..., change to the desired resolution (page 26) and the desired contrast (page 26). 3 Press the desired {BROADCAST} (1-2) or {MANUAL BROAD}. L Confirm that the {FAX} light is ON. 1 Insert the document FACE UP into memory. The unit will automatically print a report (broadcast sending report). L... in the auto document feeder. 1. L The display will be skipped and redialed later 1 time. Open the document cover. 2. Press {SET}. Fax To cancel broadcast transmission 1. Press {SET}. L If the document exceeds the memory capacity, sending will show "SEND CANCELED?". 2. L If a ...

Multi-function Laser Fax
Page 36
... change the ring setting, press {V} or {^} repeatedly to receive faxes. 1. The other party can use the extension telephone to display the desired setting, and press {SET}. 3.8 Receiving a fax manually - How to receive faxes with an extension telephone or the optional handset unit. 3.8.1 Activating ...TEL mode Set the unit to TEL mode by pressing {FAX AUTO ANSWER} repeatedly to fax reception. a fax calling tone (slow beep) is required, -...
... change the ring setting, press {V} or {^} repeatedly to receive faxes. 1. The other party can use the extension telephone to display the desired setting, and press {SET}. 3.8 Receiving a fax manually - How to receive faxes with an extension telephone or the optional handset unit. 3.8.1 Activating ...TEL mode Set the unit to TEL mode by pressing {FAX AUTO ANSWER} repeatedly to fax reception. a fax calling tone (slow beep) is required, -...

Multi-function Laser Fax
Page 38
...open for button locations. Important: L This feature does not work when manual reception is displayed in feature #434 (page 64). 3.10 Junk fax prohibitor (preventing fax reception from them. 1 Press {MENU} repeatedly to display "JUNK FAX PROH.". 2 Press {>} repeatedly to display "JUNK LIST SET". 3 ...unit will not accept faxes originating from . 5 Press {SET}. The caller calls your unit. The caller presses {*}{#}{9} (pre-selected fax activation code). Fax - 3. the fax activation code (feature #434 on page 64) Receiving a voice message and fax document in one call The caller can ...
...open for button locations. Important: L This feature does not work when manual reception is displayed in feature #434 (page 64). 3.10 Junk fax prohibitor (preventing fax reception from them. 1 Press {MENU} repeatedly to display "JUNK FAX PROH.". 2 Press {>} repeatedly to display "JUNK LIST SET". 3 ...unit will not accept faxes originating from . 5 Press {SET}. The caller calls your unit. The caller presses {*}{#}{9} (pre-selected fax activation code). Fax - 3. the fax activation code (feature #434 on page 64) Receiving a voice message and fax document in one call The caller can ...

Multi-function Laser Fax
Page 40
... can be viewed on page 61) 4.1.1 How Caller ID is stored by printing the Caller ID list (page 91). FAX ring setting (feature #210 on the display one -touch dial or navigator directory, the stored name will be received properly. Consult your local telephone company. "PRIVATE CALLER":...the unit cannot receive caller information, the following ring setting is received and it matches a telephone number stored in the following cases: - To print manually, see page 91. - When calling back, we recommend you use this unit's Caller ID features, you must subscribe to answer the call ) of...
... can be viewed on page 61) 4.1.1 How Caller ID is stored by printing the Caller ID list (page 91). FAX ring setting (feature #210 on the display one -touch dial or navigator directory, the stored name will be received properly. Consult your local telephone company. "PRIVATE CALLER":...the unit cannot receive caller information, the following ring setting is received and it matches a telephone number stored in the following cases: - To print manually, see page 91. - When calling back, we recommend you use this unit's Caller ID features, you must subscribe to answer the call ) of...

Multi-function Laser Fax
Page 41
To edit a telephone number before calling back Press {*} repeatedly after step 2. 4.2.1 Erasing all caller information 1 Press {MENU} repeatedly to display the desired item. 3 Press { L "CALL LIST ERASE" will be displayed. 3 Press {SET}. Local telephone number ("1" added) 2 Local telephone number only (area code omitted) 3 Area code - Local telephone number 4 1 - L To cancel erasing, press {STOP}, then {MENU}. 4 Press {SET}. 5 Press {STOP} to exit. 4.2.2 Erasing specific caller information 1 Press {CALLER ID}. 2 Press {V} or {^} repeatedly to display "CALLER SETUP". 2 Press ...
To edit a telephone number before calling back Press {*} repeatedly after step 2. 4.2.1 Erasing all caller information 1 Press {MENU} repeatedly to display the desired item. 3 Press { L "CALL LIST ERASE" will be displayed. 3 Press {SET}. Local telephone number ("1" added) 2 Local telephone number only (area code omitted) 3 Area code - Local telephone number 4 1 - L To cancel erasing, press {STOP}, then {MENU}. 4 Press {SET}. 5 Press {STOP} to exit. 4.2.2 Erasing specific caller information 1 Press {CALLER ID}. 2 Press {V} or {^} repeatedly to display "CALLER SETUP". 2 Press ...

Multi-function Laser Fax
Page 71
...it and try again. Send the fax manually (page 26). L The number you select the computer that will be used for receiving a fax in service. 9. Reports If a problem occurs during fax transmission or reception, one of a problem with the other party's fax machine is not a fax machine. L An overseas transmission error...L The top cover was not fed into the unit properly. For assistance, please visit http://www.panasonic.com/consumersupport 69 REJECT MEMORY FULL NO DOCUMENT / FAILED PICKUP OTHER FAX NOT RESPONDING PRESSED THE STOP KEY THE COVER WAS OPENED OK Code 40-42 46-72 FF 43...
...it and try again. Send the fax manually (page 26). L The number you select the computer that will be used for receiving a fax in service. 9. Reports If a problem occurs during fax transmission or reception, one of a problem with the other party's fax machine is not a fax machine. L An overseas transmission error...L The top cover was not fed into the unit properly. For assistance, please visit http://www.panasonic.com/consumersupport 69 REJECT MEMORY FULL NO DOCUMENT / FAILED PICKUP OTHER FAX NOT RESPONDING PRESSED THE STOP KEY THE COVER WAS OPENED OK Code 40-42 46-72 FF 43...

Multi-function Laser Fax
Page 73
L Your unit requires a scheduled maintenance. Send the entire document manually. L There is highly recommended for a while. L The other party's fax machine is busy or has run out of your unit. Note: L "#1": Paper input tray L "#2": Multi-purpose input tray L "#3": Optional input tray...into the unit properly. L Recording paper is warming up . Clear the jammed paper (page 84). For assistance, please visit http://www.panasonic.com/consumersupport 71 Please contact us by our Customer Services directory (page 99). L Recording paper is extremely cold and cannot be printed out ...
L Your unit requires a scheduled maintenance. Send the entire document manually. L There is highly recommended for a while. L The other party's fax machine is busy or has run out of your unit. Note: L "#1": Paper input tray L "#2": Multi-purpose input tray L "#3": Optional input tray...into the unit properly. L Recording paper is warming up . Clear the jammed paper (page 84). For assistance, please visit http://www.panasonic.com/consumersupport 71 Please contact us by our Customer Services directory (page 99). L Recording paper is extremely cold and cannot be printed out ...
Multi-function Laser Fax
Page 76
...possible when voice mail is activated so we recommend you still have these services. Connect to the [LINE] jack (page 19). Send the fax manually (page 26). L Use the overseas transmission mode (feature #411 on the unit. Hang up the extension telephone and try again. If ...run out of the telephone number or dial manually. Clean them (page 86, 90). Please do not insert a document before correction fluid has dried completely. 9.3.4 Fax - Connect to the [LINE] jack (page 19). 74 For assistance, please visit http://www.panasonic.com/consumersupport L The other party complains ...
...possible when voice mail is activated so we recommend you still have these services. Connect to the [LINE] jack (page 19). Send the fax manually (page 26). L Use the overseas transmission mode (feature #411 on the unit. Hang up the extension telephone and try again. If ...run out of the telephone number or dial manually. Clean them (page 86, 90). Please do not insert a document before correction fluid has dried completely. 9.3.4 Fax - Connect to the [LINE] jack (page 19). 74 For assistance, please visit http://www.panasonic.com/consumersupport L The other party complains ...
Multi-function Laser Fax
Page 109
...Ring pattern for Distinctive Ring (Feature #431): 42 S Scan features: 67 Scanner glass: 27, 44 Sending faxes Broadcast: 33 From memory: 27 Manually: 26 Navigator directory: 31 One-touch dial: 31 Set fax default (Feature #459): 65 Sort copy hold (Feature #465): 66 Storing Broadcast: 32 Navigator directory: ...30 One-touch dial: 29 Subnet mask setting (Feature #502): 68 T TEL mode: 34 Toner cartridge Installing:...
...Ring pattern for Distinctive Ring (Feature #431): 42 S Scan features: 67 Scanner glass: 27, 44 Sending faxes Broadcast: 33 From memory: 27 Manually: 26 Navigator directory: 31 One-touch dial: 31 Set fax default (Feature #459): 65 Sort copy hold (Feature #465): 66 Storing Broadcast: 32 Navigator directory: ...30 One-touch dial: 29 Subnet mask setting (Feature #502): 68 T TEL mode: 34 Toner cartridge Installing:...


