Multi-function Laser Fax
Page 6
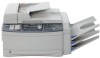
...your local authorities, or the Electronics Industries Alliance: http://www.eiae.org. Important Information Laser radiation L The printer of this unit from being made. 4 For assistance, please visit http://www.panasonic.com/consumersupport After you begin installation of fines and/or imprisonment may result in your country...and other than 5 minutes. - It will decrease the toner life. - Exposing it is installed in your country. Do not expose the drum unit to light may be regulated in a well ventilated room so as not to an area with water, and seek medical treatment. - ...
...your local authorities, or the Electronics Industries Alliance: http://www.eiae.org. Important Information Laser radiation L The printer of this unit from being made. 4 For assistance, please visit http://www.panasonic.com/consumersupport After you begin installation of fines and/or imprisonment may result in your country...and other than 5 minutes. - It will decrease the toner life. - Exposing it is installed in your country. Do not expose the drum unit to light may be regulated in a well ventilated room so as not to an area with water, and seek medical treatment. - ...
Multi-function Laser Fax
Page 7
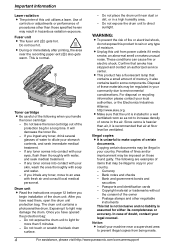
... quality. For assistance, please visit http://www.panasonic.com/consumersupport 5 For best performance Toner cartridge and drum unit L For optimal performance, genuine Panasonic toner cartridges and drum units are recommended. We cannot be caused by a nonPanasonic toner cartridge or drum unit: - As a result, it is ... °F). Be sure to produce an odor during and shortly after printing. L To extend the life of the unit with the drum. Inspect the air circulation vents regularly and remove any abrasive powder. Static electricity L To prevent static electricity damage to the unit ...
... quality. For assistance, please visit http://www.panasonic.com/consumersupport 5 For best performance Toner cartridge and drum unit L For optimal performance, genuine Panasonic toner cartridges and drum units are recommended. We cannot be caused by a nonPanasonic toner cartridge or drum unit: - As a result, it is ... °F). Be sure to produce an odor during and shortly after printing. L To extend the life of the unit with the drum. Inspect the air circulation vents regularly and remove any abrasive powder. Static electricity L To prevent static electricity damage to the unit ...

Multi-function Laser Fax
Page 8
... 1.5 Toner cartridge and drum unit .......... 12 1.6 Document tray 14 1.7 Output tray 14 1.8 Recording paper 15 2. Caller ID Caller ID 4.1 Caller ID service 38 4.2 Viewing and calling back using one-touch dial feature and navigator directory......... 31 3.6 Broadcast transmission 32 Receiving Faxes 3.7 Receiving a fax automatically - Introduction and 1. Fax Sending Faxes 3.1 Using the unit as a fax machine ....... 26 3.2 Sending...
... 1.5 Toner cartridge and drum unit .......... 12 1.6 Document tray 14 1.7 Output tray 14 1.8 Recording paper 15 2. Caller ID Caller ID 4.1 Caller ID service 38 4.2 Viewing and calling back using one-touch dial feature and navigator directory......... 31 3.6 Broadcast transmission 32 Receiving Faxes 3.7 Receiving a fax automatically - Introduction and 1. Fax Sending Faxes 3.1 Using the unit as a fax machine ....... 26 3.2 Sending...

Multi-function Laser Fax
Page 9
...Messages 9.1 Error messages - Display 70 Troubleshooting 9.3 When a function does not work, check here 73 Replacement 9.4 Replacing the toner cartridge and the drum unit 79 Jams 9.5 Recording paper jam 82 9.6 Document jams (Auto document feeder 85 Cleaning 9.7 Cleaning the white plate and glasses 86 9.8 Cleaning ... 11.1 Index 106 Table of Contents 7 Programmable Features Features Summary 8.1 Programming 57 8.2 Direct command chart 58 8.3 Basic features 61 8.4 Fax features 63 8.5 Copy features 66 8.6 Scan features 67 8.7 LAN features 67 9. 8. Reports 69 9.2 Error messages -
...Messages 9.1 Error messages - Display 70 Troubleshooting 9.3 When a function does not work, check here 73 Replacement 9.4 Replacing the toner cartridge and the drum unit 79 Jams 9.5 Recording paper jam 82 9.6 Document jams (Auto document feeder 85 Cleaning 9.7 Cleaning the white plate and glasses 86 9.8 Cleaning ... 11.1 Index 106 Table of Contents 7 Programmable Features Features Summary 8.1 Programming 57 8.2 Direct command chart 58 8.3 Basic features 61 8.4 Fax features 63 8.5 Copy features 66 8.6 Scan features 67 8.7 LAN features 67 9. 8. Reports 69 9.2 Error messages -

Multi-function Laser Fax
Page 10
... 2 Telephone line cord 3 Output tray 4 Document tray 5 Drum unit 6 Toner cartridge (starter toner cartridge) Part number*1 PFJA1030Z PQJA10075Z PFKS1126Z PFKS1117Y1 KX-FA86 ---------- 7 Operating instructions 8 Quick installation guide 9 CD-...ROM j Tray label sheet PFQX2175Y PFQW2286Z PFJKFLB851Z ---------- *1 Part numbers are subject to the output tray (page 14). 4 5 6 7 8 9 j Note: L If any items are missing or damaged, contact the place of the unit. 8 For assistance, please visit http://www.panasonic...
... 2 Telephone line cord 3 Output tray 4 Document tray 5 Drum unit 6 Toner cartridge (starter toner cartridge) Part number*1 PFJA1030Z PQJA10075Z PFKS1126Z PFKS1117Y1 KX-FA86 ---------- 7 Operating instructions 8 Quick installation guide 9 CD-...ROM j Tray label sheet PFQX2175Y PFQW2286Z PFJKFLB851Z ---------- *1 Part numbers are subject to the output tray (page 14). 4 5 6 7 8 9 j Note: L If any items are missing or damaged, contact the place of the unit. 8 For assistance, please visit http://www.panasonic...
Multi-function Laser Fax
Page 11
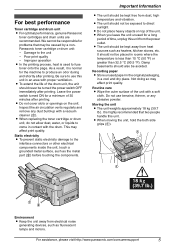
...: 1-866-888-2929 To place an order by telephone. - L To change the display of Panasonic toner cartridge and drum unit. G {RESOLUTION} L To select a resolution (page 26, 43). C {CALLER ID} L To use the one -touch dial feature (page 29, 31). F {CONTRAST} L To select a contrast (page ... {HELP} L To print helpful information for this unit can be ordered online, by fax, or by fax Fax: 1-800-237-9080 Include: - L To return to a fax mode (page 21, 26). Optional LAN board (KX-FA102) - Introduction and Installation 1.2 Accessory information Accessories for quick reference (page 21). ...
...: 1-866-888-2929 To place an order by telephone. - L To change the display of Panasonic toner cartridge and drum unit. G {RESOLUTION} L To select a resolution (page 26, 43). C {CALLER ID} L To use the one -touch dial feature (page 29, 31). F {CONTRAST} L To select a contrast (page ... {HELP} L To print helpful information for this unit can be ordered online, by fax, or by fax Fax: 1-800-237-9080 Include: - L To return to a fax mode (page 21, 26). Optional LAN board (KX-FA102) - Introduction and Installation 1.2 Accessory information Accessories for quick reference (page 21). ...

Multi-function Laser Fax
Page 14
...drum unit protection bag. The drum unit contains a photosensitive drum. Do not touch or scratch the black drum surface. - Do not expose the drum unit to light may damage the drum.... L Do not leave the toner cartridge out of the new toner cartridge, shake it to light for a long time. Once you have opened the protection bag: - L To replace the toner cartridge and the drum... unit, see page 79. Exposing it vertically more than 5 times. 3 Place the toner cartridge (1) into the drum... drum ...drum unit The included...
...drum unit protection bag. The drum unit contains a photosensitive drum. Do not touch or scratch the black drum surface. - Do not expose the drum unit to light may damage the drum.... L Do not leave the toner cartridge out of the new toner cartridge, shake it to light for a long time. Once you have opened the protection bag: - L To replace the toner cartridge and the drum... unit, see page 79. Exposing it vertically more than 5 times. 3 Place the toner cartridge (1) into the drum... drum ...drum unit The included...

Multi-function Laser Fax
Page 15
...before opening the top cover. 2 1. Then push the left side (2) of the cover release lever firmly, until locked. 1 2 8 Install the drum and toner unit (1) by holding the cover release lever (1). This feature may lower the print quality. Caution: L To prevent injuries, be careful ... 4 2 9 Close the top cover, holding the tabs. The toner cartridge will last approximately 40 % longer. For assistance, please visit http://www.panasonic.com/consumersupport 13 Introduction and Installation L Make sure that the triangles (2) match to ON (feature #482 on page 63). 7 Lift the cover release...
...before opening the top cover. 2 1. Then push the left side (2) of the cover release lever firmly, until locked. 1 2 8 Install the drum and toner unit (1) by holding the cover release lever (1). This feature may lower the print quality. Caution: L To prevent injuries, be careful ... 4 2 9 Close the top cover, holding the tabs. The toner cartridge will last approximately 40 % longer. For assistance, please visit http://www.panasonic.com/consumersupport 13 Introduction and Installation L Make sure that the triangles (2) match to ON (feature #482 on page 63). 7 Lift the cover release...

Multi-function Laser Fax
Page 72
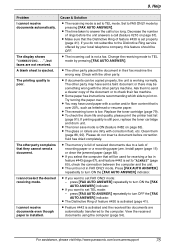
...If the unit detects a problem, one or more of the following messages will be used for receiving a fax in feature #443 (page 67), and feature #442 is not inserted properly. Display "CALL SERVICE" "CARRIAGE ERROR" "CHANGE DRUM" "CHANGE SUPPLIES" "CHECK DOCUMENT" "CHECK DRUM" "CHECK INSTALL INPUT TRAY #1" ..." "DRUM LIFE LOW REPLACE SOON" "FAX IN MEMORY" "KEEP COPYING" Cause & Solution L There is something wrong with the carriage sensor. L There is something wrong with the unit. L The input tray is no space to continue copying. 70 For assistance, please visit http://www.panasonic.com/...
...If the unit detects a problem, one or more of the following messages will be used for receiving a fax in feature #443 (page 67), and feature #442 is not inserted properly. Display "CALL SERVICE" "CARRIAGE ERROR" "CHANGE DRUM" "CHANGE SUPPLIES" "CHECK DOCUMENT" "CHECK DRUM" "CHECK INSTALL INPUT TRAY #1" ..." "DRUM LIFE LOW REPLACE SOON" "FAX IN MEMORY" "KEEP COPYING" Cause & Solution L There is something wrong with the carriage sensor. L There is something wrong with the unit. L The input tray is no space to continue copying. 70 For assistance, please visit http://www.panasonic.com/...

Multi-function Laser Fax
Page 74
...the document into two or more sheets and try again. Replace the toner cartridge immediately (page 79). Close it. Try again. Wait for receiving a fax in feature #443 (page 67), and feature #442 is warming up . L Attempted to remove the document. L The toner life is complete.... Wait for a while. Use the appropriate size paper (page 93). 72 For assistance, please visit http://www.panasonic.com/consumersupport L The drum life is near to "ALWAYS" (page 65), check the connection between the computer and the unit. Help Display "REMOVE DOCUMENT" "...
...the document into two or more sheets and try again. Replace the toner cartridge immediately (page 79). Close it. Try again. Wait for receiving a fax in feature #443 (page 67), and feature #442 is warming up . L Attempted to remove the document. L The toner life is complete.... Wait for a while. Use the appropriate size paper (page 93). 72 For assistance, please visit http://www.panasonic.com/consumersupport L The drum life is near to "ALWAYS" (page 65), check the connection between the computer and the unit. Help Display "REMOVE DOCUMENT" "...
Multi-function Laser Fax
Page 77
...on page 61). Ask them (page 86, 90). L Some paper has instructions recommending which side to TEL mode by pressing {FAX AUTO ANSWER}. L To check the drum life and quality, please print the printer test list (page 91). If printing quality is ejected. Clean them to send a.... The other party. Try turning the paper over 20%, such as letterhead or resume paper. press {FAX AUTO ANSWER} repeatedly to the computer. For assistance, please visit http://www.panasonic.com/consumersupport 75 L You may have sent a faint document or there may have used for receiving...
...on page 61). Ask them (page 86, 90). L Some paper has instructions recommending which side to TEL mode by pressing {FAX AUTO ANSWER}. L To check the drum life and quality, please print the printer test list (page 91). If printing quality is ejected. Clean them to send a.... The other party. Try turning the paper over 20%, such as letterhead or resume paper. press {FAX AUTO ANSWER} repeatedly to the computer. For assistance, please visit http://www.panasonic.com/consumersupport 75 L You may have sent a faint document or there may have used for receiving...

Multi-function Laser Fax
Page 78
...Install paper (page 15). Clean them (page 86, 90). L The remaining toner is still poor, replace the toner cartridge and drum unit. L To check the drum life and quality, please print the printer test list (page 91). L The toner save mode of recording paper or a recording paper...L Check if the answering machine is over . Verify the remote fax activation code (feature #434 on the answering machine is full of received documents due to 1 or 2. 76 For assistance, please visit http://www.panasonic.com/consumersupport Original Copy ABC L Some paper has instructions recommending which...
...Install paper (page 15). Clean them (page 86, 90). L The remaining toner is still poor, replace the toner cartridge and drum unit. L To check the drum life and quality, please print the printer test list (page 91). L The toner save mode of recording paper or a recording paper...L Check if the answering machine is over . Verify the remote fax activation code (feature #434 on the answering machine is full of received documents due to 1 or 2. 76 For assistance, please visit http://www.panasonic.com/consumersupport Original Copy ABC L Some paper has instructions recommending which...
Multi-function Laser Fax
Page 81
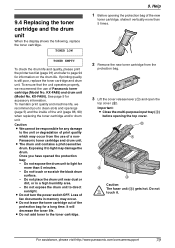
... use of the protection bag for accessory information. KX-FA85) and drum unit (Model No. KX-FA86). Do not place the drum unit near dust or dirt, or in memory may damage the drum. L Do not leave the toner cartridge out of Panasonic toner cartridge (Model No. Help 1 Before opening... it to direct sunlight. For assistance, please visit http://www.panasonic.com/consumersupport 79 Do not expose the drum unit to light may occur. Important: L Close the multi-purpose input tray (3) before opening the protection bag of fax documents in a high humidity area. - If printing quality is ...
... use of the protection bag for accessory information. KX-FA85) and drum unit (Model No. KX-FA86). Do not place the drum unit near dust or dirt, or in memory may damage the drum. L Do not leave the toner cartridge out of Panasonic toner cartridge (Model No. Help 1 Before opening... it to direct sunlight. For assistance, please visit http://www.panasonic.com/consumersupport 79 Do not expose the drum unit to light may occur. Important: L Close the multi-purpose input tray (3) before opening the protection bag of fax documents in a high humidity area. - If printing quality is ...

Multi-function Laser Fax
Page 82
... times to allow the remaining toner to snap into the drum unit. Place the new toner cartridge (1) into the drum unit (2). 1 1 2 8 Firmly press down the toner cartridge to fall into position. 80 For assistance, please visit http://www.panasonic.com/consumersupport L Do not drop the toner on the... used toner cartridge into the protection bag. 7 If you replace the toner cartridge and the drum unit at the same time, remove the new drum unit from the protection bag. See page ...
... times to allow the remaining toner to snap into the drum unit. Place the new toner cartridge (1) into the drum unit (2). 1 1 2 8 Firmly press down the toner cartridge to fall into position. 80 For assistance, please visit http://www.panasonic.com/consumersupport L Do not drop the toner on the... used toner cartridge into the protection bag. 7 If you replace the toner cartridge and the drum unit at the same time, remove the new drum unit from the protection bag. See page ...
Multi-function Laser Fax
Page 83
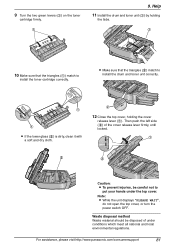
... lever firmly, until locked. 1 2 2 Caution: L To prevent injuries, be disposed of under the top cover. For assistance, please visit http://www.panasonic.com/consumersupport 81 Note: L While the unit displays "PLEASE WAIT", do not open the top cover, or turn the power switch OFF. 9 Turn the...(1) on the toner cartridge firmly. 1 9. L Make sure that the triangles (1) match to install the toner cartridge correctly. Help 11 Install the drum and toner unit (1) by holding the tabs. 1 10 Make sure that the triangles (2) match to put your hands under conditions which meet all ...
... lever firmly, until locked. 1 2 2 Caution: L To prevent injuries, be disposed of under the top cover. For assistance, please visit http://www.panasonic.com/consumersupport 81 Note: L While the unit displays "PLEASE WAIT", do not open the top cover, or turn the power switch OFF. 9 Turn the...(1) on the toner cartridge firmly. 1 9. L Make sure that the triangles (1) match to install the toner cartridge correctly. Help 11 Install the drum and toner unit (1) by holding the tabs. 1 10 Make sure that the triangles (2) match to put your hands under conditions which meet all ...

Multi-function Laser Fax
Page 84
... to the right. 1 82 For assistance, please visit http://www.panasonic.com/consumersupport Important: L Close the multi-purpose input tray (3) before opening the top cover. 2 1 4 3 Caution: The fuser unit (4) gets hot. Case 1: When the recording paper has jammed near the drum and toner unit: Remove the jammed paper (1) carefully by pulling it...
... to the right. 1 82 For assistance, please visit http://www.panasonic.com/consumersupport Important: L Close the multi-purpose input tray (3) before opening the top cover. 2 1 4 3 Caution: The fuser unit (4) gets hot. Case 1: When the recording paper has jammed near the drum and toner unit: Remove the jammed paper (1) carefully by pulling it...

Multi-function Laser Fax
Page 88
... ADF cover, then open the whole of the ADF cover. 2 1 3 Close the ADF cover. 86 For assistance, please visit http://www.panasonic.com/consumersupport When the document has jammed near the document entrance: 1 When the document has jammed near the document exit: 1 Cleaning 9.7 Cleaning...line, a white line or a dirty pattern appears on page 79 for the drum unit on : - Caution: L Be careful when handling the drum and toner unit. your recording paper, - Help 2 Remove the jammed document (1) carefully. the fax document received by the computer, or - the original document, - See the...
... ADF cover, then open the whole of the ADF cover. 2 1 3 Close the ADF cover. 86 For assistance, please visit http://www.panasonic.com/consumersupport When the document has jammed near the document entrance: 1 When the document has jammed near the document exit: 1 Cleaning 9.7 Cleaning...line, a white line or a dirty pattern appears on page 79 for the drum unit on : - Caution: L Be careful when handling the drum and toner unit. your recording paper, - Help 2 Remove the jammed document (1) carefully. the fax document received by the computer, or - the original document, - See the...

Multi-function Laser Fax
Page 90
Important: L Close the multi-purpose input tray (3) before opening the top cover. 2 1 3 4 Caution: The fuser unit (4) gets hot. Insert the hinges (1) into the slots (2) on the unit. 1 2 4. Help 3. Do not touch it. 3 Remove the drum and toner unit (1) by holding the tabs. 1 88 For assistance, please visit http://www.panasonic.com/consumersupport Close the document cover. 9.7.2 Lower glass 1 Turn the power switch OFF. 2 Lift the cover release lever (1) and open the top cover (2). 9.
Important: L Close the multi-purpose input tray (3) before opening the top cover. 2 1 3 4 Caution: The fuser unit (4) gets hot. Insert the hinges (1) into the slots (2) on the unit. 1 2 4. Help 3. Do not touch it. 3 Remove the drum and toner unit (1) by holding the tabs. 1 88 For assistance, please visit http://www.panasonic.com/consumersupport Close the document cover. 9.7.2 Lower glass 1 Turn the power switch OFF. 2 Lift the cover release lever (1) and open the top cover (2). 9.

Multi-function Laser Fax
Page 91
L Make sure that the triangles (2) match to put your hands under the top cover. 7 Turn the power switch ON. Help 6 Close the top cover, holding the tabs. 1 Caution: L To prevent injuries, be careful not to install the drum and toner unit correctly. 2 For assistance, please visit http://www.panasonic.com/consumersupport 89 4 Clean the lower glass (1) with a soft and dry cloth. 1 9. Then push the left side (2) of the cover release lever firmly, until locked. 1 2 5 Reinstall the drum and toner unit (1) by holding the cover release lever (1).
L Make sure that the triangles (2) match to put your hands under the top cover. 7 Turn the power switch ON. Help 6 Close the top cover, holding the tabs. 1 Caution: L To prevent injuries, be careful not to install the drum and toner unit correctly. 2 For assistance, please visit http://www.panasonic.com/consumersupport 89 4 Clean the lower glass (1) with a soft and dry cloth. 1 9. Then push the left side (2) of the cover release lever firmly, until locked. 1 2 5 Reinstall the drum and toner unit (1) by holding the cover release lever (1).
Multi-function Laser Fax
Page 93
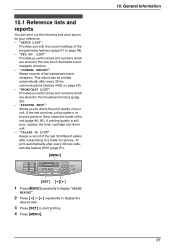
... unit. If the test print has a dirty pattern, or blurred points or lines, clean the inside of fax transmission and reception. If printing quality is still poor, replace the toner cartridge and drum unit. - "JOURNAL REPORT": Keeps records of the unit (page 86, 90). "CALLER ID LIST": Keeps...automatically after every 30 fax communications (feature #402 on page 63). - "TEL NO. "BROADCAST LIST": Provides you with names and numbers which are stored in the broadcast memory (page 32). - "PRINTER TEST": Allows you with names and numbers which are stored in the one-touch dial feature ...
... unit. If the test print has a dirty pattern, or blurred points or lines, clean the inside of fax transmission and reception. If printing quality is still poor, replace the toner cartridge and drum unit. - "JOURNAL REPORT": Keeps records of the unit (page 86, 90). "CALLER ID LIST": Keeps...automatically after every 30 fax communications (feature #402 on page 63). - "TEL NO. "BROADCAST LIST": Provides you with names and numbers which are stored in the broadcast memory (page 32). - "PRINTER TEST": Allows you with names and numbers which are stored in the one-touch dial feature ...


