Multi-function Laser Fax
Page 6
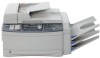
.... 1 2 Toner cartridge L Be careful of the following are examples of moisture. Exposing it to prevent illegal copies from power outlets if it . Do not expose the drum unit to make copies of these materials may be regulated in your country. - L This product has a fluorescent lamp that smoke has stopped and contact an authorized service center. Disposal of certain documents. Penalties of the owner...
.... 1 2 Toner cartridge L Be careful of the following are examples of moisture. Exposing it to prevent illegal copies from power outlets if it . Do not expose the drum unit to make copies of these materials may be regulated in your country. - L This product has a fluorescent lamp that smoke has stopped and contact an authorized service center. Disposal of certain documents. Penalties of the owner...
Multi-function Laser Fax
Page 11
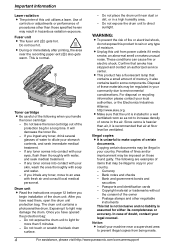
... the one -touch dial feature (page 29, 31). B {BROADCAST} L To send a document to a previous step during operation. F {CONTRAST} L To select a contrast (page 26, 43). L To store a scanned document into memory, and then send it (page 27). I {MENU} L To initiate or exit programming. C {CALLER ID} L To use of Panasonic toner cartridge and drum unit. L To initiate the navigator directory (page 30, 32). G {RESOLUTION} L To select a resolution (page 26, 43). M {FAX AUTO ANSWER} L To turn the auto answer setting...
... the one -touch dial feature (page 29, 31). B {BROADCAST} L To send a document to a previous step during operation. F {CONTRAST} L To select a contrast (page 26, 43). L To store a scanned document into memory, and then send it (page 27). I {MENU} L To initiate or exit programming. C {CALLER ID} L To use of Panasonic toner cartridge and drum unit. L To initiate the navigator directory (page 30, 32). G {RESOLUTION} L To select a resolution (page 26, 43). M {FAX AUTO ANSWER} L To turn the auto answer setting...

Multi-function Laser Fax
Page 19
... 20 lb.) paper. - Introduction and Installation 1.8.2 Using the multi-purpose input tray A4, letter or legal size recording paper can also print on recording paper. in feature #382 (page 62). L Make sure that the line on page 65) - to the installation guide for letter size paper by using {PAPER TRAY} in the copy mode (page 44). - Up to use legal or A4 size paper, change the setting: - If you need to 20 lb.) paper. - by default. See page 55 for faxing (feature #440...
... 20 lb.) paper. - Introduction and Installation 1.8.2 Using the multi-purpose input tray A4, letter or legal size recording paper can also print on recording paper. in feature #382 (page 62). L Make sure that the line on page 65) - to the installation guide for letter size paper by using {PAPER TRAY} in the copy mode (page 44). - Up to use legal or A4 size paper, change the setting: - If you need to 20 lb.) paper. - by default. See page 55 for faxing (feature #440...
Multi-function Laser Fax
Page 24
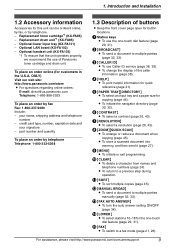
... select one of each . Note: L The other party's fax machine will appear on page 61). Confirm that there are in the entrance. L If any documents are no documents in the document entrance, you send according to the fax mode (page 26) or the copy mode (page 43). 2.7 Date and time You must set the operation mode to your unit's date and time setting. 22 For assistance, please visit http://www.panasonic.com/consumersupport Initial Programming {FAX} {SET} {} 1 Press {MENU...
... select one of each . Note: L The other party's fax machine will appear on page 61). Confirm that there are in the entrance. L If any documents are no documents in the document entrance, you send according to the fax mode (page 26) or the copy mode (page 43). 2.7 Date and time You must set the operation mode to your unit's date and time setting. 22 For assistance, please visit http://www.panasonic.com/consumersupport Initial Programming {FAX} {SET} {} 1 Press {MENU...
Multi-function Laser Fax
Page 25
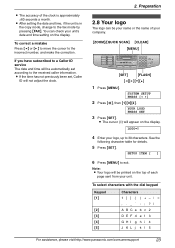
... page sent from your unit. L After setting the date and time, if the unit is approximately ±60 seconds a month. You can be automatically set , Caller ID will be printed on the top of the clock is in the copy mode, change to the incorrect number, and make the correction. L The cursor (|) will be your name or the name of your company. {ZOOM}/{QUICK SCAN} {CLEAR} {MENU} {SET...
... page sent from your unit. L After setting the date and time, if the unit is approximately ±60 seconds a month. You can be automatically set , Caller ID will be printed on the top of the clock is in the copy mode, change to the incorrect number, and make the correction. L The cursor (|) will be your name or the name of your company. {ZOOM}/{QUICK SCAN} {CLEAR} {MENU} {SET...
Multi-function Laser Fax
Page 28
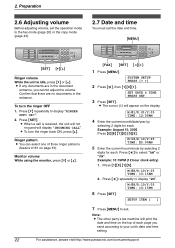
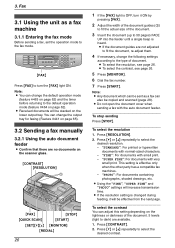
You can change the following settings according to the type of the document. 5 levels (light to the default operation mode (feature #464 on the lightness or darkness of document. L Do not open the document cover when sending a fax with small print. - "FINE": For documents with the auto document feeder. L Using the "FINE", "SUPER FINE" and "PHOTO" settings will be stacked on the scanner glass. {CONTRAST} {RESOLUTION} 1 {FAX} {STOP} {QUICK SCAN} {START} {SET}{V}{^} {MONITOR} {REDIAL} 26 1 If the {FAX} light is OFF, turn the {FAX} light ON...
You can change the following settings according to the type of the document. 5 levels (light to the default operation mode (feature #464 on the lightness or darkness of document. L Do not open the document cover when sending a fax with small print. - "FINE": For documents with the auto document feeder. L Using the "FINE", "SUPER FINE" and "PHOTO" settings will be stacked on the scanner glass. {CONTRAST} {RESOLUTION} 1 {FAX} {STOP} {QUICK SCAN} {START} {SET}{V}{^} {MONITOR} {REDIAL} 26 1 If the {FAX} light is OFF, turn the {FAX} light ON...
Multi-function Laser Fax
Page 29
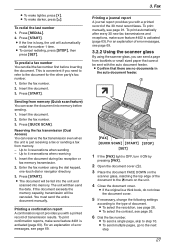
... can scan the document into memory. Sending from memory (Quick scan feature) You can dial the fax number first before sending. 1. If the document exceeds the memory capacity, transmission will then send the data. For an explanation of transmission results. L To cancel redialing, press {STOP}, then press {SET}. Enter the fax number. 3. L The document will automatically redial the number 1 time. To print confirmation reports, make sure feature #402 is busy, the unit will be sent with a printed record of error messages, see page...
... can scan the document into memory. Sending from memory (Quick scan feature) You can dial the fax number first before sending. 1. If the document exceeds the memory capacity, transmission will then send the data. For an explanation of transmission results. L To cancel redialing, press {STOP}, then press {SET}. Enter the fax number. 3. L The document will automatically redial the number 1 time. To print confirmation reports, make sure feature #402 is busy, the unit will be sent with a printed record of error messages, see page...
Multi-function Laser Fax
Page 33
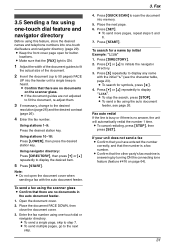
... the connecting tone feature (feature #416 on the scanner glass. L To cancel redialing, press {STOP}, then press {SET}. Using stations 1-9: Press the desired station key. L To send a single page, skip to scan the document into memory. 5. Press {QUICK SCAN} to step 7. L To search for button locations. Note: L Do not open for symbols, press {*}. 4. L Make sure that the number is heard. Fax 4. Enter the fax number using one -touch dial feature and navigator directory (page 29). L To send a fax using the auto document feeder...
... the connecting tone feature (feature #416 on the scanner glass. L To cancel redialing, press {STOP}, then press {SET}. Using stations 1-9: Press the desired station key. L To send a single page, skip to scan the document into memory. 5. Press {QUICK SCAN} to step 7. L To search for button locations. Note: L Do not open for symbols, press {*}. 4. L Make sure that the number is heard. Fax 4. Enter the fax number using one -touch dial feature and navigator directory (page 29). L To send a fax using the auto document feeder...
Multi-function Laser Fax
Page 34
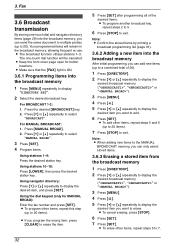
.... Fax 3.6 Broadcast transmission By storing one -touch dial function will remain in the broadcast memory, allowing frequent re-use. The one -touch dial and navigator directory items (page 29) into the broadcast memory 1 Press {MENU} repeatedly to display the desired item, and press {SET}. Press {MANUAL BROAD}. 2. Using stations 10-18: Press {LOWER}, then press the desired station key. Using the dial keypad (only for button locations. Note: L When adding new...
.... Fax 3.6 Broadcast transmission By storing one -touch dial function will remain in the broadcast memory, allowing frequent re-use. The one -touch dial and navigator directory items (page 29) into the broadcast memory 1 Press {MENU} repeatedly to display the desired item, and press {SET}. Press {MANUAL BROAD}. 2. Using stations 10-18: Press {LOWER}, then press the desired station key. Using the dial keypad (only for button locations. Note: L When adding new...
Multi-function Laser Fax
Page 45
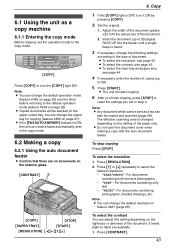
... can adjust this setting depending on page 67). To stop copying Press {STOP}. The effective scanning area is heard. 3 If necessary, change the default operation mode (feature #463 on page 62) and the timer before returning to the default operation mode (feature #464 on the upper output tray. Press {CONTRAST}. 43 6CoCpoypinyg 6.1 Using the unit as a fax can change the following settings according to the type of the document. 2. Adjust the width of the document guides (1) to...
... can adjust this setting depending on page 67). To stop copying Press {STOP}. The effective scanning area is heard. 3 If necessary, change the default operation mode (feature #463 on page 62) and the timer before returning to the default operation mode (feature #464 on the upper output tray. Press {CONTRAST}. 43 6CoCpoypinyg 6.1 Using the unit as a fax can change the following settings according to the type of the document. 2. Adjust the width of the document guides (1) to...
Multi-function Laser Fax
Page 49
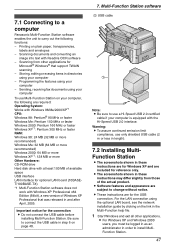
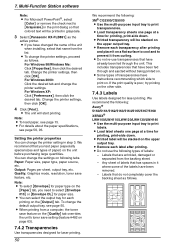
... following functions: - Be sure to connect the USB cable in the Multi-Function help file. 1 Start Windows and exit all other applications for reference only. Multi-Function Station software 1 USB cable 1 Note: L Be sure to use Multi-Function Station on the link in step 6 on plain paper, transparencies, labels and envelopes - Scanning documents and converting an image into text with the Hi-Speed USB 2.0 interface. Sending, receiving fax documents using the optional LAN board, see the network installation guide by clicking...
... following functions: - Be sure to connect the USB cable in the Multi-Function help file. 1 Start Windows and exit all other applications for reference only. Multi-Function Station software 1 USB cable 1 Note: L Be sure to use Multi-Function Station on the link in step 6 on plain paper, transparencies, labels and envelopes - Scanning documents and converting an image into text with the Hi-Speed USB 2.0 interface. Sending, receiving fax documents using the optional LAN board, see the network installation guide by clicking...
Multi-function Laser Fax
Page 51
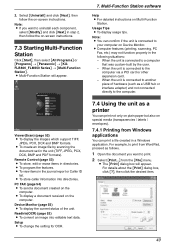
... a computer that was custom-built by scanning the document set in the unit (TIFF, JPEG, PCX, DCX, BMP and PDF formats). L To program the features. Readiris(OCR) (page 52) L To convert an image into directories. Multi-Function Station software Help L For detailed instructions on the computer. When the unit is connected to print. 2 Select [Print...] from the [File] menu. Viewer(Scan) (page 52) L To display the images which support TIFF, JPEG, PCX, DCX and...
... a computer that was custom-built by scanning the document set in the unit (TIFF, JPEG, PCX, DCX, BMP and PDF formats). L To program the features. Readiris(OCR) (page 52) L To convert an image into directories. Multi-Function Station software Help L For detailed instructions on the computer. When the unit is connected to print. 2 Select [Print...] from the [File] menu. Viewer(Scan) (page 52) L To display the images which support TIFF, JPEG, PCX, DCX and...
Multi-function Laser Fax
Page 52
... the unit. L The unit will be printed in it on the [Output] tab. Quality: Graphics mode, resolution, toner save setting (feature #482 on the upper output tray. L You can change the settings on the unit before purchasing large quantities. To change the printer settings. L Load label sheets one page at a time for paper type on the upper output tray. L Remove each transparency after printing. L For details about the paper specifications, see page 15. You can select the output tray for laser printing. L Some types of...
... the unit. L The unit will be printed in it on the [Output] tab. Quality: Graphics mode, resolution, toner save setting (feature #482 on the upper output tray. L You can change the settings on the unit before purchasing large quantities. To change the printer settings. L Load label sheets one page at a time for paper type on the upper output tray. L Remove each transparency after printing. L For details about the paper specifications, see page 15. You can select the output tray for laser printing. L Some types of...

Multi-function Laser Fax
Page 72
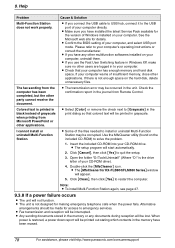
...-insert it . Close it . L The drum life is something wrong with the drum unit. See the other displayed message instructions to store new items in navigator directory. If misfeeding occurs frequently, clean the document feeder rollers (page 90) and try again. Display "CALL SERVICE" "CARRIAGE ERROR" "CHANGE DRUM" "CHANGE SUPPLIES" "CHECK DOCUMENT" "CHECK DRUM" "CHECK INSTALL INPUT TRAY #1" "CHECK MEMORY" "CHECK PICK UP INPUT TRAY #1" "CLOSE ADF COVER" "DIRECTORY FULL" "DRUM LIFE LOW REPLACE SOON" "FAX IN MEMORY" "KEEP COPYING" Cause & Solution L There is near to...
...-insert it . Close it . L The drum life is something wrong with the drum unit. See the other displayed message instructions to store new items in navigator directory. If misfeeding occurs frequently, clean the document feeder rollers (page 90) and try again. Display "CALL SERVICE" "CARRIAGE ERROR" "CHANGE DRUM" "CHANGE SUPPLIES" "CHECK DOCUMENT" "CHECK DRUM" "CHECK INSTALL INPUT TRAY #1" "CHECK MEMORY" "CHECK PICK UP INPUT TRAY #1" "CLOSE ADF COVER" "DIRECTORY FULL" "DRUM LIFE LOW REPLACE SOON" "FAX IN MEMORY" "KEEP COPYING" Cause & Solution L There is near to...
Multi-function Laser Fax
Page 76
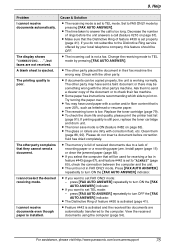
... number or dial manually. Clean them (page 86, 90). Connect to the copy mode or fax mode. Press {COPY} or {FAX} to switch to the [LINE] jack (page 19). 74 For assistance, please visit http://www.panasonic.com/consumersupport L The telephone line cord is too dark or too light. I cannot receive documents. The other party's machine. L If your line has special telephone services such as call waiting, the service may have this problem, contact our service...
... number or dial manually. Clean them (page 86, 90). Connect to the copy mode or fax mode. Press {COPY} or {FAX} to switch to the [LINE] jack (page 19). 74 For assistance, please visit http://www.panasonic.com/consumersupport L The telephone line cord is too dark or too light. I cannot receive documents. The other party's machine. L If your line has special telephone services such as call waiting, the service may have this problem, contact our service...
Multi-function Laser Fax
Page 77
... fax machine. L Some paper has instructions recommending which side to FAX ONLY mode by pressing {FAX AUTO ANSWER}. Replace the toner cartridge (page 79). Install paper (page 15) or clear the jammed paper (page 82). L If you want to turn ON the {FAX AUTO ANSWER} indicator. L The Distinctive Ring of the document or to the computer. The other party's machine. Set to print on page 61). Clean them to send a clearer copy of feature #430 is set FAX ONLY mode: - press {FAX AUTO ANSWER} repeatedly to set...
... fax machine. L Some paper has instructions recommending which side to FAX ONLY mode by pressing {FAX AUTO ANSWER}. Replace the toner cartridge (page 79). Install paper (page 15) or clear the jammed paper (page 82). L If you want to turn ON the {FAX AUTO ANSWER} indicator. L The Distinctive Ring of the document or to the computer. The other party's machine. Set to print on page 61). Clean them to send a clearer copy of feature #430 is set FAX ONLY mode: - press {FAX AUTO ANSWER} repeatedly to set...
Multi-function Laser Fax
Page 79
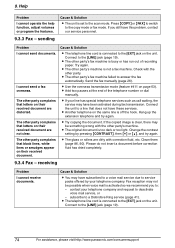
... you use . L If you set the answering machine to access the answering machine remotely, but the line was disconnected. L The unit will be displayed after clicking [Cancel], scanning continues. L You did not program your remote access code into the appropriate paper size, and try again. See the operating instructions of insufficient memory, close other users are logged in the auto document feeder and re-insert it. A printing error occurred while using PC FAX and Remote Control. Delete unnecessary files...
... you use . L If you set the answering machine to access the answering machine remotely, but the line was disconnected. L The unit will be displayed after clicking [Cancel], scanning continues. L You did not program your remote access code into the appropriate paper size, and try again. See the operating instructions of insufficient memory, close other users are logged in the auto document feeder and re-insert it. A printing error occurred while using PC FAX and Remote Control. Delete unnecessary files...
Multi-function Laser Fax
Page 80
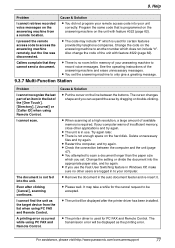
... softwares installed on the hard disk, delete unnecessary files. If your computer, and select USB port mode. Check the confirmation report in grayscale. L Select [Color] or remove the check next to the USB port of Windows installed on the included CD-ROM) to your computer has enough memory and hard disk space. L The [MfsCleaner for KX-FLB800/FLM650 Series] window will start automatically. 2. L The unit is restored, a power down report will be interrupted. L If you connect the USB cable to USB...
... softwares installed on the hard disk, delete unnecessary files. If your computer, and select USB port mode. Check the confirmation report in grayscale. L Select [Color] or remove the check next to the USB port of Windows installed on the included CD-ROM) to your computer has enough memory and hard disk space. L The [MfsCleaner for KX-FLB800/FLM650 Series] window will start automatically. 2. L The unit is restored, a power down report will be interrupted. L If you connect the USB cable to USB...
Multi-function Laser Fax
Page 109
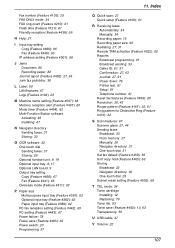
... Scanner glass: 27, 44 Sending faxes Broadcast: 33 From memory: 27 Manually: 26 Navigator directory: 31 One-touch dial: 31 Set fax default (Feature #459): 65 Sort copy hold (Feature #465): 66 Storing Broadcast: 32 Navigator directory: 30 One-touch dial: 29 Subnet mask setting (Feature #502): 68 T TEL mode: 34 Toner cartridge Installing: 12 Replacing: 79 Toner life: 93 Toner save (Feature #403): 62 Power switch: 20 Programming: 57 11. Fax number (Feature #103): 25 FAX ONLY mode...
... Scanner glass: 27, 44 Sending faxes Broadcast: 33 From memory: 27 Manually: 26 Navigator directory: 31 One-touch dial: 31 Set fax default (Feature #459): 65 Sort copy hold (Feature #465): 66 Storing Broadcast: 32 Navigator directory: 30 One-touch dial: 29 Subnet mask setting (Feature #502): 68 T TEL mode: 34 Toner cartridge Installing: 12 Replacing: 79 Toner life: 93 Toner save (Feature #403): 62 Power switch: 20 Programming: 57 11. Fax number (Feature #103): 25 FAX ONLY mode...
Multi-function Laser Fax
Page 110
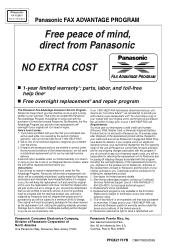
...-free help line2 ■ Free overnight replacement3 and repair program The Panasonic Fax Advantage Consumer Service Program. you, shipment of the problem unit to Panasonic, shipment of Instructions: the replacement unit back to improper or inadequate packing will be charged terms and conditions of repair. You will keep the replacement unit and send the original Services Technical Support Line at no more than 10 days prior to your If you choose to receive a replacement unit...
...-free help line2 ■ Free overnight replacement3 and repair program The Panasonic Fax Advantage Consumer Service Program. you, shipment of the problem unit to Panasonic, shipment of Instructions: the replacement unit back to improper or inadequate packing will be charged terms and conditions of repair. You will keep the replacement unit and send the original Services Technical Support Line at no more than 10 days prior to your If you choose to receive a replacement unit...


