Panasonic CF-73SCUTSBM - Toughbook 73 - Pentium M 1.86 GHz Support and Manuals
Get Help and Manuals for this Panasonic item

View All Support Options Below
Free Panasonic CF-73SCUTSBM manuals!
Problems with Panasonic CF-73SCUTSBM?
Ask a Question
Free Panasonic CF-73SCUTSBM manuals!
Problems with Panasonic CF-73SCUTSBM?
Ask a Question
Popular Panasonic CF-73SCUTSBM Manual Pages
Service Manual - Page 1
... No. CPD0304020C1
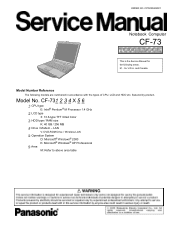
Notebook Computer
CF-73
This is the Service Manual for U.S.A. and Canada
Model Number Reference
The following areas. LAN V: DVD-ROM Drive / Wireless LAN
5: Operation System D: Microsoft® Windows® 2000 K: Microsoft® Windows® XP Professional
6: Area M: Refer to above area table CF-731 2 3 4 X 5 6
1: CPU type E: Intel® Pentium® M Processor...
Service Manual - Page 15
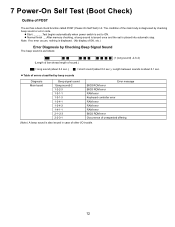
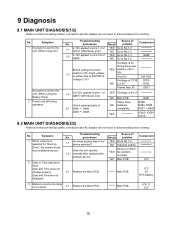
..., nothing is displayed. (No display of OK, etc.)
Error Diagnosis by checking beep sound or error code.
z Start Test begins automatically when power switch is set is placed into automatic stop.
The condition of other I/O trouble.
12 z Normal finish .....After memory checking, a beep sound is also issued in it. 7 Power-On Self Test (Boot Check...
Service Manual - Page 16
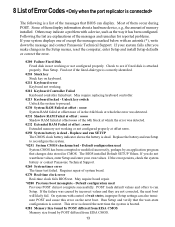
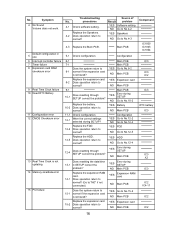
...-time clock fails BIOS test. Run Setup and verify that changes data stored in the 64k block at which the error was caused by incorrect values and they are explanations of memory installed. Others may indicate a problem with an asterisk (*), write down the message and contact Panasonic Technical Support. Requires repair of the 64k block at offset...
Service Manual - Page 17
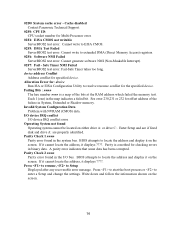
... to locate the address and display it on the screen.
Each 1 (one) in the system bus. Safe Timer NMI Failed ServerBIOS2 test error: Fail-Safe Timer takes too long.
Parity Check 1 nnnn Parity error found Operating system cannot be located on the screen.
14
Troubleshooting Press to resume, to enter a Setup and change the settings.
Service Manual - Page 18
... SW1000 Is
Voltage 3.3V? YES NO
If voltage is set to ON, check voltage on either side of Q699?
Troubleshooting
No.
Main PCB
IC4-11 IC2
15
Does the unit operate 1-2 normally after replacing the
problem device. Troubleshooting
Source of Q710? (Whichever one )
Check soldered parts of C738 is 8-12V
NO Main PCB If they show...
Service Manual - Page 19
...YES
Error during SETUP? No.
procedures
4-1 Check software setting. Source of
Result
problem
YES Software setting
NO Go to No.4-2
YES Speakers
NO Go to
normal?
Replace the ...
is not updating
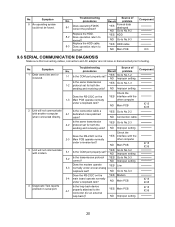
14 Memory size/data error
15 PCI failure
Troubleshooting
No. Symptom
4 No Sound Volume does not work.
5
Default configuration in SETUP correct the
problem?
14-1
Replace the expansion...
Service Manual - Page 21
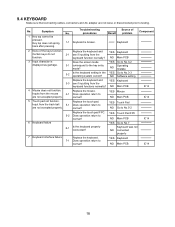
...are not accepted properly. normal?
Replace the keyboard. 7-1 Does operation return to No.3-2
NO
Operating mistake
3-2
Is the keyboard setting in the operating system correct? ...Troubleshooting
No. NO Main PCB
4 Mouse does not function.
normal?
No. Result
Source of problem
Component
Keyboard
2 None of the keys function.
Does the screen mode 3-1 correspond to testing. Replace...
Service Manual - Page 22
... and AC adapter are destroyed.
4 Diagnostic Test reports problem in the OS? Damage to
normal?
YES HDD NO Go to No. 1-4
Replace the HDD cable. 1-4 Does operation return to data read...not light.
6 Abnormal sound. 7 Hard disk failure
Troubleshooting
Source of
No. YES Go to No. 5-2 NO Improper setting YES HDD
NO Go to No. 5-3
Replace the LED PCB. 5-3 Does operation return to
normal...
Service Manual - Page 23
Troubleshooting
No.
procedures
8-1
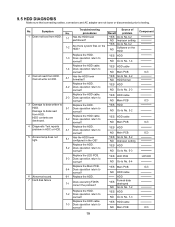
Does executing FDISK correct the problem? No. Symptom
1 Data cannot be found. procedures
Result
problem
1-1
Is the COM port properly set for both the
sending and receiving units?
YES Go to No.2-3 NO Improper setting
Does the RS-232C on the 1-3 Main PCB operate normally
under a reverse test?
Replace the HDD. 8-2 Does operation return...
Service Manual - Page 25

... mouse plug pin 3.) Connect pins 3-4-7-9-10-12 to skip the previous password and disable the password.
22
Using the plug enables the user to VC5 (PS/2 mouse ... to the IO BOX (CF-VEBU03). (2) Connect the AC Adapter and External Equipments. (3) The System Setup should be set to the factory setting values by executing the "SETUP UTILITY"
which can be used for servicing purpose only.
Service Manual - Page 26
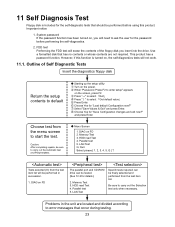
...Problems in succession.
1. FDD test Performing the FDD test will need to carry out the Automatic test and Peripheraltest. Starting up the setup utility Turn on the screen, press F2. Press " " to select Exit Press " " to error...are not required.
This product has a password function. However, if this product.
Parallel test 5. When "Panasonic Press F2 to default
Choose test from...
Service Manual - Page 27
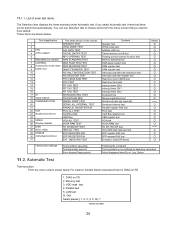
... models Select and press Enter for DIAG on the main DMA REGISTER TEST
9 board, etc.)
DMAC TRANSFER TEST
10
PIC HALT INSTRUCTION TEST...R/W test
Select
Test function settings
Test condition save/play Test automatic execute Error display (Paging style)
Following file command Test executed on FD 2. DIAG on run settings by selecting command Select displayed items Error, Log, Option
11.2. ...
Service Manual - Page 28
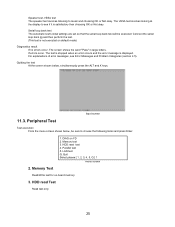
...errors occur. Peripheral Test
Input screen
Test execution From the menu screen shown below , simultaneously press the ALT and X keys.
11.3. Serial loop back test The Automatic test's initial settings are set...VESA test The speaker test involves listening to see Error Messages and Problem Categories (section 4.5). For explanations of error messages, see if it is satisfactory then choosing ...
Service Manual - Page 29
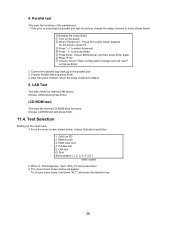
... test
This tests the functions of the parallel port. 1. When "Panasonic", "Press F2 to select Advanced. Press Enter, choose Bidirectional, and...Connect the parallel loop back jig to choose Mode. LAN test Q. 4. The input screen shown below .
[Changing the setup utility] Turn on FD 2. Choose Yes for internal LAN device. LAN Test
This test checks for "Save Configuration changes and...
Service Manual - Page 41
... CABLE, MODEM MANUAL CARD, WARRANTY (M2)
PROTECT SHEET CUSHION, T CUSHION, B CASE, PACKING PROTECTION BAG HOLDER
38
Q'TY
RTL 1 RTL 1 RTL 1 RTL 1 RTL 1 RTL 1 RTL 1 RTL 1
1 1 1 1 1 1 1 1 1 2 1 1 2 1 2 1 2 1 1 1 1 1 1 1 1 1 RTL 1 1 RTL 1 1
1 1 1 1 1 1
1 2 2 1 1 1
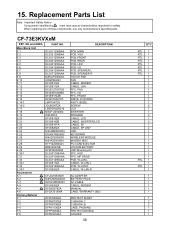
CF-73E3KVXxM
REF. 15. When replacing any of these components, use only manufacturer's specified parts. Replacement Parts List
Note...
Panasonic CF-73SCUTSBM Reviews
We have not received any reviews for Panasonic yet.