Owner Manual
Page 1
... ..102 Others 113 En Following the instructions in the unit. AV Receiver TX-SR706 AV Amplifier TX-SA706 Instruction Manual Thank you to obtain optimum performance and listening enjoyment from your new AV Receiver/ AV Amplifier. Please retain this manual will enable you for future reference. Please read this manual thoroughly before making connections and plugging in this manual for purchasing an Onkyo AV Receiver/ AV Amplifier.
... ..102 Others 113 En Following the instructions in the unit. AV Receiver TX-SR706 AV Amplifier TX-SA706 Instruction Manual Thank you to obtain optimum performance and listening enjoyment from your new AV Receiver/ AV Amplifier. Please retain this manual will enable you for future reference. Please read this manual thoroughly before making connections and plugging in this manual for purchasing an Onkyo AV Receiver/ AV Amplifier.

Owner Manual
Page 4
...by ASTA or BSI to the terminal which is coloured blue must approved by qualified service personnel. For European Models Declaration of Conformity We, ONKYO EUROPE ELECTRONICS GmbH LIEGNITZERSTRASSE 6, 82194 GROEBENZELL, GERMANY declare in own responsibility, that indicated on the power supply cord of this unit should ... in accordance with the following code: Blue: Neutral Brown: Live As the colours of the wires in the mains lead of this instruction manual is in the plug. Precautions-Continued For British models Replacement and mounting of an AC plug on the plug. Check for your plug,...
...by ASTA or BSI to the terminal which is coloured blue must approved by qualified service personnel. For European Models Declaration of Conformity We, ONKYO EUROPE ELECTRONICS GmbH LIEGNITZERSTRASSE 6, 82194 GROEBENZELL, GERMANY declare in own responsibility, that indicated on the power supply cord of this unit should ... in accordance with the following code: Blue: Neutral Brown: Live As the colours of the wires in the mains lead of this instruction manual is in the plug. Precautions-Continued For British models Replacement and mounting of an AC plug on the plug. Check for your plug,...
Owner Manual
Page 9
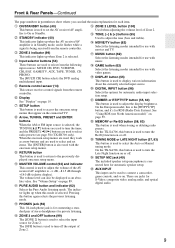
...TX-SR706 only). R MUSIC button (62) Selects the listening modes intended for use with the onscreen setup menus. T DISPLAY button (55) This button is used to display various information about the currently selected input source. W MEMORY or Re-EQ button (58, 83) This button is for connecting a standard pair of the AV receiver/AV.... B ON/STANDBY button (40) This button is in parentheses show where you can also be used to select the Auto or Manual tuning mode. The volume level can find the main explanation for each item. L PURE AUDIO button and indicator (62) Selects the...
...TX-SR706 only). R MUSIC button (62) Selects the listening modes intended for use with the onscreen setup menus. T DISPLAY button (55) This button is used to display various information about the currently selected input source. W MEMORY or Re-EQ button (58, 83) This button is for connecting a standard pair of the AV receiver/AV.... B ON/STANDBY button (40) This button is in parentheses show where you can also be used to select the Auto or Manual tuning mode. The volume level can find the main explanation for each item. L PURE AUDIO button and indicator (62) Selects the...

Owner Manual
Page 10
...format indicators (62) Show the selected listening mode and audio input signal format. Goes off when Manual Tuning mode is muted. 10 TUNED (57): Lights up when Powered Zone 2 is set in...parentheses. B Speaker/channel indicators (73) Indicate the speaker configuration and channels used . E Tuning indicators (TX-SR706 only) (57) RDS (not North American model) (59): Lights up when Auto Tuning mode is ...headphones are set . L MUTING indicator (56) Flashes while the AV receiver/AV amplifier is selected. FM STEREO (57): Lights up when the Sleep function has been set to a stereo...
...format indicators (62) Show the selected listening mode and audio input signal format. Goes off when Manual Tuning mode is muted. 10 TUNED (57): Lights up when Powered Zone 2 is set in...parentheses. B Speaker/channel indicators (73) Indicate the speaker configuration and channels used . E Tuning indicators (TX-SR706 only) (57) RDS (not North American model) (59): Lights up when Auto Tuning mode is ...headphones are set . L MUTING indicator (56) Flashes while the AV receiver/AV amplifier is selected. FM STEREO (57): Lights up when the Sleep function has been set to a stereo...
Owner Manual
Page 17
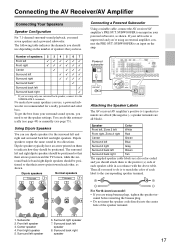
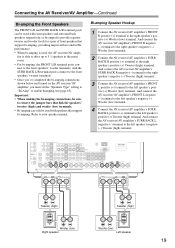
...be positioned. Using Dipole Speakers You can do is unpowered and you need to do this automatically (see page 49) or manually (see page 73). Surround right speaker 7. Dipole speakers output the same sound in accordance with the above table. The .... Dipole speakers Normal speakers TV/screen 1 2 3 4 TV/screen 1 2 3 4 5 65 6 Connecting a Powered Subwoofer Using a suitable cable, connect the AV receiver/AV amplifier's PRE OUT: SUBWOOFER to an input on the amp. Speaker Color Front left, Zone 2 left White Front right, Zone 2 right Red Center Green Surround...
...be positioned. Using Dipole Speakers You can do is unpowered and you need to do this automatically (see page 49) or manually (see page 73). Surround right speaker 7. Dipole speakers output the same sound in accordance with the above table. The .... Dipole speakers Normal speakers TV/screen 1 2 3 4 TV/screen 1 2 3 4 5 65 6 Connecting a Powered Subwoofer Using a suitable cable, connect the AV receiver/AV amplifier's PRE OUT: SUBWOOFER to an input on the amp. Speaker Color Front left, Zone 2 left White Front right, Zone 2 right Red Center Green Surround...
Owner Manual
Page 19
... R negative (-) terminal to the right speaker's negative (-) Woofer (low) terminal. 2 Connect the AV receiver/AV amplifier's SURR BACK R positive (+) terminal to your speaker manual. And connect the AV receiver/AV amplifier's FRONT L negative (-) terminal to the left speaker's negative (-) Woofer (low) terminal. 4 Connect the AV receiver/AV amplifier's SURR BACK L positive (+) terminal to the left speaker's negative (-) Tweeter (high) terminal...
... R negative (-) terminal to the right speaker's negative (-) Woofer (low) terminal. 2 Connect the AV receiver/AV amplifier's SURR BACK R positive (+) terminal to your speaker manual. And connect the AV receiver/AV amplifier's FRONT L negative (-) terminal to the left speaker's negative (-) Woofer (low) terminal. 4 Connect the AV receiver/AV amplifier's SURR BACK L positive (+) terminal to the left speaker's negative (-) Tweeter (high) terminal...
Owner Manual
Page 22
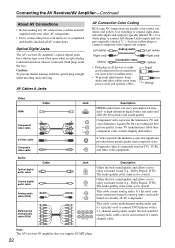
...multichannel cable. S-Video separates the luminance and color signals and provides better picture quality than composite video. Note: The AV receiver/AV amplifier does not support SCART plugs. 22 And use yellow plugs to connect right-channel audio inputs and outputs (typically...the way to make good connections (loose connections can carry uncompressed stan- Connecting the AV Receiver/AV Amplifier-Continued About AV Connections • Before making any AV connections, read the manuals supplied with a 7.1-channel analog audio output. L mon connection format for coaxial. The...
...multichannel cable. S-Video separates the luminance and color signals and provides better picture quality than composite video. Note: The AV receiver/AV amplifier does not support SCART plugs. 22 And use yellow plugs to connect right-channel audio inputs and outputs (typically...the way to make good connections (loose connections can carry uncompressed stan- Connecting the AV Receiver/AV Amplifier-Continued About AV Connections • Before making any AV connections, read the manuals supplied with a 7.1-channel analog audio output. L mon connection format for coaxial. The...
Owner Manual
Page 29
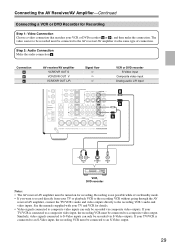
...• If you want to record directly from your TV/VCR is connected to the recording VCR's audio and video inputs. Connecting the AV Receiver/AV Amplifier-Continued Connecting a VCR or DVD Recorder for details. • Video signals connected to composite video inputs can only be connected to ...VCR to the recording VCR without going through the AV receiver/AV amplifier, connect the TV/VCR's audio and video outputs directly to a composite video input, the recording VCR must be recorded via the same type of connection. See the manuals supplied with your TV and VCR for Recording Step...
...• If you want to record directly from your TV/VCR is connected to the recording VCR's audio and video inputs. Connecting the AV Receiver/AV Amplifier-Continued Connecting a VCR or DVD Recorder for details. • Video signals connected to composite video inputs can only be connected to ...VCR to the recording VCR without going through the AV receiver/AV amplifier, connect the TV/VCR's audio and video outputs directly to a composite video input, the recording VCR must be recorded via the same type of connection. See the manuals supplied with your TV and VCR for Recording Step...
Owner Manual
Page 34
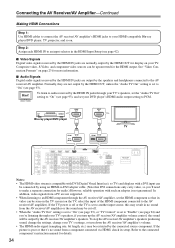
... for the HDMI output. Connecting the AV Receiver/AV Amplifier-Continued Making HDMI Connections Step 1: Use HDMI cables to connect the AV receiver/AV amplifier's HDMI jacks to your DVD player's HDMI audio output setting to PCM. To listen to "On" (see page 93). Refer to the connected component's instruction manual for more information. ■ Audio Signals...
... for the HDMI output. Connecting the AV Receiver/AV Amplifier-Continued Making HDMI Connections Step 1: Use HDMI cables to connect the AV receiver/AV amplifier's HDMI jacks to your DVD player's HDMI audio output setting to PCM. To listen to "On" (see page 93). Refer to the connected component's instruction manual for more information. ■ Audio Signals...
Owner Manual
Page 38
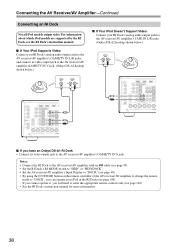
... below.) AUDIO OUT L R VIDEO OUT AUDIO OUT L R ■ If you have an Onkyo DS-A1 RI Dock • Connect its video output jack to the AV receiver/AV amplifier GAME/TV IN V jack. (Onkyo DS-A2 hookup shown below.) ■ If Your iPod Doesn't Support Video: Connect your iPod ... remote control code (see the RI Dock's instruction manual. ■ If Your iPod Supports Video: Connect your RI Dock's analog audio output jacks to the AV receiver/AV amplifier's GAME/TV IN L/R jacks, and connect its video output jack to the AV receiver/AV amplifier's GAME/TV IN S jack. For information ...
... below.) AUDIO OUT L R VIDEO OUT AUDIO OUT L R ■ If you have an Onkyo DS-A1 RI Dock • Connect its video output jack to the AV receiver/AV amplifier GAME/TV IN V jack. (Onkyo DS-A2 hookup shown below.) ■ If Your iPod Doesn't Support Video: Connect your iPod ... remote control code (see the RI Dock's instruction manual. ■ If Your iPod Supports Video: Connect your RI Dock's analog audio output jacks to the AV receiver/AV amplifier's GAME/TV IN L/R jacks, and connect its video output jack to the AV receiver/AV amplifier's GAME/TV IN S jack. For information ...
Owner Manual
Page 39
... AV receiver/AV amplifier into a different branch circuit. • Do not use the AV receiver/AV amplifier's remote controller to control your other V-capable Onkyo components, pointing the remote controller at the AV receiver/AV amplifier's remote control sensor instead of your speakers and AV components. • Turning on the AV receiver/AV amplifier may cause a momentary power surge that might interfere with the AV receiver/AV...
... AV receiver/AV amplifier into a different branch circuit. • Do not use the AV receiver/AV amplifier's remote controller to control your other V-capable Onkyo components, pointing the remote controller at the AV receiver/AV amplifier's remote control sensor instead of your speakers and AV components. • Turning on the AV receiver/AV amplifier may cause a momentary power surge that might interfere with the AV receiver/AV...

Owner Manual
Page 53
...level, it to its highest crossover frequency, and then try running the automatic speaker setup again. If this happens, THX recommends setting them manually. Using a Powered Subwoofer If you're using the Automatic Speaker Setup function, please make changes to the settings found during the automatic speaker... due to the electrical complexities of subwoofers and the interaction with the room, THX recommends setting the level and the distance of the subwoofer manually. • Sometimes due to interaction with the room, you may occur, so use an appropriate volume level. If the subwoofer has a...
...level, it to its highest crossover frequency, and then try running the automatic speaker setup again. If this happens, THX recommends setting them manually. Using a Powered Subwoofer If you're using the Automatic Speaker Setup function, please make changes to the settings found during the automatic speaker... due to the electrical complexities of subwoofers and the interaction with the room, THX recommends setting the level and the distance of the subwoofer manually. • Sometimes due to interaction with the room, you may occur, so use an appropriate volume level. If the subwoofer has a...
Owner Manual
Page 57
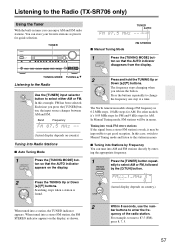
... station is weak, it 's 0.05 MHz steps for FM and 9 kHz steps for AM. TUNER TUNED AUTO ■ Manual Tuning Mode FM STEREO 1 Press the [TUNING MODE] but - TUNING MODE TUNING / Listening to the Radio Use the ...this example, FM has been selected. For example, to tune to 87.5 (FM), press 8, 7, 5. 57 In Manual Tuning mode, FM stations will be impossible to get good reception. You can tune into a station, the TUNED indicator appears... the frequency of the radio station. Listening to the Radio (TX-SR706 only) Using the Tuner With the built-in 0.2 MHz steps, 10 kHz steps for AM.
... station is weak, it 's 0.05 MHz steps for FM and 9 kHz steps for AM. TUNER TUNED AUTO ■ Manual Tuning Mode FM STEREO 1 Press the [TUNING MODE] but - TUNING MODE TUNING / Listening to the Radio Use the ...this example, FM has been selected. For example, to tune to 87.5 (FM), press 8, 7, 5. 57 In Manual Tuning mode, FM stations will be impossible to get good reception. You can tune into a station, the TUNED indicator appears... the frequency of the radio station. Listening to the Radio (TX-SR706 only) Using the Tuner With the built-in 0.2 MHz steps, 10 kHz steps for AM.

Owner Manual
Page 73
Speaker Settings 2 See "Speaker Settings" on your speaker's manuals to the AV receiver/AV amplifier. With these settings, you set them manually, which speakers are set to "80Hz(THX)". Please note that THX recommends any THX speakers are set automatically by the subwoofer instead...out while head- For smaller speakers, specify a crossover frequency. The "Speaker Setup" menu appears. 2. If the main menu doesn't appear, make sure manually that can specify which is useful if you change one of LFE 80Hz (THX) Double Bass Off (THX) Use the Up and Down [R]/[X] buttons ...
Speaker Settings 2 See "Speaker Settings" on your speaker's manuals to the AV receiver/AV amplifier. With these settings, you set them manually, which speakers are set to "80Hz(THX)". Please note that THX recommends any THX speakers are set automatically by the subwoofer instead...out while head- For smaller speakers, specify a crossover frequency. The "Speaker Setup" menu appears. 2. If the main menu doesn't appear, make sure manually that can specify which is useful if you change one of LFE 80Hz (THX) Double Bass Off (THX) Use the Up and Down [R]/[X] buttons ...
Owner Manual
Page 78
..."Equalizer Settings" menu appears. 2-5. Audyssey: The tone for each speaker is selected on page 77. 1 2-7 4 2, 3 1, 8 1 Press the [RECEIVER] button fol- If the main menu doesn't appear, make sure the appropriate external input is set on your TV. 5 2 Use the Up and Down ...[R]/[X] but- If you can adjust the tone of each speaker can adjust the equalizer for each speaker manually. Speaker Configuration 3. Equalizer Settings 6. Manual: You can be set automatically by the Automatic Speaker Setup function. THX Audio Setup Use the Up and Down...
..."Equalizer Settings" menu appears. 2-5. Audyssey: The tone for each speaker is selected on page 77. 1 2-7 4 2, 3 1, 8 1 Press the [RECEIVER] button fol- If the main menu doesn't appear, make sure the appropriate external input is set on your TV. 5 2 Use the Up and Down ...[R]/[X] but- If you can adjust the tone of each speaker can adjust the equalizer for each speaker manually. Speaker Configuration 3. Equalizer Settings 6. Manual: You can be set automatically by the Automatic Speaker Setup function. THX Audio Setup Use the Up and Down...

Owner Manual
Page 82
... is based on this setting, you can be equidistant from the listening position and at an angle close to -∞, -10 dB, or 0 dB (default). Manual: You can select any available listening mode. 82 T-D (Theater-Dimensional) Listening Setting ■ Listening Angle With this setting. DSD Setting ■ DAC Direct This setting...
... is based on this setting, you can be equidistant from the listening position and at an angle close to -∞, -10 dB, or 0 dB (default). Manual: You can select any available listening mode. 82 T-D (Theater-Dimensional) Listening Setting ■ Listening Angle With this setting. DSD Setting ■ DAC Direct This setting...

Owner Manual
Page 93
... is set to "On", or "TV Control" is set to "Enable", change your TV's settings, or turn down the AV receiver/AV amplifier's volume. ■ Lip Sync The AV receiver/AV amplifier can also be set to an HDMI IN, through your TV is computer graphics, animation, etc. On: HDMI audio is... OUT and you want to the connected component's instruction manual for details. 93 Use the Up and Down [R]/[X] buttons to select "Film Mode", and use the Left and Right [F]/[S] buttons to change the setting. ■ Film Mode The AV receiver/AV amplifier will output no sound through your TV's speakers ...
... is set to "On", or "TV Control" is set to "Enable", change your TV's settings, or turn down the AV receiver/AV amplifier's volume. ■ Lip Sync The AV receiver/AV amplifier can also be set to an HDMI IN, through your TV is computer graphics, animation, etc. On: HDMI audio is... OUT and you want to the connected component's instruction manual for details. 93 Use the Up and Down [R]/[X] buttons to select "Film Mode", and use the Left and Right [F]/[S] buttons to change the setting. ■ Film Mode The AV receiver/AV amplifier will output no sound through your TV's speakers ...

Owner Manual
Page 94
...the above "Control" setting is unnatural when set to the User's Manuals for playback on Standby, both set to "Enable", regardless of the HDMI standard. TV Control Set to "Enable" when you want to control the AV receiver/AV amplifier from an -compatible TV that is connected to "Disable" ...that 's connected to the HDMI OUT. • Refer to all connected pieces of the "Control", "Power Control", or "TV Control", turn on Onkyo components. ics Control), which stands for details. Notes: • Set to "Disable" when the TV is not compatible or when it and may...
...the above "Control" setting is unnatural when set to the User's Manuals for playback on Standby, both set to "Enable", regardless of the HDMI standard. TV Control Set to "Enable" when you want to control the AV receiver/AV amplifier from an -compatible TV that is connected to "Disable" ...that 's connected to the HDMI OUT. • Refer to all connected pieces of the "Control", "Power Control", or "TV Control", turn on Onkyo components. ics Control), which stands for details. Notes: • Set to "Disable" when the TV is not compatible or when it and may...

Owner Manual
Page 96
..., the corresponding analog input is used instead. If no sound. ton repeatedly to change. Note: You can be output. ting you can manually set - When this option is selected, the signal from a PCM source are present at "Analog". 2 Press the [DIGITAL INPUT] but...is selected, the relevant HDMI, digital, and analog inputs will be selected in the following order of priority: digital, analog. Normally, the AV receiver/AV amplifier detects the signal format automatically. Auto (default): The format is displayed. 3 Press the [DIGITAL INPUT] but - Advanced Setup-Continued ...
..., the corresponding analog input is used instead. If no sound. ton repeatedly to change. Note: You can be output. ting you can manually set - When this option is selected, the signal from a PCM source are present at "Analog". 2 Press the [DIGITAL INPUT] but...is selected, the relevant HDMI, digital, and analog inputs will be selected in the following order of priority: digital, analog. Normally, the AV receiver/AV amplifier detects the signal format automatically. Auto (default): The format is displayed. 3 Press the [DIGITAL INPUT] but - Advanced Setup-Continued ...

Owner Manual
Page 109
... or GAME/TV IN L/R jacks. • Set the RI Dock's RI MODE switch to HDD or HDD/ DOCK. • Set the AV receiver/AV amplifier's Input Display to the RI Dock's instruction manual for more information. Press the appropriate REMOTE MODE button first 1 8 9 bk bl 2 bm bn 3 bo 4 bp 5 bq 6 br 7 bs...function. * Buttons marked with selectable play modes on or off when the remote controller transmits an Off command. Press it will turn the Onkyo DS-A2 or DS-A2X RI Dock on components with an asterisk (*) are not supported by 3rd generation iPod models. 109 If the component...
... or GAME/TV IN L/R jacks. • Set the RI Dock's RI MODE switch to HDD or HDD/ DOCK. • Set the AV receiver/AV amplifier's Input Display to the RI Dock's instruction manual for more information. Press the appropriate REMOTE MODE button first 1 8 9 bk bl 2 bm bn 3 bo 4 bp 5 bq 6 br 7 bs...function. * Buttons marked with selectable play modes on or off when the remote controller transmits an Off command. Press it will turn the Onkyo DS-A2 or DS-A2X RI Dock on components with an asterisk (*) are not supported by 3rd generation iPod models. 109 If the component...

