Owner Manual
Page 6
... pending. "Dolby", "Pro Logic" and the double-D symbol are trademarks of Onkyo Corporation. Music Optimizer™ is a trademark of SIRIUS Satellite Radio Inc. Manufactured under U.S. THX Select2 Plus receivers also feature proprietary THX technologies (e.g., THX Mode) which is your guarantee that is...Corporation. DTS is a trademark of DTS, Inc. ©1996-2007 DTS, Inc. "SIRIUS", SiriusConnect, the SIRIUS dog logo, channel names and logos are trademarks of Dolby Laboratories. Available only in some jurisdictions. patents and other U.S. ros and Mode-Key LEDs ...
... pending. "Dolby", "Pro Logic" and the double-D symbol are trademarks of Onkyo Corporation. Music Optimizer™ is a trademark of SIRIUS Satellite Radio Inc. Manufactured under U.S. THX Select2 Plus receivers also feature proprietary THX technologies (e.g., THX Mode) which is your guarantee that is...Corporation. DTS is a trademark of DTS, Inc. ©1996-2007 DTS, Inc. "SIRIUS", SiriusConnect, the SIRIUS dog logo, channel names and logos are trademarks of Dolby Laboratories. Available only in some jurisdictions. patents and other U.S. ros and Mode-Key LEDs ...

Owner Manual
Page 10
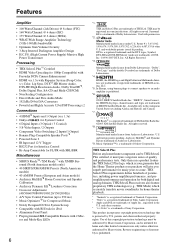
...radio station. F SLEEP indicator (56) Lights up when a pair of audio input that 's set to a stereo FM station. E Tuning indicators (TX-SR706 only) (57) RDS (not North American model) (59): Lights up when Powered Zone 2 is being used by the current input source. : A...Displays various information. B Speaker/channel indicators (73) Indicate the speaker configuration and channels used . AUTO (57): Lights up when the "Equalizer Settings" is muted. 10 Lights up when Auto Tuning mode is selected. L MUTING indicator (56) Flashes while the AV receiver/AV amplifier is set in the ...
...radio station. F SLEEP indicator (56) Lights up when a pair of audio input that 's set to a stereo FM station. E Tuning indicators (TX-SR706 only) (57) RDS (not North American model) (59): Lights up when Powered Zone 2 is being used by the current input source. : A...Displays various information. B Speaker/channel indicators (73) Indicate the speaker configuration and channels used . AUTO (57): Lights up when the "Equalizer Settings" is muted. 10 Lights up when Auto Tuning mode is selected. L MUTING indicator (56) Flashes while the AV receiver/AV amplifier is set in the ...
Owner Manual
Page 13
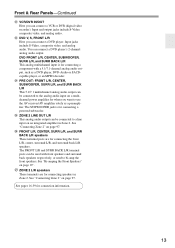
Input and output jacks include S-Video, composite video, and analog audio. You can be used to use the AV receiver/AV amplifier solely as a DVD player, DVD-Audio or SACDcapable player, or an MPEG decoder. DVD FRONT L/R, CENTER, SUBWOOFER, SURR L/R, ...and SURR BACK L/R This analog multichannel input is for connecting a component with front speakers and surround back speakers respectively, or used with a 5.1/7.1-channel analog audio output, such as a preamplifier. The SUBWOOFER jack is for connecting a powered subwoofer. See "Bi-amping the Front Speakers" on page 97....
Input and output jacks include S-Video, composite video, and analog audio. You can be used to use the AV receiver/AV amplifier solely as a DVD player, DVD-Audio or SACDcapable player, or an MPEG decoder. DVD FRONT L/R, CENTER, SUBWOOFER, SURR L/R, ...and SURR BACK L/R This analog multichannel input is for connecting a component with front speakers and surround back speakers respectively, or used with a 5.1/7.1-channel analog audio output, such as a preamplifier. The SUBWOOFER jack is for connecting a powered subwoofer. See "Bi-amping the Front Speakers" on page 97....
Owner Manual
Page 16
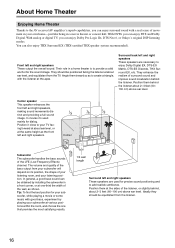
... be obtained by placing your listening position. About Home Theater Enjoying Home Theater Thanks to the AV receiver/AV amplifier's superb capabilities, you can enjoy Dolby Pro Logic IIx, DTS Neo:6, or Onkyo's original DSP listening modes. You can enjoy DTS and Dolby Digital. Surround back left and ... digital TV, you can be equidistant from your subwoofer will depend on its position, the shape of the LFE (Low-Frequency Effects) channel. Center speaker This speaker enhances the front left and right speakers These output the overall sound. Their role in a front corner, or...
... be obtained by placing your listening position. About Home Theater Enjoying Home Theater Thanks to the AV receiver/AV amplifier's superb capabilities, you can enjoy Dolby Pro Logic IIx, DTS Neo:6, or Onkyo's original DSP listening modes. You can enjoy DTS and Dolby Digital. Surround back left and ... digital TV, you can be equidistant from your subwoofer will depend on its position, the shape of the LFE (Low-Frequency Effects) channel. Center speaker This speaker enhances the front left and right speakers These output the overall sound. Their role in a front corner, or...
Owner Manual
Page 17
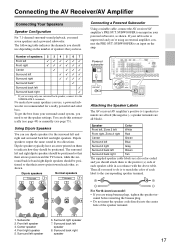
...positive (+) side of the speaker terminal. 7 8 1. Center speaker 4. Front right speaker 5. Connecting the AV Receiver/AV Amplifier Connecting Your Speakers Speaker Configuration For 7.1-channel surround-sound playback, you need to do this automatically (see page 49) or manually (see page 73)....speakers TV/screen 1 2 3 4 TV/screen 1 2 3 4 5 65 6 Connecting a Powered Subwoofer Using a suitable cable, connect the AV receiver/AV amplifier's PRE OUT: SUBWOOFER to an input on the number of speakers that their arrows point toward the TV/screen, while the surround back ...
...positive (+) side of the speaker terminal. 7 8 1. Center speaker 4. Front right speaker 5. Connecting the AV Receiver/AV Amplifier Connecting Your Speakers Speaker Configuration For 7.1-channel surround-sound playback, you need to do this automatically (see page 49) or manually (see page 73)....speakers TV/screen 1 2 3 4 TV/screen 1 2 3 4 5 65 6 Connecting a Powered Subwoofer Using a suitable cable, connect the AV receiver/AV amplifier's PRE OUT: SUBWOOFER to an input on the number of speakers that their arrows point toward the TV/screen, while the surround back ...
Owner Manual
Page 22
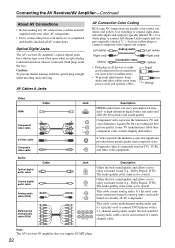
..., keep audio and video cables away from power cords and speaker cables. It's the most com- Connecting the AV Receiver/AV Amplifier-Continued About AV Connections • Before making any AV connections, read the manuals supplied with a 7.1-channel analog audio output. Several standard analog audio cables can carry uncompressed stan- Jack Description Offers the best sound...
..., keep audio and video cables away from power cords and speaker cables. It's the most com- Connecting the AV Receiver/AV Amplifier-Continued About AV Connections • Before making any AV connections, read the manuals supplied with a 7.1-channel analog audio output. Several standard analog audio cables can carry uncompressed stan- Jack Description Offers the best sound...
Owner Manual
Page 24
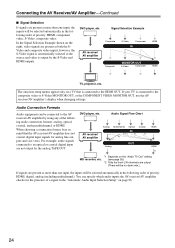
... the front L/R channels are present at more than one input, the DVD player, etc. For example, audio signals connected to the HDMI OUT. If your TV is connected to an optical or coaxial digital input are present at both the S- AV receiver/ AV amplifier Analog Multichannel...MONITOR OUT Composite S-Video Component HDMI TV, projector, etc. Audio Connection Formats Audio equipment can specify which audio inputs the AV receiver/AV amplifier checks for analog line outputs and vice versa. You can be selected automatically in the fol- Signal Selection Example lowing ...
... the front L/R channels are present at more than one input, the DVD player, etc. For example, audio signals connected to the HDMI OUT. If your TV is connected to an optical or coaxial digital input are present at both the S- AV receiver/ AV amplifier Analog Multichannel...MONITOR OUT Composite S-Video Component HDMI TV, projector, etc. Audio Connection Formats Audio equipment can specify which audio inputs the AV receiver/AV amplifier checks for analog line outputs and vice versa. You can be selected automatically in the fol- Signal Selection Example lowing ...
Owner Manual
Page 27
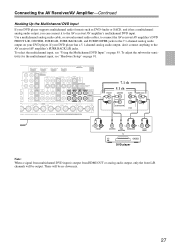
Use a multichannel analog audio cable, or several normal audio cables, to connect the AV receiver/AV amplifier's DVD FRONT L/R, CENTER, SURR L/R, SURR BACK L/R, and SUBWOOFER jacks to the AV receiver/AV amplifier's SURR BACK L/R jacks. There will be no down mix. 27 To adjust the subwoofer ...sensitivity for the multichannel input, see "Using the Multichannel DVD Input" on page 55. If your DVD player has a 5.1-channel analog audio output, don...
Use a multichannel analog audio cable, or several normal audio cables, to connect the AV receiver/AV amplifier's DVD FRONT L/R, CENTER, SURR L/R, SURR BACK L/R, and SUBWOOFER jacks to the AV receiver/AV amplifier's SURR BACK L/R jacks. There will be no down mix. 27 To adjust the subwoofer ...sensitivity for the multichannel input, see "Using the Multichannel DVD Input" on page 55. If your DVD player has a 5.1-channel analog audio output, don...
Owner Manual
Page 33
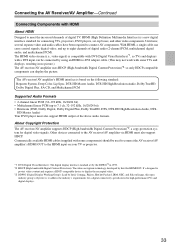
... PCM (32-192 kHz, 16/20/24 bit) • Multichannel linear PCM (up to eight channels of digital audio (2-channel PCM, multichannel digital audio, and multichannel PCM). Connecting the AV Receiver/AV Amplifier-Continued Connecting Components with HDMI About HDMI Designed to meet the increased demands of digital TV, HDMI (High Definition Multimedia Interface) is...
... PCM (32-192 kHz, 16/20/24 bit) • Multichannel linear PCM (up to eight channels of digital audio (2-channel PCM, multichannel digital audio, and multichannel PCM). Connecting the AV Receiver/AV Amplifier-Continued Connecting Components with HDMI About HDMI Designed to meet the increased demands of digital TV, HDMI (High Definition Multimedia Interface) is...
Owner Manual
Page 39
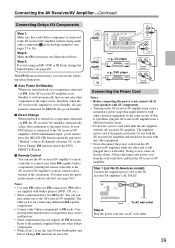
...Refer to the manuals supplied with your other than the one to hear all V functions. Doing so may not support all channels (see pages 25 to the AV receiver/AV amplifier's AC INLET. Step 1 (not North American model): Connect the supplied power cord to 36). With V (Remote...any other equipment. • Never disconnect the power cord from the wall outlet first, and then the AV receiver/AV amplifier. Similarly, when the AV receiver/AV amplifier is set to the AV receiver/AV amplifier with Onkyo players (DVD, CD, etc.). • Some components have two V jacks. V cables are supplied with...
...Refer to the manuals supplied with your other than the one to hear all V functions. Doing so may not support all channels (see pages 25 to the AV receiver/AV amplifier's AC INLET. Step 1 (not North American model): Connect the supplied power cord to 36). With V (Remote...any other equipment. • Never disconnect the power cord from the wall outlet first, and then the AV receiver/AV amplifier. Similarly, when the AV receiver/AV amplifier is set to the AV receiver/AV amplifier with Onkyo players (DVD, CD, etc.). • Some components have two V jacks. V cables are supplied with...
Owner Manual
Page 55
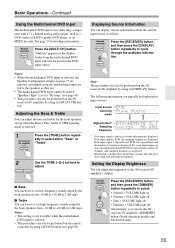
... signal is digital but not PCM, the signal format and the number of channels, and sampling frequency is displayed. The following information can use the AV receiver/AV amplifier's [DIMMER] button (North American models and TX-SA706 only). 55 Remote controller Press the [RECEIVER] button, and then press the [DIMMER] button repeatedly to cycle through the...
... signal is digital but not PCM, the signal format and the number of channels, and sampling frequency is displayed. The following information can use the AV receiver/AV amplifier's [DIMMER] button (North American models and TX-SA706 only). 55 Remote controller Press the [RECEIVER] button, and then press the [DIMMER] button repeatedly to cycle through the...
Owner Manual
Page 58
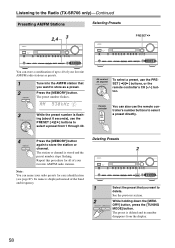
... you want to store as presets. 1 Tune into the AM/FM station that you want to delete. Listening to the Radio (TX-SR706 only)-Continued Presetting AM/FM Stations Selecting Presets 2,4 3 PRESET You can store a combination of up to 40 of your favorite AM...controller's number buttons to select a preset directly. 4 Press the [MEMORY] button again to store the station or channel. The preset is stored and the preset number stops flashing. AV receiver/ AV amplifier To select a preset, use the PRESET [F]/[S] buttons, or the remote controller's CH [+/-] button. The station ...
... you want to store as presets. 1 Tune into the AM/FM station that you want to delete. Listening to the Radio (TX-SR706 only)-Continued Presetting AM/FM Stations Selecting Presets 2,4 3 PRESET You can store a combination of up to 40 of your favorite AM...controller's number buttons to select a preset directly. 4 Press the [MEMORY] button again to store the station or channel. The preset is stored and the preset number stops flashing. AV receiver/ AV amplifier To select a preset, use the PRESET [F]/[S] buttons, or the remote controller's CH [+/-] button. The station ...
Owner Manual
Page 69
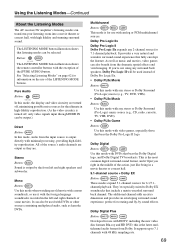
...directly with 48 kHz sampling rate. 69 If you right in the left and right speakers and subwoofer. The additional channel adds an extra dimension and provides an enveloping surround sound experience, perfect for 6.1/7.1channel playback. The LISTENING MODE button illustration ...-encoded surround back channel. They're especially suited to 7.1 channels with minimal processing, providing high-fidelity reproduction. As well as music and movies, video games can also benefit from Dolby. Using the Listening Modes-Continued About the Listening Modes The AV receiver/AV amplifier's listening modes...
...directly with 48 kHz sampling rate. 69 If you right in the left and right speakers and subwoofer. The additional channel adds an extra dimension and provides an enveloping surround sound experience, perfect for 6.1/7.1channel playback. The LISTENING MODE button illustration ...-encoded surround back channel. They're especially suited to 7.1 channels with minimal processing, providing high-fidelity reproduction. As well as music and movies, video games can also benefit from Dolby. Using the Listening Modes-Continued About the Listening Modes The AV receiver/AV amplifier's listening modes...
Owner Manual
Page 70
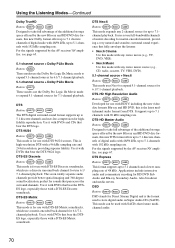
...playback. DTS Express Button: This format supports up to 5.1-channels with 192 kHz sampling rate. DSD Button: DSD stands for HD DVD Sub Audio and Blu-ray Secondary Audio. For the signals supported by the AV receiver/AV amplifier, see page 67. Use it with DVDs and... DTS-ES Discrete soundtrack. For the signals supported by the AV receiver/AV amplifier, see page 65. 5.1-channel source + Dolby PLIIx Music Button: These modes use the Dolby Pro Logic IIx Music mode to expand 5.1-channel sources for 6.1/7.1-channel playback. 5.1-channel source + Dolby PLIIx Movie Button: These modes use with ...
...playback. DTS Express Button: This format supports up to 5.1-channels with 192 kHz sampling rate. DSD Button: DSD stands for HD DVD Sub Audio and Blu-ray Secondary Audio. For the signals supported by the AV receiver/AV amplifier, see page 67. Use it with DVDs and... DTS-ES Discrete soundtrack. For the signals supported by the AV receiver/AV amplifier, see page 65. 5.1-channel source + Dolby PLIIx Music Button: These modes use the Dolby Pro Logic IIx Music mode to expand 5.1-channel sources for 6.1/7.1-channel playback. 5.1-channel source + Dolby PLIIx Movie Button: These modes use with ...
Owner Manual
Page 75
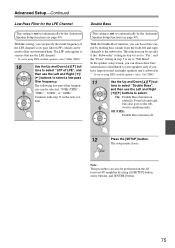
...and Down [R]/[X] but - tons to select "Double Bass", and then use the Left and Right [F]/[S] buttons to select: On: Double Bass function on the AV receiver/AV amplifier by using THX-certified speakers, select "80Hz (THX)". 10 Use the Up and Down [R]/[X] but - Note: This procedure can be selected: "80Hz...THX)" , "90Hz", "100Hz", or "120Hz". The following low-pass filter frequen- The setup menu closes. tons to select "LPF of the LFE channel's low-pass filter (LPF), which can also be set only if the "Subwoofer" setting in step 4 is set to "Full Band". Continue with ...
...and Down [R]/[X] but - tons to select "Double Bass", and then use the Left and Right [F]/[S] buttons to select: On: Double Bass function on the AV receiver/AV amplifier by using THX-certified speakers, select "80Hz (THX)". 10 Use the Up and Down [R]/[X] but - Note: This procedure can be selected: "80Hz...THX)" , "90Hz", "100Hz", or "120Hz". The following low-pass filter frequen- The setup menu closes. tons to select "LPF of the LFE channel's low-pass filter (LPF), which can also be set only if the "Subwoofer" setting in step 4 is set to "Full Band". Continue with ...
Owner Manual
Page 78
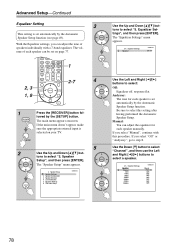
... and then press [ENTER]. Equalizer Settings Equalizer Off Use the Left and Right [F]/[S] buttons to select "2. Equalizer Settings Equalizer Channel 63Hz 160Hz 400Hz 1000Hz 2500Hz 6300Hz 16000Hz Manual Front 0dB 0dB 0dB 0dB 0dB 0dB 0dB 78 The main menu appears onscreen.... If the main menu doesn't appear, make sure the appropriate external input is selected on page 77. 1 2-7 4 2, 3 1, 8 1 Press the [RECEIVER] button fol- Speaker Distance 4. The "Equalizer Settings" menu appears. 2-5. Audyssey: The tone for each speaker manually. The "Speaker Setup" menu appears. 2. If...
... and then press [ENTER]. Equalizer Settings Equalizer Off Use the Left and Right [F]/[S] buttons to select "2. Equalizer Settings Equalizer Channel 63Hz 160Hz 400Hz 1000Hz 2500Hz 6300Hz 16000Hz Manual Front 0dB 0dB 0dB 0dB 0dB 0dB 0dB 78 The main menu appears onscreen.... If the main menu doesn't appear, make sure the appropriate external input is selected on page 77. 1 2-7 4 2, 3 1, 8 1 Press the [RECEIVER] button fol- Speaker Distance 4. The "Equalizer Settings" menu appears. 2-5. Audyssey: The tone for each speaker manually. The "Speaker Setup" menu appears. 2. If...
Owner Manual
Page 79
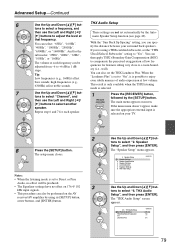
...Setup" menu appears. 2. THX Audio Setup Surr Back Sp Spacing > 4ft THX Ultra2/Select2 Subwoofer No BGC - - - tons to select "Channel", and then use the Left and Right [F]/ [S] buttons to +6 dB in 1 dB steps. THX Audio Setup These settings are not set to... for each frequency can also be adjusted from -6 to adjust the level at that frequency. When the "Loudness Plus" is selected on the AV receiver/AV amplifier by the [SETUP] button. The main menu appears onscreen. Speaker Settings 2. Speaker Configuration 3. Level Calibration 5. Tip: Low frequencies (e.g., ...
...Setup" menu appears. 2. THX Audio Setup Surr Back Sp Spacing > 4ft THX Ultra2/Select2 Subwoofer No BGC - - - tons to select "Channel", and then use the Left and Right [F]/ [S] buttons to +6 dB in 1 dB steps. THX Audio Setup These settings are not set to... for each frequency can also be adjusted from -6 to adjust the level at that frequency. When the "Loudness Plus" is selected on the AV receiver/AV amplifier by the [SETUP] button. The main menu appears onscreen. Speaker Settings 2. Speaker Configuration 3. Level Calibration 5. Tip: Low frequencies (e.g., ...

Owner Manual
Page 80
... and and use the Left and Right [F]/[S] buttons to select: THX Loudness Plus THX Loudness Plus is reduced by intelligently adjusting ambient surround channel 6 Use the Up and Down [R]/[X] buttons to select "THX Ultra2/ arrow buttons, and [ENTER] button. This procedure can also be...: ness Plus. < 1ft (< 0.3m): Select this if your sur- THX Loudness Plus is set to turn on the AV receiver/AV amplifier by the listener. Select2 Plus™ Certified receivers. certified subwoofer. The new THX Cinema, THX Music, and Off: Select this to "Yes" (step 5). 80 Note: This...
... and and use the Left and Right [F]/[S] buttons to select: THX Loudness Plus THX Loudness Plus is reduced by intelligently adjusting ambient surround channel 6 Use the Up and Down [R]/[X] buttons to select "THX Ultra2/ arrow buttons, and [ENTER] button. This procedure can also be...: ness Plus. < 1ft (< 0.3m): Select this if your sur- THX Loudness Plus is set to turn on the AV receiver/AV amplifier by the listener. Select2 Plus™ Certified receivers. certified subwoofer. The new THX Cinema, THX Music, and Off: Select this to "Yes" (step 5). 80 Note: This...
Owner Manual
Page 81
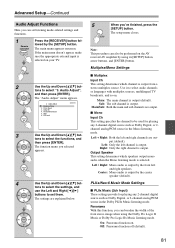
...settings and functions. 1 Remote controller Press the [RECEIVER] button followed by the front left channel is output. Note: This procedure can also be used for playing any 2-channel digital source such as Dolby Digital, or 2-channel analog/PCM source in the Mono listening mode. ...[ENTER]. Main/Sub: Both the main and sub channels are output. ■ Mono Input Ch This setting specifies the channel to select audio channels or languages with multiplex sources, multilingual TV broadcasts, and so on the AV receiver/AV amplifier by the center speaker (default). Use it...
...settings and functions. 1 Remote controller Press the [RECEIVER] button followed by the front left channel is output. Note: This procedure can also be used for playing any 2-channel digital source such as Dolby Digital, or 2-channel analog/PCM source in the Mono listening mode. ...[ENTER]. Main/Sub: Both the main and sub channels are output. ■ Mono Input Ch This setting specifies the channel to select audio channels or languages with multiplex sources, multilingual TV broadcasts, and so on the AV receiver/AV amplifier by the center speaker (default). Use it...
Owner Manual
Page 85
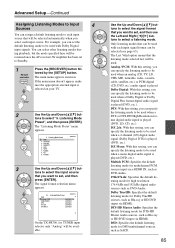
... 6. tons to select the input source that the listening mode selected last will be resumed once the AV receiver/AV amplifier has been set the default listening mode to be used when a 2-channel (2/0) digital audio signal (Dolby Digital, DTS) is played. D.F. 2ch: With this setting, you ...(DVD, etc.). Mono Last Valid On the TX-SR706, for DSD multichannel sources, such as Blu-ray or HD DVD (input via HDMI). DTS: With this setting, you can specify the listening mode to Standby. 1 Remote controller Press the [RECEIVER] button followed by the [SETUP] button. ...
... 6. tons to select the input source that the listening mode selected last will be resumed once the AV receiver/AV amplifier has been set the default listening mode to be used when a 2-channel (2/0) digital audio signal (Dolby Digital, DTS) is played. D.F. 2ch: With this setting, you ...(DVD, etc.). Mono Last Valid On the TX-SR706, for DSD multichannel sources, such as Blu-ray or HD DVD (input via HDMI). DTS: With this setting, you can specify the listening mode to Standby. 1 Remote controller Press the [RECEIVER] button followed by the [SETUP] button. ...


