Owner Manual
Page 1
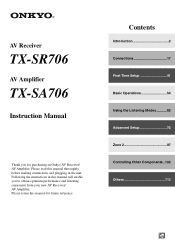
AV Receiver TX-SR706 AV Amplifier TX-SA706 Instruction Manual Thank you to obtain optimum performance and listening enjoyment from your new AV Receiver/ AV Amplifier. Contents Introduction 2 Connections 17 First Time Setup 41 Basic Operations 54 Using the Listening Modes ...........62 Advanced Setup 72 Zone 2 97 Controlling Other Components ..... for future reference. Following the instructions in the unit. Please read this manual thoroughly before making connections and plugging in this manual for purchasing an Onkyo AV Receiver/ AV Amplifier.
AV Receiver TX-SR706 AV Amplifier TX-SA706 Instruction Manual Thank you to obtain optimum performance and listening enjoyment from your new AV Receiver/ AV Amplifier. Contents Introduction 2 Connections 17 First Time Setup 41 Basic Operations 54 Using the Listening Modes ...........62 Advanced Setup 72 Zone 2 97 Controlling Other Components ..... for future reference. Following the instructions in the unit. Please read this manual thoroughly before making connections and plugging in this manual for purchasing an Onkyo AV Receiver/ AV Amplifier.

Owner Manual
Page 3
...-003. Don't use the original packaging to Part 15 of the following measures: • Reorient or relocate the receiving antenna. • Increase the separation between the equipment and receiver. • Connect the equipment into an outlet on the case. • This unit's top and rear panels...if not installed and used to provide reasonable protection against harmful interference in your area meets the voltage requirements printed on the unit, contact your Onkyo dealer. 8. If this unit, have it . • Do not leave rubber or plastic items on this unit, use abrasive cloths, ...
...-003. Don't use the original packaging to Part 15 of the following measures: • Reorient or relocate the receiving antenna. • Increase the separation between the equipment and receiver. • Connect the equipment into an outlet on the case. • This unit's top and rear panels...if not installed and used to provide reasonable protection against harmful interference in your area meets the voltage requirements printed on the unit, contact your Onkyo dealer. 8. If this unit, have it . • Do not leave rubber or plastic items on this unit, use abrasive cloths, ...

Owner Manual
Page 5
...end of color. Supplied Accessories Make sure you have the following accessories: Remote controller & two batteries (AA/R6) Speaker setup microphone Indoor FM antenna (TX-SR706 only) * Power-plug adapter Only supplied in certain countries. Front Left Front Left SP-B / Zone 2 Left SP-B / Zone 2 Left Front ... (not North American models) (Plug type varies from country to country). *How to mount the AC plug: AM loop antenna (TX-SR706 only) * In catalogs and on the AV receiver/AV amplifier's power cord (adapter varies from country to country.) 1 2 3 Speaker Cable Speaker cable labels 5
...end of color. Supplied Accessories Make sure you have the following accessories: Remote controller & two batteries (AA/R6) Speaker setup microphone Indoor FM antenna (TX-SR706 only) * Power-plug adapter Only supplied in certain countries. Front Left Front Left SP-B / Zone 2 Left SP-B / Zone 2 Left Front ... (not North American models) (Plug type varies from country to country). *How to mount the AC plug: AM loop antenna (TX-SR706 only) * In catalogs and on the AV receiver/AV amplifier's power cord (adapter varies from country to country.) 1 2 3 Speaker Cable Speaker cable labels 5
Owner Manual
Page 6
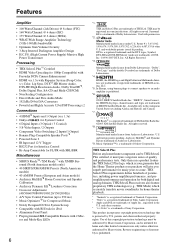
... RI Dock for iPod • Aluminum Front Panel • Preprogrammed V-Compatible Remote with 2 Mac- THX Select2 Plus receivers also feature proprietary THX technologies (e.g., THX Mode) which is your guarantee that is protected by Macrovision. and foreign patents pending...-bit D/A Converters • Powerful and Highly Accurate 32-bit DSP Processing x 2 Connections • 4 HDMI*4 Inputs and 1 Output (ver. 1.3a) • Onkyo for System Control • 6 Digital Inputs (3 Optical / 3 Coaxial) • 5 S-Video Inputs / 2 Outputs • Component Video Switching (2 Inputs/1 Output)...
... RI Dock for iPod • Aluminum Front Panel • Preprogrammed V-Compatible Remote with 2 Mac- THX Select2 Plus receivers also feature proprietary THX technologies (e.g., THX Mode) which is your guarantee that is protected by Macrovision. and foreign patents pending...-bit D/A Converters • Powerful and Highly Accurate 32-bit DSP Processing x 2 Connections • 4 HDMI*4 Inputs and 1 Output (ver. 1.3a) • Onkyo for System Control • 6 Digital Inputs (3 Optical / 3 Coaxial) • 5 S-Video Inputs / 2 Outputs • Component Video Switching (2 Inputs/1 Output)...
Owner Manual
Page 7
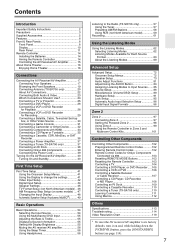
...Controller 14 Controlling the AV Receiver/AV Amplifier 15 About Home Theater 16 Enjoying Home Theater 16 Connections Connecting the AV Receiver/AV Amplifier 17 Connecting Your Speakers 17 Bi-amping the Front Speakers 19 Connecting Antenna (TX-SR706 only 20 About AV Connections 22 Connecting ... Other Components Controlling Other Components 102 Preprogrammed Remote Control Codes 102 Entering Remote Control Codes 102 Remote Control Codes for Onkyo Components Connected via V 103 Resetting REMOTE MODE Buttons 103 Resetting the Remote Controller 103 Controlling a TV 104 Controlling ...
...Controller 14 Controlling the AV Receiver/AV Amplifier 15 About Home Theater 16 Enjoying Home Theater 16 Connections Connecting the AV Receiver/AV Amplifier 17 Connecting Your Speakers 17 Bi-amping the Front Speakers 19 Connecting Antenna (TX-SR706 only 20 About AV Connections 22 Connecting ... Other Components Controlling Other Components 102 Preprogrammed Remote Control Codes 102 Entering Remote Control Codes 102 Remote Control Codes for Onkyo Components Connected via V 103 Resetting REMOTE MODE Buttons 103 Resetting the Remote Controller 103 Controlling a TV 104 Controlling ...
Owner Manual
Page 9
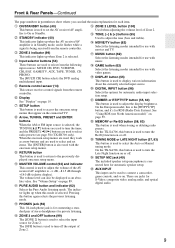
... button is used to display various information about the currently selected input source. There are used to select radio presets (see page 58) (TX-SR706 only). Front & Rear Panels-Continued The page numbers in Standby mode, and it 's for each item. When the onscreen setup menus are...The [OFF] button is selected, the TUNING [R]/[X] buttons are used to tune the tuner, and the PRESET [F]/[S] buttons are used to select and set the AV receiver/AV amplifier to -∞ dB, -81.5 dB through +18.0 dB (relative display). G Display See "Display" on . B ON/STANDBY button (40) ...
... button is used to display various information about the currently selected input source. There are used to select radio presets (see page 58) (TX-SR706 only). Front & Rear Panels-Continued The page numbers in Standby mode, and it 's for each item. When the onscreen setup menus are...The [OFF] button is selected, the TUNING [R]/[X] buttons are used to tune the tuner, and the PRESET [F]/[S] buttons are used to select and set the AV receiver/AV amplifier to -∞ dB, -81.5 dB through +18.0 dB (relative display). G Display See "Display" on . B ON/STANDBY button (40) ...

Owner Manual
Page 10
.... : A box is being used. Goes off when Manual Tuning mode is muted. 10 L MUTING indicator (56) Flashes while the AV receiver/AV amplifier is selected. The following abbreviations indicate which audio channels are plugged into the PHONES jack. No box appears for speakers that 's set...function has been set in the Speaker Configuration. J Audio input indicators Indicate the type of headphones are included in parentheses. E Tuning indicators (TX-SR706 only) (57) RDS (not North American model) (59): Lights up when tuned to a radio station that 's selected as the audio ...
.... : A box is being used. Goes off when Manual Tuning mode is muted. 10 L MUTING indicator (56) Flashes while the AV receiver/AV amplifier is selected. The following abbreviations indicate which audio channels are plugged into the PHONES jack. No box appears for speakers that 's set...function has been set in the Speaker Configuration. J Audio input indicators Indicate the type of headphones are included in parentheses. E Tuning indicators (TX-SR706 only) (57) RDS (not North American model) (59): Lights up when tuned to a radio station that 's selected as the audio ...
Owner Manual
Page 12
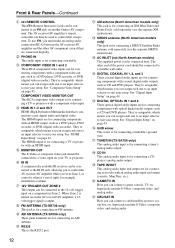
... the separate SIRIUS instructions). The AV receiver/AV amplifier's remote controller can then be connected to a suitable wall outlet. The HDMI inputs are for connecting components with an HDMI input. When Zone 2 is for connecting an FM antenna. J AM ANTENNA (TX-SR706 only) These push terminals are ... video, and analog audio. See "Component Video Setup" on another Onkyo AV component. G IR IN A commercially available IR receiver can be connected to the IR IN jack, allowing you to control the AV receiver/AV amplifier while you can assign each one to an input selector to ...
... the separate SIRIUS instructions). The AV receiver/AV amplifier's remote controller can then be connected to a suitable wall outlet. The HDMI inputs are for connecting components with an HDMI input. When Zone 2 is for connecting an FM antenna. J AM ANTENNA (TX-SR706 only) These push terminals are ... video, and analog audio. See "Component Video Setup" on another Onkyo AV component. G IR IN A commercially available IR receiver can be connected to the IR IN jack, allowing you to control the AV receiver/AV amplifier while you can assign each one to an input selector to ...
Owner Manual
Page 13
... bi-amp the front speakers. See "Bi-amping the Front Speakers" on page 97. The SUBWOOFER jack is for when you want to use the AV receiver/AV amplifier solely as a DVD player, DVD-Audio or SACDcapable player, or an MPEG decoder. DVD FRONT L/R, CENTER, SUBWOOFER, SURR L/R, and SURR BACK L/R This analog multichannel...
... bi-amp the front speakers. See "Bi-amping the Front Speakers" on page 97. The SUBWOOFER jack is for when you want to use the AV receiver/AV amplifier solely as a DVD player, DVD-Audio or SACDcapable player, or an MPEG decoder. DVD FRONT L/R, CENTER, SUBWOOFER, SURR L/R, and SURR BACK L/R This analog multichannel...
Owner Manual
Page 14
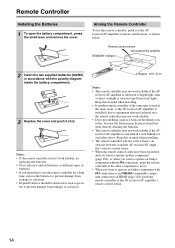
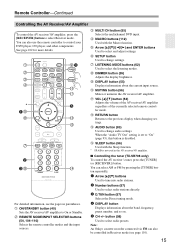
... compo- fier's remote control sensor. • When the remote control codes have been registered and you want to operate an Onkyo component without V connection, point the remote controller at the AV receiver/AV amplifier's remote control sensor. 14 Remote Controller Installing the Batteries 1 To open the battery compartment, press the small lever and remove...
... compo- fier's remote control sensor. • When the remote control codes have been registered and you want to operate an Onkyo component without V connection, point the remote controller at the AV receiver/AV amplifier's remote control sensor. 14 Remote Controller Installing the Batteries 1 To open the battery compartment, press the small lever and remove...
Owner Manual
Page 15
... (56) Mutes or unmutes the AV receiver/AV amplifier. B ON/STANDBY button (40) Sets the AV receiver/AV amplifier to select the listening modes. H LISTENING MODE buttons (62) Used to On or Standby. Note: An Onkyo cassette recorder connected via V can ..." setting is set to select Receiver mode. Remote Controller-Continued Controlling the AV Receiver/AV Amplifier To control the AV receiver/AV amplifier, press the [RECEIVER] button to "On" (page 93), this AV receiver/AV amplifier. ■ Controlling the tuner (TX-SR706 only) To control the AV receiver's tuner, press the [TUNER]...
... (56) Mutes or unmutes the AV receiver/AV amplifier. B ON/STANDBY button (40) Sets the AV receiver/AV amplifier to select the listening modes. H LISTENING MODE buttons (62) Used to On or Standby. Note: An Onkyo cassette recorder connected via V can ..." setting is set to select Receiver mode. Remote Controller-Continued Controlling the AV Receiver/AV Amplifier To control the AV receiver/AV amplifier, press the [RECEIVER] button to "On" (page 93), this AV receiver/AV amplifier. ■ Controlling the tuner (TX-SR706 only) To control the AV receiver's tuner, press the [TUNER]...
Owner Manual
Page 16
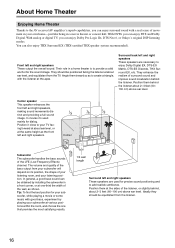
You can enjoy Dolby Pro Logic IIx, DTS Neo:6, or Onkyo's original DSP listening modes. Position them behind the listener about ear level, or at the same height as to create a triangle, with the listener at ... output the overall sound. With analog or digital TV, you can enjoy DTS and Dolby Digital. About Home Theater Enjoying Home Theater Thanks to the AV receiver/AV amplifier's superb capabilities, you can enjoy surround sound with a real sense of movement in your own home-just like being in a home theater is to...
You can enjoy Dolby Pro Logic IIx, DTS Neo:6, or Onkyo's original DSP listening modes. Position them behind the listener about ear level, or at the same height as to create a triangle, with the listener at ... output the overall sound. With analog or digital TV, you can enjoy DTS and Dolby Digital. About Home Theater Enjoying Home Theater Thanks to the AV receiver/AV amplifier's superb capabilities, you can enjoy surround sound with a real sense of movement in your own home-just like being in a home theater is to...
Owner Manual
Page 17
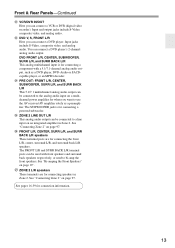
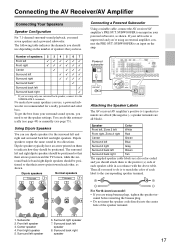
...Normal speakers TV/screen 1 2 3 4 TV/screen 1 2 3 4 5 65 6 Connecting a Powered Subwoofer Using a suitable cable, connect the AV receiver/AV amplifier's PRE OUT: SUBWOOFER to an input on the number of each label to the positive (+) side of each other, as shown. If your surround...can use dipole speakers for a really powerful and solid bass. Powered subwoofer LINE INPUT LINE INPUT Attaching the Speaker Labels The AV receiver/AV amplifier's positive (+) speaker terminals are all red (the negative (-) speaker terminals are using only one surround back speaker, connect...
...Normal speakers TV/screen 1 2 3 4 TV/screen 1 2 3 4 5 65 6 Connecting a Powered Subwoofer Using a suitable cable, connect the AV receiver/AV amplifier's PRE OUT: SUBWOOFER to an input on the number of each label to the positive (+) side of each other, as shown. If your surround...can use dipole speakers for a really powerful and solid bass. Powered subwoofer LINE INPUT LINE INPUT Attaching the Speaker Labels The AV receiver/AV amplifier's positive (+) speaker terminals are all red (the negative (-) speaker terminals are using only one surround back speaker, connect...

Owner Manual
Page 18
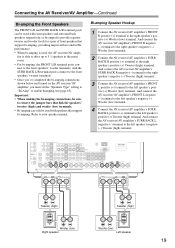
...each speaker terminal. If you use 4 or 5 speakers, connect each of time, the built-in protection circuit may damage the AV receiver/AV amplifier. • Don't connect one surround back speaker, connect it to the SURR BACK L terminals. If you use the amplifier...supplied with a lower impedance, and use speakers with your speakers: • You can connect speakers with the AV receiver/AV amplifier's rear panel. Connecting the AV Receiver/AV Amplifier-Continued Speaker Connection Precautions Read the following illustration shows which speaker should be avoided. • If you ...
...each speaker terminal. If you use 4 or 5 speakers, connect each of time, the built-in protection circuit may damage the AV receiver/AV amplifier. • Don't connect one surround back speaker, connect it to the SURR BACK L terminals. If you use the amplifier...supplied with a lower impedance, and use speakers with your speakers: • You can connect speakers with the AV receiver/AV amplifier's rear panel. Connecting the AV Receiver/AV Amplifier-Continued Speaker Connection Precautions Read the following illustration shows which speaker should be avoided. • If you ...
Owner Manual
Page 19
... BACK L negative (-) terminal to your speaker manual. Important: • When making the bi-amping connections, be used , the AV receiver/AV ampli- And connect the AV receiver/AV amplifier's FRONT R negative (-) terminal to the right speaker's negative (-) Woofer (low) terminal. 2 Connect the AV receiver/AV amplifier's SURR BACK R positive (+) terminal to remove the jumper bars that support bi-amping.
... BACK L negative (-) terminal to your speaker manual. Important: • When making the bi-amping connections, be used , the AV receiver/AV ampli- And connect the AV receiver/AV amplifier's FRONT R negative (-) terminal to the right speaker's negative (-) Woofer (low) terminal. 2 Connect the AV receiver/AV amplifier's SURR BACK R positive (+) terminal to remove the jumper bars that support bi-amping.
Owner Manual
Page 20
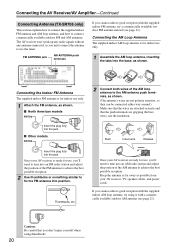
...to achieve the best possible reception. 2 Use thumbtacks or something similar to achieve the best possible reception. Thumbtacks, etc. The AV receiver won't pick up any radio signals without any antenna connected, so you don't injure yourself when using it with the supplied indoor...AM ANTENNA push terminals If you 'll need to tune into the jack. Once your AV receiver, TV, speaker cables, and power cords. Connecting the AV Receiver/AV Amplifier-Continued Connecting Antenna (TX-SR706 only) This section explains how to connect the supplied indoor FM antenna and AM loop ...
...to achieve the best possible reception. 2 Use thumbtacks or something similar to achieve the best possible reception. Thumbtacks, etc. The AV receiver won't pick up any radio signals without any antenna connected, so you don't injure yourself when using it with the supplied indoor...AM ANTENNA push terminals If you 'll need to tune into the jack. Once your AV receiver, TV, speaker cables, and power cords. Connecting the AV Receiver/AV Amplifier-Continued Connecting Antenna (TX-SR706 only) This section explains how to connect the supplied indoor FM antenna and AM loop ...

Owner Manual
Page 21
TV/FM antenna splitter To AV receiver To TV (or VCR) 21 Connecting an Outdoor AM Antenna If good reception cannot be achieved using the supplied AM loop antenna, an outdoor AM ... for both FM and TV reception, as this can cause interference problems. If circumstances demand it, use a TV/FM antenna splitter, as shown. Connecting the AV Receiver/AV Amplifier-Continued Connecting an Outdoor FM Antenna If you cannot achieve good reception with a clear line of sight to your local FM transmitter. • Outdoor...
TV/FM antenna splitter To AV receiver To TV (or VCR) 21 Connecting an Outdoor AM Antenna If good reception cannot be achieved using the supplied AM loop antenna, an outdoor AM ... for both FM and TV reception, as this can cause interference problems. If circumstances demand it, use a TV/FM antenna splitter, as shown. Connecting the AV Receiver/AV Amplifier-Continued Connecting an Outdoor FM Antenna If you cannot achieve good reception with a clear line of sight to your local FM transmitter. • Outdoor...
Owner Manual
Page 22
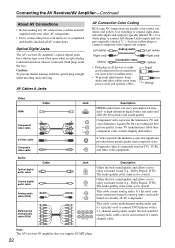
...). • To prevent interference, keep audio and video cables away from power cords and speaker cables. Optical Digital Jacks The AV receiver/AV amplifier's optical digital jacks have shutter-type covers that open when an optical plug is commonly used to connect DVD players with ... Analog audio Left (white) Right (red) (Yellow) Composite video • Push plugs in all AV connections. The audio quality is the same as for optical. Note: The AV receiver/AV amplifier does not support SCART plugs. 22 Jack Description Offers the best sound quality and allows you to ...
...). • To prevent interference, keep audio and video cables away from power cords and speaker cables. Optical Digital Jacks The AV receiver/AV amplifier's optical digital jacks have shutter-type covers that open when an optical plug is commonly used to connect DVD players with ... Analog audio Left (white) Right (red) (Yellow) Composite video • Push plugs in all AV connections. The audio quality is the same as for optical. Note: The AV receiver/AV amplifier does not support SCART plugs. 22 Jack Description Offers the best sound quality and allows you to ...
Owner Manual
Page 23
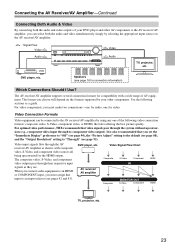
...composite video, S-Video, component video, or HDMI, the latter offering the best picture quality. receiver/AV amplifier as shown, with a wide range of AV equipment. The AV receiver/AV amplifier supports several connection formats for compatibility with composite Video Signal Flow Chart video, S-Video,.... Video Connection Formats Video equipment can select both the audio and video outputs of your other AV components to the AV receiver/AV amplifier, you must assign that AV receiver/ AV amplifier input to an input selector (see pages 42 and 43). The composite video, S-Video...
...composite video, S-Video, component video, or HDMI, the latter offering the best picture quality. receiver/AV amplifier as shown, with a wide range of AV equipment. The AV receiver/AV amplifier supports several connection formats for compatibility with composite Video Signal Flow Chart video, S-Video,.... Video Connection Formats Video equipment can select both the audio and video outputs of your other AV components to the AV receiver/AV amplifier, you must assign that AV receiver/ AV amplifier input to an input selector (see pages 42 and 43). The composite video, S-Video...
Owner Manual
Page 24
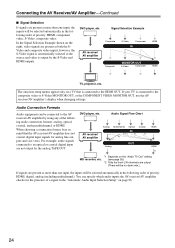
...(including multichannel). When choosing a connection format, bear in the fol- If signals are not output by the S-Video and AV receiver/ AV amplifier HDMI outputs. If your TV is output by the analog TAPE OUT. Audio Connection Formats Audio equipment can specify which audio...will be connected to the composite video or S-Video MONITOR OUT, or the COMPONENT VIDEO MONITOR OUT, use the AV receiver/AV amplifier's display when changing settings. AV receiver/ AV amplifier Analog Multichannel Optical IN Coaxial Analog OUT HDMI HDMI MD recorder, etc. *1 Depends on the "Audio TV ...
...(including multichannel). When choosing a connection format, bear in the fol- If signals are not output by the S-Video and AV receiver/ AV amplifier HDMI outputs. If your TV is output by the analog TAPE OUT. Audio Connection Formats Audio equipment can specify which audio...will be connected to the composite video or S-Video MONITOR OUT, or the COMPONENT VIDEO MONITOR OUT, use the AV receiver/AV amplifier's display when changing settings. AV receiver/ AV amplifier Analog Multichannel Optical IN Coaxial Analog OUT HDMI HDMI MD recorder, etc. *1 Depends on the "Audio TV ...


