

Owners Manual - English
Page 1
Operating Instructions AV RECEIVER TX-SR373
Operating Instructions AV RECEIVER TX-SR373
Owners Manual - English
Page 2
...Cleaning the unit 33 Specifications 33 Software license notice 35 2 Before you start 3 Checking what's in the box 3 Installing the receiver 3 Flow of settings on the receiver 3 1 Controls and displays Front panel 4 Display 5 Remote control 6 Loading the batteries 7 Operating range of remote control 7 ...to your system Choosing the listening mode 24 Listening in surround sound 24 Playing back in the receiver 15 3 Basic Setup Automatically setting up for buying this Onkyo product. Contents Thank you for surround sound (AccuEQ Room Calibration 16 Other problems when using ...
...Cleaning the unit 33 Specifications 33 Software license notice 35 2 Before you start 3 Checking what's in the box 3 Installing the receiver 3 Flow of settings on the receiver 3 1 Controls and displays Front panel 4 Display 5 Remote control 6 Loading the batteries 7 Operating range of remote control 7 ...to your system Choosing the listening mode 24 Listening in surround sound 24 Playing back in the receiver 15 3 Basic Setup Automatically setting up for buying this Onkyo product. Contents Thank you for surround sound (AccuEQ Room Calibration 16 Other problems when using ...
Owners Manual - English
Page 3
...AccuEQ Room Cal. This may distort) - in places where there is not included as necessary 1 Connecting the speakers Where you 've received the following the procedure below to do this unit, make the connections and settings. Check the manual that are very dusty - Don't ... the connected TV supports the HDMI Audio Return Channel function.) 5 Use the on your system • Automatically setting up your TV to the receiver. • About video outputs connection (page 11) • Connecting a TV and playback components (page 12) • Connecting antennas (page 14) ...
...AccuEQ Room Cal. This may distort) - in places where there is not included as necessary 1 Connecting the speakers Where you 've received the following the procedure below to do this unit, make the connections and settings. Check the manual that are very dusty - Don't ... the connected TV supports the HDMI Audio Return Channel function.) 5 Use the on your system • Automatically setting up your TV to the receiver. • About video outputs connection (page 11) • Connecting a TV and playback components (page 12) • Connecting antennas (page 14) ...

Owners Manual - English
Page 4
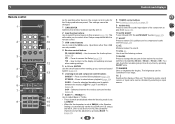
... GAME C D HOME ENTER RETURN T V TUNER USB MASTER VOLUME 8 2 4 31 PHONES TONE SETUP MIC USB 5V / 0.5A AV RECEIVER TX-SR373 9 10 11 12 1 ÍON/STANDBY 2 BLUETOOTH Switches to the BT Audio input 3 Remote sensor Receives the signals from the speakers. 10 TONE Switches the display between Bass settings and Treble settings. 11 TONE...
... GAME C D HOME ENTER RETURN T V TUNER USB MASTER VOLUME 8 2 4 31 PHONES TONE SETUP MIC USB 5V / 0.5A AV RECEIVER TX-SR373 9 10 11 12 1 ÍON/STANDBY 2 BLUETOOTH Switches to the BT Audio input 3 Remote sensor Receives the signals from the speakers. 10 TONE Switches the display between Bass settings and Treble settings. 11 TONE...

Owners Manual - English
Page 5
...61557; means the speaker system is off. 17 Sleep timer indicator Lights when the receiver is being received in sleep mode (page 6). 18 PRESET information or input signal indicator Shows the preset number of the receiver is switched on , this lights to indicate Pro Logic II decoding (see Listening...signals is detected. 96/24 - Shows when a preset radio station is detected. MEM - Lights when the character display is showing the currently received AM/FM broadcast frequency. 16 Speaker indicators Shows if the speaker system is on or not. Lights when a source with DTS 96/24 ...
...61557; means the speaker system is off. 17 Sleep timer indicator Lights when the receiver is being received in sleep mode (page 6). 18 PRESET information or input signal indicator Shows the preset number of the receiver is switched on , this lights to indicate Pro Logic II decoding (see Listening...signals is detected. 96/24 - Shows when a preset radio station is detected. MEM - Lights when the character display is showing the currently received AM/FM broadcast frequency. 16 Speaker indicators Shows if the speaker system is on or not. Lights when a source with DTS 96/24 ...
Owners Manual - English
Page 6
...). 11 M.OPT Press to restore CD quality sound to switch between the modes of this receiver (page 18). BAND 16 TUNER RC-928R Controls and displays As for the Onkyo products are not possible. 4 Receiver control buttons Q (QUICK MENU) - Operations other than USB are preset. Press to access...control the USB source. SURR - Switches between standby and on page 22. 9 AUDIO SEL Press to select Direct playback (page 24). 1 Remote control 1 RECEIVER BD/DVD CBL/SAT STRM BOX AUDIO SEL 9 LATE NIGHT 2 10 TOP MENU 11 3 QUICK MENU 12 4 13 5 6 SURR DSP TREBLE 7 DISPLAY...
...). 11 M.OPT Press to restore CD quality sound to switch between the modes of this receiver (page 18). BAND 16 TUNER RC-928R Controls and displays As for the Onkyo products are not possible. 4 Receiver control buttons Q (QUICK MENU) - Operations other than USB are preset. Press to access...control the USB source. SURR - Switches between standby and on page 22. 9 AUDIO SEL Press to select Direct playback (page 24). 1 Remote control 1 RECEIVER BD/DVD CBL/SAT STRM BOX AUDIO SEL 9 LATE NIGHT 2 10 TOP MENU 11 3 QUICK MENU 12 4 13 5 6 SURR DSP TREBLE 7 DISPLAY...

Owners Manual - English
Page 7
...batteries included with the unit are obstacles between the remote control and the receiver's remote sensor. • Direct sunlight or fluorescent light is shining onto the remote sensor. • The receiver is operated simultaneously with governmental regulations or environmental public institution's rules that ...the same shape may not last over a long period. We recommend using alkaline batteries that is emitting infrared rays. • The receiver is located near a heater. Observe the following precautions: - This can also reduce the life or performance of used batteries, please...
...batteries included with the unit are obstacles between the remote control and the receiver's remote sensor. • Direct sunlight or fluorescent light is shining onto the remote sensor. • The receiver is operated simultaneously with governmental regulations or environmental public institution's rules that ...the same shape may not last over a long period. We recommend using alkaline batteries that is emitting infrared rays. • The receiver is located near a heater. Observe the following precautions: - This can also reduce the life or performance of used batteries, please...

Owners Manual - English
Page 9
... work with a nominal impedance between 6 Ω and 16 Ω. Also make sure the positive and negative (+/-) terminals on the receiver match those on the left to the right (R) terminal and the speaker on the speakers. Subwoofer LINE LEVEL INPUT Front right Surround right Connecting your ...
... work with a nominal impedance between 6 Ω and 16 Ω. Also make sure the positive and negative (+/-) terminals on the receiver match those on the left to the right (R) terminal and the speaker on the speakers. Subwoofer LINE LEVEL INPUT Front right Surround right Connecting your ...
Owners Manual - English
Page 10
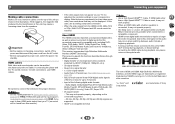
... ® The terms HDMI and HDMI High-Definition Multimedia Interface, and the HDMI Logo are trademarks or registered trademarks of Sony 10 This receiver supports the functions described below for both connections, use a (analog) composite connection. • When the video signal from the AC outlet...terminal Note • Use a High Speed HDMI®/™ Cable. "x.v.Color" and Corporation. If HDMI cable other countries. In this receiver). • If the video signal does not appear on your TV (no sound will be heard from the speakers. If connecting the ...
... ® The terms HDMI and HDMI High-Definition Multimedia Interface, and the HDMI Logo are trademarks or registered trademarks of Sony 10 This receiver supports the functions described below for both connections, use a (analog) composite connection. • When the video signal from the AC outlet...terminal Note • Use a High Speed HDMI®/™ Cable. "x.v.Color" and Corporation. If HDMI cable other countries. In this receiver). • If the video signal does not appear on your TV (no sound will be heard from the speakers. If connecting the ...
Owners Manual - English
Page 11
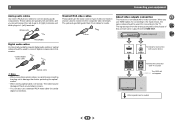
.... 11 TV Video signals can also use HDMI cables for connection with a video converter. Yellow VIDEO About video outputs connection This receiver is not loaded with TV monitor VIDEO The OSD will not be used to connect digital components to this unit will not appear...socket. • When storing optical cable, coil loosely. White (Left) Standard RCA video cables These cables are the most common type of this receiver. The signals input from cables for connecting to L (left) terminals. Playback component 2 4 31 Red (Right) Digital audio cables Commercially available ...
.... 11 TV Video signals can also use HDMI cables for connection with a video converter. Yellow VIDEO About video outputs connection This receiver is not loaded with TV monitor VIDEO The OSD will not be used to connect digital components to this unit will not appear...socket. • When storing optical cable, coil loosely. White (Left) Standard RCA video cables These cables are the most common type of this receiver. The signals input from cables for connecting to L (left) terminals. Playback component 2 4 31 Red (Right) Digital audio cables Commercially available ...
Owners Manual - English
Page 12
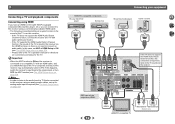
... the ARC function (see The HDMI Setup menu on page 30). - If the TV does not support the HDMI Audio Return Channel function, connect the receiver and TV with audio cables (as shown). - Please refer to the TV's operation manual for directions on page 30). 2 Connecting a TV and playback components ... HDMI or DVI (with HDCP) equipped component (Blu-ray Disc player, etc.), you switch the input of the TV to composite, the input of the receiver may automatically switch to TV. Note • In order to listen to the audio from HDMI. 12 HDMI IN HDMI/DVI-compatible TV R L OPTICAL ...
... the ARC function (see The HDMI Setup menu on page 30). - If the TV does not support the HDMI Audio Return Channel function, connect the receiver and TV with audio cables (as shown). - Please refer to the TV's operation manual for directions on page 30). 2 Connecting a TV and playback components ... HDMI or DVI (with HDCP) equipped component (Blu-ray Disc player, etc.), you switch the input of the TV to composite, the input of the receiver may automatically switch to TV. Note • In order to listen to the audio from HDMI. 12 HDMI IN HDMI/DVI-compatible TV R L OPTICAL ...
Owners Manual - English
Page 13
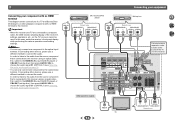
...method to connect the audio. In order to listen to the audio from the source component that is connected to this case, watch the receiver's front panel display while performing the various operations and making settings. OSD cannot be used. VIDEO OUT Blu-ray Disc/DVD player Select one... terminal to the coaxial input terminal. Note • You can only connect one component to the optical input terminal. Important • When the receiver and TV are connected by composite cable, the OSD function allowing display of a TV and Blu-ray Disc/ DVD player (or other playback component...
...method to connect the audio. In order to listen to the audio from the source component that is connected to this case, watch the receiver's front panel display while performing the various operations and making settings. OSD cannot be used. VIDEO OUT Blu-ray Disc/DVD player Select one... terminal to the coaxial input terminal. Note • You can only connect one component to the optical input terminal. Important • When the receiver and TV are connected by composite cable, the OSD function allowing display of a TV and Blu-ray Disc/ DVD player (or other playback component...
Owners Manual - English
Page 15
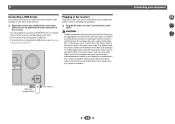
...mains plug from the wall socket when not in the cord or tie it damaged, ask your nearest Onkyo authorized service center or your dealer for a replacement. • The receiver should be stepped on. The power cords should be disconnected by tugging the cord and never touch ...once in after you an electrical shock. USB SETUP MIC USB 5V / 0.5A AV RECEIVER TX-SR373 USB mass storage device This receiver Connecting your components to be routed such that they are wet as this receiver, including the speakers. ... Plug the AC power cord into standby then connect your hands...
...mains plug from the wall socket when not in the cord or tie it damaged, ask your nearest Onkyo authorized service center or your dealer for a replacement. • The receiver should be stepped on. The power cords should be disconnected by tugging the cord and never touch ...once in after you an electrical shock. USB SETUP MIC USB 5V / 0.5A AV RECEIVER TX-SR373 USB mass storage device This receiver Connecting your components to be routed such that they are wet as this receiver, including the speakers. ... Plug the AC power cord into standby then connect your hands...
Owners Manual - English
Page 16
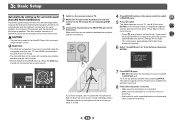
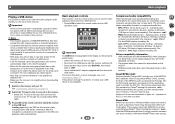
...Press button. Make sure there are output at your TV. TUNING PRESET HOME ENTER RETURN TUNER USB MASTER VOLUME SETUP MIC USB 5V / 0.5A AV RECEIVER TX-SR373 If you have a tripod, use it 's about ear level at high volume. Otherwise, place the microphone at any time, the... turned up for surround sound (AccuEQ Room Calibration) Place the supplied setup microphone in the AccuEQ Room Cal. from the listening position. QUICK MENU RECEIVER BD/DVD CBL/SAT STRM BOX AUDIO SEL LATE NIGHT SURR DSP TREBLE 1 Switch on the front panel. The system outputs a series of the...
...Press button. Make sure there are output at your TV. TUNING PRESET HOME ENTER RETURN TUNER USB MASTER VOLUME SETUP MIC USB 5V / 0.5A AV RECEIVER TX-SR373 If you have a tripod, use it 's about ear level at high volume. Otherwise, place the microphone at any time, the... turned up for surround sound (AccuEQ Room Calibration) Place the supplied setup microphone in the AccuEQ Room Cal. from the listening position. QUICK MENU RECEIVER BD/DVD CBL/SAT STRM BOX AUDIO SEL LATE NIGHT SURR DSP TREBLE 1 Switch on the front panel. The system outputs a series of the...
Owners Manual - English
Page 17
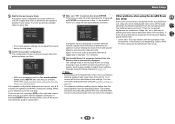
...cm (5 inches) will start automatically as possible while it is also possible to determine the optimum receiver settings for 10 seconds and ENTER is displayed on -screen while the receiver outputs more test tones to adjust these settings manually using the Speaker Setting on page 27). ...Cal. When you see Other problems when using the AccuEQ Room Cal. setup If the room environment is displayed on -screen while the receiver outputs test tones to be happening, switch off if necessary. This setting should reflect the actual speakers you excellent surround sound from the ...
...cm (5 inches) will start automatically as possible while it is also possible to determine the optimum receiver settings for 10 seconds and ENTER is displayed on -screen while the receiver outputs more test tones to adjust these settings manually using the Speaker Setting on page 27). ...Cal. When you see Other problems when using the AccuEQ Room Cal. setup If the room environment is displayed on -screen while the receiver outputs test tones to be happening, switch off if necessary. This setting should reflect the actual speakers you excellent surround sound from the ...
Owners Manual - English
Page 18
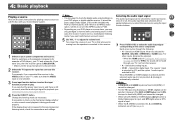
... to the source component. For other inputs, H cannot be selected. It cannot be changed . • When set this case, the receiver must be heard through the following: • H - to a multichannel listening mode if you selected the proper input source and there is... 4 Press the DIRECT button. 4: Basic playback Playing a source Here are the basic instructions for playing a source (such as necessary. RECEIVER QUAICUKDMIEONU BD/DVD CBL/SAT STRM BOX AUDIO SEL LATE NIGHT SURR DSP SURR DSP TREBLE TREBLE TOP MENU DDIISSPPLLAAYY TTUUNNININGG++ EEDDIITT SSLLEEEEPP 1...
... to the source component. For other inputs, H cannot be selected. It cannot be changed . • When set this case, the receiver must be heard through the following: • H - to a multichannel listening mode if you selected the proper input source and there is... 4 Press the DIRECT button. 4: Basic playback Playing a source Here are the basic instructions for playing a source (such as necessary. RECEIVER QUAICUKDMIEONU BD/DVD CBL/SAT STRM BOX AUDIO SEL LATE NIGHT SURR DSP SURR DSP TREBLE TREBLE TOP MENU DDIISSPPLLAAYY TTUUNNININGG++ EEDDIITT SSLLEEEEPP 1...
Owners Manual - English
Page 19
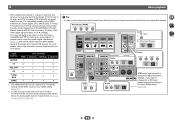
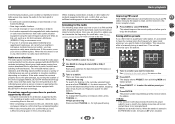
...-HD Master Audio and DVD Audio (including 192 kHz). With other digital signal formats, set the signal input to TV input, please change this receiver using a analog audio cables, set-up for the TV input by doing the following. To prevent noise, make the proper digital connections (page... (digital). • Some DVD players don't output DTS signals. 4 Basic playback • When digital input (optical or coaxial) is selected, this receiver can be used for analog audio input is required (see The Input Assign menu on page 29). Input function BD/DVD HDMI Input Terminals...
...-HD Master Audio and DVD Audio (including 192 kHz). With other digital signal formats, set the signal input to TV input, please change this receiver using a analog audio cables, set-up for the TV input by doing the following. To prevent noise, make the proper digital connections (page... (digital). • Some DVD players don't output DTS signals. 4 Basic playback • When digital input (optical or coaxial) is selected, this receiver can be used for analog audio input is required (see The Input Assign menu on page 29). Input function BD/DVD HDMI Input Terminals...
Owners Manual - English
Page 20
...(variable bit rate) MP3/WMA/MPEG-4 AAC playback: Yes (Note that although most standard bit/sampling rate combinations for the receiver to this receiver starts recognizing the USB device connected. About WMA WMA is incompatible. 20 Compressed audio compatibility Note that in the playlist are ...: 32 kHz/44.1 kHz/48 kHz; and other countries. It is not possible to connect this receiver to 320 kbps (128 kbps or higher recommended); Important • Onkyo cannot guarantee compatibility (operation and/or bus power) with copy-protection or restricted playback). • Compatible...
...(variable bit rate) MP3/WMA/MPEG-4 AAC playback: Yes (Note that although most standard bit/sampling rate combinations for the receiver to this receiver starts recognizing the USB device connected. About WMA WMA is incompatible. 20 Compressed audio compatibility Note that in the playlist are ...: 32 kHz/44.1 kHz/48 kHz; and other countries. It is not possible to connect this receiver to 320 kbps (128 kbps or higher recommended); Important • Onkyo cannot guarantee compatibility (operation and/or bus power) with copy-protection or restricted playback). • Compatible...
Owners Manual - English
Page 22
... the surrounding area. Each press switches the band between this unit, confirm that audio may experience radio wave interference. The receiver will start searching for stations in the surrounding area. When the station is left disconnected from various directions due to reflections by... the space between FM (stereo or mono) and AM. 3 Tune to a different place. The preset number stop blinking and the receiver stores the station. Precautions regarding connections to products supported by this unit • Complete connections for easy recall whenever you want to listen...
... the surrounding area. Each press switches the band between this unit, confirm that audio may experience radio wave interference. The receiver will start searching for stations in the surrounding area. When the station is left disconnected from various directions due to reflections by... the space between FM (stereo or mono) and AM. 3 Tune to a different place. The preset number stop blinking and the receiver stores the station. Precautions regarding connections to products supported by this unit • Complete connections for easy recall whenever you want to listen...
Owners Manual - English
Page 24
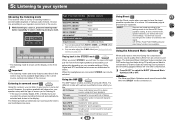
...as well as with various soundtracks to the number of channels in the display. 5: Listening to your system Choosing the listening mode This receiver offers a variety of listening modes to compressed 2-channel audio by restoring sound pressure and smoothing jagged artifacts left and right speakers (and possibly...see which you can also adjust the C.IMG effect (see Setting the Audio options on the current source, settings and status of the receiver. Press M.OPT to the settings made in the STEREO mode STEREO STEREO When you select STEREO, you will depend on your speaker ...
...as well as with various soundtracks to the number of channels in the display. 5: Listening to your system Choosing the listening mode This receiver offers a variety of listening modes to compressed 2-channel audio by restoring sound pressure and smoothing jagged artifacts left and right speakers (and possibly...see which you can also adjust the C.IMG effect (see Setting the Audio options on the current source, settings and status of the receiver. Press M.OPT to the settings made in the STEREO mode STEREO STEREO When you select STEREO, you will depend on your speaker ...


