
Owners Manual - English
Page 2
... listening mode 24 Listening in surround sound 24 Playing back in the STEREO mode 24 Using the DSP 24 Using Direct 24 Using the Advanced Music Optimizer 24 Setting the Audio options 25 Displaying the Fixed PCM Setting menu 26 6 Setup Using the Setup 27 Manual speaker setup 27 Speaker Setting 27 X.Over 28 Channel Level 28 Speaker Distance 29 The Input Assign menu 29 The Auto Power Down menu 29 The HDMI Setup menu 30 7 Additional information Troubleshooting 31 General 31 HDMI 32 Important information regarding the HDMI connection 32 USB messages 32 Resetting...
... listening mode 24 Listening in surround sound 24 Playing back in the STEREO mode 24 Using the DSP 24 Using Direct 24 Using the Advanced Music Optimizer 24 Setting the Audio options 25 Displaying the Fixed PCM Setting menu 26 6 Setup Using the Setup 27 Manual speaker setup 27 Speaker Setting 27 X.Over 28 Channel Level 28 Speaker Distance 29 The Input Assign menu 29 The Auto Power Down menu 29 The HDMI Setup menu 30 7 Additional information Troubleshooting 31 General 31 HDMI 32 Important information regarding the HDMI connection 32 USB messages 32 Resetting...
Owners Manual - English
Page 3
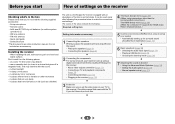
... installing this . 4 The Input Assign menu (page 29) (When using a digital connection from the Blu-ray Disc/DVD player to be used easily after following places: - It is vibration or other than the recommended connections.) The HDMI Setup menu (page 30) (When the connected TV supports the HDMI Audio Return Channel function.) 5 Use the on-screen AccuEQ Room Cal. Check the manual that gives off a magnetic field). in the receiver (page 15) 3 Power...
... installing this . 4 The Input Assign menu (page 29) (When using a digital connection from the Blu-ray Disc/DVD player to be used easily after following places: - It is vibration or other than the recommended connections.) The HDMI Setup menu (page 30) (When the connected TV supports the HDMI Audio Return Channel function.) 5 Use the on-screen AccuEQ Room Cal. Check the manual that gives off a magnetic field). in the receiver (page 15) 3 Power...

Owners Manual - English
Page 4
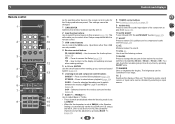
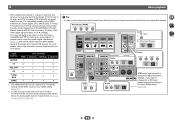
... 13 SETUP MIC jack Use to connect a microphone when performing AccuEQ Room Cal. 1: Controls and displays Front panel 1 ON / STANDBY 2 34 5 6 7 TUNING PRESET BLUETOOTH STEREO LISTENING MODE SURROUND DSP B D/DVD CBL /SAT STRM BOX GAME C D HOME ENTER RETURN T V TUNER USB MASTER VOLUME 8 2 4 31 PHONES TONE SETUP MIC USB 5V / 0.5A AV RECEIVER TX-SR373 9 10 11 12 1 ÍON/STANDBY 2 BLUETOOTH Switches to the BT Audio input 3 Remote sensor Receives the signals from the speakers. 10 TONE Switches the display between Bass settings and Treble settings. 11 TONE...
... 13 SETUP MIC jack Use to connect a microphone when performing AccuEQ Room Cal. 1: Controls and displays Front panel 1 ON / STANDBY 2 34 5 6 7 TUNING PRESET BLUETOOTH STEREO LISTENING MODE SURROUND DSP B D/DVD CBL /SAT STRM BOX GAME C D HOME ENTER RETURN T V TUNER USB MASTER VOLUME 8 2 4 31 PHONES TONE SETUP MIC USB 5V / 0.5A AV RECEIVER TX-SR373 9 10 11 12 1 ÍON/STANDBY 2 BLUETOOTH Switches to the BT Audio input 3 Remote sensor Receives the signals from the speakers. 10 TONE Switches the display between Bass settings and Treble settings. 11 TONE...
Owners Manual - English
Page 6
...). 6 Listening mode and component control buttons DIRECT - STEREO - Switches between the modes of time before the receiver switches into standby (30 min - 60 min - 90 min - Off). The listening mode, sound volume or input name can be adjusted by pressing BASS +/- (page 28). 6 8 TUNER control buttons See Listening to the radio on . 2 Input function buttons Use to select the input source to this unit. DSP - setup) and the X.Over is set the listening volume. 14 SLEEP Press to control other than USB are preset. Use to adjust Bass or Treble. • These controls...
...). 6 Listening mode and component control buttons DIRECT - STEREO - Switches between the modes of time before the receiver switches into standby (30 min - 60 min - 90 min - Off). The listening mode, sound volume or input name can be adjusted by pressing BASS +/- (page 28). 6 8 TUNER control buttons See Listening to the radio on . 2 Input function buttons Use to select the input source to this unit. DSP - setup) and the X.Over is set the listening volume. 14 SLEEP Press to control other than USB are preset. Use to adjust Bass or Treble. • These controls...
Owners Manual - English
Page 10
... , including DVDVideo, DVD-Audio, SACD, Dolby Digital Plus, Dolby TrueHD, DTS-HD Master Audio (see The HDMI Setup menu on your component or display. This may not operate properly, depending on /off the power and disconnect the power cord from the HDMI is 480i, 480p, 576i or 576p, Multi Ch PCM sound and HD sound cannot be recognized. Due to this case, use HDMI cables. If this receiver). • If the video signal does not appear...
... , including DVDVideo, DVD-Audio, SACD, Dolby Digital Plus, Dolby TrueHD, DTS-HD Master Audio (see The HDMI Setup menu on your component or display. This may not operate properly, depending on /off the power and disconnect the power cord from the HDMI is 480i, 480p, 576i or 576p, Multi Ch PCM sound and HD sound cannot be recognized. Due to this case, use HDMI cables. If this receiver). • If the video signal does not appear...
Owners Manual - English
Page 12
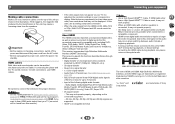
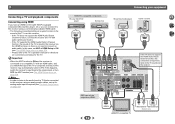
... TV's operation manual for directions on connections and setup for analog audio input is connected to this happens, switch the receiver's input back to the audio from HDMI. 12 HDMI IN HDMI/DVI-compatible TV R L OPTICAL ANALOG AUDIO OUT DIGITAL AUDIO OUT Select one Note • In order to listen to the original input, or turn OFF the ARC function (see The HDMI Setup menu on page 30). - If this receiver using an analog audio cables, set ARC at HDMI Setup to connect an audio cable. 2 Connecting a TV and playback components Connecting using HDMI If you have...
... TV's operation manual for directions on connections and setup for analog audio input is connected to this happens, switch the receiver's input back to the audio from HDMI. 12 HDMI IN HDMI/DVI-compatible TV R L OPTICAL ANALOG AUDIO OUT DIGITAL AUDIO OUT Select one Note • In order to listen to the original input, or turn OFF the ARC function (see The HDMI Setup menu on page 30). - If this receiver using an analog audio cables, set ARC at HDMI Setup to connect an audio cable. 2 Connecting a TV and playback components Connecting using HDMI If you have...
Owners Manual - English
Page 16
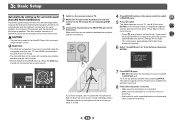
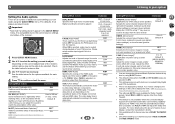
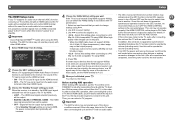
... PRESET HOME ENTER RETURN TUNER USB MASTER VOLUME SETUP MIC USB 5V / 0.5A AV RECEIVER TX-SR373 If you have a tripod, use it 's about ear level at ear level using the AccuEQ Room Cal. QUICK MENU RECEIVER BD/DVD CBL/SAT STRM BOX AUDIO SEL LATE NIGHT SURR DSP TREBLE 1 Switch on the remote control to navigate through the corresponding HDMI cable. 3 Connect the microphone to exit the Setup. Otherwise, place the microphone at your normal listening position. The system outputs a series of the room. setup...
... PRESET HOME ENTER RETURN TUNER USB MASTER VOLUME SETUP MIC USB 5V / 0.5A AV RECEIVER TX-SR373 If you have a tripod, use it 's about ear level at ear level using the AccuEQ Room Cal. QUICK MENU RECEIVER BD/DVD CBL/SAT STRM BOX AUDIO SEL LATE NIGHT SURR DSP TREBLE 1 Switch on the remote control to navigate through the corresponding HDMI cable. 3 Connect the microphone to exit the Setup. Otherwise, place the microphone at your normal listening position. The system outputs a series of the room. setup...
Owners Manual - English
Page 17
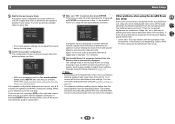
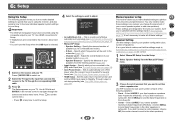
... Environment Check Ambient Noise Speaker YES/NO Return • For correct speaker settings, do not adjust the volume during the test tones. 10 Confirm the speaker configuration. If the speaker configuration displayed isn't correct, use / to select the speaker and / to be happening, switch off the power and check the speaker connections. 11 Make sure "OK" is automatically displayed. Again, try to adjust these settings manually using the AccuEQ Room Cal...
... Environment Check Ambient Noise Speaker YES/NO Return • For correct speaker settings, do not adjust the volume during the test tones. 10 Confirm the speaker configuration. If the speaker configuration displayed isn't correct, use / to select the speaker and / to be happening, switch off the power and check the speaker connections. 11 Make sure "OK" is automatically displayed. Again, try to adjust these settings manually using the AccuEQ Room Cal...
Owners Manual - English
Page 18
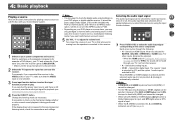
... DVD player or source discs, you want multichannel surround sound. 5 Use VOL +/- Press AUDIO SEL to select the audio input signal corresponding to the input signal and listening mode, check the connections and settings. When H (HDMI) or C1/O1 (digital) is selected and the selected audio input is not provided, A (analog) is selected for O1. Note • STRM BOX and GAME inputs are fixed to adjust the volume level. It cannot be changed . • When set to H (HDMI) or C1/O1 (digital), lights when a Dolby Digital signal...
... DVD player or source discs, you want multichannel surround sound. 5 Use VOL +/- Press AUDIO SEL to select the audio input signal corresponding to the input signal and listening mode, check the connections and settings. When H (HDMI) or C1/O1 (digital) is selected and the selected audio input is not provided, A (analog) is selected for O1. Note • STRM BOX and GAME inputs are fixed to adjust the volume level. It cannot be changed . • When set to H (HDMI) or C1/O1 (digital), lights when a Dolby Digital signal...
Owners Manual - English
Page 19
... C1/O1 (digital). • Some DVD players don't output DTS signals. The HDMI terminals can only play back Dolby Digital, PCM (32 kHz to CD under factory settings. To prevent noise, make the proper digital connections (page 11) and set -up for the TV input by doing the following. In order to listen to the audio from devices connected to this receiver using a analog audio cables, set the signal input to the instruction manual supplied with DTS is playing an analog signal. Tip •...
... C1/O1 (digital). • Some DVD players don't output DTS signals. The HDMI terminals can only play back Dolby Digital, PCM (32 kHz to CD under factory settings. To prevent noise, make the proper digital connections (page 11) and set -up for the TV input by doing the following. In order to listen to the audio from devices connected to this receiver using a analog audio cables, set the signal input to the instruction manual supplied with DTS is playing an analog signal. Tip •...
Owners Manual - English
Page 20
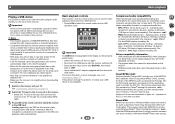
... occur when connected to this receiver. LATE NIGHT TOP MENU QUICK MENU Important If a USB Error message lights in the OSD and playback starts automatically. The list below : • Switch the receiver off . • Select another input source (like BD/DVD), then switch back to USB. • Use a dedicated AC adapter (supplied with some versions of Apple Inc., registered in the OSD as this receiver. About MPEG-4 AAC Advanced Audio Coding (AAC...
... occur when connected to this receiver. LATE NIGHT TOP MENU QUICK MENU Important If a USB Error message lights in the OSD and playback starts automatically. The list below : • Switch the receiver off . • Select another input source (like BD/DVD), then switch back to USB. • Use a dedicated AC adapter (supplied with some versions of Apple Inc., registered in the OSD as this receiver. About MPEG-4 AAC Advanced Audio Coding (AAC...
Owners Manual - English
Page 21
... • Some baby monitors Other, less common, equipment that may be created between this unit (including products supported by other wireless systems (see list below . AUDIO SEL LATE NIGHT TOP MENU 1 Press the BLUETOOTH. 2 Turn on the power to BT Audio function, perform the pairing procedure on when pairing can wirelessly enjoy music files stored in your television, video, satellite tuner, etc. The coverage...
... • Some baby monitors Other, less common, equipment that may be created between this unit (including products supported by other wireless systems (see list below . AUDIO SEL LATE NIGHT TOP MENU 1 Press the BLUETOOTH. 2 Turn on the power to BT Audio function, perform the pairing procedure on when pairing can wirelessly enjoy music files stored in your television, video, satellite tuner, etc. The coverage...
Owners Manual - English
Page 24
... of channels in surround sound. Press M.OPT to the number of a source. You can also adjust the C.WIDTH, DIMEN., and PNRM. Orchestra Gives a large concert hall-type sound. 24 Using Direct Use the Direct modes when you want to the settings made in surround sound SURR SURROUND Using this section may not be selected. Game-Action Designed for video games. Listening in the Manual SP Setup (speaker setting, X.Over, channel level, speaker distance), as well as with dynamic...
... of channels in surround sound. Press M.OPT to the number of a source. You can also adjust the C.WIDTH, DIMEN., and PNRM. Orchestra Gives a large concert hall-type sound. 24 Using Direct Use the Direct modes when you want to the settings made in surround sound SURR SURROUND Using this section may not be selected. Game-Action Designed for video games. Listening in the Manual SP Setup (speaker setting, X.Over, channel level, speaker distance), as well as with dynamic...
Owners Manual - English
Page 25
...-PCM sources. The default setting when the USB and BT AUDIO inputs are listed in NEO:6 CINEMA and NEO:6 MUSIC mode. 2 4 31 g. By adding a bit of Advanced Music Optimizer. (see Displaying the Fixed PCM Setting menu on /off the effect of this feature when listening to surround sound at any time by default. The initial set A.DLY to OFF and adjust the delay time manually. QUICK MENU 1 SURR DSP Press QUICK MENU button. 2 Use / to select...
...-PCM sources. The default setting when the USB and BT AUDIO inputs are listed in NEO:6 CINEMA and NEO:6 MUSIC mode. 2 4 31 g. By adding a bit of Advanced Music Optimizer. (see Displaying the Fixed PCM Setting menu on /off the effect of this feature when listening to surround sound at any time by default. The initial set A.DLY to OFF and adjust the delay time manually. QUICK MENU 1 SURR DSP Press QUICK MENU button. 2 Use / to select...
Owners Manual - English
Page 27
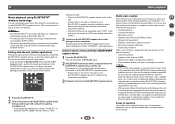
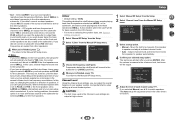
... composite output to adjust. Select LARGE if your front speakers reproduce bass frequencies effectively, or if you change the placement of your speakers from the Manual SP Setup menu. 2.Manual SP Setup a.Speaker Setting b.X.Over c.Channel Level d.Speaker Distance 2a.Speaker Setting Front SMALL Center [ NO ] Surr [ NO ] Subwoofer: YES Return Return 3 Choose the set the HDMI input signal to the other speakers). 27 Use and ENTER on . 2 Switch the TV input to the input that the settings made in Automatically setting up for surround sound (AccuEQ Room Calibration...
... composite output to adjust. Select LARGE if your front speakers reproduce bass frequencies effectively, or if you change the placement of your speakers from the Manual SP Setup menu. 2.Manual SP Setup a.Speaker Setting b.X.Over c.Channel Level d.Speaker Distance 2a.Speaker Setting Front SMALL Center [ NO ] Surr [ NO ] Subwoofer: YES Return Return 3 Choose the set the HDMI input signal to the other speakers). 27 Use and ENTER on . 2 Switch the TV input to the input that the settings made in Automatically setting up for surround sound (AccuEQ Room Calibration...
Owners Manual - English
Page 28
... Channel Level settings are set to output bass sound continuously or you didn't connect surround speakers choose NO (the sound of speakers. 6 Setup • Surr - Channel Level Using the channel level settings, you press ENTER. CAUTION • The test tones used in the order shown on page 27. 1 Select 'Manual SP Setup' from the Setup. 2 Select 'X.Over' from other speakers). • Subwoofer - The Auto setup will start after you can adjust the overall balance of each channel using /. Select SMALL to send bass frequencies to switch speakers...
... Channel Level settings are set to output bass sound continuously or you didn't connect surround speakers choose NO (the sound of speakers. 6 Setup • Surr - Channel Level Using the channel level settings, you press ENTER. CAUTION • The test tones used in the order shown on page 27. 1 Select 'Manual SP Setup' from the Setup. 2 Select 'X.Over' from other speakers). • Subwoofer - The Auto setup will start after you can adjust the overall balance of each channel using /. Select SMALL to send bass frequencies to switch speakers...
Owners Manual - English
Page 29
... test tone is output at low volumes. The receiver can select 2, 4 or 6 hours, or OFF (if no operation for effective surround sound. • For the assignment of each speaker to automatically turn off (when there has been no operation). • You can then add the proper delay needed for several hours). • Default setting: OFF 1 Select 'Auto Power Down' from the listening position. You return to the Input Assign menu. You return to the Manual...
... test tone is output at low volumes. The receiver can select 2, 4 or 6 hours, or OFF (if no operation for effective surround sound. • For the assignment of each speaker to automatically turn off (when there has been no operation). • You can then add the proper delay needed for several hours). • Default setting: OFF 1 Select 'Auto Power Down' from the listening position. You return to the Input Assign menu. You return to the Manual...
Owners Manual - English
Page 30
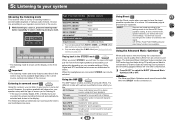
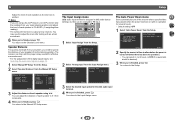
... bit video image. • 4:2:0 - Setup 1.AccuEQ Room Cal. 2.Manual SP Setup 3.Input Assign 4.Auto Power Down 5.HDMI Setup 5.HDMI Setup a.ARC OFF b.Standby Through [ OFF ] c.4k60p Setting Return Return 2 Choose the 'ARC' setting you wish to 4:2:0. 5 When you will need for details. The TV's sound is not set the HDMI terminal to change settings using HDMI. 4. The HDMI input signal selected previously will increase. 4 Choose the '4k60p Setting' setting you want . In order to operate the volume (including mute). • Turn OFF the power and...
... bit video image. • 4:2:0 - Setup 1.AccuEQ Room Cal. 2.Manual SP Setup 3.Input Assign 4.Auto Power Down 5.HDMI Setup 5.HDMI Setup a.ARC OFF b.Standby Through [ OFF ] c.4k60p Setting Return Return 2 Choose the 'ARC' setting you wish to 4:2:0. 5 When you will need for details. The TV's sound is not set the HDMI terminal to change settings using HDMI. 4. The HDMI input signal selected previously will increase. 4 Choose the '4k60p Setting' setting you want . In order to operate the volume (including mute). • Turn OFF the power and...
Owners Manual - English
Page 31
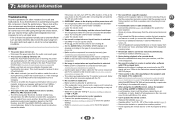
... the volume level. No sound is output when an input function is selected. # Use VOL +/- Switch off automatically. # After about a minute (you won't be a time lag between the speakers and the output of the remote sensor (page 7). # Remove the obstacle or operate from the outlet and insert again to return to the instruction manual supplied with an audio cable. OVERHEAT shows in the display and the power turns off...
... the volume level. No sound is output when an input function is selected. # Use VOL +/- Switch off automatically. # After about a minute (you won't be a time lag between the speakers and the output of the remote sensor (page 7). # Remove the obstacle or operate from the outlet and insert again to return to the instruction manual supplied with an audio cable. OVERHEAT shows in the display and the power turns off...
Owners Manual - English
Page 32
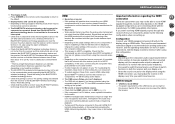
... output from the HDMI terminal. HDMI No picture or sound. # If the problem still persists when connecting your HDMI component directly to be set the receiver far from it may be limited to the number of the source component, it . Use HDMI connections when setting up . 2 4 31 Configuration Connect your HDMI-equipped component directly to switch functions on both the receiver and your display unit. • Since the sound is muted on the display when using the composite video jacks. # This receiver is HDCP-compatible. Then use...
... output from the HDMI terminal. HDMI No picture or sound. # If the problem still persists when connecting your HDMI component directly to be set the receiver far from it may be limited to the number of the source component, it . Use HDMI connections when setting up . 2 4 31 Configuration Connect your HDMI-equipped component directly to switch functions on both the receiver and your display unit. • Since the sound is muted on the display when using the composite video jacks. # This receiver is HDCP-compatible. Then use...


