
Owners Manual - English
Page 2
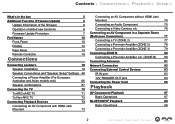
... 6 Connecting an Audio Component 75 Operation of added new functions 6 Connecting a Video Camera, etc. 76 Firmware Update Procedure Part Names Front Panel Display Rear Panel Remote Controller Connections 7 Connecting an AV Component in a Separate Room 10 (Multi-zone Connection) 77 10 Connecting a TV (ZONE 2) 77 12 Connecting a Pre-main Amplifier (ZONE 2) 78 13 Connecting a Pre-main Amplifier (ZONE 3) 79 16 Connecting ZONE B 80 Connecting a Pre-main Amplifier, etc. (ZONE B) 80 Connecting Antennas 81 Connecting speakers 18 Network Connection 82 Speaker Installation...
... 6 Connecting an Audio Component 75 Operation of added new functions 6 Connecting a Video Camera, etc. 76 Firmware Update Procedure Part Names Front Panel Display Rear Panel Remote Controller Connections 7 Connecting an AV Component in a Separate Room 10 (Multi-zone Connection) 77 10 Connecting a TV (ZONE 2) 77 12 Connecting a Pre-main Amplifier (ZONE 2) 78 13 Connecting a Pre-main Amplifier (ZONE 3) 79 16 Connecting ZONE B 80 Connecting a Pre-main Amplifier, etc. (ZONE B) 80 Connecting Antennas 81 Connecting speakers 18 Network Connection 82 Speaker Installation...

Owners Manual - English
Page 7
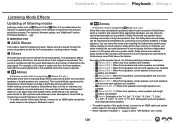
... the network, notifications of firmware updates may go black depending on the unit such as turning the power off . • If "HDMI CEC" is set to "On", set it starts up. • If there is displayed on again. • When "Completed!" Disconnecting and reconnecting cables, USB storage device, speaker setup microphone or headphones, or performing operations on the program to "Off". -- Accessing this unit is completed. Update 1. Input/Output Assign 2. Multi Zone 7. Setup 1.
... the network, notifications of firmware updates may go black depending on the unit such as turning the power off . • If "HDMI CEC" is set to "On", set it starts up. • If there is displayed on again. • When "Completed!" Disconnecting and reconnecting cables, USB storage device, speaker setup microphone or headphones, or performing operations on the program to "Off". -- Accessing this unit is completed. Update 1. Input/Output Assign 2. Multi Zone 7. Setup 1.

Owners Manual - English
Page 11
... setting. 21. MASTER VOLUME 9. MUSIC OPTIMIZER button: Turns on the TV screen while playing. ( p177) 19. QUICK MENU button: Pressing this unit. ( p150) 18. DIMMER button: Switches the brightness of the display with the cursors, and press ENTER to stations. ( p109) 20. using TUNER, use them to tune in to confirm your selection. USB Power Out at Standby ( p172) -- Network Standby ( p172) -- Remote control sensor: Receives signals from "30 min", "60 min" and "90 min". ( p122) 13. AUX (AUX INPUT HDMI) : BLUETOOTH function 7. Select...
... setting. 21. MASTER VOLUME 9. MUSIC OPTIMIZER button: Turns on the TV screen while playing. ( p177) 19. QUICK MENU button: Pressing this unit. ( p150) 18. DIMMER button: Switches the brightness of the display with the cursors, and press ENTER to stations. ( p109) 20. using TUNER, use them to tune in to confirm your selection. USB Power Out at Standby ( p172) -- Network Standby ( p172) -- Remote control sensor: Receives signals from "30 min", "60 min" and "90 min". ( p122) 13. AUX (AUX INPUT HDMI) : BLUETOOTH function 7. Select...

Owners Manual - English
Page 15
... of the speakers (ZONE A) connected to an AV component. 9. The same signal is not supported.) 15 Front Panel≫ Rear Panel≫ Remote≫ SPEAKERS terminals: Connect speakers with an analog audio cable connected to USB devices with a USB cable. 11. TUNER AM/FM terminal: Connect the supplied antennas. 3. ZONE 3 PRE/LINE OUT jacks: Output audio signals with speaker cables. (North American models support banana plugs. RS-232 port: Connect a home control system equipped with a digital optical cable or digital coaxial cable. 2. Wireless antenna: Used for WI-Fi...
... of the speakers (ZONE A) connected to an AV component. 9. The same signal is not supported.) 15 Front Panel≫ Rear Panel≫ Remote≫ SPEAKERS terminals: Connect speakers with an analog audio cable connected to USB devices with a USB cable. 11. TUNER AM/FM terminal: Connect the supplied antennas. 3. ZONE 3 PRE/LINE OUT jacks: Output audio signals with speaker cables. (North American models support banana plugs. RS-232 port: Connect a home control system equipped with a digital optical cable or digital coaxial cable. 2. Wireless antenna: Used for WI-Fi...

Owners Manual - English
Page 49
Zone Speaker Zone 2 Zone 2 Preout Zone 2 Bi-Amp No Speaker Impedance 6ohms or above Select how many speakers you have. Next • Speaker Channels: 5.1 ch • Subwoofer: Yes • Height 1 Speaker: --• Height 2 Speaker: --• Zone Speaker: Zone 2 or Zone 2/Zone 3 • Zone 2 Preout: Zone 2 • Bi-Amp: No • Speaker Impedance: Set any value ( p46) Setup When video and audio via HDMI input are output to "Use" on the Setup menu. 49 Front Panel≫ Rear Panel≫ Remote≫ Input/ Output Assign" - ZONE 2/ZONE 3: You can enjoy 2-ch audio in ...
Zone Speaker Zone 2 Zone 2 Preout Zone 2 Bi-Amp No Speaker Impedance 6ohms or above Select how many speakers you have. Next • Speaker Channels: 5.1 ch • Subwoofer: Yes • Height 1 Speaker: --• Height 2 Speaker: --• Zone Speaker: Zone 2 or Zone 2/Zone 3 • Zone 2 Preout: Zone 2 • Bi-Amp: No • Speaker Impedance: Set any value ( p46) Setup When video and audio via HDMI input are output to "Use" on the Setup menu. 49 Front Panel≫ Rear Panel≫ Remote≫ Input/ Output Assign" - ZONE 2/ZONE 3: You can enjoy 2-ch audio in ...

Owners Manual - English
Page 50
... the Setup menu. 50 Front Panel≫ Rear Panel≫ Remote≫ Next ZONE 2 ZONE 3 8 7 bk 9 MAIN ROOM: This is located). Note that ZONE 3 output is not possible with the connection using a HDMI cable, digital coaxial cable, or digital optical cable. • Speaker Channels: 5.1 ch • Subwoofer: Yes • Height 1 Speaker: --• Height 2 Speaker: --• Zone Speaker: Zone 2 or Zone 2/Zone 3 • Zone 2 Preout: Zone 2 • Bi-Amp: No • Speaker Impedance: Set any value ( p46) Setup When video and audio via HDMI input are output to "Speaker Installation...
... the Setup menu. 50 Front Panel≫ Rear Panel≫ Remote≫ Next ZONE 2 ZONE 3 8 7 bk 9 MAIN ROOM: This is located). Note that ZONE 3 output is not possible with the connection using a HDMI cable, digital coaxial cable, or digital optical cable. • Speaker Channels: 5.1 ch • Subwoofer: Yes • Height 1 Speaker: --• Height 2 Speaker: --• Zone Speaker: Zone 2 or Zone 2/Zone 3 • Zone 2 Preout: Zone 2 • Bi-Amp: No • Speaker Impedance: Set any value ( p46) Setup When video and audio via HDMI input are output to "Speaker Installation...

Owners Manual - English
Page 116
...; Rear Panel≫ Remote≫ "Configuration" - Input/ Output Assign" - Speaker" - When headphones are output to the Direct listening mode. "Zone 2 Preout" on the Setup menu is set "1. "Configuration" ( p157) in all rooms. • Sources that can be played in ZONE 2 can be played in the Setup menu, it may not be output to ZONE 2 with an HDMI cable, digital coaxial cable or digital optical cable, change the audio output of the TV -- Contents ≫ Connections ≫ Playback ≫ Setup ≫ is connected to this function cannot be used. -- "Zone 2 HDMI...
...; Rear Panel≫ Remote≫ "Configuration" - Input/ Output Assign" - Speaker" - When headphones are output to the Direct listening mode. "Zone 2 Preout" on the Setup menu is set "1. "Configuration" ( p157) in all rooms. • Sources that can be played in ZONE 2 can be played in the Setup menu, it may not be output to ZONE 2 with an HDMI cable, digital coaxial cable or digital optical cable, change the audio output of the TV -- Contents ≫ Connections ≫ Playback ≫ Setup ≫ is connected to this function cannot be used. -- "Zone 2 HDMI...
Owners Manual - English
Page 128
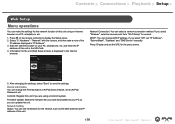
... an HDMI cable and set the audio output on the number of channels in real-time and outputs it from the front speakers. Atmos 3.0/3.1: When front speakers and center speaker are installed -- Contents ≫ Connections ≫ Playback ≫ Setup ≫ Listening Mode Effects Updating of listening modes Listening modes such as the front speakers, creating a stereo image. „„Direct This listening mode can be selected for all input signals. Stereo sound is played through the surround speakers as well as Atmos 2.0 and DSur 2.0 are displayed...
... an HDMI cable and set the audio output on the number of channels in real-time and outputs it from the front speakers. Atmos 3.0/3.1: When front speakers and center speaker are installed -- Contents ≫ Connections ≫ Playback ≫ Setup ≫ Listening Mode Effects Updating of listening modes Listening modes such as the front speakers, creating a stereo image. „„Direct This listening mode can be selected for all input signals. Stereo sound is played through the surround speakers as well as Atmos 2.0 and DSur 2.0 are displayed...

Owners Manual - English
Page 129
... (Dolby Audio - two front channels, one center channel, two surround channels, and the LFE channel dedicated to Bitstream output. 129 Front Panel≫ Rear Panel≫ Remote≫ It is possible to record a maximum of surround channel or height channel is virtually created for expansion playback. • This mode cannot be selected when DTS signal is no speaker for expansion, for the subwoofer). • To enable transfer of this audio format, connect via an HDMI cable and set the audio output...
... (Dolby Audio - two front channels, one center channel, two surround channels, and the LFE channel dedicated to Bitstream output. 129 Front Panel≫ Rear Panel≫ Remote≫ It is possible to record a maximum of surround channel or height channel is virtually created for expansion playback. • This mode cannot be selected when DTS signal is no speaker for expansion, for the subwoofer). • To enable transfer of this audio format, connect via an HDMI cable and set the audio output...

Owners Manual - English
Page 132
... Timbre Matching function filters the signals sent to the surround speakers, and adjusts the tonal characteristics of game 132 Front Panel≫ Rear Panel≫ Remote≫ This setting optimizes the surround sound environment. THX Cinema: Use this reason the high range is reduced, by controlling how sounds reach the listener's left and right ears. • This mode cannot be distinguished any volume level. This mode creates a lively sound field with a powerful acoustic...
... Timbre Matching function filters the signals sent to the surround speakers, and adjusts the tonal characteristics of game 132 Front Panel≫ Rear Panel≫ Remote≫ This setting optimizes the surround sound environment. THX Cinema: Use this reason the high range is reduced, by controlling how sounds reach the listener's left and right ears. • This mode cannot be distinguished any volume level. This mode creates a lively sound field with a powerful acoustic...

Owners Manual - English
Page 164
... speaker settings, "Off" is applied. * This function will display "1+1" on the remote controller will not be selectable if the firmware is updated after purchase or the firmware is output from the center speaker. "Main": Main channel only "Sub": Sub channel only "Main/Sub": Main and sub channels are input. Setting Item Loudness Management Center Spread* Default Value On Off Setting Details When playing Dolby TrueHD, enable the dialog normalization function which keeps the volume of connected channels. „„2. Surr listening mode. "On": The sound...
... speaker settings, "Off" is applied. * This function will display "1+1" on the remote controller will not be selectable if the firmware is updated after purchase or the firmware is output from the center speaker. "Main": Main channel only "Sub": Sub channel only "Main/Sub": Main and sub channels are input. Setting Item Loudness Management Center Spread* Default Value On Off Setting Details When playing Dolby TrueHD, enable the dialog normalization function which keeps the volume of connected channels. „„2. Surr listening mode. "On": The sound...

Owners Manual - English
Page 166
... input screen. Setting Item Audio Select Default Value BD/DVD: HDMI GAME: HDMI CBL/SAT: HDMI STRM BOX: HDMI PC: HDMI AUX: HDMI CD: Analog PHONO: Analog TV: OPTICAL Setting Details ARC: When giving priority to the input signal from HDMI IN jacks • This item can be selected only when the input to be set is set name appears on the remote controller also toggles between upper and lower cases. (Pressing MODE on the main unit's display. "Audio Return Channel (eARC supported)" is assigned to the HDMI jack...
... input screen. Setting Item Audio Select Default Value BD/DVD: HDMI GAME: HDMI CBL/SAT: HDMI STRM BOX: HDMI PC: HDMI AUX: HDMI CD: Analog PHONO: Analog TV: OPTICAL Setting Details ARC: When giving priority to the input signal from HDMI IN jacks • This item can be selected only when the input to be set is set name appears on the remote controller also toggles between upper and lower cases. (Pressing MODE on the main unit's display. "Audio Return Channel (eARC supported)" is assigned to the HDMI jack...

Owners Manual - English
Page 168
... "Auto(Eco)" can switch the input of the unit using the CEC link function, irrespective of the TV while this unit is on. You can enjoy the sound of an HDMI-connected ARC-compatible TV or eARC-compatible TV through the speakers of what input is selected immediately before the unit is switched to standby. Input/ Output Assign" - You can play the video and audio of the connected device, audio may not be changed while "Audio...
... "Auto(Eco)" can switch the input of the unit using the CEC link function, irrespective of the TV while this unit is on. You can enjoy the sound of an HDMI-connected ARC-compatible TV or eARC-compatible TV through the speakers of what input is selected immediately before the unit is switched to standby. Input/ Output Assign" - You can play the video and audio of the connected device, audio may not be changed while "Audio...

Owners Manual - English
Page 175
Audio Adjust" - Audio Adjust" - "Auto": When the main room input is NET, music is played in a separate room (ZONE 2/ZONE 3). Miscellaneous „„1. Select a frequency step to "Absolute") Set the Zone 3 volume level of "Maximum Volume". „„3. "Volume Display" is located) or in the separate room. When the separate room input is NET and the main room input is other ONKYO products. Tuner Change the frequency step for remote play. Select "10 kHz/0.2 MHz" or "9 kHz/0.05 MHz". •...
Audio Adjust" - Audio Adjust" - "Auto": When the main room input is NET, music is played in a separate room (ZONE 2/ZONE 3). Miscellaneous „„1. Select a frequency step to "Absolute") Set the Zone 3 volume level of "Maximum Volume". „„3. "Volume Display" is located) or in the separate room. When the separate room input is NET and the main room input is other ONKYO products. Tuner Change the frequency step for remote play. Select "10 kHz/0.2 MHz" or "9 kHz/0.05 MHz". •...
Owners Manual - English
Page 179
...: AirPlay Device Name: AirPlay Password: 5. Firmware Update: Select the firmware file you have downloaded to display the Setup menu. 2. Network Setting Status: You can select a network connection method. Select "5. Start the Internet browser on the remote controller to your PC, smartphone, etc. Network Connection: You can see information for the network function of this unit if you can change the Friendly Name or AirPlay Device Name, set an AirPlay Password, etc. Hardware" - and enter...
...: AirPlay Device Name: AirPlay Password: 5. Firmware Update: Select the firmware file you have downloaded to display the Setup menu. 2. Network Setting Status: You can select a network connection method. Select "5. Start the Internet browser on the remote controller to your PC, smartphone, etc. Network Connection: You can see information for the network function of this unit if you can change the Friendly Name or AirPlay Device Name, set an AirPlay Password, etc. Hardware" - and enter...

Owners Manual - English
Page 186
... indicator on the display blinks, press on the remote controller to cancel muting. • While headphones are connected to "On", audio is connected. • If the TV does not support the ARC function, along with the speaker cable connection. CH SP WIRE NG If the unit returns to standby state, connect the speaker cable again. "Auto Standby" on the Setup menu is activated, the unit automatically enters the standby mode. • The protection circuit function may be malfunctioning...
... indicator on the display blinks, press on the remote controller to cancel muting. • While headphones are connected to "On", audio is connected. • If the TV does not support the ARC function, along with the speaker cable connection. CH SP WIRE NG If the unit returns to standby state, connect the speaker cable again. "Auto Standby" on the Setup menu is activated, the unit automatically enters the standby mode. • The protection circuit function may be malfunctioning...

Owners Manual - English
Page 187
... digital audio signals, audio output may be output from speakers. Change the position of the cables. ❏❏The beginning of audio received by an HDMI IN cannot be heard • Since it takes longer to identify the format of an HDMI signal than "Full Band". Select another listening mode to see if the speaker connections have a high low-range reproduction capability, changing this , the bass sound may be sure to install surround speakers as those supporting DVD...
... digital audio signals, audio output may be output from speakers. Change the position of the cables. ❏❏The beginning of audio received by an HDMI IN cannot be heard • Since it takes longer to identify the format of an HDMI signal than "Full Band". Select another listening mode to see if the speaker connections have a high low-range reproduction capability, changing this , the bass sound may be sure to install surround speakers as those supporting DVD...

Owners Manual - English
Page 188
..., Dolby Atmos or DTS-HD Master Audio format cannot be selected. After changing the setting, switch the listening mode to switch the display of a connected Blu-ray Disc player, etc. "My Input Volume" on the remote controller several times to that switches suddenly from DTS to protect the circuits. ❏❏Sound suddenly changes • When "My Input Volume" is set, the volume is performed on your player, noise may not start immediately. Check the following if the problem...
..., Dolby Atmos or DTS-HD Master Audio format cannot be selected. After changing the setting, switch the listening mode to switch the display of a connected Blu-ray Disc player, etc. "My Input Volume" on the remote controller several times to that switches suddenly from DTS to protect the circuits. ❏❏Sound suddenly changes • When "My Input Volume" is set, the volume is performed on your player, noise may not start immediately. Check the following if the problem...

Owners Manual - English
Page 189
... press the HDMI MAIN/SUB button on the remote controller and select the HDMI OUT jack. • Check if "Resolution Error" is displayed on the main unit display when video input via HDMI IN jack is blurry or unclear, the power cord or connection cables of the unit may be behind the audio. In this may be solved by changing the screen mode on the TV. ❏❏Video and audio are bent, twisted...
... press the HDMI MAIN/SUB button on the remote controller and select the HDMI OUT jack. • Check if "Resolution Error" is displayed on the main unit display when video input via HDMI IN jack is blurry or unclear, the power cord or connection cables of the unit may be behind the audio. In this may be solved by changing the screen mode on the TV. ❏❏Video and audio are bent, twisted...

Owners Manual - English
Page 193
... p119) ( p16) 193 Front Panel≫ Rear Panel≫ Remote≫ "Zone 2 Preout" on the Setup menu to "Zone B". „„Multi-zone function ❏❏Cannot ZONE-output the audio of HDMI IN1 to IN3 jacks. Input/Output Assign" - Contents ≫ Connections ≫ Playback ≫ Setup ≫ „„ZONE B function ❏❏Cannot output audio to ZONE B • To output audio to ZONE B, set "2. "Zone 2 HDMI" ( p153) to "Use" on Quick menu to ZONE 3, use a digital coaxial cable, digital optical cable or analog audio cable. Relocate it to any of...
... p119) ( p16) 193 Front Panel≫ Rear Panel≫ Remote≫ "Zone 2 Preout" on the Setup menu to "Zone B". „„Multi-zone function ❏❏Cannot ZONE-output the audio of HDMI IN1 to IN3 jacks. Input/Output Assign" - Contents ≫ Connections ≫ Playback ≫ Setup ≫ „„ZONE B function ❏❏Cannot output audio to ZONE B • To output audio to ZONE B, set "2. "Zone 2 HDMI" ( p153) to "Use" on Quick menu to ZONE 3, use a digital coaxial cable, digital optical cable or analog audio cable. Relocate it to any of...


