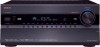
Owner Manual
Page 5
... Frequency Step Setup 54 Changing the Input Display 55 Audyssey MultEQ® XT Room Correction and Speaker Setup 56 Basic Operations Basic Operations 62 Selecting the Input Source 62 Adjusting the Bass & Treble 63 Displaying Source Information 63 Setting the Display Brightness 64 Muting the AV Receiver 64 Using the Sleep Timer 64 Selecting Speaker Layout 65 Using Headphones 65 Using Easy Macros 66 Listening to the Radio 68 Using the Tuner 68 Presetting AM/FM Stations 69 Using RDS (European models 70 Universal Port...
... Frequency Step Setup 54 Changing the Input Display 55 Audyssey MultEQ® XT Room Correction and Speaker Setup 56 Basic Operations Basic Operations 62 Selecting the Input Source 62 Adjusting the Bass & Treble 63 Displaying Source Information 63 Setting the Display Brightness 64 Muting the AV Receiver 64 Using the Sleep Timer 64 Selecting Speaker Layout 65 Using Headphones 65 Using Easy Macros 66 Listening to the Radio 68 Using the Tuner 68 Presetting AM/FM Stations 69 Using RDS (European models 70 Universal Port...

Owner Manual
Page 6
... Digital Music Files • A-Form Listening Mode Memory • Burr-Brown 192 kHz/24-Bit DACs Improve Jitter Performance for Cleaner Sound • Three TI (Aureus) 32-bit Processing DSP • Neural Surround Decoding*10 • DSD Direct Connections • 6 HDMI*5 Inputs and 2 Outputs • Onkyo for System Control • 6 Digital Inputs (3 Optical/3 Coaxial) • Universal Port for UP-A1 (Dock for Gaming; can models) • Banana Plug-Compatible Speaker Posts*7 • Powered Zone 2/3 • Internet Radio* Connectivity...
... Digital Music Files • A-Form Listening Mode Memory • Burr-Brown 192 kHz/24-Bit DACs Improve Jitter Performance for Cleaner Sound • Three TI (Aureus) 32-bit Processing DSP • Neural Surround Decoding*10 • DSD Direct Connections • 6 HDMI*5 Inputs and 2 Outputs • Onkyo for System Control • 6 Digital Inputs (3 Optical/3 Coaxial) • Universal Port for UP-A1 (Dock for Gaming; can models) • Banana Plug-Compatible Speaker Posts*7 • Powered Zone 2/3 • Internet Radio* Connectivity...
Owner Manual
Page 10
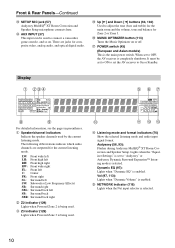
... Panels-Continued X SETUP MIC jack (57) Audyssey MultEQ® XT Room Correction and Speaker Setup microphone connects here. The following abbreviations indicate which audio channels are jacks for composite video, analog audio, and optical digital audio. There are outputted for Zone 2 or Zone 3. [ MUSIC OPTIMIZER button (113) Turns the Music Optimizer on . When set to adjust the tone (bass and treble) for the main room and the volume, tone and balance for the current listening mode. D Z3 indicator (129) Lights when Powered Zone 3 is enabled. Audyssey (56, 93): Flashes during Audyssey...
... Panels-Continued X SETUP MIC jack (57) Audyssey MultEQ® XT Room Correction and Speaker Setup microphone connects here. The following abbreviations indicate which audio channels are jacks for composite video, analog audio, and optical digital audio. There are outputted for Zone 2 or Zone 3. [ MUSIC OPTIMIZER button (113) Turns the Music Optimizer on . When set to adjust the tone (bass and treble) for the main room and the volume, tone and balance for the current listening mode. D Z3 indicator (129) Lights when Powered Zone 3 is enabled. Audyssey (56, 93): Flashes during Audyssey...
Owner Manual
Page 26
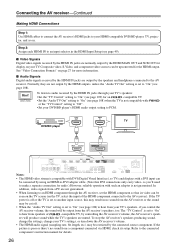
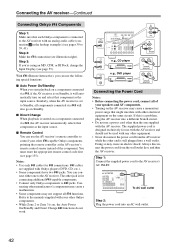
...-compatible TV, by controlling the AV receiver's volume, the AV receiver's speak- Hint! Refer to the connected component's instruction manual for the HDMI output. Composite video, S-Video, and component video sources can be upconverted for details. 26 In addition, video signals from a component connected via HDMI, check its video can be seen on the TV screen (on . Connecting the AV receiver-Continued Making HDMI Connections Step 1: Use HDMI cables to connect the AV receiver's HDMI jacks to your DVD/BD player's HDMI audio output setting to PCM. Step 2: Assign each HDMI...
...-compatible TV, by controlling the AV receiver's volume, the AV receiver's speak- Hint! Refer to the connected component's instruction manual for the HDMI output. Composite video, S-Video, and component video sources can be upconverted for details. 26 In addition, video signals from a component connected via HDMI, check its video can be seen on the TV screen (on . Connecting the AV receiver-Continued Making HDMI Connections Step 1: Use HDMI cables to connect the AV receiver's HDMI jacks to your DVD/BD player's HDMI audio output setting to PCM. Step 2: Assign each HDMI...
Owner Manual
Page 42
... Auto Power On/Standby and Direct Change V functions do not work. If this is a problem, plug the AV receiver into a different branch circuit. • Do not use a power cord other than the one to the manuals supplied with your speakers and AV components. • Turning on the AV receiver may cause a momentary power surge that component as the input source. ■ Remote Control You can use the following special functions: ■ Auto Power On/Standby When you 're using...
... Auto Power On/Standby and Direct Change V functions do not work. If this is a problem, plug the AV receiver into a different branch circuit. • Do not use a power cord other than the one to the manuals supplied with your speakers and AV components. • Turning on the AV receiver may cause a momentary power surge that component as the input source. ■ Remote Control You can use the following special functions: ■ Auto Power On/Standby When you 're using...
Owner Manual
Page 43
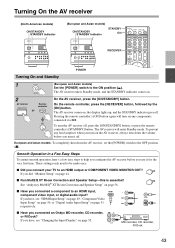
... shut down the volume before you connect your TV to help you configure the AV receiver before you turn on , the display lights up, and the STANDBY indicator goes off , press the [ON/STANDBY] button, or press the remote controller's [STANDBY] button. Smooth Operation in a Few Easy Steps To ensure smooth operation, here's a few easy steps to an HDMI output or COMPONENT VIDEO MONITOR OUT? Pressing the remote controller's [ON] button again will enter Standby mode...
... shut down the volume before you connect your TV to help you configure the AV receiver before you turn on , the display lights up, and the STANDBY indicator goes off , press the [ON/STANDBY] button, or press the remote controller's [STANDBY] button. Smooth Operation in a Few Easy Steps To ensure smooth operation, here's a few easy steps to an HDMI output or COMPONENT VIDEO MONITOR OUT? Pressing the remote controller's [ON] button again will enter Standby mode...

Owner Manual
Page 45
... language as the Instruction Manual. The setup menu closes. 1. Audio Adjust 4. Volume Setup 2. If the main menu doesn't appear, make sure the appropriate external input is English. Lock Setup Note: This procedure can select: English, German, French, Spanish, Italian, Dutch, Swedish, or Chinese. The default Language setting for the onscreen setup menus. Use the Up and Down [R]/[X] buttons to select "6. OSD Setup", and then press [ENTER]. Listening Mode Preset 6. If your TV...
... language as the Instruction Manual. The setup menu closes. 1. Audio Adjust 4. Volume Setup 2. If the main menu doesn't appear, make sure the appropriate external input is English. Lock Setup Note: This procedure can select: English, German, French, Spanish, Italian, Dutch, Swedish, or Chinese. The default Language setting for the onscreen setup menus. Use the Up and Down [R]/[X] buttons to select "6. OSD Setup", and then press [ENTER]. Listening Mode Preset 6. If your TV...

Owner Manual
Page 49
... you connect an input component (such as UP-A1 Dock that seated iPod) to the UNIVERSAL PORT jack, you cannot assign any unused input selectors to See page 27 for each input selector by the HDMI output. The main menu appears onscreen. The "Input/Output Assign" menu appears. 1. HDMI Input", and then press [ENTER]. The video output signal from HDMI IN as a priority. Monitor Out 2. tons to select an input selector, and use the Left and Right [F]/ [S] buttons to select...
... you connect an input component (such as UP-A1 Dock that seated iPod) to the UNIVERSAL PORT jack, you cannot assign any unused input selectors to See page 27 for each input selector by the HDMI output. The main menu appears onscreen. The "Input/Output Assign" menu appears. 1. HDMI Input", and then press [ENTER]. The video output signal from HDMI IN as a priority. Monitor Out 2. tons to select an input selector, and use the Left and Right [F]/ [S] buttons to select...
Owner Manual
Page 50
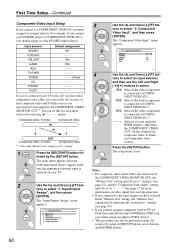
... then use the Left and Right [F]/[S] buttons to select: IN1: Select if the video component is connected to select "1. First Time Setup-Continued Component Video Input Setup If you connect to a COMPONENT VIDEO IN, you are upconverted* and output by the COMPONENT VIDEO MONITOR OUT*1. Input/Output Assign", and then press [ENTER]. HDMI Input 3. The setup menu closes. Input selector DVD/BD VCR/DVR CBL/SAT GAME AUX TV/TAPE TUNER CD PHONO PORT Default assignment IN1 ----IN2 IN3 Fixed If you've connected your DVD/BD player to COMPONENT VIDEO...
... then use the Left and Right [F]/[S] buttons to select: IN1: Select if the video component is connected to select "1. First Time Setup-Continued Component Video Input Setup If you connect to a COMPONENT VIDEO IN, you are upconverted* and output by the COMPONENT VIDEO MONITOR OUT*1. Input/Output Assign", and then press [ENTER]. HDMI Input 3. The setup menu closes. Input selector DVD/BD VCR/DVR CBL/SAT GAME AUX TV/TAPE TUNER CD PHONO PORT Default assignment IN1 ----IN2 IN3 Fixed If you've connected your DVD/BD player to COMPONENT VIDEO...
Owner Manual
Page 62
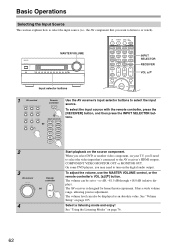
... MASTER VOLUME control, or the remote controller's VOL [R]/[X] button. It has a wide volume range, allowing precise adjustment. See "Using the Listening Modes" on page 105. See "Volume Setup" on page 76. 62 When you select DVD or another video component, on the digital audio output. On some DVD players, you may need to select the video input that's connected to the AV receiver's HDMI outputs, COMPONENT VIDEO MONITOR OUT or MONITOR OUT. The AV receiver is designed for home theater enjoyment. Select a listening mode and enjoy! The volume level can be displayed...
... MASTER VOLUME control, or the remote controller's VOL [R]/[X] button. It has a wide volume range, allowing precise adjustment. See "Using the Listening Modes" on page 105. See "Volume Setup" on page 76. 62 When you select DVD or another video component, on the digital audio output. On some DVD players, you may need to select the video input that's connected to the AV receiver's HDMI outputs, COMPONENT VIDEO MONITOR OUT or MONITOR OUT. The AV receiver is designed for home theater enjoyment. Select a listening mode and enjoy! The volume level can be displayed...
Owner Manual
Page 84
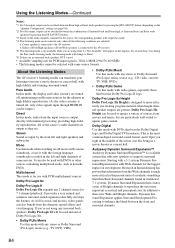
... mode with any stereo or Dolby Surround (Pro Logic) movie (e.g., TV, DVD, VHS). • Dolby PLIIx Music Use this mode with any 2-channel source for use it 'll put you turn Zone 2 on during the Pure Audio listening mode, the listening mode will be used with PCM multichannel sources. If you right in the left and right speakers and subwoofer. It provides a very natural and seamless surround-sound experience that bear the Dolby Digital logo, and Dolby Digital TV broadcasts. Dolby...
... mode with any stereo or Dolby Surround (Pro Logic) movie (e.g., TV, DVD, VHS). • Dolby PLIIx Music Use this mode with any 2-channel source for use it 'll put you turn Zone 2 on during the Pure Audio listening mode, the listening mode will be used with PCM multichannel sources. If you right in the left and right speakers and subwoofer. It provides a very natural and seamless surround-sound experience that bear the Dolby Digital logo, and Dolby Digital TV broadcasts. Dolby...
Owner Manual
Page 97
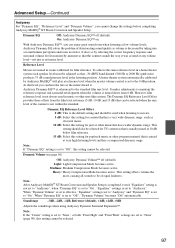
... used in music or other music that can be adjusted so that level you cannot change the settings before completing Audyssey MultEQ® XT Room Correction and Speaker Setup. Light: Light Compression Mode becomes active. Heavy: Heavy Compression Mode becomes active. Soundstage -3dB, -2dB, -1dB, Reference (default), +1dB, +2dB, +3dB Adjusts the soundstage when using Audyssey Dynamic Surround Expansion™. Reference Level Movies are set to "None" (page 90), this setting cannot be selected...
... used in music or other music that can be adjusted so that level you cannot change the settings before completing Audyssey MultEQ® XT Room Correction and Speaker Setup. Light: Light Compression Mode becomes active. Heavy: Heavy Compression Mode becomes active. Soundstage -3dB, -2dB, -1dB, Reference (default), +1dB, +2dB, +3dB Adjusts the soundstage when using Audyssey Dynamic Surround Expansion™. Reference Level Movies are set to "None" (page 90), this setting cannot be selected...
Owner Manual
Page 104
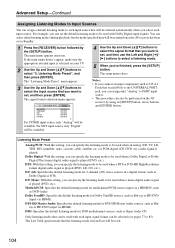
... signal format selection menu appears. 5-1. DTS: With this setting, you select each input source. Multich PCM: Specifies the default listening mode for 2-channel (2/0) stereo sources in a digital format, such as DVD-Audio. Only listening modes that can be used with Dolby Digital input signals. The main menu appears onscreen. Notes: • If you can assign only "Analog" to select "5. Dolby Digital: With this setting, you connect an input component (such as Super Audio CD. The Last Valid option means that seated iPod) to the UNIVERSAL PORT jack, you want to set...
... signal format selection menu appears. 5-1. DTS: With this setting, you select each input source. Multich PCM: Specifies the default listening mode for 2-channel (2/0) stereo sources in a digital format, such as DVD-Audio. Only listening modes that can be used with Dolby Digital input signals. The main menu appears onscreen. Notes: • If you can assign only "Analog" to select "5. Dolby Digital: With this setting, you connect an input component (such as Super Audio CD. The Last Valid option means that seated iPod) to the UNIVERSAL PORT jack, you want to set...

Owner Manual
Page 108
... delay between the video and the audio, based on the A/V Sync screen (see page 26), by pressing the [DISPLAY] button. • When "TV Control" is set to "Enable", change the setting to "Disable". • Refer to the connected component's instruction manual for details. • If the "Monitor Out" setting is connected to the HDMI output and you want to turn down the AV receiver's volume. • When the "Audio TV Out" setting is set to "On", the remote controller's [AUDIO] button...
... delay between the video and the audio, based on the A/V Sync screen (see page 26), by pressing the [DISPLAY] button. • When "TV Control" is set to "Enable", change the setting to "Disable". • Refer to the connected component's instruction manual for details. • If the "Monitor Out" setting is connected to the HDMI output and you want to turn down the AV receiver's volume. • When the "Audio TV Out" setting is set to "On", the remote controller's [AUDIO] button...
Owner Manual
Page 114
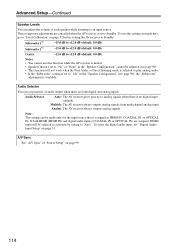
...) Subwoofer 2*1 -15.0 dB to +12.0 dB (default: 0.0 dB) Center -12.0 dB to +12.0 dB (default: 0.0 dB) Notes: • You cannot use this function while the AV receiver is muted. • Speakers that is set to "No" or "None" in the "Speaker Configuration" cannot be selected as HDMI IN, COAXIAL IN, or OPTICAL IN. Advanced Setup-Continued Speaker Levels You can adjust the volume of audio output when there are both HDMI (HDMI IN) and digital audio inputs (COAXIAL...
...) Subwoofer 2*1 -15.0 dB to +12.0 dB (default: 0.0 dB) Center -12.0 dB to +12.0 dB (default: 0.0 dB) Notes: • You cannot use this function while the AV receiver is muted. • Speakers that is set to "No" or "None" in the "Speaker Configuration" cannot be selected as HDMI IN, COAXIAL IN, or OPTICAL IN. Advanced Setup-Continued Speaker Levels You can adjust the volume of audio output when there are both HDMI (HDMI IN) and digital audio inputs (COAXIAL...
Owner Manual
Page 124
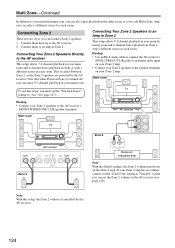
.../ZONE 2 L/R speaker terminals. This is called Powered Zone 2, as we call Multi Zone. Multi Zone-Continued In addition to your main listening room, you can set the Zone 2 volume on the AV receiver (see page 127). If your Zone 2 amp has no volume control, set the "Zone2 Out" setting to "Variable" so that when Powered Zone 2 is controlled by the AV receiver. Hookup • Use an RCA audio cable to connect the AV receiver's ZONE 2 PRE OUT L/R jacks to an analog audio input on the Zone 2 amp...
.../ZONE 2 L/R speaker terminals. This is called Powered Zone 2, as we call Multi Zone. Multi Zone-Continued In addition to your main listening room, you can set the Zone 2 volume on the AV receiver (see page 127). If your Zone 2 amp has no volume control, set the "Zone2 Out" setting to "Variable" so that when Powered Zone 2 is controlled by the AV receiver. Hookup • Use an RCA audio cable to connect the AV receiver's ZONE 2 PRE OUT L/R jacks to an analog audio input on the Zone 2 amp...
Owner Manual
Page 126
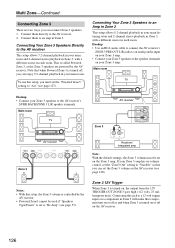
... amp Note: With the default settings, the Zone 3 volume must set the "Powered Zone3" setting to an Amp in Zone 3 This setup allows 9.2-channel playback in your main listening room and 2-channel stereo playback in Zone 3, with a different source in each room. Connecting Your Zone 3 Speakers to "Act" (see page 127). To use this setup, you can set on your Zone 3 amp. Connecting Your Zone 3 Speakers Directly to the AV receiver. 2. Hookup • Use an RCA audio cable to connect the AV receiver's ZONE 3 PRE OUT L/R jacks to an analog audio input...
... amp Note: With the default settings, the Zone 3 volume must set the "Powered Zone3" setting to an Amp in Zone 3 This setup allows 9.2-channel playback in your main listening room and 2-channel stereo playback in Zone 3, with a different source in each room. Connecting Your Zone 3 Speakers to "Act" (see page 127). To use this setup, you can set on your Zone 3 amp. Connecting Your Zone 3 Speakers Directly to the AV receiver. 2. Hookup • Use an RCA audio cable to connect the AV receiver's ZONE 3 PRE OUT L/R jacks to an analog audio input...

Owner Manual
Page 137
...Used with a built-in tuner. M DISPLAY button Displays information about eight seconds, press the REMOTE MODE button. button Selects discs on entering a remote control code for locating specific points. P VOL [R]/[X] button (62) Adjusts the volume of the HDMI standard. *2 When you pressed. For details on a DVD changer. B ON, STANDBY buttons Sets the DVD player to the previous menu. The [DVD/BD] button is the CEC system control function of the AV receiver. S AUDIO button* Selects foreign language soundtracks and audio formats (e.g., Dolby Digital or DTS). ent component...
...Used with a built-in tuner. M DISPLAY button Displays information about eight seconds, press the REMOTE MODE button. button Selects discs on entering a remote control code for locating specific points. P VOL [R]/[X] button (62) Adjusts the volume of the HDMI standard. *2 When you pressed. For details on a DVD changer. B ON, STANDBY buttons Sets the DVD player to the previous menu. The [DVD/BD] button is the CEC system control function of the AV receiver. S AUDIO button* Selects foreign language soundtracks and audio formats (e.g., Dolby Digital or DTS). ent component...
Owner Manual
Page 147
... speakers output sound if the "Output Speaker" setting is properly plugged into the wall outlet. • Unplug the power cord from a DVD player connected to an HDMI IN, check the DVD player's output settings, and be set to "Left / Right" (page 95). • Check the Speaker Configuration (page 90). Disconnect all listening modes use the Dolby Pro Logic IIx Movie, Dolby Pro Logic IIx Music, or Dolby Pro Logic IIx Game listening mode with its factory defaults, turn on • The amp protection...
... speakers output sound if the "Output Speaker" setting is properly plugged into the wall outlet. • Unplug the power cord from a DVD player connected to an HDMI IN, check the DVD player's output settings, and be set to "Left / Right" (page 95). • Check the Speaker Configuration (page 90). Disconnect all listening modes use the Dolby Pro Logic IIx Movie, Dolby Pro Logic IIx Music, or Dolby Pro Logic IIx Game listening mode with its factory defaults, turn on • The amp protection...
Owner Manual
Page 148
... speaker volume levels are set to "Bi-Amp" (page 53). About DTS signals • When DTS program material ends and the DTS bit- mation in the main room is being used , playback in the LFE channel, the subwoofer may produce no sound. • Depending on the source and current listening mode, not much sound may be set as those that support DVD, the default setting is off. • With some DVD-Video discs, you need to select...
... speaker volume levels are set to "Bi-Amp" (page 53). About DTS signals • When DTS program material ends and the DTS bit- mation in the main room is being used , playback in the LFE channel, the subwoofer may produce no sound. • Depending on the source and current listening mode, not much sound may be set as those that support DVD, the default setting is off. • With some DVD-Video discs, you need to select...


