
VR-350 Instruction Manual (English)
Page 1
... place for future reference. ● We recommend that you for VR-360/D-760. DIGITAL CAMERA VR-360/D-760 VR-350/D-755 VR-340/D-750 Instruction Manual ● Thank you take test shots to get accustomed to your new camera, please read these illustrations is provided for purchasing an Olympus digital camera. Unless otherwise specifi ed, the explanation about these...
... place for future reference. ● We recommend that you for VR-360/D-760. DIGITAL CAMERA VR-360/D-760 VR-350/D-755 VR-340/D-750 Instruction Manual ● Thank you take test shots to get accustomed to your new camera, please read these illustrations is provided for purchasing an Olympus digital camera. Unless otherwise specifi ed, the explanation about these...
VR-350 Instruction Manual (English)
Page 13
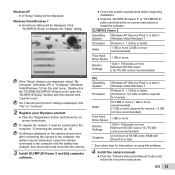
... 13 Windows Vista/Windows 7 ● An Autorun dialog will be displayed. Leave the camera connected to the computer until the battery has charged, then disconnect and reconnect the camera. 3 Install OLYMPUS Viewer 2 and [ib] computer software. ● Check the system requirements before beginning ...64 MB video RAM with DirectX 9 or later. * See online help for information on using the software. 4 Install the camera manual. ● Click the "Camera Instruction Manual" button and follow the onscreen instructions. Windows XP ● A "Setup" dialog will be displayed. If the "Setup" dialog...
... 13 Windows Vista/Windows 7 ● An Autorun dialog will be displayed. Leave the camera connected to the computer until the battery has charged, then disconnect and reconnect the camera. 3 Install OLYMPUS Viewer 2 and [ib] computer software. ● Check the system requirements before beginning ...64 MB video RAM with DirectX 9 or later. * See online help for information on using the software. 4 Install the camera manual. ● Click the "Camera Instruction Manual" button and follow the onscreen instructions. Windows XP ● A "Setup" dialog will be displayed. If the "Setup" dialog...
VR-350 Instruction Manual (English)
Page 14
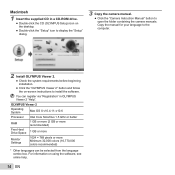
... the "Setup" icon to display the "Setup" dialog. 3 Copy the camera manual. ● Click the "Camera Instruction Manual" button to open the folder containing the camera manuals. You can be selected from the language combo box. For information on -screen instructions to the computer. 2 Install OLYMPUS Viewer 2. ● Check the system requirements before beginning installation. ● Click...
... the "Setup" icon to display the "Setup" dialog. 3 Copy the camera manual. ● Click the "Camera Instruction Manual" button to open the folder containing the camera manuals. You can be selected from the language combo box. For information on -screen instructions to the computer. 2 Install OLYMPUS Viewer 2. ● Check the system requirements before beginning installation. ● Click...
VR-350 Instruction Manual (English)
Page 23
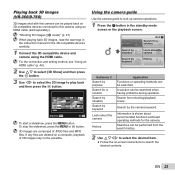
... 3D images are deleted on a computer, playback of JPEG files and MPO files. Playing back 3D images (VR-360/D-760) 3D images shot with this camera using the HDMI cable. Slideshow MENU Set OK To start a slideshow, press the button. Search from the search history...operation. Searches can be played back on -screen instructions to look up camera operations. 1 Press the E button in the instruction manual for the 3D-compatible devices carefully. 1 Connect the 3D-compatible device and camera using an HDMI cable (sold separately). EN 23 Information is shown ...
... 3D images are deleted on a computer, playback of JPEG files and MPO files. Playing back 3D images (VR-360/D-760) 3D images shot with this camera using the HDMI cable. Slideshow MENU Set OK To start a slideshow, press the button. Search from the search history...operation. Searches can be played back on -screen instructions to look up camera operations. 1 Press the E button in the instruction manual for the 3D-compatible devices carefully. 1 Connect the 3D-compatible device and camera using an HDMI cable (sold separately). EN 23 Information is shown ...

VR-350 Instruction Manual (English)
Page 27
...(if the distance between the camera and subject is taken. The flash is fixed. Images shot in 3D mode cannot be displayed in 3D on the subject, etc. To shoot 3D images (W mode) (VR-360/D-760, VR-350/D-755) 1 Use HI to select [Auto] or [Manual] and then press the Q... button to P. Submenu 1 Auto Manual Description The user only composes the shots so that the target marks and pointers overlap, and the camera automatically releases the shutter. The zoom ratio is...
...(if the distance between the camera and subject is taken. The flash is fixed. Images shot in 3D mode cannot be displayed in 3D on the subject, etc. To shoot 3D images (W mode) (VR-360/D-760, VR-350/D-755) 1 Use HI to select [Auto] or [Manual] and then press the Q... button to P. Submenu 1 Auto Manual Description The user only composes the shots so that the target marks and pointers overlap, and the camera automatically releases the shutter. The zoom ratio is...
VR-350 Instruction Manual (English)
Page 37
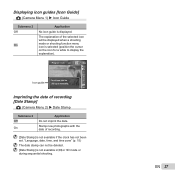
... stamp can be displayed when a shooting mode or shooting function menu icon is displayed. Stamp new photographs with the date of recording [Date Stamp] K (Camera Menu 2) Date Stamp Submenu 2 Off On Application Do not imprint the date. Program Auto P 0.0 WB AUTO Functions can not be deleted. ...Date Stamp] is not available if the clock has not been set. The explanation of the selected icon will be ISO AUTO Icon guide changed manually. 16M MENU Imprinting the date of recording. [Date Stamp] is not available in ~ or 3D mode or during sequential shooting. EN 37...
... stamp can be displayed when a shooting mode or shooting function menu icon is displayed. Stamp new photographs with the date of recording [Date Stamp] K (Camera Menu 2) Date Stamp Submenu 2 Off On Application Do not imprint the date. Program Auto P 0.0 WB AUTO Functions can not be deleted. ...Date Stamp] is not available if the clock has not been set. The explanation of the selected icon will be ISO AUTO Icon guide changed manually. 16M MENU Imprinting the date of recording. [Date Stamp] is not available in ~ or 3D mode or during sequential shooting. EN 37...
VR-350 Instruction Manual (English)
Page 42
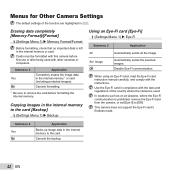
.... Cancels formatting. *1 Be sure to the card. When using an Eye-Fi card, read the Eye-Fi card instruction manual carefully, and comply with other cameras or computers. Submenu 2 Yes No Application Backs up image data in the internal memory*1 or card (including protected images). ... Format]/[Format] d (Settings Menu 1) Memory Format/Format Before formatting, check that no important data is prohibited, remove the Eye-Fi card from the camera, or set [Eye-fi] to the card [Backup] d (Settings Menu 1) Backup Using an Eye-Fi card [Eye-Fi] d (Settings Menu...
.... Cancels formatting. *1 Be sure to the card. When using an Eye-Fi card, read the Eye-Fi card instruction manual carefully, and comply with other cameras or computers. Submenu 2 Yes No Application Backs up image data in the internal memory*1 or card (including protected images). ... Format]/[Format] d (Settings Menu 1) Memory Format/Format Before formatting, check that no important data is prohibited, remove the Eye-Fi card from the camera, or set [Eye-fi] to the card [Backup] d (Settings Menu 1) Backup Using an Eye-Fi card [Eye-Fi] d (Settings Menu...
VR-350 Instruction Manual (English)
Page 46
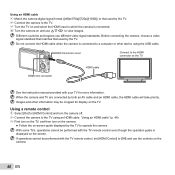
...not connect the HDMI cable when the camera is connected to [Off] and use the controls on -screen guide displayed by both an AV cable and an HDMI cable, the HDMI cable will take priority. HDMI mini connector HDMI cable See the instruction manual provided with the TV remote control ...TV to view images. With some TVs, operations cannot be cropped for display on the screen. Different countries and regions use FGHI to operate the camera. Connector cover Connect to the TV using the USB cable. Using a remote control 1 Select [On] for more information. Using an HDMI cable ...
...not connect the HDMI cable when the camera is connected to [Off] and use the controls on -screen guide displayed by both an AV cable and an HDMI cable, the HDMI cable will take priority. HDMI mini connector HDMI cable See the instruction manual provided with the TV remote control ...TV to view images. With some TVs, operations cannot be cropped for display on the screen. Different countries and regions use FGHI to operate the camera. Connector cover Connect to the TV using the USB cable. Using a remote control 1 Select [On] for more information. Using an HDMI cable ...
VR-350 Instruction Manual (English)
Page 47
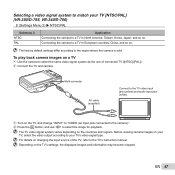
For details on changing the input source of connected TV ([NTSC]/[PAL]). 2 Connect the TV and camera. EN 47 Connecting the camera to the TV's instruction manual. The TV video signal system varies depending on the TV's settings, the displayed images and information may become cropped. ...your TV's video signal type. Selecting a video signal system to match your TV [NTSC/PAL] (VR-350/D-755, VR-340/D-750) d (Settings Menu 2) NTSC/PAL Submenu 2 NTSC PAL Application Connecting the camera to your TV, select the video output according to a TV in North America, Taiwan, Korea, ...
For details on changing the input source of connected TV ([NTSC]/[PAL]). 2 Connect the TV and camera. EN 47 Connecting the camera to the TV's instruction manual. The TV video signal system varies depending on the TV's settings, the displayed images and information may become cropped. ...your TV's video signal type. Selecting a video signal system to match your TV [NTSC/PAL] (VR-350/D-755, VR-340/D-750) d (Settings Menu 2) NTSC/PAL Submenu 2 NTSC PAL Application Connecting the camera to your TV, select the video output according to a TV in North America, Taiwan, Korea, ...
VR-350 Instruction Manual (English)
Page 50
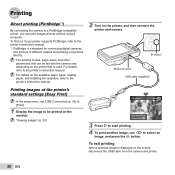
...on the printer, and then connect the printer and camera. "Viewing images" (p. 20) Easy Print Back MENU Easy Print Start Custom Print OK 3 Press I to start printing. 4 To print another image, use HI to the printer's instruction manual. 2 Turn on the available paper types, loading ... ink cassettes, refer to select an image, and press the Q button. For details, refer to the printer's instruction manual. *1 PictBridge is a standard for connecting digital cameras and printers of different makers and printing out pictures directly. To exit printing After a selected image is used. To ...
...on the printer, and then connect the printer and camera. "Viewing images" (p. 20) Easy Print Back MENU Easy Print Start Custom Print OK 3 Press I to start printing. 4 To print another image, use HI to the printer's instruction manual. 2 Turn on the available paper types, loading ... ink cassettes, refer to select an image, and press the Q button. For details, refer to the printer's instruction manual. *1 PictBridge is a standard for connecting digital cameras and printers of different makers and printing out pictures directly. To exit printing After a selected image is used. To ...
VR-350 Instruction Manual (English)
Page 64
...result. To avoid personal injury, never insert a metal object into the camera, contact an authorized distributor or service center. Handling the Camera WARNING • Do not use only accessories recommended by Olympus. 64 EN Water and Moisture - Never use any type of liquid or...Firing the flash too close range. • You must be at the sun or strong lights with weatherproof designs, read all manuals and documentation for cleaning. General Precautions Read All Instructions - Cleaning - Connect this symbol, serious injury or death may result. WARNING! ...
...result. To avoid personal injury, never insert a metal object into the camera, contact an authorized distributor or service center. Handling the Camera WARNING • Do not use only accessories recommended by Olympus. 64 EN Water and Moisture - Never use any type of liquid or...Firing the flash too close range. • You must be at the sun or strong lights with weatherproof designs, read all manuals and documentation for cleaning. General Precautions Read All Instructions - Cleaning - Connect this symbol, serious injury or death may result. WARNING! ...
VR-350 Instruction Manual (English)
Page 65
...camera, remove a tripod and all instructions regarding the use any other non-OLYMPUS accessories. • Do not touch electric contacts on and pressing the shutter button to a magnetic/electromagnetic field, radio waves, or high voltage, such as near a heat source, etc. • To prevent causing battery leaks or damaging their manuals... eyes, flush your hands. • Never hold on to the camera in this product, never leave the camera in the places listed below, no matter if in the camera's manual. Select a cool, dry location for a long period, remove the batteries....
...camera, remove a tripod and all instructions regarding the use any other non-OLYMPUS accessories. • Do not touch electric contacts on and pressing the shutter button to a magnetic/electromagnetic field, radio waves, or high voltage, such as near a heat source, etc. • To prevent causing battery leaks or damaging their manuals... eyes, flush your hands. • Never hold on to the camera in this product, never leave the camera in the places listed below, no matter if in the camera's manual. Select a cool, dry location for a long period, remove the batteries....
VR-350 Instruction Manual (English)
Page 67
...which are caused by one or more of the following measures: • Adjust or relocate the receiving antenna. • Increase the distance between the camera and receiver. • Connect the equipment to an outlet on a circuit different from that infringe upon the rights of any damages, or benefi... do not have any benefit expected by or concerning any content of the FCC Rules. No liability is due to this manual. Olympus assumes no representations or warranties regarding any type of the monitor. Because of the characteristics, the unevenness of this product. •...
...which are caused by one or more of the following measures: • Adjust or relocate the receiving antenna. • Increase the distance between the camera and receiver. • Connect the equipment to an outlet on a circuit different from that infringe upon the rights of any damages, or benefi... do not have any benefit expected by or concerning any content of the FCC Rules. No liability is due to this manual. Olympus assumes no representations or warranties regarding any type of the monitor. Because of the characteristics, the unevenness of this product. •...

VR-350 Instruction Manual (English)
Page 73
...names are registered trademarks and/or trademarks of their respective owners. • The standards for camera file systems referred to in this camera may be found in this manual are registered trademarks of Microsoft Corporation. • Macintosh is a trademark of Apple Inc. ...• IBM is a registered trademark of International Business Machines Corporation. • Microsoft and Windows are the "Design rule for Camera File system/DCF" standards stipulated by the Japan Electronics and Information Technology Industries Association (JEITA). The software in the software notice ...
...names are registered trademarks and/or trademarks of their respective owners. • The standards for camera file systems referred to in this camera may be found in this manual are registered trademarks of Microsoft Corporation. • Macintosh is a trademark of Apple Inc. ...• IBM is a registered trademark of International Business Machines Corporation. • Microsoft and Windows are the "Design rule for Camera File system/DCF" standards stipulated by the Japan Electronics and Information Technology Industries Association (JEITA). The software in the software notice ...


