
VR-350 Instruction Manual (English)
Page 10
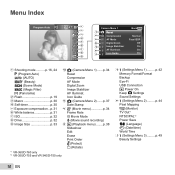
... Flash p. 19 3 Macro p. 30 4 Self-timer p. 30 5 Exposure compensation ...p. 31 6 White balance p. 31 7 ISO p. 32 8 Drive p. 32 9 Image Size p. 33 0 K (Camera Menu 1) .......p. 34 Reset Compression AF Mode Digital Zoom Image Stabilizer AF Illuminat. Menu Index Program Auto P 1 2 3 4 0.0 5 WB AUTO 6 ISO AUTO 7 8 16M 9 MENU Camera Menu 1 0 Reset a Compression b AF Mode c Digital Zoom d Image Stabilizer e AF Illuminat. Icon Guide a K (Camera Menu 2) .......p. 37 Date Stamp b A (Movie menu p. 34 Frame Rate IS Movie Mode R (Movie sound recording) c q (Playback menu...
... Flash p. 19 3 Macro p. 30 4 Self-timer p. 30 5 Exposure compensation ...p. 31 6 White balance p. 31 7 ISO p. 32 8 Drive p. 32 9 Image Size p. 33 0 K (Camera Menu 1) .......p. 34 Reset Compression AF Mode Digital Zoom Image Stabilizer AF Illuminat. Menu Index Program Auto P 1 2 3 4 0.0 5 WB AUTO 6 ISO AUTO 7 8 16M 9 MENU Camera Menu 1 0 Reset a Compression b AF Mode c Digital Zoom d Image Stabilizer e AF Illuminat. Icon Guide a K (Camera Menu 2) .......p. 37 Date Stamp b A (Movie menu p. 34 Frame Rate IS Movie Mode R (Movie sound recording) c q (Playback menu...
VR-350 Instruction Manual (English)
Page 11
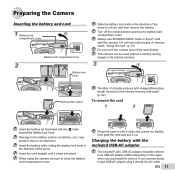
When using the camera, be used without a card by storing images in its internal memory. 3 1 2 "Number of storable pictures (still images)/Recording length (movies) in the internal memory and cards" (p. 62) To remove the card 1 2 Insert the battery as USB-AC adapter) differs depending on the region where you received a plugin type USB-AC adapter, plug it out. Charging the battery with this camera. Always use SD/SDHC/SDXC cards or Eye-Fi card with the included USB-AC adapter The included...
When using the camera, be used without a card by storing images in its internal memory. 3 1 2 "Number of storable pictures (still images)/Recording length (movies) in the internal memory and cards" (p. 62) To remove the card 1 2 Insert the battery as USB-AC adapter) differs depending on the region where you received a plugin type USB-AC adapter, plug it out. Charging the battery with this camera. Always use SD/SDHC/SDXC cards or Eye-Fi card with the included USB-AC adapter The included...
VR-350 Instruction Manual (English)
Page 12
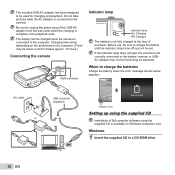
...-connector Indicator lamp Indicator lamp On: Charging Off: Charged The battery is connected to unplug the power plug of purchase. AC outlet or USB connector (supplied) Battery Empty Flashes in a CD-ROM drive. 12 EN Be sure to the camera. Charging time varies depending on Windows computers only. The included USB-AC adapter has been designed to charge the batteries Charge the battery when the error message shown below appears. Do not take pictures...
...-connector Indicator lamp Indicator lamp On: Charging Off: Charged The battery is connected to unplug the power plug of purchase. AC outlet or USB connector (supplied) Battery Empty Flashes in a CD-ROM drive. 12 EN Be sure to the camera. Charging time varies depending on Windows computers only. The included USB-AC adapter has been designed to charge the batteries Charge the battery when the error message shown below appears. Do not take pictures...
VR-350 Instruction Manual (English)
Page 13
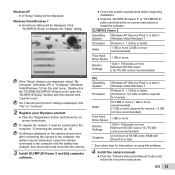
... online help for information on using the software. 4 Install the camera manual. ● Click the "Camera Instruction Manual" button and follow the on the camera screen even after connecting the camera to the computer, the battery may be displayed. To register the camera, it must be displayed. Windows Vista/Windows 7 ● An Autorun dialog will be exhausted. Windows XP ● A "Setup" dialog will be connected to the computer. Double-click the CD-ROM (OLYMPUS Setup) icon to display...
... online help for information on using the software. 4 Install the camera manual. ● Click the "Camera Instruction Manual" button and follow the on the camera screen even after connecting the camera to the computer, the battery may be displayed. To register the camera, it must be displayed. Windows Vista/Windows 7 ● An Autorun dialog will be exhausted. Windows XP ● A "Setup" dialog will be connected to the computer. Double-click the CD-ROM (OLYMPUS Setup) icon to display...
VR-350 Instruction Manual (English)
Page 14
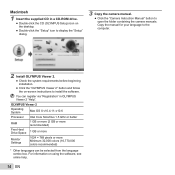
...,000 colors (16,770,000 colors recommended) * Other languages can register via "Registration" in a CD-ROM drive. ● Double-click the CD (OLYMPUS Setup) icon on the desktop. ● Double-click the "Setup" icon to display the "Setup" dialog. 3 Copy the camera manual. ● Click the "Camera Instruction Manual" button to install the software. You can be selected from the language combo box. For information on -screen instructions to open the folder containing the camera manuals.
...,000 colors (16,770,000 colors recommended) * Other languages can register via "Registration" in a CD-ROM drive. ● Double-click the CD (OLYMPUS Setup) icon on the desktop. ● Double-click the "Setup" icon to display the "Setup" dialog. 3 Copy the camera manual. ● Click the "Camera Instruction Manual" button to install the software. You can be selected from the language combo box. For information on -screen instructions to open the folder containing the camera manuals.
VR-350 Instruction Manual (English)
Page 15
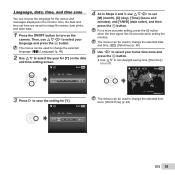
Language, date, time, and time zone You can choose the language for the menus and messages displayed in Steps 2 and 3, use FGHI to set here are saved to image file names, date prints, and other data. 1 Press the n button to change the selected time zone. [World Time] (p. 48) EN 15 For a more accurate setting, press the Q button when the time signal hits 00 seconds while setting the minutes. Then, use FGHI to select...
Language, date, time, and time zone You can choose the language for the menus and messages displayed in Steps 2 and 3, use FGHI to set here are saved to image file names, date prints, and other data. 1 Press the n button to change the selected time zone. [World Time] (p. 48) EN 15 For a more accurate setting, press the Q button when the time signal hits 00 seconds while setting the minutes. Then, use FGHI to select...
VR-350 Instruction Manual (English)
Page 23
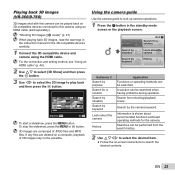
... camera guide Use the camera guide to play back and then press the Q button. Playing back 3D images (VR-360/D-760) 3D images shot with this camera can be searched when having problems during operation. For the connection and setting method, see "Using an HDMI cable" (p. 46). 2 Use FG to select [3D Show] and then press the Q button. 3 Use HI to select the 3D image to look up camera operations. 1 Press the E button in the instruction manual for a solution...
... camera guide Use the camera guide to play back and then press the Q button. Playing back 3D images (VR-360/D-760) 3D images shot with this camera can be searched when having problems during operation. For the connection and setting method, see "Using an HDMI cable" (p. 46). 2 Use FG to select [3D Show] and then press the Q button. 3 Use HI to select the 3D image to look up camera operations. 1 Press the E button in the instruction manual for a solution...

VR-350 Instruction Manual (English)
Page 25
... by the camera,and then press the shutter button to set. 5 To save the image, select [OK] on the review screen. ● Settings for Beauty Fix can be retouched, only the unedited image is fixed at [n]. If the image cannot be registered. The [Image Size] of the retouched image is saved. EN 25 3 Use HI to select the retouching setting, and press the Q button to take the picture. To retouch...
... by the camera,and then press the shutter button to set. 5 To save the image, select [OK] on the review screen. ● Settings for Beauty Fix can be retouched, only the unedited image is fixed at [n]. If the image cannot be registered. The [Image Size] of the retouched image is saved. EN 25 3 Use HI to select the retouching setting, and press the Q button to take the picture. To retouch...
VR-350 Instruction Manual (English)
Page 28
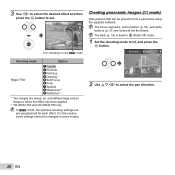
... to $ (Flash Off) mode. 1 Set the shooting mode to form a panorama using the supplied software. 3 Use HI to select the desired effect and then press the Q button to set. 1 0.0 WB AUTO 16M 4 NORM 0:00:34 Icon indicating current P mode Creating panoramic images (~ mode) Take pictures that can be changed in some modes. 0.0 WB AUTO 16M MENU 2 Use FGHI to which the effect has been applied. *2 VR-360/D-760 and VR-350/D-755 only In P mode, the optimum shooting settings are locked at...
... to $ (Flash Off) mode. 1 Set the shooting mode to form a panorama using the supplied software. 3 Use HI to select the desired effect and then press the Q button to set. 1 0.0 WB AUTO 16M 4 NORM 0:00:34 Icon indicating current P mode Creating panoramic images (~ mode) Take pictures that can be changed in some modes. 0.0 WB AUTO 16M MENU 2 Use FGHI to which the effect has been applied. *2 VR-360/D-760 and VR-350/D-755 only In P mode, the optimum shooting settings are locked at...
VR-350 Instruction Manual (English)
Page 34
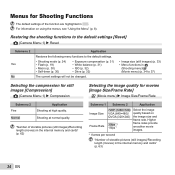
... the shooting functions to the default settings [Reset] K (Camera Menu 1) Reset Submenu 2 Yes No Application Restores the following menu functions to the default settings. • Shooting mode (p. 24) • Flash (p. 19) • Macro (p. 30) • Self-timer (p. 30) • Exposure compensation (p. 31) • White balance (p. 31) • ISO (p. 32) • Drive (p. 32) The current settings will not be changed. • Image size (still images) (p. 33) • Menu functions in z (Shooting menu)/A (Movie menu) (p. 34 to 37) Selecting the compression for still images...
... the shooting functions to the default settings [Reset] K (Camera Menu 1) Reset Submenu 2 Yes No Application Restores the following menu functions to the default settings. • Shooting mode (p. 24) • Flash (p. 19) • Macro (p. 30) • Self-timer (p. 30) • Exposure compensation (p. 31) • White balance (p. 31) • ISO (p. 32) • Drive (p. 32) The current settings will not be changed. • Image size (still images) (p. 33) • Menu functions in z (Shooting menu)/A (Movie menu) (p. 34 to 37) Selecting the compression for still images...
VR-350 Instruction Manual (English)
Page 43
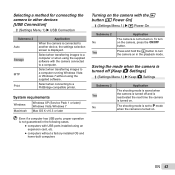
... screen is displayed. Saving the mode when the camera is turned off [Keep K Settings] d (Settings Menu 1) Keep K Settings Submenu 2 Yes No Application The shooting mode is saved when the camera is turned off and is reactivated the next time the camera is turned on the camera, press the n button. To turn the camera on . Selecting a method for connecting the camera to other devices [USB Connection] d (Settings Menu 1) USB Connection Submenu 2 Auto Storage MTP Print Application When the camera is connected to a PictBridge-compatible printer...
... screen is displayed. Saving the mode when the camera is turned off [Keep K Settings] d (Settings Menu 1) Keep K Settings Submenu 2 Yes No Application The shooting mode is saved when the camera is turned off and is reactivated the next time the camera is turned on the camera, press the n button. To turn the camera on . Selecting a method for connecting the camera to other devices [USB Connection] d (Settings Menu 1) USB Connection Submenu 2 Auto Storage MTP Print Application When the camera is connected to a PictBridge-compatible printer...
VR-350 Instruction Manual (English)
Page 46
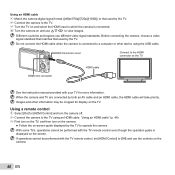
... TV remote control, set [HDMI Control] to [Off] and use the controls on -screen guide displayed by the TV to operate the camera. "Using an HDMI cable" (p. 46) 3 First turn on the TV, and then turn the camera off. 2 Connect the camera to the TV using the USB cable. Connector cover Connect to the HDMI connector on and use different video signal standards. Using a remote control 1 Select [On] for more information. Using an HDMI cable 1 Match the camera digital signal format ([480p...
... TV remote control, set [HDMI Control] to [Off] and use the controls on -screen guide displayed by the TV to operate the camera. "Using an HDMI cable" (p. 46) 3 First turn on the TV, and then turn the camera off. 2 Connect the camera to the TV using the USB cable. Connector cover Connect to the HDMI connector on and use different video signal standards. Using a remote control 1 Select [On] for more information. Using an HDMI cable 1 Match the camera digital signal format ([480p...
VR-350 Instruction Manual (English)
Page 47
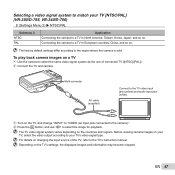
... TV's settings, the displayed images and information may become cropped. Connecting the camera to select the image for playback. For details on your TV, select the video output according to your TV [NTSC/PAL] (VR-350/D-755, VR-340/D-750) d (Settings Menu 2) NTSC/PAL Submenu 2 NTSC PAL Application Connecting the camera to the TV's instruction manual. Before viewing camera images on changing the input source of connected TV ([NTSC]/[PAL]). 2 Connect the...
... TV's settings, the displayed images and information may become cropped. Connecting the camera to select the image for playback. For details on your TV, select the video output according to your TV [NTSC/PAL] (VR-350/D-755, VR-340/D-750) d (Settings Menu 2) NTSC/PAL Submenu 2 NTSC PAL Application Connecting the camera to the TV's instruction manual. Before viewing camera images on changing the input source of connected TV ([NTSC]/[PAL]). 2 Connect the...
VR-350 Instruction Manual (English)
Page 50
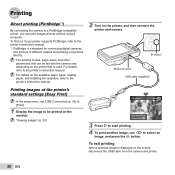
... supports PictBridge, refer to the printer's instruction manual. *1 PictBridge is displayed on the screen, disconnect the USB cable from the camera and printer. 50 EN "Viewing images" (p. 20) Easy Print Back MENU Easy Print Start Custom Print OK 3 Press I to start printing. 4 To print another image, use HI to the printer's instruction manual. 2 Turn on the printer, and then connect the printer and camera. Printing Direct printing (PictBridge*1) By connecting the camera to a PictBridge-compatible printer, you can be set [USB Connection] (p. 43) to [Print]. 1 Display the image...
... supports PictBridge, refer to the printer's instruction manual. *1 PictBridge is displayed on the screen, disconnect the USB cable from the camera and printer. 50 EN "Viewing images" (p. 20) Easy Print Back MENU Easy Print Start Custom Print OK 3 Press I to start printing. 4 To print another image, use HI to the printer's instruction manual. 2 Turn on the printer, and then connect the printer and camera. Printing Direct printing (PictBridge*1) By connecting the camera to a PictBridge-compatible printer, you can be set [USB Connection] (p. 43) to [Print]. 1 Display the image...
VR-350 Instruction Manual (English)
Page 55
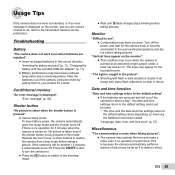
Card/Internal memory "An error message is fully pressed in this mode. To save battery power, the camera automatically goes into sleep mode and the monitor turns off if there is no operation is performed. Date and time function "Date and time settings return to the default setting". ● If the batteries are removed and left for another 12 minutes, it is ready to turn the camera on . "The light is caught in the picture". ● Shooting with fl...
Card/Internal memory "An error message is fully pressed in this mode. To save battery power, the camera automatically goes into sleep mode and the monitor turns off if there is no operation is performed. Date and time function "Date and time settings return to the default setting". ● If the batteries are removed and left for another 12 minutes, it is ready to turn the camera on . "The light is caught in the picture". ● Shooting with fl...
VR-350 Instruction Manual (English)
Page 56
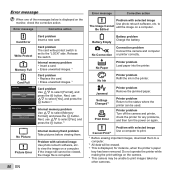
... the Q button. Be Edited Battery Empty No Connection Battery problem Charge the battery. Connection problem Connect the camera and computer or printer correctly. No Ink Printer problem Refill the ink in the printer. Jammed Settings Changed*3 Print Error Printer problem Remove the jammed paper. Memory Full Internal memory problem • Insert a card. • Erase unwanted images.*1 Card Full Card problem • Replace the card. • Erase unwanted images.*1 Card Setup Back MENU Power Off Format Card problem Use FG to the "LOCK" side. Error message Corrective...
... the Q button. Be Edited Battery Empty No Connection Battery problem Charge the battery. Connection problem Connect the camera and computer or printer correctly. No Ink Printer problem Refill the ink in the printer. Jammed Settings Changed*3 Print Error Printer problem Remove the jammed paper. Memory Full Internal memory problem • Insert a card. • Erase unwanted images.*1 Card Full Card problem • Replace the card. • Erase unwanted images.*1 Card Setup Back MENU Power Off Format Card problem Use FG to the "LOCK" side. Error message Corrective...

VR-350 Instruction Manual (English)
Page 58
...) mode uses a fast shutter speed and can reduce the blur incurred by selecting white balance (p. 31) Best results in the positive (+) direction to express whites as they appear" ● Taking pictures by a moving subject. ● Taking pictures at a high ISO sensitivity If a high ISO sensitivity is grainier than the actual subject. When taking pictures of white subjects (such as well. "Selecting the ISO sensitivity" (p. 32) Batteries "Making batteries last longer" ● Set [Power Save...
...) mode uses a fast shutter speed and can reduce the blur incurred by selecting white balance (p. 31) Best results in the positive (+) direction to express whites as they appear" ● Taking pictures by a moving subject. ● Taking pictures at a high ISO sensitivity If a high ISO sensitivity is grainier than the actual subject. When taking pictures of white subjects (such as well. "Selecting the ISO sensitivity" (p. 32) Batteries "Making batteries last longer" ● Set [Power Save...
VR-350 Instruction Manual (English)
Page 61
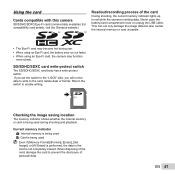
... writing. Never open the battery/card compartment cover or unplug the USB cable. Return the switch to prevent the disclosure of personal data. LOCK Checking the image saving location The memory indicator shows whether the internal memory or card is being used Even if [Memory Format]/[Format], [Erase], [Sel. When disposing of the card During shooting, the current memory indicator lights up in the card is writing data. Image], or [All Erase] is performed, the data in red while the camera is not completely erased...
... writing. Never open the battery/card compartment cover or unplug the USB cable. Return the switch to prevent the disclosure of personal data. LOCK Checking the image saving location The memory indicator shows whether the internal memory or card is being used Even if [Memory Format]/[Format], [Erase], [Sel. When disposing of the card During shooting, the current memory indicator lights up in the card is writing data. Image], or [All Erase] is performed, the data in red while the camera is not completely erased...
VR-350 Instruction Manual (English)
Page 67
... warranty of copyright owners. it . These pixels do not allow the exclusion or limitation of liability for a Class B digital device, pursuant to Part 15 of this product. • Olympus makes no event shall be used in these written materials or software, and in playback mode. • In places subject to low temperatures, the monitor may take a long time to turn on a circuit...
... warranty of copyright owners. it . These pixels do not allow the exclusion or limitation of liability for a Class B digital device, pursuant to Part 15 of this product. • Olympus makes no event shall be used in these written materials or software, and in playback mode. • In places subject to low temperatures, the monitor may take a long time to turn on a circuit...

VR-350 Instruction Manual (English)
Page 70
... a model on which Olympus does not place and record serial numbers). 3 A detailed description of the problem. 4 Sample prints, negatives, digital prints (or files on a Product to another image or data storage medium and/or remove any image or other data saved on disk) if available and related to the problem. When returning Products for service. This symbol [crossed-out wheeled bin Directive 2006/66/EC Annex II] indicates...
... a model on which Olympus does not place and record serial numbers). 3 A detailed description of the problem. 4 Sample prints, negatives, digital prints (or files on a Product to another image or data storage medium and/or remove any image or other data saved on disk) if available and related to the problem. When returning Products for service. This symbol [crossed-out wheeled bin Directive 2006/66/EC Annex II] indicates...


