FE-360 Instruction Manual (English)
Page 1
... and may differ from the actual product. DIGITAL CAMERA Instruction Manual ● Thank you take test shots to get accustomed to your new camera, please read these illustrations is provided for purchasing an Olympus digital camera. Before you start to use your camera before taking important photographs. ● In ...the explanation about these instructions carefully to update or modify information contained in this manual. ● The screen and camera illustrations shown in this manual in a safe place for future reference. ● We recommend that you for FE-360/X-875/C-570.
... and may differ from the actual product. DIGITAL CAMERA Instruction Manual ● Thank you take test shots to get accustomed to your new camera, please read these illustrations is provided for purchasing an Olympus digital camera. Before you start to use your camera before taking important photographs. ● In ...the explanation about these instructions carefully to update or modify information contained in this manual. ● The screen and camera illustrations shown in this manual in a safe place for future reference. ● We recommend that you for FE-360/X-875/C-570.
FE-360 Instruction Manual (English)
Page 2
... 14) 4 Step Printing "Direct printing (PictBridge)" (p. 34) "Print Reservations (DPOF)" (p. 37) Contents ¾ Names of Parts 6 ¾ Preparing the Camera 10 ¾ Shooting, Playback, and Erasing.......14 ¾ Using Shooting Modes 17 ¾ Using Shooting Functions 19 ¾ Using Playback Features 22 ¾ Menus ...for Shooting Functions...........24 ¾ Menus for Playback, Editing, and Printing Functions 28 ¾ Menus for Other Camera Settings .....31 ¾ Printing 34 ¾ Using OLYMPUS Master 2 39 ¾ Usage Tips 41 ¾ Appendix 45 ¾ Index 59 2 EN
... 14) 4 Step Printing "Direct printing (PictBridge)" (p. 34) "Print Reservations (DPOF)" (p. 37) Contents ¾ Names of Parts 6 ¾ Preparing the Camera 10 ¾ Shooting, Playback, and Erasing.......14 ¾ Using Shooting Modes 17 ¾ Using Shooting Functions 19 ¾ Using Playback Features 22 ¾ Menus ...for Shooting Functions...........24 ¾ Menus for Playback, Editing, and Printing Functions 28 ¾ Menus for Other Camera Settings .....31 ¾ Printing 34 ¾ Using OLYMPUS Master 2 39 ¾ Usage Tips 41 ¾ Appendix 45 ¾ Index 59 2 EN
FE-360 Instruction Manual (English)
Page 3
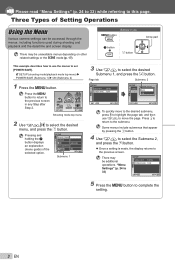
... and press the B button. There may be unavailable menus depending on other related settings or the f mode (p. 17). IMAGE SILENT QUALITY MODE CAMERA RESET MENU SETUP P/AUTO SCENE DIS MODE EXIT MENU SET OK Shooting mode top menu 2 Use klmn to this page. Page tab Submenu 2 ...returns to complete the setting. Pressing and holding the E button displays an explanation (menu guide) of Setting Operations Using the Menu Various camera settings can be accessed through the menus, including functions used during shooting and playback and the date/time and screen display. Three Types ...
... and press the B button. There may be unavailable menus depending on other related settings or the f mode (p. 17). IMAGE SILENT QUALITY MODE CAMERA RESET MENU SETUP P/AUTO SCENE DIS MODE EXIT MENU SET OK Shooting mode top menu 2 Use klmn to this page. Page tab Submenu 2 ...returns to complete the setting. Pressing and holding the E button displays an explanation (menu guide) of Setting Operations Using the Menu Various camera settings can be accessed through the menus, including functions used during shooting and playback and the date/time and screen display. Three Types ...
FE-360 Instruction Manual (English)
Page 5
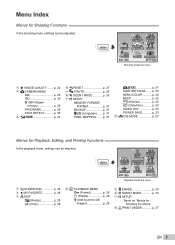
.../ movies p. 25 PANORAMA p. 26 FACE DETECT........... Menu Index Menus for Shooting Functions In the shooting mode, settings can be adjusted. 4 RESET 5 1 6 IMAGE SILENT QUALITY MODE 2 7 CAMERA MENU SETUP 3 8 P/AUTO SCENE DIS MODE EXIT MENU SET OK Shooting mode top menu 1 D IMAGE QUALITY........ PLAYBACK SHOW MENU SETUP 2 5 8 MY PRINT FAVORITE ERASE ORDER...
.../ movies p. 25 PANORAMA p. 26 FACE DETECT........... Menu Index Menus for Shooting Functions In the shooting mode, settings can be adjusted. 4 RESET 5 1 6 IMAGE SILENT QUALITY MODE 2 7 CAMERA MENU SETUP 3 8 P/AUTO SCENE DIS MODE EXIT MENU SET OK Shooting mode top menu 1 D IMAGE QUALITY........ PLAYBACK SHOW MENU SETUP 2 5 8 MY PRINT FAVORITE ERASE ORDER...
FE-360 Instruction Manual (English)
Page 6
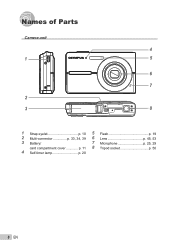
Names of Parts Camera unit 4 1 5 6 7 2 3 8 1 Strap eyelet p. 10 5 Flash p. 19 2 Multi-connector p. 33, 34, 39 6 Lens p. 45, 53 3 Battery/ 7 Microphone p. 25, 29 card compartment cover p. 11 8 Tripod socket p. 50 4 Self-timer lamp p. 20 6 EN
Names of Parts Camera unit 4 1 5 6 7 2 3 8 1 Strap eyelet p. 10 5 Flash p. 19 2 Multi-connector p. 33, 34, 39 6 Lens p. 45, 53 3 Battery/ 7 Microphone p. 25, 29 card compartment cover p. 11 8 Tripod socket p. 50 4 Self-timer lamp p. 20 6 EN
FE-360 Instruction Manual (English)
Page 8
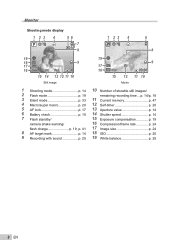
... 11 10 Still image 1 Shooting mode p. 14 2 Flash mode p. 19 3 Silent mode p. 33 4 Macro/super macro p. 20 5 AF lock p. 17 6 Battery check p. 10 7 Flash standby/ camera shake warning/ flash charge p. 19, p. 41 8 AF target mark p. 14 9 Recording with sound p. 25 19 17 QVGA 16 15 +2.0 9 IN 00:34 15 12...
... 11 10 Still image 1 Shooting mode p. 14 2 Flash mode p. 19 3 Silent mode p. 33 4 Macro/super macro p. 20 5 AF lock p. 17 6 Battery check p. 10 7 Flash standby/ camera shake warning/ flash charge p. 19, p. 41 8 AF target mark p. 14 9 Recording with sound p. 25 19 17 QVGA 16 15 +2.0 9 IN 00:34 15 12...
FE-360 Instruction Manual (English)
Page 10
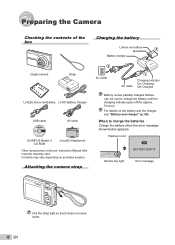
... the contents of the box Charging the battery Lithium ion battery 3 ▼ Battery charger Digital camera Strap LI-42B Lithium Ion Battery LI-40C Battery Charger USB cable AV cable OLYMPUS Master 2 CD-ROM microSD Attachment Other accessories not shown: Instruction Manual (this manual), warranty..." (p. 45). Before use, be sure to charge the batteries Charge the battery when the error message shown below appears. Attaching the camera strap 2 AC outlet AC cable 1 Charging indicator On: Charging Off: Charged Battery comes partially charged. When to charge the battery until...
... the contents of the box Charging the battery Lithium ion battery 3 ▼ Battery charger Digital camera Strap LI-42B Lithium Ion Battery LI-40C Battery Charger USB cable AV cable OLYMPUS Master 2 CD-ROM microSD Attachment Other accessories not shown: Instruction Manual (this manual), warranty..." (p. 45). Before use, be sure to charge the batteries Charge the battery when the error message shown below appears. Attaching the camera strap 2 AC outlet AC cable 1 Charging indicator On: Charging Off: Charged Battery comes partially charged. When to charge the battery until...
FE-360 Instruction Manual (English)
Page 11
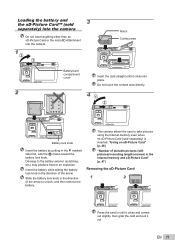
...the battery exterior (scratches, etc.) may produce heat or an explosion. This camera allows the user to take pictures using the internal memory even when no xD-Picture Card (sold 3 separately) ...into the camera Do not insert anything other than an xD-Picture Card or the microSD Attachment into... place. Insert the battery while sliding the battery lock knob in until it clicks into the camera. 1 2 1 Notch Contact area Battery/card compartment cover Insert the card straight until it clicks and ...
...the battery exterior (scratches, etc.) may produce heat or an explosion. This camera allows the user to take pictures using the internal memory even when no xD-Picture Card (sold 3 separately) ...into the camera Do not insert anything other than an xD-Picture Card or the microSD Attachment into... place. Insert the battery while sliding the battery lock knob in until it clicks into the camera. 1 2 1 Notch Contact area Battery/card compartment cover Insert the card straight until it clicks and ...
FE-360 Instruction Manual (English)
Page 12
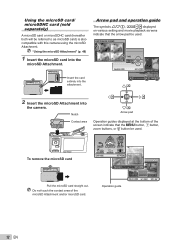
IMAGE SILENT QUALITY MODE CAMERA RESET MENU SETUP P/AUTO SCENE DIS MODE EXIT MENU SET OK SEL. IMAGE IN WT SET1 OK 2 3 Operation guide 4 BACK MENU 5 6 OK GO 12 EN .... Do not touch the contact area of the screen indicate that the arrow pad be referred to as microSD card) is also compatible with this camera using the microSD Attachment. "Using the microSD Attachment" (p. 48) 1 Insert the microSD card into the attachment. EXPOSURE COMP. 0.0 X +0.3 Y M D TIME +0.7 2008 +018.0 26 12 30 Y M D CANCEL...
IMAGE SILENT QUALITY MODE CAMERA RESET MENU SETUP P/AUTO SCENE DIS MODE EXIT MENU SET OK SEL. IMAGE IN WT SET1 OK 2 3 Operation guide 4 BACK MENU 5 6 OK GO 12 EN .... Do not touch the contact area of the screen indicate that the arrow pad be referred to as microSD card) is also compatible with this camera using the microSD Attachment. "Using the microSD Attachment" (p. 48) 1 Insert the microSD card into the attachment. EXPOSURE COMP. 0.0 X +0.3 Y M D TIME +0.7 2008 +018.0 26 12 30 Y M D CANCEL...

FE-360 Instruction Manual (English)
Page 13
... [Y/M/D] (date order). X Y M D TIME Y M D CANCEL MENU Date and time setting screen 2 Use kl to select the year for the menu and error messages displayed on the camera. ● The date and time setting screen is selectable. 1 Press the m button, and press klmn to select [W] and press the B button. IMAGE SILENT QUALITY MODE...
... [Y/M/D] (date order). X Y M D TIME Y M D CANCEL MENU Date and time setting screen 2 Use kl to select the year for the menu and error messages displayed on the camera. ● The date and time setting screen is selectable. 1 Press the m button, and press klmn to select [W] and press the B button. IMAGE SILENT QUALITY MODE...
FE-360 Instruction Manual (English)
Page 14
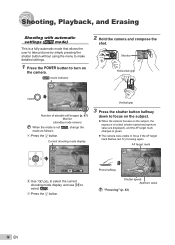
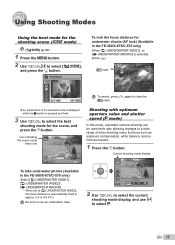
... locked (shutter speed and aperture value are displayed), and the AF target mark changes to green. ● The camera was unable to focus on the subject. ● When the camera focuses on the camera. AF target mark AUTO WB AUTO ISO AUTO 8M NORM PROGRAM AUTO AUTO 2 Use kl to select the current... pressing the shutter button without using the menu to make detailed settings. 1 Press the o button to select h. 3 Press the B button. h mode indicator AUTO 2 Hold the camera and compose the shot.
... locked (shutter speed and aperture value are displayed), and the AF target mark changes to green. ● The camera was unable to focus on the subject. ● When the camera focuses on the camera. AF target mark AUTO WB AUTO ISO AUTO 8M NORM PROGRAM AUTO AUTO 2 Use kl to select the current... pressing the shutter button without using the menu to make detailed settings. 1 Press the o button to select h. 3 Press the B button. h mode indicator AUTO 2 Hold the camera and compose the shot.
FE-360 Instruction Manual (English)
Page 15
... can not be changed. EN 15 To shoot movies "Shooting movies (A mode)" (p. 18) When shooting is finished Press the o button to turn off the camera. 2008.10.26 12:30 NORM 8M 100-0001 IN 1 Number of images. 4 To take the picture, gently press the shutter button all the way... fully 1/400 F3.1 Image review screen To view images during shooting Pressing the q button enables playback of frames Playback image 2 Use klmn to shake the camera. "Index view and closeup view" (p. 22) To play back movies Select a movie, and press the B button. 2008.10.26 12:30 100-0004 MOVIE PLAY...
... can not be changed. EN 15 To shoot movies "Shooting movies (A mode)" (p. 18) When shooting is finished Press the o button to turn off the camera. 2008.10.26 12:30 NORM 8M 100-0001 IN 1 Number of images. 4 To take the picture, gently press the shutter button all the way... fully 1/400 F3.1 Image review screen To view images during shooting Pressing the q button enables playback of frames Playback image 2 Use klmn to shake the camera. "Index view and closeup view" (p. 22) To play back movies Select a movie, and press the B button. 2008.10.26 12:30 100-0004 MOVIE PLAY...
FE-360 Instruction Manual (English)
Page 17
...as exposure compensation, white balance, and so forth as needed. 1 Press the B button. Current shooting mode display AUTO To take underwater photos (Available in the FE-360/X-875/C-570 only) When [k UNDERWATER WIDE1], or, [H UNDERWATER MACRO] is selected, press l. ^ mark AFL EXIT MENU SET OK To cancel, press l ...WIDE2], the focus distance is set 8M NORM IN 4 Shooting with optimum aperture value and shutter speed (P mode) In this mode, automatic camera shooting can be used while also allowing changes to a wide range of the selected mode is displayed while the E button is pressed and ...
...as exposure compensation, white balance, and so forth as needed. 1 Press the B button. Current shooting mode display AUTO To take underwater photos (Available in the FE-360/X-875/C-570 only) When [k UNDERWATER WIDE1], or, [H UNDERWATER MACRO] is selected, press l. ^ mark AFL EXIT MENU SET OK To cancel, press l ...WIDE2], the focus distance is set 8M NORM IN 4 Shooting with optimum aperture value and shutter speed (P mode) In this mode, automatic camera shooting can be used while also allowing changes to a wide range of the selected mode is displayed while the E button is pressed and ...
FE-360 Instruction Manual (English)
Page 18
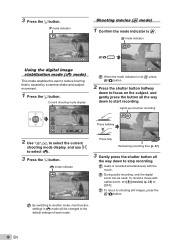
...to shooting still images, press the n/K button. Audio is recorded simultaneously with optical zoom, set [R] (movies) (p. 25) to reduce blurring that is caused by a camera shake and subject movement. 1 Press the B button. To return to select h. 3 Press the B button. 3 Press the B button. h mode indicator h ...00:34 Remaining recording time (p. 47) 3 Gently press the shutter button all the way down to start recording. During audio recording, only the digital zoom can be changed to the default settings of each mode. 18 EN P mode indicator P Shooting movies (n mode) 1 Confirm...
...to shooting still images, press the n/K button. Audio is recorded simultaneously with optical zoom, set [R] (movies) (p. 25) to reduce blurring that is caused by a camera shake and subject movement. 1 Press the B button. To return to select h. 3 Press the B button. 3 Press the B button. h mode indicator h ...00:34 Remaining recording time (p. 47) 3 Gently press the shutter button all the way down to start recording. During audio recording, only the digital zoom can be changed to the default settings of each mode. 18 EN P mode indicator P Shooting movies (n mode) 1 Confirm...
FE-360 Instruction Manual (English)
Page 19
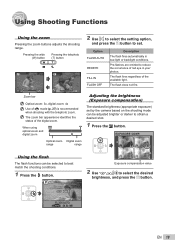
...Exposure compensation) The standard brightness (appropriate exposure) set . When using optical zoom and digital zoom 2 Use mn to select the setting option, and press the B button to set by the camera based on the shooting mode can be adjusted brighter or darker to select the desired ...! # $ EN 19 Pressing the wide (W) button Pressing the telephoto (T) button P P 8M NORM IN 4 8M NORM Zoom bar IN 4 Optical zoom: 3x, digital zoom: 4x Use of red eye in low-light or backlight conditions. P AUTO SET OK +0.7 +1.0 Exposure compensation value 2 Use klmn to obtain a desired shot. ...
...Exposure compensation) The standard brightness (appropriate exposure) set . When using optical zoom and digital zoom 2 Use mn to select the setting option, and press the B button to set by the camera based on the shooting mode can be adjusted brighter or darker to select the desired ...! # $ EN 19 Pressing the wide (W) button Pressing the telephoto (T) button P P 8M NORM IN 4 8M NORM Zoom bar IN 4 Optical zoom: 3x, digital zoom: 4x Use of red eye in low-light or backlight conditions. P AUTO SET OK +0.7 +1.0 Exposure compensation value 2 Use klmn to obtain a desired shot. ...
FE-360 Instruction Manual (English)
Page 20
... 10 seconds, the previous brightness resumes. 20 EN Self-timer shooting is taken. The monitor becomes brighter. Shooting closeups (Macro shooting) This function enables the camera to focus and shoot subjects at the most telephoto (T) position. *3 The zoom is no operation for approx. 2 seconds, and then the picture is automatically canceled...
... 10 seconds, the previous brightness resumes. 20 EN Self-timer shooting is taken. The monitor becomes brighter. Shooting closeups (Macro shooting) This function enables the camera to focus and shoot subjects at the most telephoto (T) position. *3 The zoom is no operation for approx. 2 seconds, and then the picture is automatically canceled...
FE-360 Instruction Manual (English)
Page 25
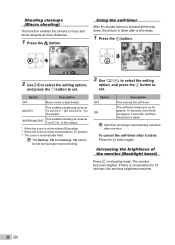
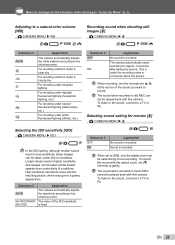
.... Larger values result in higher sensitivity, and images can be taken at the source of the sound you want to [ON], only the digital zoom can be used during movie recording. n/D: n Submenu 2 OFF ON Application No sound is recorded. EN 25 The sound when recorded ... to record. Selecting sound setting for the functions while referring to [OFF]. When set [R] (movies) to "Using the Menu" (p. 3). The camera automatically starts recording for recording notes or comments about the picture. To listen to the sound, connect to the shooting scene. Adjusting to a natural ...
.... Larger values result in higher sensitivity, and images can be taken at the source of the sound you want to [ON], only the digital zoom can be used during movie recording. n/D: n Submenu 2 OFF ON Application No sound is recorded. EN 25 The sound when recorded ... to record. Selecting sound setting for the functions while referring to [OFF]. When set [R] (movies) to "Using the Menu" (p. 3). The camera automatically starts recording for recording notes or comments about the picture. To listen to the sound, connect to the shooting scene. Adjusting to a natural ...
FE-360 Instruction Manual (English)
Page 26
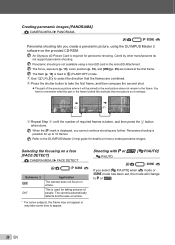
...remain in the microSD Attachment. Selecting the focusing on a face [FACE DETECT] K CAMERA MENU X FACE DETECT n/D: P f h Submenu 2 OFF ON*1 Application The camera does not focus on how to P or h. 26 EN Panoramic shooting is not available using the OLYMPUS Master 2 software on a face. *1 For some subjects, the frame may not .... The flash (p. 19) is taken, and then press the B button when done. Panorama shooting is required for details on a face. The camera automatically detects and focuses on the provided CD-ROM. An Olympus xD-Picture Card is possible for up to the...
...remain in the microSD Attachment. Selecting the focusing on a face [FACE DETECT] K CAMERA MENU X FACE DETECT n/D: P f h Submenu 2 OFF ON*1 Application The camera does not focus on how to P or h. 26 EN Panoramic shooting is not available using the OLYMPUS Master 2 software on a face. *1 For some subjects, the frame may not .... The flash (p. 19) is taken, and then press the B button when done. Panorama shooting is required for details on a face. The camera automatically detects and focuses on the provided CD-ROM. An Olympus xD-Picture Card is possible for up to the...
FE-360 Instruction Manual (English)
Page 27
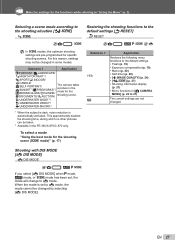
... INDOOR/ W CANDLE/ R SELF PORTRAIT/ S SUNSET*1/X FIREWORKS*1/ P BEHIND GLASS/V CUISINE/ d DOCUMENTS/i AUCTION/ The camera takes a picture in the FE-360/X-875/C-570 only. EN 27 This approximately doubles the shooting time, during which no other pictures can be taken. *2 ... the shooting functions to the default settings [R RESET] R RESET n/D: f n/D: h P f n h In f modes, the optimum shooting settings are not changed in [K CAMERA MENU] (p. 24 to the default settings. • Flash (p. 19) • Exposure compensation (p. 19) • Macro (p. 20) • Self-timer (p. 20) ...
... INDOOR/ W CANDLE/ R SELF PORTRAIT/ S SUNSET*1/X FIREWORKS*1/ P BEHIND GLASS/V CUISINE/ d DOCUMENTS/i AUCTION/ The camera takes a picture in the FE-360/X-875/C-570 only. EN 27 This approximately doubles the shooting time, during which no other pictures can be taken. *2 ... the shooting functions to the default settings [R RESET] R RESET n/D: f n/D: h P f n h In f modes, the optimum shooting settings are not changed in [K CAMERA MENU] (p. 24 to the default settings. • Flash (p. 19) • Exposure compensation (p. 19) • Macro (p. 20) • Self-timer (p. 20) ...
FE-360 Instruction Manual (English)
Page 28
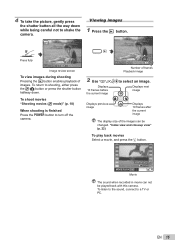
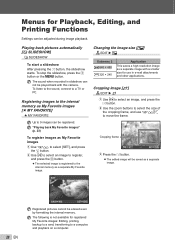
... images [f MY FAVORITE] f MY FAVORITE Up to a computer, and playback on a computer. The following is registered to the internal memory as a separate image with this camera. To stop the slideshow, press the B button or the m button. Registering images to the internal memory as a separate image. Cropping image [P] E EDIT X P 1 Use mn to...
... images [f MY FAVORITE] f MY FAVORITE Up to a computer, and playback on a computer. The following is registered to the internal memory as a separate image with this camera. To stop the slideshow, press the B button or the m button. Registering images to the internal memory as a separate image. Cropping image [P] E EDIT X P 1 Use mn to...


