FE-230 Advanced Manual (English)
Page 11
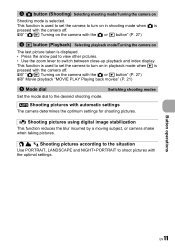
...) g Movie playback "MOVIE PLAY Playing back movies" (P. 21) 5 Mode dial Switching shooting modes Set the mode dial to the desired shooting mode. g "K/q Turning on The last picture taken is displayed. • Press the arrow pad to view other pictures. • Use the zoom lever to turn on Shooting mode is selected. B E M Shooting pictures according to the situation Use PORTRAIT, LANDSCAPE and NIGHT+PORTRAIT to turn on in shooting mode when K is pressed with the camera off . This function is used to set the camera to shoot pictures...
...) g Movie playback "MOVIE PLAY Playing back movies" (P. 21) 5 Mode dial Switching shooting modes Set the mode dial to the desired shooting mode. g "K/q Turning on The last picture taken is displayed. • Press the arrow pad to view other pictures. • Use the zoom lever to turn on Shooting mode is selected. B E M Shooting pictures according to the situation Use PORTRAIT, LANDSCAPE and NIGHT+PORTRAIT to turn on in shooting mode when K is pressed with the camera off . This function is used to set the camera to shoot pictures...
FE-230 Advanced Manual (English)
Page 12
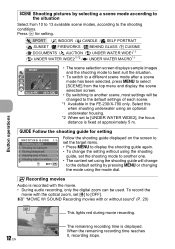
... selection screen. • By switching to another one. • The content set [R] to display the shooting guide again. • To change the setting without sound" (P. 20) A This lights red during movie recording. Select this when shooting underwater using the mode dial. n Recording movies Audio is fixed at approximately 5 m. Button operations 12 EN 00:36 The remaining recording time is displayed. Press for setting SHOOTING GUIDE 1/3 1 Brightening subject. 2 Shooting into backlight. 3 Blurring background. 4 Adjusting area in focus. 5 Shooting subject in the FE-230...
... selection screen. • By switching to another one. • The content set [R] to display the shooting guide again. • To change the setting without sound" (P. 20) A This lights red during movie recording. Select this when shooting underwater using the mode dial. n Recording movies Audio is fixed at approximately 5 m. Button operations 12 EN 00:36 The remaining recording time is displayed. Press for setting SHOOTING GUIDE 1/3 1 Brightening subject. 2 Shooting into backlight. 3 Blurring background. 4 Adjusting area in focus. 5 Shooting subject in the FE-230...
FE-230 Advanced Manual (English)
Page 13
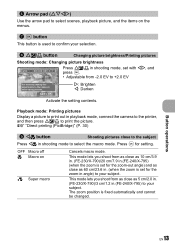
.... (FE-230/X-790)/3 cm/1.2 in playback mode, connect the camera to the printer, and then press OF/< to print the picture. Button operations EN 13 OFF Macro off & Macro on the menus. 7 button This button is set with XY, and + 2.0 press . • Adjustable from as close as 10 cm/3.9 in. (FE-230/X-790)/20 cm/7.9 in.(FE-240/X-795) (when the zoom is fixed automatically and cannot be changed. g "Direct printing (PictBridge)" (P. 30) 9 X& button Shooting pictures...
.... (FE-230/X-790)/3 cm/1.2 in playback mode, connect the camera to the printer, and then press OF/< to print the picture. Button operations EN 13 OFF Macro off & Macro on the menus. 7 button This button is set with XY, and + 2.0 press . • Adjustable from as close as 10 cm/3.9 in. (FE-230/X-790)/20 cm/7.9 in.(FE-240/X-795) (when the zoom is fixed automatically and cannot be changed. g "Direct printing (PictBridge)" (P. 30) 9 X& button Shooting pictures...
FE-230 Advanced Manual (English)
Page 26
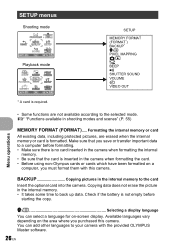
...) MEMORY FORMAT (FORMAT)..... SETUP MEMORY FORMAT (FORMAT*) BACKUP* W PIXEL MAPPING K/q s BEEP 8 SHUTTER SOUND VOLUME X VIDEO OUT Menu operations • Some functions are erased when the internal memory or card is inserted in the internal memory to the card Insert the optional card into the camera. You can select a language for on-screen display. W Selecting a display language You can add other languages to the selected mode. Available languages vary depending on a computer, you must format them with the provided OLYMPUS Master software. 26 EN PRINT SHOW...
...) MEMORY FORMAT (FORMAT)..... SETUP MEMORY FORMAT (FORMAT*) BACKUP* W PIXEL MAPPING K/q s BEEP 8 SHUTTER SOUND VOLUME X VIDEO OUT Menu operations • Some functions are erased when the internal memory or card is inserted in the internal memory to the card Insert the optional card into the camera. You can select a language for on-screen display. W Selecting a display language You can add other languages to the selected mode. Available languages vary depending on a computer, you must format them with the provided OLYMPUS Master software. 26 EN PRINT SHOW...
FE-230 Advanced Manual (English)
Page 30
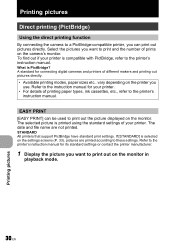
... printing out pictures directly. • Available printing modes, paper sizes etc.. EASY PRINT [EASY PRINT] can print out pictures directly. Refer to the printer's instruction manual for its standard settings or contact the printer manufacturer. 1 Display the picture you want to print out on the camera's monitor. vary depending on the printer you can be used to print out the picture displayed on the settings screens (P. 33), pictures are not printed. Refer to the instruction manual for connecting digital cameras and printers of prints on the monitor in playback mode...
... printing out pictures directly. • Available printing modes, paper sizes etc.. EASY PRINT [EASY PRINT] can print out pictures directly. Refer to the printer's instruction manual for its standard settings or contact the printer manufacturer. 1 Display the picture you want to print out on the camera's monitor. vary depending on the printer you can be used to print out the picture displayed on the settings screens (P. 33), pictures are not printed. Refer to the instruction manual for connecting digital cameras and printers of prints on the monitor in playback mode...
FE-230 Advanced Manual (English)
Page 35
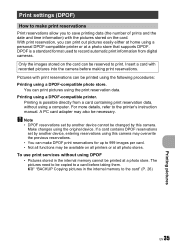
... printer's instruction manual. Print settings (DPOF) How to make DPOF print reservations for up to 999 images per card. • Not all photo stores. You can be necessary. To use print services without using the print reservation data. The pictures need to be copied to record automatic print information from a card containing print reservation data, without using DPOF • Pictures stored in the internal memory to save printing data (the number of prints and the date and time information) with the pictures stored on the card can print pictures using...
... printer's instruction manual. Print settings (DPOF) How to make DPOF print reservations for up to 999 images per card. • Not all photo stores. You can be necessary. To use print services without using the print reservation data. The pictures need to be copied to record automatic print information from a card containing print reservation data, without using DPOF • Pictures stored in the internal memory to save printing data (the number of prints and the date and time information) with the pictures stored on the card can print pictures using...
FE-230 Advanced Manual (English)
Page 38
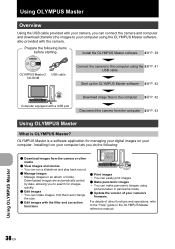
... 2 USB cable CD-ROM Connect the camera to the computer using the gP. 41 USB cable Start up the OLYMPUS Master software gP. 42 Computer equipped with a USB port Download image files to your computer using pictures taken in panorama mode. ( Update the version of other media ( View images and movies • You can run a slideshow and play back sound. ( Manage images • Manage images in the OLYMPUS Master reference manual. For details of your camera's firmware. OLYMPUS Master is OLYMPUS Master? Installing...
... 2 USB cable CD-ROM Connect the camera to the computer using the gP. 41 USB cable Start up the OLYMPUS Master software gP. 42 Computer equipped with a USB port Download image files to your computer using pictures taken in panorama mode. ( Update the version of other media ( View images and movies • You can run a slideshow and play back sound. ( Manage images • Manage images in the OLYMPUS Master reference manual. For details of your camera's firmware. OLYMPUS Master is OLYMPUS Master? Installing...

FE-230 Advanced Manual (English)
Page 41
... EASY PRINT CUSTOM PRINT EXIT SET OK Using OLYMPUS Master EN 41 Connecting the camera to a computer 1 Make sure the camera is turned off. • The monitor is off. • The lens is retracted. 2 Connect the multi-connector on the camera to the USB port on and the selection screen for the USB connection is displayed. • You must restart your computer's instruction manual to proceed with the installation. • The screen confirming that installation...
... EASY PRINT CUSTOM PRINT EXIT SET OK Using OLYMPUS Master EN 41 Connecting the camera to a computer 1 Make sure the camera is turned off. • The monitor is off. • The lens is retracted. 2 Connect the multi-connector on the camera to the USB port on and the selection screen for the USB connection is displayed. • You must restart your computer's instruction manual to proceed with the installation. • The screen confirming that installation...
FE-230 Advanced Manual (English)
Page 42
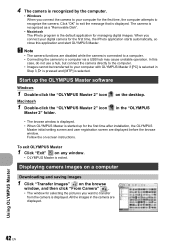
... after installation, the OLYMPUS Master initial setting screen and user registration screen are displayed. in the camera are displayed before the browse window. The camera is recognized as a "Removable Disk". • Macintosh The iPhoto program is started up the OLYMPUS Master software Windows 1 Double-click the "OLYMPUS Master 2" icon Macintosh 1 Double-click the "OLYMPUS Master 2" icon Master 2" folder. 4 The camera is displayed. Follow the on the desktop. Using OLYMPUS Master 42 EN Displaying camera images on a computer Downloading and saving images 1 Click "Transfer Images...
... after installation, the OLYMPUS Master initial setting screen and user registration screen are displayed. in the camera are displayed before the browse window. The camera is recognized as a "Removable Disk". • Macintosh The iPhoto program is started up the OLYMPUS Master software Windows 1 Double-click the "OLYMPUS Master 2" icon Macintosh 1 Double-click the "OLYMPUS Master 2" icon Master 2" folder. 4 The camera is displayed. Follow the on the desktop. Using OLYMPUS Master 42 EN Displaying camera images on a computer Downloading and saving images 1 Click "Transfer Images...

FE-230 Advanced Manual (English)
Page 46
... this occurs, remove the battery from sleep mode before taking the picture. a Shoot Before taking any pictures (Off) b After taking one picture (Lit) Shoot c d Shoot Wait After taking pictures The camera does not turn the camera on . Operate the zoom lever or other than R. If this mode. Remove the battery and warm it by following the shooting guide, or turn on even when a battery is loaded The battery is not charged • Charge the battery with the charger. The memory gauge is...
... this occurs, remove the battery from sleep mode before taking the picture. a Shoot Before taking any pictures (Off) b After taking one picture (Lit) Shoot c d Shoot Wait After taking pictures The camera does not turn the camera on . Operate the zoom lever or other than R. If this mode. Remove the battery and warm it by following the shooting guide, or turn on even when a battery is loaded The battery is not charged • Charge the battery with the charger. The memory gauge is...
FE-230 Advanced Manual (English)
Page 47
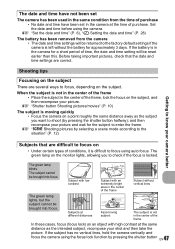
Set the date and time before using the focus lock function by pressing the shutter button EN 47 The subject cannot be brought into focus. The date and time have not been set The camera has been used in the same condition from the camera • The date and time settings will be reset earlier than this. Before taking important pictures, check that are difficult to focus on the subject. and then recompose your camera better...
Set the date and time before using the focus lock function by pressing the shutter button EN 47 The subject cannot be brought into focus. The date and time have not been set The camera has been used in the same condition from the camera • The date and time settings will be reset earlier than this. Before taking important pictures, check that are difficult to focus on the subject. and then recompose your camera better...
FE-230 Advanced Manual (English)
Page 50
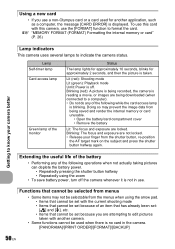
... message [CARD ERROR] is not in the camera. [PANORAMA]/[PRINT ORDER]/[FORMAT]/[BACKUP] 50 EN Blinking (red): A picture is being recorded, the camera is reading a movie, or images are being saved and render the internal memory or card unusable. • Open the battery/card compartment cover • Remove the battery Lit: The focus and exposure are locked. g "MEMORY FORMAT (FORMAT) Formatting the internal memory or card" (P. 26) Getting to know your finger from being downloaded (when connected to indicate the camera status. To use this camera, use a non-Olympus card or a card used...
... message [CARD ERROR] is not in the camera. [PANORAMA]/[PRINT ORDER]/[FORMAT]/[BACKUP] 50 EN Blinking (red): A picture is being recorded, the camera is reading a movie, or images are being saved and render the internal memory or card unusable. • Open the battery/card compartment cover • Remove the battery Lit: The focus and exposure are locked. g "MEMORY FORMAT (FORMAT) Formatting the internal memory or card" (P. 26) Getting to know your finger from being downloaded (when connected to indicate the camera status. To use this camera, use a non-Olympus card or a card used...
FE-230 Advanced Manual (English)
Page 51
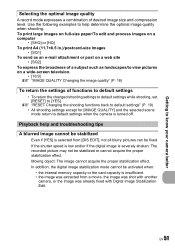
Use the following examples to help and troubleshooting tips A blurred image cannot be stabilized Even if [YES] is selected from a movie, the image was shot with another camera, or the image was extracted from [DIS EDIT], not all blurry pictures can be fixed. Playback help determine the optimal image quality when shooting. g "RESET Changing the shooting functions back to default settings" (P. 19) • All shooting settings except for [IMAGE QUALITY] and the selected scene mode return...
Use the following examples to help and troubleshooting tips A blurred image cannot be stabilized Even if [YES] is selected from a movie, the image was shot with another camera, or the image was extracted from [DIS EDIT], not all blurry pictures can be fixed. Playback help determine the optimal image quality when shooting. g "RESET Changing the shooting functions back to default settings" (P. 19) • All shooting settings except for [IMAGE QUALITY] and the selected scene mode return...
FE-230 Advanced Manual (English)
Page 52
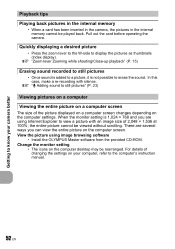
...-recording with an image size of changing the settings on the computer screen. There are using image browsing software • Install the OLYMPUS Master software from the provided CD-ROM. the entire picture cannot be played back. For details of 2,048 × 1,536 at 100%; g "Zoom lever Zooming while shooting/Close-up playback" (P. 15) Erasing sound recorded to still pictures • Once sound is added to view a picture with silence. Pull out the card before operating the camera...
...-recording with an image size of changing the settings on the computer screen. There are using image browsing software • Install the OLYMPUS Master software from the provided CD-ROM. the entire picture cannot be played back. For details of 2,048 × 1,536 at 100%; g "Zoom lever Zooming while shooting/Close-up playback" (P. 15) Erasing sound recorded to still pictures • Once sound is added to view a picture with silence. Pull out the card before operating the camera...
FE-230 Advanced Manual (English)
Page 68
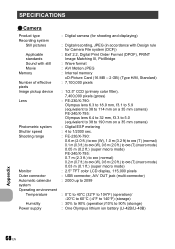
SPECIFICATIONS ( Camera Product type Recording system Still pictures Applicable standards Sound with still Movie Memory Number of effective pixels Image pickup device Lens Photometric system Shutter speed Shooting range Monitor Outer connector Automatic calendar system Operating environment Temperature Humidity Power supply : Digital camera (for shooting and displaying) : Digital recording, JPEG (in accordance with Design rule for Camera File system (DCF)) : Exif 2.2, Digital Print Order Format (DPOF), PRINT Image Matching III, PictBridge : Wave format : AVI Motion JPEG : Internal memory xD...
SPECIFICATIONS ( Camera Product type Recording system Still pictures Applicable standards Sound with still Movie Memory Number of effective pixels Image pickup device Lens Photometric system Shutter speed Shooting range Monitor Outer connector Automatic calendar system Operating environment Temperature Humidity Power supply : Digital camera (for shooting and displaying) : Digital recording, JPEG (in accordance with Design rule for Camera File system (DCF)) : Exif 2.2, Digital Print Order Format (DPOF), PRINT Image Matching III, PictBridge : Wave format : AVI Motion JPEG : Internal memory xD...
FE-230 Advanced Manual (English)
Page 74
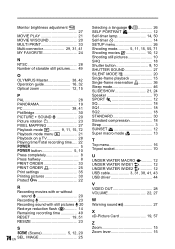
... Playback mode menu q 21 Playback on a TV 28 Playing time/Total recording time.... 22 o 5 o button 5, 10 Press completely 8 Press halfway 8 PRINT ORDER 33 PRINT ORDER 25 Print settings 35 Printing pictures 30 Protect 0 22 R Recording movies with or without sound R 20 Recording R 23 Recording sound with still pictures R 20 Red-eye reduction flash 14 Remaining recording time 49 RESET 19, 51 RESIZE 23 S f (Scene 5, 12, 20 74 EN SEL. IMAGE 25 Selecting a language W 26 SELF PORTRAIT R 12 Self-timer lamp 14, 50 Self-timer Y 14 SETUP menu 26 Shooting mode...
... Playback mode menu q 21 Playback on a TV 28 Playing time/Total recording time.... 22 o 5 o button 5, 10 Press completely 8 Press halfway 8 PRINT ORDER 33 PRINT ORDER 25 Print settings 35 Printing pictures 30 Protect 0 22 R Recording movies with or without sound R 20 Recording R 23 Recording sound with still pictures R 20 Red-eye reduction flash 14 Remaining recording time 49 RESET 19, 51 RESIZE 23 S f (Scene 5, 12, 20 74 EN SEL. IMAGE 25 Selecting a language W 26 SELF PORTRAIT R 12 Self-timer lamp 14, 50 Self-timer Y 14 SETUP menu 26 Shooting mode...
FE-230 Basic Manual (English, Français, Español, Português)
Page 2
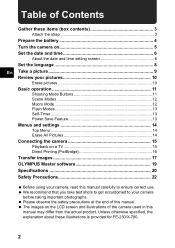
The images on a TV 15 Direct Printing (PictBridge 16 Transfer images 17 OLYMPUS Master software 19 Specifications 20 Safety Precautions 22 Before using your camera, read this manual carefully to your pictures 10 Erase pictures 10 Basic operation 11 Shooting Mode Buttons 11 Scene Modes 12 Macro Mode 12 Flash Modes 13 Self-Timer 13 Power Save Feature 13 Menus and settings 14 Top Menu 14 Erase All Pictures 14 Connecting the camera 15 Playback on the LCD screen and illustrations of this manual may differ from the...
The images on a TV 15 Direct Printing (PictBridge 16 Transfer images 17 OLYMPUS Master software 19 Specifications 20 Safety Precautions 22 Before using your camera, read this manual carefully to your pictures 10 Erase pictures 10 Basic operation 11 Shooting Mode Buttons 11 Scene Modes 12 Macro Mode 12 Flash Modes 13 Self-Timer 13 Power Save Feature 13 Menus and settings 14 Top Menu 14 Erase All Pictures 14 Connecting the camera 15 Playback on the LCD screen and illustrations of this manual may differ from the...
FE-230 Basic Manual (English, Français, Español, Português)
Page 11
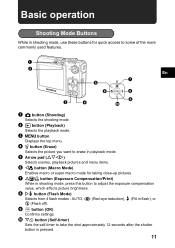
...ONXY) Selects scenes, playback pictures and menu items. 6 X& button (Macro Mode) Enables macro or super macro mode for taking close-up pictures. 7 OF/< button (Exposure Compensation/Print) While in flash), or $ (Flash off). 9 button (OK) Confirms settings. 0 NY button (Self-timer) Sets the self-timer to adjust the exposure compensation value, which affects picture brightness. 8 Y# button (Flash Mode) Selects from 4 flash modes - AUTO, ! (Red-eye reduction), # (Fill-in shooting mode, press this button to take the shot approximately 12 seconds after the shutter button is pressed. 11...
...ONXY) Selects scenes, playback pictures and menu items. 6 X& button (Macro Mode) Enables macro or super macro mode for taking close-up pictures. 7 OF/< button (Exposure Compensation/Print) While in flash), or $ (Flash off). 9 button (OK) Confirms settings. 0 NY button (Self-timer) Sets the self-timer to adjust the exposure compensation value, which affects picture brightness. 8 Y# button (Flash Mode) Selects from 4 flash modes - AUTO, ! (Red-eye reduction), # (Fill-in shooting mode, press this button to take the shot approximately 12 seconds after the shutter button is pressed. 11...
FE-230 Basic Manual (English, Français, Español, Português)
Page 16
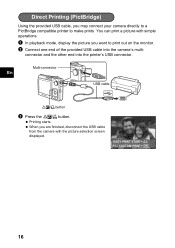
... print a picture with the picture selection screen displayed. When you are finished, disconnect the USB cable from the camera with simple operations. 1 In playback mode, display the picture you may connect your camera directly to a PictBridge compatible printer to print out on the monitor. 2 Connect one end of the provided USB cable into the printer's USB connector. Multi-connector En USB cable OF/< button 3 Press the OF/< button. EASY PRINT START PC / CUSTOM PRINT OK 16 Direct Printing (PictBridge) Using the provided USB cable, you want to make prints. Printing starts...
... print a picture with the picture selection screen displayed. When you are finished, disconnect the USB cable from the camera with simple operations. 1 In playback mode, display the picture you may connect your camera directly to a PictBridge compatible printer to print out on the monitor. 2 Connect one end of the provided USB cable into the printer's USB connector. Multi-connector En USB cable OF/< button 3 Press the OF/< button. EASY PRINT START PC / CUSTOM PRINT OK 16 Direct Printing (PictBridge) Using the provided USB cable, you want to make prints. Printing starts...
FE-230 Quick Start Guide (English, Português)
Page 1
...and time setting screen Y M D TIME Y / M / D Y-M-D Hour Minute Date formats (Y-M-D, M-D-Y, D-M-Y) CANCEL MENU Cancels the setting a. Shoot. • For a more information, please refer to select [M]. The card access lamp blinks. button [] [IN] HQ 3072×2304 4 Shutter Button (Press Completely) Review your subject. Press the X& and Y# buttons to display the picture you want to select the hours and minutes. • The time is displayed. W Power Cable 1 3 Lithium Ion Battery Battery Charger 2 AC Wall Outlet Charging Indicator Red light...
...and time setting screen Y M D TIME Y / M / D Y-M-D Hour Minute Date formats (Y-M-D, M-D-Y, D-M-Y) CANCEL MENU Cancels the setting a. Shoot. • For a more information, please refer to select [M]. The card access lamp blinks. button [] [IN] HQ 3072×2304 4 Shutter Button (Press Completely) Review your subject. Press the X& and Y# buttons to display the picture you want to select the hours and minutes. • The time is displayed. W Power Cable 1 3 Lithium Ion Battery Battery Charger 2 AC Wall Outlet Charging Indicator Red light...


