
FE-190 Advanced Manual (English)
Page 3
Attach the strap Quick Start Guide Pull the strap tight so that it does not come loose. Quick Start Guide Gather these items (box contents) Digital Camera Strap Lithium Ion Battery (LI-42B) Battery Charger (LI-40C) USB Cable AV Cable OLYMPUS Master CD-ROM Items not shown: Advanced Manual (this manual), Basic Manual, warranty card. Contents may vary depending on purchase location. EN 3
Attach the strap Quick Start Guide Pull the strap tight so that it does not come loose. Quick Start Guide Gather these items (box contents) Digital Camera Strap Lithium Ion Battery (LI-42B) Battery Charger (LI-40C) USB Cable AV Cable OLYMPUS Master CD-ROM Items not shown: Advanced Manual (this manual), Basic Manual, warranty card. Contents may vary depending on purchase location. EN 3
FE-190 Advanced Manual (English)
Page 4
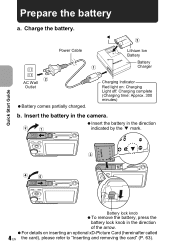
Quick Start Guide Prepare the battery a. Insert the battery in the camera. 2 1 Insert the battery in the direction indicated by the mark. 3 45 Battery lock knob To remove the battery, press the battery lock knob in the ... the card), please refer to "Inserting and removing the card" (P. 63). For details on : Charging Light off: Charging complete (Charging time: Approx. 300 minutes) b. W 3 Power Cable 1 Lithium Ion Battery Battery Charger 2 AC Wall Outlet Battery comes partially charged. Charge the battery.
Quick Start Guide Prepare the battery a. Insert the battery in the camera. 2 1 Insert the battery in the direction indicated by the mark. 3 45 Battery lock knob To remove the battery, press the battery lock knob in the ... the card), please refer to "Inserting and removing the card" (P. 63). For details on : Charging Light off: Charging complete (Charging time: Approx. 300 minutes) b. W 3 Power Cable 1 Lithium Ion Battery Battery Charger 2 AC Wall Outlet Battery comes partially charged. Charge the battery.
FE-190 Advanced Manual (English)
Page 29
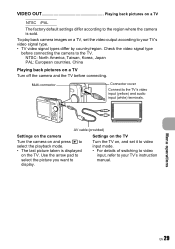
To play back camera images on a TV, set it to video input mode. • For details of switching to video input, refer to select the playback mode. • The ..., China Playing back pictures on and press q to your TV's video signal type. • TV video signal types differ by country/region. AV cable (provided) Settings on the camera Turn the camera on a TV Turn off the camera and the TV before connecting the camera to the region where the camera is displayed on the TV.
To play back camera images on a TV, set it to video input mode. • For details of switching to video input, refer to select the playback mode. • The ..., China Playing back pictures on and press q to your TV's video signal type. • TV video signal types differ by country/region. AV cable (provided) Settings on the camera Turn the camera on a TV Turn off the camera and the TV before connecting the camera to the region where the camera is displayed on the TV.
FE-190 Advanced Manual (English)
Page 31
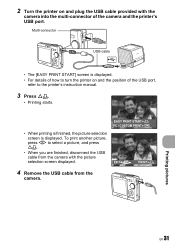
2 Turn the printer on and plug the USB cable provided with the camera into the multi-connector of the USB port, refer to turn the printer on and the position of the camera and the printer's USB port. Multi-connector USB cable • The [EASY PRINT START] screen is displayed. • For details of how to the printer's instruction manual. 3 Press O
2 Turn the printer on and plug the USB cable provided with the camera into the multi-connector of the USB port, refer to turn the printer on and the position of the camera and the printer's USB port. Multi-connector USB cable • The [EASY PRINT START] screen is displayed. • For details of how to the printer's instruction manual. 3 Press O
FE-190 Advanced Manual (English)
Page 32
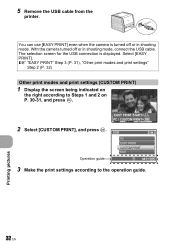
Select [EASY PRINT]. Printing pictures 32 EN With the camera turned off or in shooting mode, connect the USB cable. You can use [EASY PRINT] even when the camera is displayed. Operation guide USB PC EASY PRINT CUSTOM PRINT EXIT SET OK 3 Make the print settings according to Steps 1 ...and 2 on the right according to the operation guide. 5 Remove the USB cable from the printer...
Select [EASY PRINT]. Printing pictures 32 EN With the camera turned off or in shooting mode, connect the USB cable. You can use [EASY PRINT] even when the camera is displayed. Operation guide USB PC EASY PRINT CUSTOM PRINT EXIT SET OK 3 Make the print settings according to Steps 1 ...and 2 on the right according to the operation guide. 5 Remove the USB cable from the printer...

FE-190 Advanced Manual (English)
Page 34
Setting the number of prints and data to be printed PRINT INFO DATE FILE NAME 1 WITHOUT WITHOUT BACK MENU SET OK
Setting the number of prints and data to be printed PRINT INFO DATE FILE NAME 1 WITHOUT WITHOUT BACK MENU SET OK
FE-190 Advanced Manual (English)
Page 38
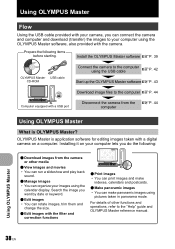
...OLYMPUS Master Flow Using the USB cable provided with your camera, you can connect the camera and computer and download (transfer) the images to your computer lets you want by date or keyword. ( Edit images • You can rotate images, trim them and change the size. ( Edit images with a digital camera on your computer using the OLYMPUS... Master software, also provided with the camera. For details of other media ( View images and movies • You can run a ...
...OLYMPUS Master Flow Using the USB cable provided with your camera, you can connect the camera and computer and download (transfer) the images to your computer lets you want by date or keyword. ( Edit images • You can rotate images, trim them and change the size. ( Edit images with a digital camera on your computer using the OLYMPUS... Master software, also provided with the camera. For details of other media ( View images and movies • You can run a ...

FE-190 Advanced Manual (English)
Page 39
... could result in unstable computer operation and the need to reboot. • Disconnect the cable connecting the camera to Mac OS X 10.2 are using Windows 98SE, the USB driver is installed automatically. Install the OLYMPUS Master software Before installing the OLYMPUS Master software, please confirm that your computer. • Windows XP corresponds to Windows...
... could result in unstable computer operation and the need to reboot. • Disconnect the cable connecting the camera to Mac OS X 10.2 are using Windows 98SE, the USB driver is installed automatically. Install the OLYMPUS Master software Before installing the OLYMPUS Master software, please confirm that your computer. • Windows XP corresponds to Windows...
FE-190 Advanced Manual (English)
Page 42
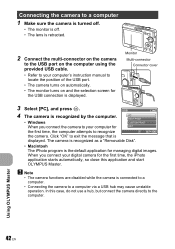
...Q. In this application and start OLYMPUS Master. The camera is recognized as a "Removable Disk". • Macintosh The iPhoto program is the default application for EXIT the first time, the computer attempts to recognize SET OK the camera. USB 4 The camera is recognized by the computer. Click...camera to your computer for managing digital images. Connecting the camera to a computer 1 Make sure the camera is turned off. • The monitor is off. • The lens is retracted. 2 Connect the multi-connector on the camera to the USB port on the computer using the provided USB cable...
...Q. In this application and start OLYMPUS Master. The camera is recognized as a "Removable Disk". • Macintosh The iPhoto program is the default application for EXIT the first time, the computer attempts to recognize SET OK the camera. USB 4 The camera is recognized by the computer. Click...camera to your computer for managing digital images. Connecting the camera to a computer 1 Make sure the camera is turned off. • The monitor is off. • The lens is retracted. 2 Connect the multi-connector on the camera to the USB port on the computer using the provided USB cable...

FE-190 Advanced Manual (English)
Page 45
... "Unplug or Eject Hardware", a warning message may be ejected safely, click "OK". EN 45 Using OLYMPUS Master Drag and drop it on the eject icon. 3 Disconnect the USB cable from the camera and that the hardware can be displayed. Click the "Unplug or Eject Hardware" icon again and disconnect ...or Eject Hardware" icon in the system tray. 2 Click the message that image data is not being downloaded from the camera. 2 Make the following preparations for disconnecting the USB cable. Windows 98SE 1 Double-click the "My Computer" icon and right-click the "Removable Disk" icon to the eject ...
... "Unplug or Eject Hardware", a warning message may be ejected safely, click "OK". EN 45 Using OLYMPUS Master Drag and drop it on the eject icon. 3 Disconnect the USB cable from the camera and that the hardware can be displayed. Click the "Unplug or Eject Hardware" icon again and disconnect ...or Eject Hardware" icon in the system tray. 2 Click the message that image data is not being downloaded from the camera. 2 Make the following preparations for disconnecting the USB cable. Windows 98SE 1 Double-click the "My Computer" icon and right-click the "Removable Disk" icon to the eject ...
FE-190 Advanced Manual (English)
Page 48
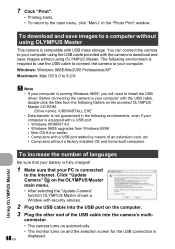
You can connect the camera to your computer. Click "Update Camera" on the OLYMPUS Master main menu. • After selecting the "Update Camera" function OLYMPUS Master shows a Window with security advices. 2 Plug the USB cable into the camera's multi- The following environments, even if your computer is connected to a ... To download and save images without using OLYMPUS Master This camera is running Windows 98SE, you will need to the main menu, click "Menu" in the following environment is required to use the USB cable to connect the camera to your computer with a USB port ...
You can connect the camera to your computer. Click "Update Camera" on the OLYMPUS Master main menu. • After selecting the "Update Camera" function OLYMPUS Master shows a Window with security advices. 2 Plug the USB cable into the camera's multi- The following environments, even if your computer is connected to a ... To download and save images without using OLYMPUS Master This camera is running Windows 98SE, you will need to the main menu, click "Menu" in the following environment is required to use the USB cable to connect the camera to your computer with a USB port ...
FE-190 Advanced Manual (English)
Page 49
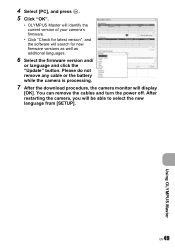
... [OK]. Please do not remove any cable or the battery while the camera is processing. 7 After the download procedure, the camera monitor will be able to select the new language from [SETUP]. 4 Select [PC], and press Q. 5 Click "OK". • OLYMPUS Master will identify the current version of your camera's firmware. • Click "Check for latest...
... [OK]. Please do not remove any cable or the battery while the camera is processing. 7 After the download procedure, the camera monitor will be able to select the new language from [SETUP]. 4 Select [PC], and press Q. 5 Click "OK". • OLYMPUS Master will identify the current version of your camera's firmware. • Click "Check for latest...
FE-190 Advanced Manual (English)
Page 70
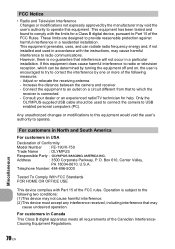
Increase the distance between the camera and receiver. - Only the OLYMPUS-supplied USB cable should be determined by turning the equipment off and on a circuit different from that may cause undesired operation. However, there ... customers in North and South America For customers in Canada This Class B digital apparatus meets all requirements of the Canadian InterferenceCausing Equipment Regulations. For customers in USA Declaration of Conformity Model Number : FE-190/X-750 Trade Name : OLYMPUS Responsible Party : Address : 3500 Corporate Parkway, P.O. If this equipment does...
Increase the distance between the camera and receiver. - Only the OLYMPUS-supplied USB cable should be determined by turning the equipment off and on a circuit different from that may cause undesired operation. However, there ... customers in North and South America For customers in Canada This Class B digital apparatus meets all requirements of the Canadian InterferenceCausing Equipment Regulations. For customers in USA Declaration of Conformity Model Number : FE-190/X-750 Trade Name : OLYMPUS Responsible Party : Address : 3500 Corporate Parkway, P.O. If this equipment does...

FE-190 Advanced Manual (English)
Page 78
... ALL INDEX 33 ALL PRINT 33 All-frame reservation U 37 Arrow pad (ONXY 16, 19 AUCTION i 15 Auto flash AUTO 17 Auto focus 51 AV cable 3, 29 B BACKUP 27 Battery 4, 61 Battery/card compartment cover ..... 63 Battery charger 3, 4, 61 Battery check 76 BEEP 27 Beep sound 8 28 BEHIND GLASS P 15 C...CCD 52, 59 Close-up playback U 18 Compression 21 Connector cover 29, 42 CUISINE V 15 CUSTOM PRINT 32 D Date and time X 6, 28, 51 DCF 59 Digital zoom 16, 18 Direct printing 30 DOCUMENTS d 15 DPOF 35, 59 E EASY PRINT 30 ERASE 9, 25 Error messages 56 EV 23, 59 Exposure 59 EXPOSURE...
... ALL INDEX 33 ALL PRINT 33 All-frame reservation U 37 Arrow pad (ONXY 16, 19 AUCTION i 15 Auto flash AUTO 17 Auto focus 51 AV cable 3, 29 B BACKUP 27 Battery 4, 61 Battery/card compartment cover ..... 63 Battery charger 3, 4, 61 Battery check 76 BEEP 27 Beep sound 8 28 BEHIND GLASS P 15 C...CCD 52, 59 Close-up playback U 18 Compression 21 Connector cover 29, 42 CUISINE V 15 CUSTOM PRINT 32 D Date and time X 6, 28, 51 DCF 59 Digital zoom 16, 18 Direct printing 30 DOCUMENTS d 15 DPOF 35, 59 E EASY PRINT 30 ERASE 9, 25 Error messages 56 EV 23, 59 Exposure 59 EXPOSURE...
FE-190 Advanced Manual (English)
Page 79
... j 15 SQ 21 SQ1 21 SQ2 21 STANDARD 30 Standard compression 21 Strap 3 SUNSET S 15 Super macro mode 17 T TFT 59 Top menu 19 U USB cable 3, 31, 38, 42 USB driver 39, 48 V VIDEO OUT 29 VOLUME 24, 28 X xD-Picture Card 22, 62 Z Zoom 18 Zoom button 18 EN 79..., 76 Monitor brightness adjustment s 27 MOVIE PLAY 24 MULTI PRINT 33 Multi-connector 29, 31, 42 N NTSC 29, 59 Number of storable still pictures ...... 53 O OLYMPUS Master 38, 43 Operation guide 19, 32 Optical zoom 16, 18 P PAL 29, 59 PANORAMA 22 PC 38, 42 PictBridge 30, 59 PIXEL MAPPING 27...
... j 15 SQ 21 SQ1 21 SQ2 21 STANDARD 30 Standard compression 21 Strap 3 SUNSET S 15 Super macro mode 17 T TFT 59 Top menu 19 U USB cable 3, 31, 38, 42 USB driver 39, 48 V VIDEO OUT 29 VOLUME 24, 28 X xD-Picture Card 22, 62 Z Zoom 18 Zoom button 18 EN 79..., 76 Monitor brightness adjustment s 27 MOVIE PLAY 24 MULTI PRINT 33 Multi-connector 29, 31, 42 N NTSC 29, 59 Number of storable still pictures ...... 53 O OLYMPUS Master 38, 43 Operation guide 19, 32 Optical zoom 16, 18 P PAL 29, 59 PANORAMA 22 PC 38, 42 PictBridge 30, 59 PIXEL MAPPING 27...

FE-190 Basic Manual (English, Español, Français, Português)
Page 3
Gather these items (box contents) Digital Camera Strap Lithium Ion Battery (LI-42B) En Battery Charger (LI-40C) USB Cable AV Cable OLYMPUS Master CD-ROM Items not shown: Advanced Manual (CD-ROM), Basic Manual (this manual), warranty card. Attach the strap Pull the strap tight so that it does not come loose. 3 Contents may vary depending on purchase location.
Gather these items (box contents) Digital Camera Strap Lithium Ion Battery (LI-42B) En Battery Charger (LI-40C) USB Cable AV Cable OLYMPUS Master CD-ROM Items not shown: Advanced Manual (CD-ROM), Basic Manual (this manual), warranty card. Attach the strap Pull the strap tight so that it does not come loose. 3 Contents may vary depending on purchase location.

FE-190 Basic Manual (English, Español, Français, Português)
Page 4
Insert the battery in the camera. 2 1 Insert the battery in the direction indicated by the mark. 3 45 Battery lock knob To remove the battery, press the battery lock knob in the direction of the arrow. b. W 3 Power Cable Lithium Ion Battery En 2 AC Wall Outlet Battery 1 Charger Charging Indicator Red light on inserting an...
Insert the battery in the camera. 2 1 Insert the battery in the direction indicated by the mark. 3 45 Battery lock knob To remove the battery, press the battery lock knob in the direction of the arrow. b. W 3 Power Cable Lithium Ion Battery En 2 AC Wall Outlet Battery 1 Charger Charging Indicator Red light on inserting an...

FE-190 Basic Manual (English, Español, Français, Português)
Page 15
... the TV using the AV cable. For details of switching to video input, refer to your TV. Use the arrow pad (O/N/X/Y) to select the picture you want to the video input mode. Both still pictures and movies can be played back. 1 Make sure that the TV and camera are turned off. AV... cable (provided) 2 Turn the TV on and set it to display. 15 Connecting the camera Playback on a TV Use the AV cable provided with the camera to playback recorded images on your TV's instruction manual. 3 Turn the...
... the TV using the AV cable. For details of switching to video input, refer to your TV. Use the arrow pad (O/N/X/Y) to select the picture you want to the video input mode. Both still pictures and movies can be played back. 1 Make sure that the TV and camera are turned off. AV... cable (provided) 2 Turn the TV on and set it to display. 15 Connecting the camera Playback on a TV Use the AV cable provided with the camera to playback recorded images on your TV's instruction manual. 3 Turn the...

FE-190 Basic Manual (English, Español, Français, Português)
Page 16
... picture selection screen displayed. When you are finished, disconnect the USB cable from the camera with simple operations. 1 In playback mode, display the picture you may connect your camera directly to a PictBridge compatible printer such as the Olympus P-11 to print out on the monitor. 2 Connect one end... of the provided USB cable into the printer's USB connector. EASY PRINT START PC / CUSTOM ...
... picture selection screen displayed. When you are finished, disconnect the USB cable from the camera with simple operations. 1 In playback mode, display the picture you may connect your camera directly to a PictBridge compatible printer such as the Olympus P-11 to print out on the monitor. 2 Connect one end... of the provided USB cable into the printer's USB connector. EASY PRINT START PC / CUSTOM ...

FE-190 Basic Manual (English, Español, Français, Português)
Page 17
En b. The monitor will now recognize your camera as a removable storage drive. Transfer images a. Macintosh: Double-click the "Installer" icon. 3 Simply follow the on the monitor, and press Q. USB PC EASY PRINT CUSTOM PRINT EXIT SET OK 17 Your PC will turn on automatically. 2 USB cable 1 2 Select [PC] on -screen instructions. Connect the camera to the computer 1 Connect the camera and computer using the USB cable (provided). Install the software 1 Insert the OLYMPUS Master CD-ROM. 2 Windows: Click the "OLYMPUS Master" button.
En b. The monitor will now recognize your camera as a removable storage drive. Transfer images a. Macintosh: Double-click the "Installer" icon. 3 Simply follow the on the monitor, and press Q. USB PC EASY PRINT CUSTOM PRINT EXIT SET OK 17 Your PC will turn on automatically. 2 USB cable 1 2 Select [PC] on -screen instructions. Connect the camera to the computer 1 Connect the camera and computer using the USB cable (provided). Install the software 1 Insert the OLYMPUS Master CD-ROM. 2 Windows: Click the "OLYMPUS Master" button.


