
FE-120 Advanced Manual (English)
Page 1
... accustomed to update or modify information contained in a safe place for purchasing an Olympus digital camera. In the interest of your camera before taking important photographs. Basic Operation Shooting Playing Back Printing Online Pictures Camera Settings Troubleshooting Thank you for future reference. DIGITAL CAMERA FE-120 X-700 Advanced Manual Detailed explanations of all the functions for getting the most...
... accustomed to update or modify information contained in a safe place for purchasing an Olympus digital camera. In the interest of your camera before taking important photographs. Basic Operation Shooting Playing Back Printing Online Pictures Camera Settings Troubleshooting Thank you for future reference. DIGITAL CAMERA FE-120 X-700 Advanced Manual Detailed explanations of all the functions for getting the most...

FE-120 Advanced Manual (English)
Page 2
...a malfunction or operational problems. Also warns of operations that will help you get used in this manual. For details on how to the camera's many functions after you to take much more creative pictures, with more fun! (Indications used to read it carefully before proceeding. TIPS ... you to use this manual (Basic and Advanced Manuals The instruction manual accompanying this camera is an explanation of how to the camera. It will help you get the most out of your camera. It gives you easy-tofollow explanations on notation and how to read the procedure ...
...a malfunction or operational problems. Also warns of operations that will help you get used in this manual. For details on how to the camera's many functions after you to take much more creative pictures, with more fun! (Indications used to read it carefully before proceeding. TIPS ... you to use this manual (Basic and Advanced Manuals The instruction manual accompanying this camera is an explanation of how to the camera. It will help you get the most out of your camera. It gives you easy-tofollow explanations on notation and how to read the procedure ...
FE-120 Advanced Manual (English)
Page 3
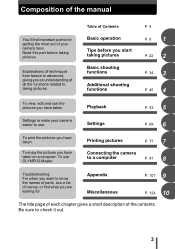
... pictures you have taken. Playback P. 53 5 Settings to make your camera here. Be sure to use OLYMPUS Master. Explanations of techniques from basics to advanced, giving you are looking for getting the most out of your camera easier to check it out. 3 Appendix Miscellaneous P. 107 9 P.... pictures. Settings P. 69 6 To print the pictures you have taken. To use . Printing pictures P. 77 7 Connecting the camera to taking pictures. Composition of the manual You'll find what you an understanding of all the functions related to a computer P. 91 8 Troubleshooting...
... pictures you have taken. Playback P. 53 5 Settings to make your camera here. Be sure to use OLYMPUS Master. Explanations of techniques from basics to advanced, giving you are looking for getting the most out of your camera easier to check it out. 3 Appendix Miscellaneous P. 107 9 P.... pictures. Settings P. 69 6 To print the pictures you have taken. To use . Printing pictures P. 77 7 Connecting the camera to taking pictures. Composition of the manual You'll find what you an understanding of all the functions related to a computer P. 91 8 Troubleshooting...

FE-120 Advanced Manual (English)
Page 4
... 16 About the menus 16 Using the menus 19 How to read the procedure pages 21 2 Tips before you start taking pictures 22 Holding the camera 23 If correct focus cannot be obtained 24 How to focus (focus lock 24 Subjects that are difficult to focus on 25 Record mode 26... 34 Selecting a shooting mode according to the situation 35 Selecting scene modes by subject (SCENE SELECT 37 Zooming in on a distant subject 39 Using the digital zoom 40 Taking close-up pictures (macro/super macro) 41 Flash shooting 42 Adjusting picture brightness (exposure compensation 44 4
... 16 About the menus 16 Using the menus 19 How to read the procedure pages 21 2 Tips before you start taking pictures 22 Holding the camera 23 If correct focus cannot be obtained 24 How to focus (focus lock 24 Subjects that are difficult to focus on 25 Record mode 26... 34 Selecting a shooting mode according to the situation 35 Selecting scene modes by subject (SCENE SELECT 37 Zooming in on a distant subject 39 Using the digital zoom 40 Taking close-up pictures (macro/super macro) 41 Flash shooting 42 Adjusting picture brightness (exposure compensation 44 4

FE-120 Advanced Manual (English)
Page 5
... Protecting pictures 64 Copying pictures to a card (BACKUP 65 Erasing pictures 66 Single-frame erase 66 All-frame erase 67 Formatting 68 6 Settings 69 Saving camera settings (ALL RESET 70 Changing the display language 71 Selecting a power on screen (PW ON SETUP 72 Registering a power on screen (SCREEN SETUP 72 Viewing...
... Protecting pictures 64 Copying pictures to a card (BACKUP 65 Erasing pictures 66 Single-frame erase 66 All-frame erase 67 Formatting 68 6 Settings 69 Saving camera settings (ALL RESET 70 Changing the display language 71 Selecting a power on screen (PW ON SETUP 72 Registering a power on screen (SCREEN SETUP 72 Viewing...

FE-120 Advanced Manual (English)
Page 6
... Resetting print reservation data 89 8 Connecting the camera to a computer - - - - - 91 Flow 92 Using OLYMPUS Master 93 What is OLYMPUS Master 93 Installing OLYMPUS Master 94 Connecting the camera to a computer 98 Starting up OLYMPUS Master 99 Displaying camera images on a computer 101 Downloading and saving ... and movies 103 Printing pictures 104 To download and save images to a computer without using OLYMPUS Master 106 9 Appendix 107 Troubleshooting 108 Error codes 108 Troubleshooting 110 Camera care 116 AC adapter (optional 117 Safety Precautions 118 Glossary of terms 122 6
... Resetting print reservation data 89 8 Connecting the camera to a computer - - - - - 91 Flow 92 Using OLYMPUS Master 93 What is OLYMPUS Master 93 Installing OLYMPUS Master 94 Connecting the camera to a computer 98 Starting up OLYMPUS Master 99 Displaying camera images on a computer 101 Downloading and saving ... and movies 103 Printing pictures 104 To download and save images to a computer without using OLYMPUS Master 106 9 Appendix 107 Troubleshooting 108 Error codes 108 Troubleshooting 110 Camera care 116 AC adapter (optional 117 Safety Precautions 118 Glossary of terms 122 6

FE-120 Advanced Manual (English)
Page 7
Table of Contents 10 Miscellaneous 124 Menu list 125 List of factory default settings 129 Modes and shooting functions 130 Names of parts 131 Camera 131 Monitor indications 133 Index 136 7
Table of Contents 10 Miscellaneous 124 Menu list 125 List of factory default settings 129 Modes and shooting functions 130 Names of parts 131 Camera 131 Monitor indications 133 Index 136 7

FE-120 Advanced Manual (English)
Page 8
... them confidently? Familiarize yourself with the buttons and menus before reading the explanations of your picture or select the picture that although your digital camera. Just display a menu on your camera has many attractive functions, you have to choose a setting. j MODE MENU SCENE SELECT WB AUTO SET MEM PICTURE CAM HQ 00:15...
... them confidently? Familiarize yourself with the buttons and menus before reading the explanations of your picture or select the picture that although your digital camera. Just display a menu on your camera has many attractive functions, you have to choose a setting. j MODE MENU SCENE SELECT WB AUTO SET MEM PICTURE CAM HQ 00:15...

FE-120 Advanced Manual (English)
Page 9
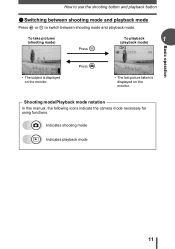
... retracts, and the monitor turns off → Press the POWER switch. Press $ on its own, to 1 turn the camera on in playback mode. (Turning the camera on in shooting mode. Shooting mode is for taking pictures and making shooting settings, whereas playback mode is enabled. The lens ... → Press $. POWER switch (The monitor turns on in shooting mode Press the POWER switch. • The camera turns on . (The lens extends. # Shooting button ( ) $ Playback button ( ) To turn the camera off . To switch between the two modes, use the shooting button and playback button This...
... retracts, and the monitor turns off → Press the POWER switch. Press $ on its own, to 1 turn the camera on in playback mode. (Turning the camera on in shooting mode. Shooting mode is for taking pictures and making shooting settings, whereas playback mode is enabled. The lens ... → Press $. POWER switch (The monitor turns on in shooting mode Press the POWER switch. • The camera turns on . (The lens extends. # Shooting button ( ) $ Playback button ( ) To turn the camera off . To switch between the two modes, use the shooting button and playback button This...

FE-120 Advanced Manual (English)
Page 10
.... The last picture taken is not a malfunction. 10 POWER switch (The monitor turns on in playback mode With the camera off, press $. 1 • The camera turns on . (The lens is retracted. # Shooting button ( ) $ Playback button ( ) To turn the camera off . Press $ to return to use the shooting button and playback button (Turning the...
.... The last picture taken is not a malfunction. 10 POWER switch (The monitor turns on in playback mode With the camera off, press $. 1 • The camera turns on . (The lens is retracted. # Shooting button ( ) $ Playback button ( ) To turn the camera off . Press $ to return to use the shooting button and playback button (Turning the...
FE-120 Advanced Manual (English)
Page 11
... subject is displayed on the monitor. To take pictures (shooting mode) P Press $. Shooting mode/Playback mode notation In this manual, the following icons indicate the camera mode necessary for using functions. Press #. '05.08.30 15:30 5 • The last picture taken is displayed on the monitor. Indicates shooting mode Indicates...
... subject is displayed on the monitor. To take pictures (shooting mode) P Press $. Shooting mode/Playback mode notation In this manual, the following icons indicate the camera mode necessary for using functions. Press #. '05.08.30 15:30 5 • The last picture taken is displayed on the monitor. Indicates shooting mode Indicates...

FE-120 Advanced Manual (English)
Page 12
... capable of landscapes. Use the mode dial to switch between shooting modes before and after turning the camera on the monitor. 1 P P PROGRAM AUTO For auto shooting with the mode dial set to a mode, the explanation for taking pictures. i Suitable for that the function ...
... capable of landscapes. Use the mode dial to switch between shooting modes before and after turning the camera on the monitor. 1 P P PROGRAM AUTO For auto shooting with the mode dial set to a mode, the explanation for taking pictures. i Suitable for that the function ...

FE-120 Advanced Manual (English)
Page 15
... flash fires automatically in shooting mode. • The flash mode selection screen is ready to shoot. 15 Selected setting SELECT GO OK 3 Press Z. • The camera is displayed. Follow the buttons displayed on the screen to select and make settings. Basic operation How to use the direct buttons Using the direct...
... flash fires automatically in shooting mode. • The flash mode selection screen is ready to shoot. 15 Selected setting SELECT GO OK 3 Press Z. • The camera is displayed. Follow the buttons displayed on the screen to select and make settings. Basic operation How to use the direct buttons Using the direct...

FE-120 Advanced Manual (English)
Page 16
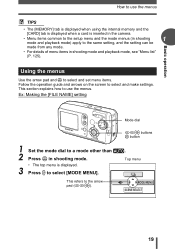
... function. Top menu Menus are categorized into shortcut menus and mode menus. TIPS • Set the mode dial to h and press Z to directly make all camera settings. 1 Press Z. About the menus The menu items displayed in shooting mode or playback mode. This menu is pressed in shooting mode and playback mode...
... function. Top menu Menus are categorized into shortcut menus and mode menus. TIPS • Set the mode dial to h and press Z to directly make all camera settings. 1 Press Z. About the menus The menu items displayed in shooting mode or playback mode. This menu is pressed in shooting mode and playback mode...

FE-120 Advanced Manual (English)
Page 18
... 18 Basic operation SET MEM PIC CAMERA SET MEM EDIT PLAY How to the card. SETUP tab For making basic camera settings and settings that make the camera easier to use the menus Mode menu 1 CAMERA tab PICTURE tab MEMORY/ CARD tab SETUP tab DIGITAL ZOOM OFF PANORAMA 2 IN 1 PLAY... tab EDIT tab MEMORY/ CARD tab SETUP tab y 0 < CAMERA For setting shooting- For backing...
... 18 Basic operation SET MEM PIC CAMERA SET MEM EDIT PLAY How to the card. SETUP tab For making basic camera settings and settings that make the camera easier to use the menus Mode menu 1 CAMERA tab PICTURE tab MEMORY/ CARD tab SETUP tab DIGITAL ZOOM OFF PANORAMA 2 IN 1 PLAY... tab EDIT tab MEMORY/ CARD tab SETUP tab y 0 < CAMERA For setting shooting- For backing...
FE-120 Advanced Manual (English)
Page 19
... Z in shooting mode and playback mode, see "Menu list" (P. 125). MODE MENU SCENE SELECT 19 Top menu • The top menu is inserted in the camera. • Menu items common to the setup menu and the mode menus (in shooting 1 mode and playback mode) apply to the arrow pad (acbd).
... Z in shooting mode and playback mode, see "Menu list" (P. 125). MODE MENU SCENE SELECT 19 Top menu • The top menu is inserted in the camera. • Menu items common to the setup menu and the mode menus (in shooting 1 mode and playback mode) apply to the arrow pad (acbd).
FE-120 Advanced Manual (English)
Page 21
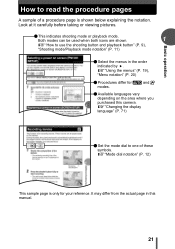
... when both icons are shown. 1 g"How to use the shooting button and playback button" (P. 9), "Shooting mode/Playback mode notation" (P. 11) (Select the menus in this camera. It may differ from the actual page in the order indicated by . Basic operation How to read the procedure pages A sample of these symbols. Look...
... when both icons are shown. 1 g"How to use the shooting button and playback button" (P. 9), "Shooting mode/Playback mode notation" (P. 11) (Select the menus in this camera. It may differ from the actual page in the order indicated by . Basic operation How to read the procedure pages A sample of these symbols. Look...

FE-120 Advanced Manual (English)
Page 23
... you start taking pictures with both hands while keeping your elbows at the precise moment that the flash is not clearly defined To prevent the camera from the lens and flash. Horizontal grip Vertical grip Tips before you have taken, the contours of the lens. 23 Keep your sides. When ...taking pictures Top view Do not hold the camera so that the shutter button is pressed. 2 Picture where subject is positioned higher than the lens. This is often caused by movement of the...
... you start taking pictures with both hands while keeping your elbows at the precise moment that the flash is not clearly defined To prevent the camera from the lens and flash. Horizontal grip Vertical grip Tips before you have taken, the contours of the lens. 23 Keep your sides. When ...taking pictures Top view Do not hold the camera so that the shutter button is pressed. 2 Picture where subject is positioned higher than the lens. This is often caused by movement of the...

FE-120 Advanced Manual (English)
Page 24
...halfway until the green lamp lights. position the AF target mark on the subject you start taking pictures If correct focus cannot be obtained The camera automatically detects the focus target in the frame. If this happens, the simplest solution is one of the criteria it uses to detect the ... Tips before you want to focus on. • When shooting a hard-to-focus or fastmoving subject, focus the camera on an object about the same distance away as the subject. The camera may fail to determine subjects with lower contrast than the surroundings or with an area of contrast is to...
...halfway until the green lamp lights. position the AF target mark on the subject you start taking pictures If correct focus cannot be obtained The camera automatically detects the focus target in the frame. If this happens, the simplest solution is one of the criteria it uses to detect the ... Tips before you want to focus on. • When shooting a hard-to-focus or fastmoving subject, focus the camera on an object about the same distance away as the subject. The camera may fail to determine subjects with lower contrast than the surroundings or with an area of contrast is to...

FE-120 Advanced Manual (English)
Page 25
... shot and then take the picture. 25 If the subject has no vertical lines, hold the camera vertically and focus the camera using the focus lock function by pressing the shutter button halfway, then return the camera to focus on an object with low contrast The green lamp lights, but the subject cannot...
... shot and then take the picture. 25 If the subject has no vertical lines, hold the camera vertically and focus the camera using the focus lock function by pressing the shutter button halfway, then return the camera to focus on an object with low contrast The green lamp lights, but the subject cannot...


