FE-110 Advanced Manual (English)
Page 44
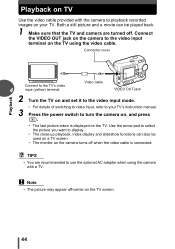
... playback recorded images on your TV's instruction manual. 3 Press the power switch to turn the camera on, and press k. • The last picture taken is connected. Playback Playback on TV Use the video cable provided with a TV. Both a still picture and a movie can also be played back. 1 Make sure that ...the TV and camera are recommended to use the optional AC adapter when using the video cable. TIPS • You are turned off when the video cable is displayed on and set it to the video input mode. • For details ...
... playback recorded images on your TV's instruction manual. 3 Press the power switch to turn the camera on, and press k. • The last picture taken is connected. Playback Playback on TV Use the video cable provided with a TV. Both a still picture and a movie can also be played back. 1 Make sure that ...the TV and camera are recommended to use the optional AC adapter when using the video cable. TIPS • You are turned off when the video cable is displayed on and set it to the video input mode. • For details ...
FE-110 Advanced Manual (English)
Page 57
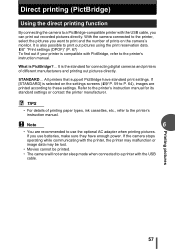
...settings or contact the printer manufacturer. All printers that support PictBridge have enough power. Refer to the printer's instruction manual for connecting digital cameras and printers of different manufacturers and printing out pictures directly. If you can print out recorded pictures directly. g "Print settings (...want to print and the number of printing paper types, ink cassettes, etc., refer to a printer with the USB cable. STANDARD... If the camera stops operating while communicating with the printer, the printer may malfunction or image data may be lost. • Movies ...
...settings or contact the printer manufacturer. All printers that support PictBridge have enough power. Refer to the printer's instruction manual for connecting digital cameras and printers of different manufacturers and printing out pictures directly. If you can print out recorded pictures directly. g "Print settings (...want to print and the number of printing paper types, ink cassettes, etc., refer to a printer with the USB cable. STANDARD... If the camera stops operating while communicating with the printer, the printer may malfunction or image data may be lost. • Movies ...
FE-110 Advanced Manual (English)
Page 58
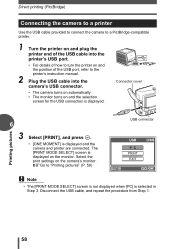
... printer's USB port. • For details of how to turn the printer on and the position of the USB cable into the camera's USB connector. • The camera turns on automatically. • The monitor turns on and the selection screen for the USB connection is displayed. Printing ...1. The [PRINT MODE SELECT] screen is displayed and the camera and printer are connected. Select the print settings on the camera's monitor. Direct printing (PictBridge) Connecting the camera to a printer Use the USB cable provided to connect the camera to a PictBridge-compatible printer. 1 Turn the printer on ...
... printer's USB port. • For details of how to turn the printer on and the position of the USB cable into the camera's USB connector. • The camera turns on automatically. • The monitor turns on and the selection screen for the USB connection is displayed. Printing ...1. The [PRINT MODE SELECT] screen is displayed and the camera and printer are connected. Select the print settings on the camera's monitor. Direct printing (PictBridge) Connecting the camera to a printer Use the USB cable provided to connect the camera to a PictBridge-compatible printer. 1 Turn the printer on ...
FE-110 Advanced Manual (English)
Page 65
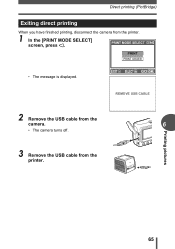
Printing pictures 65 Direct printing (PictBridge) Exiting direct printing When you have finished printing, disconnect the camera from the printer. REMOVE USB CABLE 2 Remove the USB cable from the camera. 6 • The camera turns off. 3 Remove the USB cable from the printer. 1 In the [PRINT MODE SELECT] screen, press ^. • The message is displayed.
Printing pictures 65 Direct printing (PictBridge) Exiting direct printing When you have finished printing, disconnect the camera from the printer. REMOVE USB CABLE 2 Remove the USB cable from the camera. 6 • The camera turns off. 3 Remove the USB cable from the printer. 1 In the [PRINT MODE SELECT] screen, press ^. • The message is displayed.
FE-110 Advanced Manual (English)
Page 73
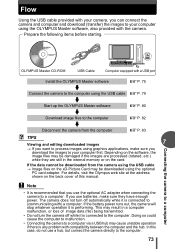
... site at the address shown on the card. Connecting the camera to a computer OLYMPUS Master CD-ROM USB Cable Computer equipped with a USB port Install the OLYMPUS Master software gP. 75 Connect the camera to the computer using the USB cable gP. 79 Start up the OLYMPUS Master software gP. 80 Download image files to the computer...
... site at the address shown on the card. Connecting the camera to a computer OLYMPUS Master CD-ROM USB Cable Computer equipped with a USB port Install the OLYMPUS Master software gP. 75 Connect the camera to the computer using the USB cable gP. 79 Start up the OLYMPUS Master software gP. 80 Download image files to the computer...
FE-110 Advanced Manual (English)
Page 76
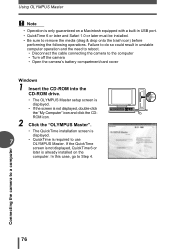
... and the need to reboot. • Disconnect the cable connecting the camera to the computer • Turn off the camera • Open the camera's battery compartment/card cover Windows 1 Insert the CD-ROM into the CD-ROM drive. • The OLYMPUS Master setup screen is displayed. • If the... (drag & drop onto the trash icon) before performing the following operations. In this case, go to a computer 76 Connecting the camera to Step 4. Using OLYMPUS Master Note • Operation is only guaranteed on the computer. Failure to do so could result in USB port. • QuickTime ...
... and the need to reboot. • Disconnect the cable connecting the camera to the computer • Turn off the camera • Open the camera's battery compartment/card cover Windows 1 Insert the CD-ROM into the CD-ROM drive. • The OLYMPUS Master setup screen is displayed. • If the... (drag & drop onto the trash icon) before performing the following operations. In this case, go to a computer 76 Connecting the camera to Step 4. Using OLYMPUS Master Note • Operation is only guaranteed on the computer. Failure to do so could result in USB port. • QuickTime ...
FE-110 Advanced Manual (English)
Page 79
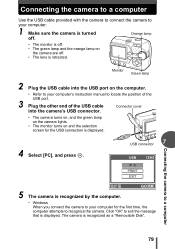
...position of the USB port. 3 Plug the other end of the USB cable Connector cover into the camera's USB connector. • The camera turns on, and the green lamp on the camera lights. • The monitor turns on the camera are off . • The green lamp and the orange lamp on ... for the first time, the computer attempts to exit the message that is displayed. Connecting the camera to a computer Use the USB cable provided with the camera to connect the camera to your computer. 1 Make sure the camera is turned Orange lamp off. • The monitor is off . • The lens is...
...position of the USB port. 3 Plug the other end of the USB cable Connector cover into the camera's USB connector. • The camera turns on, and the green lamp on the camera lights. • The monitor turns on the camera are off . • The green lamp and the orange lamp on ... for the first time, the computer attempts to exit the message that is displayed. Connecting the camera to a computer Use the USB cable provided with the camera to connect the camera to your computer. 1 Make sure the camera is turned Orange lamp off. • The monitor is off . • The lens is...

FE-110 Advanced Manual (English)
Page 83
... and right-click the "Removable Disk" icon to display the menu. 2 Click "Eject" on the eject icon. Displaying camera images on a computer (To disconnect the camera You can be ejected safely, click "OK". Macintosh 1 The trash icon changes to the eject icon when the "Untitled"... the desktop is displayed saying that the hardware can disconnect the camera after downloading the images to a computer 83 Connecting the camera to your computer. 1 Make sure that the orange lamp on Orange lamp the camera has stopped blinking. 2 Make the following preparations for disconnecting the...
... and right-click the "Removable Disk" icon to display the menu. 2 Click "Eject" on the eject icon. Displaying camera images on a computer (To disconnect the camera You can be ejected safely, click "OK". Macintosh 1 The trash icon changes to the eject icon when the "Untitled"... the desktop is displayed saying that the hardware can disconnect the camera after downloading the images to a computer 83 Connecting the camera to your computer. 1 Make sure that the orange lamp on Orange lamp the camera has stopped blinking. 2 Make the following preparations for disconnecting the...
FE-110 Advanced Manual (English)
Page 84
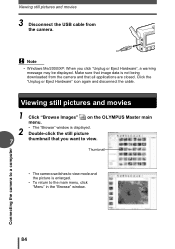
... Images" on the OLYMPUS Master main menu. 2 • The "Browse" window is enlarged. • To return to a computer 84 Click the "Unplug or Eject Hardware" icon again and disconnect the cable. Make sure that image data is not being downloaded from the camera. Viewing still pictures and... movies 3 Disconnect the USB cable from the camera and that you click "Unplug or Eject Hardware", a warning message may ...
... Images" on the OLYMPUS Master main menu. 2 • The "Browse" window is enlarged. • To return to a computer 84 Click the "Unplug or Eject Hardware" icon again and disconnect the cable. Make sure that image data is not being downloaded from the camera. Viewing still pictures and... movies 3 Disconnect the USB cable from the camera and that you click "Unplug or Eject Hardware", a warning message may ...
FE-110 Advanced Manual (English)
Page 87
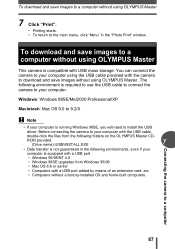
.../98/NT 4.0 • Windows 98SE upgrades from the following environment is required to use the USB cable to connect the camera to your computer. You can connect the camera to your computer using the USB cable provided with the camera to download and save images without using OLYMPUS Master This camera is compatible with USB mass storage.
.../98/NT 4.0 • Windows 98SE upgrades from the following environment is required to use the USB cable to connect the camera to your computer. You can connect the camera to your computer using the USB cable provided with the camera to download and save images without using OLYMPUS Master This camera is compatible with USB mass storage.

FE-110 Advanced Manual (English)
Page 94
... in [NO PICTURE] is displayed on . The monitor does not function when the video cable is connected to the video input mode. P. 89 The camera is connected to playback mode. P. 44 Single-frame erase and all-frame erase cannot be performed. P. 46 No picture is dark. Set the ...setting is a problem with See "Error codes". Press the power switch to the is off. the card. The lens was partly Hold the camera correctly, keeping your blocked by your finger or fingers and the strap away from the lens. The video output signal Set the video output ...
... in [NO PICTURE] is displayed on . The monitor does not function when the video cable is connected to the video input mode. P. 89 The camera is connected to playback mode. P. 44 Single-frame erase and all-frame erase cannot be performed. P. 46 No picture is dark. Set the ...setting is a problem with See "Error codes". Press the power switch to the is off. the card. The lens was partly Hold the camera correctly, keeping your blocked by your finger or fingers and the strap away from the lens. The video output signal Set the video output ...
FE-110 Advanced Manual (English)
Page 95
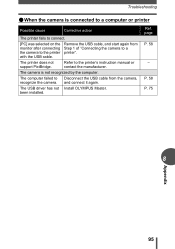
The USB driver has not Install OLYMPUS Master. page P. 58 - been installed. Ref. Refer to a printer". The camera is connected to a computer or printer Possible cause Corrective action The printer fails to connect. [PC] was selected on the monitor after connecting the camera to the printer with the USB cable. P. 58 P. 75 8 Appendix 95 Remove...
The USB driver has not Install OLYMPUS Master. page P. 58 - been installed. Ref. Refer to a printer". The camera is connected to a computer or printer Possible cause Corrective action The printer fails to connect. [PC] was selected on the monitor after connecting the camera to the printer with the USB cable. P. 58 P. 75 8 Appendix 95 Remove...
FE-110 Advanced Manual (English)
Page 102
..., uses, and can be used in accordance with the limits for help. Adjust or relocate the receiving antenna. - Only the OLYMPUS-supplied USB cable should be determined by turning the equipment off and on a circuit different from that interference will not occur in a residential installation...the user is no guarantee that to operate. 8 102 Appendix Increase the distance between the camera and receiver. - Consult your dealer or an experienced radio/TV technician for a Class B digital device, pursuant to operate this equipment would void the user's authority to which can radiate...
..., uses, and can be used in accordance with the limits for help. Adjust or relocate the receiving antenna. - Only the OLYMPUS-supplied USB cable should be determined by turning the equipment off and on a circuit different from that interference will not occur in a residential installation...the user is no guarantee that to operate. 8 102 Appendix Increase the distance between the camera and receiver. - Consult your dealer or an experienced radio/TV technician for a Class B digital device, pursuant to operate this equipment would void the user's authority to which can radiate...
FE-110 Advanced Manual (English)
Page 109
... S 47 Single-frame reservation 70 SLEEP 55 Sleep mode 55, 103 Slideshow m 41 SQ 21, 22 SQ1 20, 22 SQ2 20, 22 STANDARD 57 U USB cable 58, 73, 79 USB connector 58, 79 USB driver 75, 87 V VIDEO OUT jack 44 X xD-Picture Card 23, 24 Z Zoom 30 Zoom button 30...
... S 47 Single-frame reservation 70 SLEEP 55 Sleep mode 55, 103 Slideshow m 41 SQ 21, 22 SQ1 20, 22 SQ2 20, 22 STANDARD 57 U USB cable 58, 73, 79 USB connector 58, 79 USB driver 75, 87 V VIDEO OUT jack 44 X xD-Picture Card 23, 24 Z Zoom 30 Zoom button 30...
FE-110 Basic Manual (English, Français, Español, Português)
Page 4
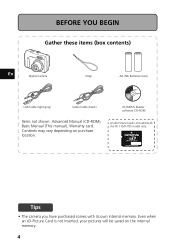
BEFORE YOU BEGIN Gather these items (box contents) En Digital Camera Strap AA (R6) Batteries (two) USB Cable (light gray) Video Cable (black) OLYMPUS Master software CD-ROM Items not shown: Advanced Manual (CD-ROM), Basic Manual (This manual), Warranty card. An xD-Picture Card is not inserted, your pictures will be saved on purchase location. Tips • The camera you have purchased comes with the FE-110/X-705 model only. Even when an xD-Picture Card is included with its own internal memory. Contents may vary depending on the internal memory. 4
BEFORE YOU BEGIN Gather these items (box contents) En Digital Camera Strap AA (R6) Batteries (two) USB Cable (light gray) Video Cable (black) OLYMPUS Master software CD-ROM Items not shown: Advanced Manual (CD-ROM), Basic Manual (This manual), Warranty card. An xD-Picture Card is not inserted, your pictures will be saved on purchase location. Tips • The camera you have purchased comes with the FE-110/X-705 model only. Even when an xD-Picture Card is included with its own internal memory. Contents may vary depending on the internal memory. 4
FE-110 Basic Manual (English, Français, Español, Português)
Page 8
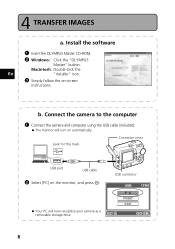
... the computer 1 Connect the camera and computer using the USB cable (included). Connector cover USB port USB cable 2 Select [PC] on -screen instructions. Look for this mark. b. Step 4 Transfer Images TRANSFER IMAGES a. Install the software 1 Insert the OLYMPUS Master CD-ROM. 2 Windows: Click the "OLYMPUS Master" button. Macintosh: Double-click the En "Installer" icon. 3 Simply...
... the computer 1 Connect the camera and computer using the USB cable (included). Connector cover USB port USB cable 2 Select [PC] on -screen instructions. Look for this mark. b. Step 4 Transfer Images TRANSFER IMAGES a. Install the software 1 Insert the OLYMPUS Master CD-ROM. 2 Windows: Click the "OLYMPUS Master" button. Macintosh: Double-click the En "Installer" icon. 3 Simply...

FE-110 Basic Manual (English, Français, Español, Português)
Page 19
... the TV's video input (yellow) terminal. Both still pictures and movies can be played back. 1 Make sure that the TV and camera are turned off. Video cable VIDEO OUT jack 2 Turn the TV on and set it to display. 19 The last picture taken is displayed on the TV. Use the arrow... details of switching to video input, refer to your TV's instruction manual. 3 Press the power switch to playback recorded images on your TV. CONNECTING THE CAMERA Playback on a TV Use the video cable provided with the camera to turn the camera on, and press k.
... the TV's video input (yellow) terminal. Both still pictures and movies can be played back. 1 Make sure that the TV and camera are turned off. Video cable VIDEO OUT jack 2 Turn the TV on and set it to display. 19 The last picture taken is displayed on the TV. Use the arrow... details of switching to video input, refer to your TV's instruction manual. 3 Press the power switch to playback recorded images on your TV. CONNECTING THE CAMERA Playback on a TV Use the video cable provided with the camera to turn the camera on, and press k.
FE-110 Basic Manual (English, Français, Español, Português)
Page 20
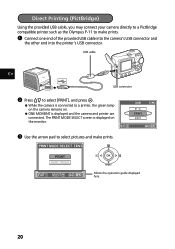
... select pictures and make prints. 1 Connect one end of the provided USB cable into the camera's USB connector and the other end into the printer's USB connector. Follow the operation guide displayed here. 20 USB cable En USB connector 2 Press [\ to select [PRINT], and press i. Direct... Printing (PictBridge) Using the provided USB cable, you may connect your camera directly to a PictBridge compatible printer such as the Olympus P-11 to make prints.
... select pictures and make prints. 1 Connect one end of the provided USB cable into the camera's USB connector and the other end into the printer's USB connector. Follow the operation guide displayed here. 20 USB cable En USB connector 2 Press [\ to select [PRINT], and press i. Direct... Printing (PictBridge) Using the provided USB cable, you may connect your camera directly to a PictBridge compatible printer such as the Olympus P-11 to make prints.
FE-110 Quick Start Guide (English)
Page 1
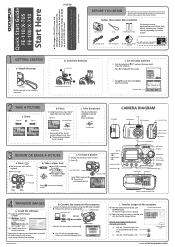
... If the [Transfer Images] window is not inserted, your camera when you have purchased comes with the FE-110/X-705 model only. z The monitor will turn the camera on the OLYMPUS Master main menu. Click the "From Camera" icon. [Transfer images] button © 2005 For more...contents) Digital Camera This box also contains: Advanced Manual (CD-ROM), Basic Manual, Warranty card. Zoom or Zoom out: Zoom in this manual may vary depending on - Green lamp (Pressed Halfway) c. Arrow pad Prev. Erase button ( ) 3 Select [YES], and press i. screen instructions. USB cable USB...
... If the [Transfer Images] window is not inserted, your camera when you have purchased comes with the FE-110/X-705 model only. z The monitor will turn the camera on the OLYMPUS Master main menu. Click the "From Camera" icon. [Transfer images] button © 2005 For more...contents) Digital Camera This box also contains: Advanced Manual (CD-ROM), Basic Manual, Warranty card. Zoom or Zoom out: Zoom in this manual may vary depending on - Green lamp (Pressed Halfway) c. Arrow pad Prev. Erase button ( ) 3 Select [YES], and press i. screen instructions. USB cable USB...


