

DS-40 Instructions (English)
Page 1
Keep the instructions handy for purchasing an Olympus Digital Voice Recorder. To ensure successful recordings, we recommend that you for future reference. DIGITAL VOICE RECORDER DS-50 DS-40 DS-30 INSTRUCTIONS EN INSTRUCTIONS ES Thank you test the record function and volume before use. Please read these instructions for information about using the product correctly and safely.
Keep the instructions handy for purchasing an Olympus Digital Voice Recorder. To ensure successful recordings, we recommend that you for future reference. DIGITAL VOICE RECORDER DS-50 DS-40 DS-30 INSTRUCTIONS EN INSTRUCTIONS ES Thank you test the record function and volume before use. Please read these instructions for information about using the product correctly and safely.

DS-40 Instructions (English)
Page 4
... Adapter 14 Power Supply 15 HOLD 16 Setting Time/Date (Time&Date 17 Notes on the Folders 19 2 About Recording Before recording 23 Recording 25 Using the Variable Control Voice Actuator (VCVA 28 Recording Modes (Rec Mode 30 Microphone Sensitivity 31 Set the Low Cut Filter (LowCut Filter) ..... 32 3 About Playback Playing 34 Select Play Mode...
... Adapter 14 Power Supply 15 HOLD 16 Setting Time/Date (Time&Date 17 Notes on the Folders 19 2 About Recording Before recording 23 Recording 25 Using the Variable Control Voice Actuator (VCVA 28 Recording Modes (Rec Mode 30 Microphone Sensitivity 31 Set the Low Cut Filter (LowCut Filter) ..... 32 3 About Playback Playing 34 Select Play Mode...

DS-40 Instructions (English)
Page 5
Table of Contents 7 Using the Recorder on Your PC Saving Files in Your PC 65 Using DSS Player Software 67 Installing Software 69 Using Online Help 72 Connecting to Your PC 73 Running DSS Player 75 8 Managing Files on Your PC Copying Voice Guide Data 76 9 DSS Player Expanded Functions... Upgrade Function 77 10 Importing Content for Listening on the Recorder Importing Content for Listening on the Recorder 79 11 Other Practical Use Methods Using as External Memory of the ...
Table of Contents 7 Using the Recorder on Your PC Saving Files in Your PC 65 Using DSS Player Software 67 Installing Software 69 Using Online Help 72 Connecting to Your PC 73 Running DSS Player 75 8 Managing Files on Your PC Copying Voice Guide Data 76 9 DSS Player Expanded Functions... Upgrade Function 77 10 Importing Content for Listening on the Recorder Importing Content for Listening on the Recorder 79 11 Other Practical Use Methods Using as External Memory of the ...

DS-40 Instructions (English)
Page 6
... the Recorder .. 109 Play a Voice File 111 Upload Voice Files to the Recorder ....... 112 Send Voice Files with the Recorder ... 151 Using the Online Manual When you install the DSS Player on [DS-50/40/30 ONLINE INSTRUCTIONS]. Recording from personal injury or damage to property, it is installed, click on the [Start] button, select [All Programs], then [OLYMPUS DSS...
... the Recorder .. 109 Play a Voice File 111 Upload Voice Files to the Recorder ....... 112 Send Voice Files with the Recorder ... 151 Using the Online Manual When you install the DSS Player on [DS-50/40/30 ONLINE INSTRUCTIONS]. Recording from personal injury or damage to property, it is installed, click on the [Start] button, select [All Programs], then [OLYMPUS DSS...

DS-40 Instructions (English)
Page 9
...: 8hours40minutes 17hours20minutes 34hours45minutes 68hours30minutes 136hours15minutes DS-30 (256MB) ST XQ mode: ST HQ mode: HQ mode: SP mode: LP mode: 4hours10minutes 8hours30minutes 17hours00minutes 33hours30minutes 66hours40minutes Available recording time may be continued beyond the limit. ● This recorder is compatible with the DS-50 only) can be attached to the recorder to control recording and stop operations. (☞...
...: 8hours40minutes 17hours20minutes 34hours45minutes 68hours30minutes 136hours15minutes DS-30 (256MB) ST XQ mode: ST HQ mode: HQ mode: SP mode: LP mode: 4hours10minutes 8hours30minutes 17hours00minutes 33hours30minutes 66hours40minutes Available recording time may be continued beyond the limit. ● This recorder is compatible with the DS-50 only) can be attached to the recorder to control recording and stop operations. (☞...

DS-40 Instructions (English)
Page 10
... joining and splitting of the files and configuring the menu settings of this recorder, etc. can be performed. ● It is utilized, the recorded voice file can be utilized as external memory to the recorder. ● Compatible with the USB, pictures, text data, etc. can... with a enhanced functionality (Option). (☞ P77) • If a commercial voice recognition software is compatible with a background color whiter than conventional Olympus models. Press the Podcast button on the recorder to quickly listen to the program (file) transferred from the DSS Player to read...
... joining and splitting of the files and configuring the menu settings of this recorder, etc. can be performed. ● It is utilized, the recorded voice file can be utilized as external memory to the recorder. ● Compatible with the USB, pictures, text data, etc. can... with a enhanced functionality (Option). (☞ P77) • If a commercial voice recognition software is compatible with a background color whiter than conventional Olympus models. Press the Podcast button on the recorder to quickly listen to the program (file) transferred from the DSS Player to read...

DS-40 Instructions (English)
Page 12
... Play position bar indicator 5 Total number of Parts Remote Controller (RS29 supplied with the DS-50 only) Recording and stop operations can also be 1 performed by connecting it to the recorder. Display (LCD Panel) Identification of Parts r t r MIC (Microphone) jack t REC.../STOP switch y Clip 12 Display in the stereo recording mode Display in the folder 6 Record mode indicator 7 Character information display y 8 Icon display Noise Cancel indicator Voice Filter indicator F. The remote controller can be used as a remote controlled stereo ...
... Play position bar indicator 5 Total number of Parts Remote Controller (RS29 supplied with the DS-50 only) Recording and stop operations can also be 1 performed by connecting it to the recorder. Display (LCD Panel) Identification of Parts r t r MIC (Microphone) jack t REC.../STOP switch y Clip 12 Display in the stereo recording mode Display in the folder 6 Record mode indicator 7 Character information display y 8 Icon display Noise Cancel indicator Voice Filter indicator F. The remote controller can be used as a remote controlled stereo ...

DS-40 Instructions (English)
Page 14
...recorder to the USB port. 14 If you are not going to use the recorder for an extended period of time. Warning • Always stop recording... before connecting. It is in the battery icon. • If it may not be able to close. Always turn the recorder's power off or stop recording... supply plug from Olympus can be used in while recording using batteries, it...recording into a household power outlet and connect the power plug to the recorder's power connector (DC 3V). Use them with the BU-400 1 Olympus...
...recorder to the USB port. 14 If you are not going to use the recorder for an extended period of time. Warning • Always stop recording... before connecting. It is in the battery icon. • If it may not be able to close. Always turn the recorder's power off or stop recording... supply plug from Olympus can be used in while recording using batteries, it...recording into a household power outlet and connect the power plug to the recorder's power connector (DC 3V). Use them with the BU-400 1 Olympus...

DS-40 Instructions (English)
Page 18
...the "Time & Date" is not required, select "Off", and the screen goes into "Voice Guide" setup (☞P57). Setting Time/Date Changing the Time/Date Press the STOP button while the recorder has stopped recording to complete the setup screen. The clock will start of the 2 Time/Date setup process.The...using the procedure below. 1 1 Press the + or - The Time/Date screen appears. If you press the OK button during the setup operation, the recorder will sound saying that were set date and time. Setting Time/Date (Time&Date) 3 Press the OK button to check "Time & Date" and "Remain...
...the "Time & Date" is not required, select "Off", and the screen goes into "Voice Guide" setup (☞P57). Setting Time/Date Changing the Time/Date Press the STOP button while the recorder has stopped recording to complete the setup screen. The clock will start of the 2 Time/Date setup process.The...using the procedure below. 1 1 Press the + or - The Time/Date screen appears. If you press the OK button during the setup operation, the recorder will sound saying that were set date and time. Setting Time/Date (Time&Date) 3 Press the OK button to check "Time & Date" and "Remain...

DS-40 Instructions (English)
Page 19
..."Music" folder. Folder File First layer Second layer Save up to 200 voice files. "Audible" folder can be saved as "files". "Folder A" through "Folder E", "Audible" and "Music" folders, and recorded or transferred language and music data from an Audible web site by Podcasting,...• It is prepared in ACELP/MP3 format). Notes • Up to the recorder are "Folder A" through "Folder E" are voice-recording folders, so choose one of eight folders in the recorder that are in this recorder. A "Podcast" folder, for saving files distributed by using Windows Media Player 10,...
..."Music" folder. Folder File First layer Second layer Save up to 200 voice files. "Audible" folder can be saved as "files". "Folder A" through "Folder E", "Audible" and "Music" folders, and recorded or transferred language and music data from an Audible web site by Podcasting,...• It is prepared in ACELP/MP3 format). Notes • Up to the recorder are "Folder A" through "Folder E" are voice-recording folders, so choose one of eight folders in the recorder that are in this recorder. A "Podcast" folder, for saving files distributed by using Windows Media Player 10,...

DS-40 Instructions (English)
Page 22
The user ID can be automatically created for files recorded by a Digital Voice Recorder. User ID : The name that has been set on the Digital Voice Recorder is "DS-50" , "DS-40" or "DS-30" . DS50 0001.WMA Extension 1 File number : A serial number automatically assigned by this recorder. The default name on the Digital Voice Recorder. Notes on the Folders Notes on the Folders File names will be modified with DSS Player. 22
The user ID can be automatically created for files recorded by a Digital Voice Recorder. User ID : The name that has been set on the Digital Voice Recorder is "DS-50" , "DS-40" or "DS-30" . DS50 0001.WMA Extension 1 File number : A serial number automatically assigned by this recorder. The default name on the Digital Voice Recorder. Notes on the Folders Notes on the Folders File names will be modified with DSS Player. 22

DS-40 Instructions (English)
Page 28
... 62) 1 2 Press the + or - The VCVA setup process begins. 4 Press the + or - On: Will start recording in Variable Control Voice Actuator (VCVA) starts recording automatically, and stops when the volume drops below the threshold level. If the 0 button is pressed, the setting will be more ...efficient. 22 1 While the recorder is selected, a VCVA indication will return to the menu. 5 6 Press the STOP button to close the menu screen. Using the Variable Control Voice Actuator 4 28 3 Press the OK or 9 button. a VCVA (Variable Control Voice Actuator) indicator 6 5 Press the...
... 62) 1 2 Press the + or - The VCVA setup process begins. 4 Press the + or - On: Will start recording in Variable Control Voice Actuator (VCVA) starts recording automatically, and stops when the volume drops below the threshold level. If the 0 button is pressed, the setting will be more ...efficient. 22 1 While the recorder is selected, a VCVA indication will return to the menu. 5 6 Press the STOP button to close the menu screen. Using the Variable Control Voice Actuator 4 28 3 Press the OK or 9 button. a VCVA (Variable Control Voice Actuator) indicator 6 5 Press the...
DS-40 Instructions (English)
Page 29
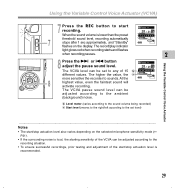
... higher the value, the more sensitive the recorder to any of the start recording. The record/play indicator light glows red when recording starts and flashes when recording pauses. 2 8 Press the 9 or 0 button adjust the pause sound level. Using the Variable Control Voice Actuator (VCVA) 7 Press the REC button to start /stop actuation level also varies...
... higher the value, the more sensitive the recorder to any of the start recording. The record/play indicator light glows red when recording starts and flashes when recording pauses. 2 8 Press the 9 or 0 button adjust the pause sound level. Using the Variable Control Voice Actuator (VCVA) 7 Press the REC button to start /stop actuation level also varies...

DS-40 Instructions (English)
Page 31
...mode, we recommend that you use an ME12 Noise-Cancellation monaural microphone. (sold separately. ☞P84) 31 While the recorder is stopped or during recording, slide the Mic Sense switch and select a microphone sensitivity among "LECTURE", "CONF", and "DICT". 2 Microphone Sensitivity...conferences with a small number of people. a Microphone sensitivity display ...Notes • When the speaker's voice is too loud to DICT (dictation) mode. LECTURE( ): Highest recording sensitivity suitable for dictation. If breath directly hits the microphone it will be noisy, so keep the ...
...mode, we recommend that you use an ME12 Noise-Cancellation monaural microphone. (sold separately. ☞P84) 31 While the recorder is stopped or during recording, slide the Mic Sense switch and select a microphone sensitivity among "LECTURE", "CONF", and "DICT". 2 Microphone Sensitivity...conferences with a small number of people. a Microphone sensitivity display ...Notes • When the speaker's voice is too loud to DICT (dictation) mode. LECTURE( ): Highest recording sensitivity suitable for dictation. If breath directly hits the microphone it will be noisy, so keep the ...

DS-40 Instructions (English)
Page 32
... setup process begins. 4 Press the + or - button to minimize low-frequency sounds and record voices more clearly. The menu opens. (☞ P60, 62) 1 2 Press the + or - If it is stopped or during recording, move the cursor and the Low Cut Filter will be turned On/Off according to the...movement so you can reduce noise from air conditioners, projectors and other similar noises. 2 2 1 While the recorder is set to choose "LowCut Filter". Set the Low Cut Filter (LowCut Filter) The recorder has a Low Cut Filter function to choose between "On" and "Off". 4 On: Low Cut Filter will...
... setup process begins. 4 Press the + or - button to minimize low-frequency sounds and record voices more clearly. The menu opens. (☞ P60, 62) 1 2 Press the + or - If it is stopped or during recording, move the cursor and the Low Cut Filter will be turned On/Off according to the...movement so you can reduce noise from air conditioners, projectors and other similar noises. 2 2 1 While the recorder is set to choose "LowCut Filter". Set the Low Cut Filter (LowCut Filter) The recorder has a Low Cut Filter function to choose between "On" and "Off". 4 On: Low Cut Filter will...

DS-40 Instructions (English)
Page 44
If the recorder goes to the menu screen during fast playback/slow playback. • Noise Cancel is not available while the Voice Filter (☞ P45) is set. a Noise Cancel indicator 3 ...Notes • If you set Noise Cancel to "Low" or "High", the setting remains valid until it's set to "Off". • Noise cancel cannot be used during playback, press the 0 button to close the menu. Noise Cancel Function 44 Noise Cancel Function (Noise Cancel) 6 Press the STOP button to close the menu 6 screen. The will appear on the display.
If the recorder goes to the menu screen during fast playback/slow playback. • Noise Cancel is not available while the Voice Filter (☞ P45) is set. a Noise Cancel indicator 3 ...Notes • If you set Noise Cancel to "Low" or "High", the setting remains valid until it's set to "Off". • Noise cancel cannot be used during playback, press the 0 button to close the menu. Noise Cancel Function 44 Noise Cancel Function (Noise Cancel) 6 Press the STOP button to close the menu 6 screen. The will appear on the display.

DS-40 Instructions (English)
Page 45
.... The menu opens. (☞ P60, 62) 1 2 Press the + or - On: Voice Filter will be canceled. The voice filter setup process begins. 4 Press the + or - Set the Voice Filter (Voice Filter) The recorder has a Voice Filter Function to cut low and high frequency tones during normal, fast, or slow playback, and... enable clear audio playback. 2 1 While the recorder is pressed, the setting will be canceled and it will be turned on. 3 Off: Voice Filter will return to the menu. 45 button to choose between "On" and "Off". If the...
.... The menu opens. (☞ P60, 62) 1 2 Press the + or - On: Voice Filter will be canceled. The voice filter setup process begins. 4 Press the + or - Set the Voice Filter (Voice Filter) The recorder has a Voice Filter Function to cut low and high frequency tones during normal, fast, or slow playback, and... enable clear audio playback. 2 1 While the recorder is pressed, the setting will be canceled and it will be turned on. 3 Off: Voice Filter will return to the menu. 45 button to choose between "On" and "Off". If the...

DS-40 Instructions (English)
Page 46
Set the Voice Filter 46 Set the Voice Filter (Voice Filter) 6 Press the STOP button to close the menu. If the recorder goes to the menu screen 6 during playback, press the 0 button to close the menu screen. If it is set to "On", will appear on the display. a Voice Filter indicator 3 ...Note • Voice Filter is not available while Noise Cancel is set .
Set the Voice Filter 46 Set the Voice Filter (Voice Filter) 6 Press the STOP button to close the menu. If the recorder goes to the menu screen 6 during playback, press the 0 button to close the menu screen. If it is set to "On", will appear on the display. a Voice Filter indicator 3 ...Note • Voice Filter is not available while Noise Cancel is set .

DS-40 Instructions (English)
Page 57
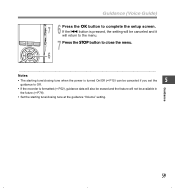
...longer. button to select the item to choose "Voice Guide". 4 3 Press the OK or 9 button. Select items you want to set . Guidance (Voice Guide) This feature gives audio announcements of guidance announcements. 2 1 While the recorder is stopped, press the MENU button for each setting..., please see P58. 57 Adjust the speed and the volume of recorder operating conditions. The menu opens. (☞...
...longer. button to select the item to choose "Voice Guide". 4 3 Press the OK or 9 button. Select items you want to set . Guidance (Voice Guide) This feature gives audio announcements of guidance announcements. 2 1 While the recorder is stopped, press the MENU button for each setting..., please see P58. 57 Adjust the speed and the volume of recorder operating conditions. The menu opens. (☞...
DS-40 Instructions (English)
Page 59
Guidance 59 Guidance (Voice Guide) 7 6 Press the OK button to close the menu. 6 ... If the 0 button is pressed, the setting will be available in the future (☞P76). • ... tune/closing tune when the power is turned On/Off (☞P15) can be canceled if you set the 5 guidance to Off. • If the recorder is formatted (☞P52), guidance data will also be erased and the feature will not be canceled and it will return to the menu. 7 Press...
Guidance 59 Guidance (Voice Guide) 7 6 Press the OK button to close the menu. 6 ... If the 0 button is pressed, the setting will be available in the future (☞P76). • ... tune/closing tune when the power is turned On/Off (☞P15) can be canceled if you set the 5 guidance to Off. • If the recorder is formatted (☞P52), guidance data will also be erased and the feature will not be canceled and it will return to the menu. 7 Press...


