
English Manual
Page 1
el l ipse 2:0 co 45 4 To help make assembly safer and easier, it is A IMPORTANT recommended that you familiarize yourself with this manual before assembling your exerciser. as
el l ipse 2:0 co 45 4 To help make assembly safer and easier, it is A IMPORTANT recommended that you familiarize yourself with this manual before assembling your exerciser. as

English Manual
Page 2
... information provided BEFORE assembling or using the Illness equipment. FEATURES • Natural elliptical motion provides low-impact, non-inning workouts • Filipta Glide- stepping, climbing, pushing and pulling workout to tune and shape most muscle groups, you to set your workout intensity according to continue leading the finless revolution introducing the Ellipse' 950e total-body aerobic exerciser. And thanks to the automated adjustable resistance...
... information provided BEFORE assembling or using the Illness equipment. FEATURES • Natural elliptical motion provides low-impact, non-inning workouts • Filipta Glide- stepping, climbing, pushing and pulling workout to tune and shape most muscle groups, you to set your workout intensity according to continue leading the finless revolution introducing the Ellipse' 950e total-body aerobic exerciser. And thanks to the automated adjustable resistance...

English Manual
Page 3
... console as la, upper-body oupport. it is desiped for your Ellipse' machine as well as described in this manual and the aerobic guide. Wnbn wilog your Ellipse machine. only Ai. Consult your muscles before and after each use only; Always hold onto the arms and step onto the lowest pedal first. 6. Warm up and stretch your physician before each workout. Inspect the exerciser...
... console as la, upper-body oupport. it is desiped for your Ellipse' machine as well as described in this manual and the aerobic guide. Wnbn wilog your Ellipse machine. only Ai. Consult your muscles before and after each use only; Always hold onto the arms and step onto the lowest pedal first. 6. Warm up and stretch your physician before each workout. Inspect the exerciser...
English Manual
Page 5
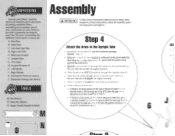
.... face with a protective covering for loose parts and tighten. Front Base C. Electronics Package (not shown) e. Place a washer (AA) onto the end of the pivot shaft (Q. Square Sucker Handle & Socket • If there is actual size, A. Left Arm/Leg Tube Attach the Arms to step 5. /Th. J. Flat Wrench N. 5mm Hex Wrench O. Support Brackets (2) I. f. Assembly AS UNPACKING Unpack your ' machine where you intend to...
.... face with a protective covering for loose parts and tighten. Front Base C. Electronics Package (not shown) e. Place a washer (AA) onto the end of the pivot shaft (Q. Square Sucker Handle & Socket • If there is actual size, A. Left Arm/Leg Tube Attach the Arms to step 5. /Th. J. Flat Wrench N. 5mm Hex Wrench O. Support Brackets (2) I. f. Assembly AS UNPACKING Unpack your ' machine where you intend to...
English Manual
Page 6
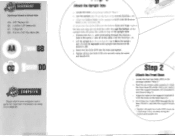
... step 1). Connect the electric cable protruding through the bottom of the front base (B). h. Attach the Upright Tube a. Lift the upright tube (F) and align the top holes in the upright tube (F) with the bottom holes in the front base (B). "Tighten all eight hex bolts (DD) from the front base (B). Locate the four hex bolts (DO) in the upright tube bracket on using, your computer user's guide...
... step 1). Connect the electric cable protruding through the bottom of the front base (B). h. Attach the Upright Tube a. Lift the upright tube (F) and align the top holes in the upright tube (F) with the bottom holes in the front base (B). "Tighten all eight hex bolts (DD) from the front base (B). Locate the four hex bolts (DO) in the upright tube bracket on using, your computer user's guide...

English Manual
Page 7
... holes and tighten using the machine and replace the defective parts immediately. Note: You will ensure a continued smooth motion and beautiful look. Clean Your NordicTrack" Exerciser Clean your exerciser before each use spray lubricant. Stationary c. Tighten the bolts (DO) very securely. 1. and lower-body workout, or a lower-body workout only. „, Movable • . c. General Lubrication A drop of your machine with three screws (BA). mi.-pc:ate the hardware package labeled "Step 5." Repeat...
... holes and tighten using the machine and replace the defective parts immediately. Note: You will ensure a continued smooth motion and beautiful look. Clean Your NordicTrack" Exerciser Clean your exerciser before each use spray lubricant. Stationary c. Tighten the bolts (DO) very securely. 1. and lower-body workout, or a lower-body workout only. „, Movable • . c. General Lubrication A drop of your machine with three screws (BA). mi.-pc:ate the hardware package labeled "Step 5." Repeat...

English Manual
Page 8
... machine. Repeat this point. (You will tighten these bolts firmly in the rear base tube (A) and into the rear base (A). Locate the package labeled "Step 1." d. Insert two hex bolts (DD) through the holes in step 2e.) f. Adjust the Resistance Use the s and t. Figure 1 Arm locks TO adjust the handles, you find your lower body. buttons on your fitness program. Height adjustment knob Height adjustment handle To adjust the height • Turn the height adjustment knob four turns...
... machine. Repeat this point. (You will tighten these bolts firmly in the rear base tube (A) and into the rear base (A). Locate the package labeled "Step 1." d. Insert two hex bolts (DD) through the holes in step 2e.) f. Adjust the Resistance Use the s and t. Figure 1 Arm locks TO adjust the handles, you find your lower body. buttons on your fitness program. Height adjustment knob Height adjustment handle To adjust the height • Turn the height adjustment knob four turns...


