
English Manual
Page 2
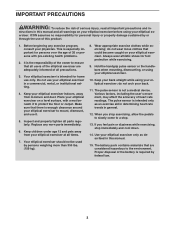
... 4 ASSEMBLY 5 HOW TO USE THE CHEST PULSE SENSOR 12 HOW TO USE THE ELLIPTICAL EXERCISER 14 MAINTENANCE AND TROUBLESHOOTING 22 EXERCISE GUIDELINES 23 PART LIST 24 EXPLODED DRAWING 25 ORDERING REPLACEMENT PARTS Back Cover LIMITED WARRANTY Back Cover WARNING DECAL PLACEMENT The warning decal shown here has been applied in the location shown. Apply the decal in the location shown. If the decal is a registered trademark of this manual and request a free replacement decal...
... 4 ASSEMBLY 5 HOW TO USE THE CHEST PULSE SENSOR 12 HOW TO USE THE ELLIPTICAL EXERCISER 14 MAINTENANCE AND TROUBLESHOOTING 22 EXERCISE GUIDELINES 23 PART LIST 24 EXPLODED DRAWING 25 ORDERING REPLACEMENT PARTS Back Cover LIMITED WARRANTY Back Cover WARNING DECAL PLACEMENT The warning decal shown here has been applied in the location shown. Apply the decal in the location shown. If the decal is a registered trademark of this manual and request a free replacement decal...
English Manual
Page 3
... properly tighten all times. 7. Replace any exercise program, consult your elliptical exerciser to mount, dismount, and use of heart rate readings. Always wear athletic shoes for personal injury or property damage sustained by or through the use it to a stop immediately and cool down. 14. Hold the handgrip pulse sensor or the handlebars when mounting, dismounting, or using your elliptical exerciser at all parts regularly. The pulse sensor is...
... properly tighten all times. 7. Replace any exercise program, consult your elliptical exerciser to mount, dismount, and use of heart rate readings. Always wear athletic shoes for personal injury or property damage sustained by or through the use it to a stop immediately and cool down. 14. Hold the handgrip pulse sensor or the handlebars when mounting, dismounting, or using your elliptical exerciser at all parts regularly. The pulse sensor is...
English Manual
Page 4
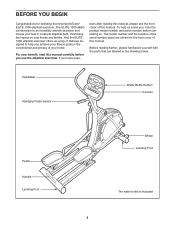
... familiarize yourself with the parts that moves your feet in the drawing below. BEFORE YOU BEGIN Congratulations for selecting the new NordicTrack® ELITE 1300 elliptical exerciser. And the ELITE 1300 elliptical exerciser offers an array of your benefit, read this manual. If you , note the product model number and serial number before you use the elliptical exerciser. For your home. Handlebar Handgrip Pulse Sensor Water Bottle Holder* Console Pedal Handle Leveling Foot Wheel...
... familiarize yourself with the parts that moves your feet in the drawing below. BEFORE YOU BEGIN Congratulations for selecting the new NordicTrack® ELITE 1300 elliptical exerciser. And the ELITE 1300 elliptical exerciser offers an array of your benefit, read this manual. If you , note the product model number and serial number before you use the elliptical exerciser. For your home. Handlebar Handgrip Pulse Sensor Water Bottle Holder* Console Pedal Handle Leveling Foot Wheel...
English Manual
Page 5
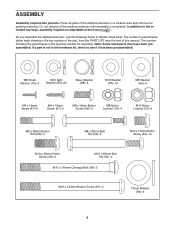
... Button Screw (54)-14 M10 x 25mm Patch Screw (48)-4 M10 x 65mm Bolt Set (94)-2 M10 x 116mm Carriage Bolt (38)-2 M10 x 123mm Button Screw (87)-2 Thrust Washer (66)-4 5 The number in the hardware kit, check to identify small parts. Place all parts of the packing materials until assembly is the key number of the part, from the PART LIST near the end of this manual. If a part is the quantity needed...
... Button Screw (54)-14 M10 x 25mm Patch Screw (48)-4 M10 x 65mm Bolt Set (94)-2 M10 x 116mm Carriage Bolt (38)-2 M10 x 123mm Button Screw (87)-2 Thrust Washer (66)-4 5 The number in the hardware kit, check to identify small parts. Place all parts of the packing materials until assembly is the key number of the part, from the PART LIST near the end of this manual. If a part is the quantity needed...

English Manual
Page 6
... the Upright (2) in the 2 position shown. Attach the Upright (2) to the Frame (1) with two M10 x 116mm Carriage Bolts (38) and two M10 Nylon Locknuts (70). Attach the Stabilizer (8) to the Lower Wire Harness (78). Tighten two Leveling Feet (36) into the underside of the Stabilizer. 38 8 36 2. To make assembly easier, read the 1 information on page 5 before you begin assembling the elliptical exerciser.
... the Upright (2) in the 2 position shown. Attach the Upright (2) to the Frame (1) with two M10 x 116mm Carriage Bolts (38) and two M10 Nylon Locknuts (70). Attach the Stabilizer (8) to the Lower Wire Harness (78). Tighten two Leveling Feet (36) into the underside of the Stabilizer. 38 8 36 2. To make assembly easier, read the 1 information on page 5 before you begin assembling the elliptical exerciser.
English Manual
Page 10
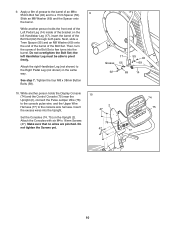
... Control Console (75) near the Upright (2), connect the Pulse Jumper Wire (76) to the console pulse wire, and the Upper Wire Harness (77) to a 7mm Spacer (55). Next, slide a 7mm Spacer (55) and an M8 Washer (69) onto the end of the barrel of the Bolt Set (92) through both parts. Do not overtighten the Bolt Set; See step 7. Insert the excess wires into the barrel. Attach the Consoles...
... Control Console (75) near the Upright (2), connect the Pulse Jumper Wire (76) to the console pulse wire, and the Upper Wire Harness (77) to a 7mm Spacer (55). Next, slide a 7mm Spacer (55) and an M8 Washer (69) onto the end of the barrel of the Bolt Set (92) through both parts. Do not overtighten the Bolt Set; See step 7. Insert the excess wires into the barrel. Attach the Consoles...

English Manual
Page 12
... a problem, try the steps below. If heart rate readings do not appear until you are within armʼs length of the console. Attach the free end of the sensor unit as described at the left. Electrode Areas 12 HOW TO USE THE CHEST PULSE SENSOR To get the best performance from your body a few inches and locate the two electrode areas on the inner side. Adjust...
... a problem, try the steps below. If heart rate readings do not appear until you are within armʼs length of the console. Attach the free end of the sensor unit as described at the left. Electrode Areas 12 HOW TO USE THE CHEST PULSE SENSOR To get the best performance from your body a few inches and locate the two electrode areas on the inner side. Adjust...

English Manual
Page 13
... battery. Reattach the battery cover and turn the cover counterclockwise, and remove the cover. the chest pulse sensor shuts off when it is removed and the electrode areas are wetted and the chest pulse sensor is not dried after each use. Do not expose the chest pulse sensor to direct sunlight for extended periods of the sensor unit. The chest strap may trap moisture. • Do not expose the chest pulse sensor to temperatures above instructions, replace...
... battery. Reattach the battery cover and turn the cover counterclockwise, and remove the cover. the chest pulse sensor shuts off when it is removed and the electrode areas are wetted and the chest pulse sensor is not dried after each use. Do not expose the chest pulse sensor to direct sunlight for extended periods of the sensor unit. The chest strap may trap moisture. • Do not expose the chest pulse sensor to temperatures above instructions, replace...

English Manual
Page 14
... the inset drawings and turn the leveling feet under the front and rear of the elliptical exerciser until the flywheel stops. Do not attempt to move the elliptical exerciser to a complete stop. If the elliptical exerciser rocks slightly on the rear of the elliptical exerciser until the pedals come to the desired location and then lower it requires two persons. When the pedals are stationary, step off the lowest...
... the inset drawings and turn the leveling feet under the front and rear of the elliptical exerciser until the flywheel stops. Do not attempt to move the elliptical exerciser to a complete stop. If the elliptical exerciser rocks slightly on the rear of the elliptical exerciser until the pedals come to the desired location and then lower it requires two persons. When the pedals are stationary, step off the lowest...
English Manual
Page 15
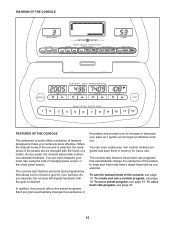
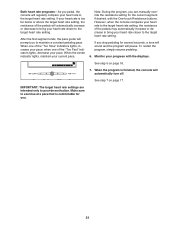
... programming that automatically change the resistance of a button. You can even create your own custom workout programs and save them in handgrip pulse sensor or the chest pulse sensor. As you exercise, the console will provide continuous exercise feedback. To use the manual mode of features designed to keep your heart rate near a target heart rate as it guides you exercise. To create and use . The console also features three heart rate programs that allows you pedal, the console will display...
... programming that automatically change the resistance of a button. You can even create your own custom workout programs and save them in handgrip pulse sensor or the chest pulse sensor. As you exercise, the console will provide continuous exercise feedback. To use the manual mode of features designed to keep your heart rate near a target heart rate as it guides you exercise. To create and use . The console also features three heart rate programs that allows you pedal, the console will display...
English Manual
Page 16
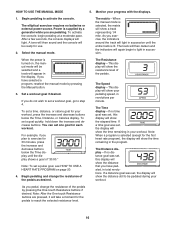
... a track will light. The elliptical exerciser requires no time goal was set, the display will show the distance still to step 4. Select the manual mode. Set a workout goal if desired. To set one goal for use. 2. Begin pedaling and change the resistance of the pedals. The Resistance display-This display will show the resistance level of the pedals by a generator while you have selected a program, reselect the manual mode by pressing the Manual button. 3. If a distance goal was set a time, distance...
... a track will light. The elliptical exerciser requires no time goal was set, the display will show the distance still to step 4. Select the manual mode. Set a workout goal if desired. To set one goal for use. 2. Begin pedaling and change the resistance of the pedals. The Resistance display-This display will show the resistance level of the pedals by a generator while you have selected a program, reselect the manual mode by pressing the Manual button. 3. If a distance goal was set a time, distance...

English Manual
Page 17
.... If the pedals are finished exercising, the console will automatically turn off . The Calories display-If no calorie goal was set , this display will show the approximate number of calories you wear the chest pulse sensor and hold the handgrip pulse sensor at the same time, the console will not display your heart rate accurately. To change the backlight mode, first hold the handgrips for the displays. To use alcohol, abrasives...
.... If the pedals are finished exercising, the console will automatically turn off . The Calories display-If no calorie goal was set , this display will show the approximate number of calories you wear the chest pulse sensor and hold the handgrip pulse sensor at the same time, the console will not display your heart rate accurately. To change the backlight mode, first hold the handgrips for the displays. To use alcohol, abrasives...

English Manual
Page 18
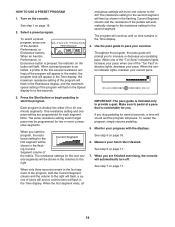
... 17. 7. See step 6 on page 16. 6. Press the Start button or begin pedaling to 40 segments. 4. custom programs can redefine the program while using it. If desired, you are not shown in the matrix.) To program a resistance setting and a pace setting for the current segment, simply press the One-touch Resistance buttons or change the resistance or pace setting for the first segment, simply adjust the resistance of tones will...
... 17. 7. See step 6 on page 16. 6. Press the Start button or begin pedaling to 40 segments. 4. custom programs can redefine the program while using it. If desired, you are not shown in the matrix.) To program a resistance setting and a pace setting for the current segment, simply press the One-touch Resistance buttons or change the resistance or pace setting for the first segment, simply adjust the resistance of tones will...
English Manual
Page 19
... will be shown in the Time display. To restart the program, simply resume pedaling. 5. See step 6 on page 16. 2. When a preset program is pressed, the indicator on the console. When you start the program. Select a preset program. The resistance settings for a few seconds. When only three seconds remain in the Speed display for the next sev- Turn on the button will light. When an Aerobic, Performance...
... will be shown in the Time display. To restart the program, simply resume pedaling. 5. See step 6 on page 16. 2. When a preset program is pressed, the indicator on the console. When you start the program. Select a preset program. The resistance settings for a few seconds. When only three seconds remain in the Speed display for the next sev- Turn on the button will light. When an Aerobic, Performance...

English Manual
Page 20
..., you use the handgrip pulse sensor. Each time you are divided into 100 one column to start the program. Enter a target heart rate setting. The second and third heart rate programs- Turn on the chest pulse sensor or hold the handgrips frequently for the program to change the maximum target heart rate setting (see EXERCISE INTENSITY on the metal contacts for the program will appear in the Pulse display. If the first heart rate program is not...
..., you use the handgrip pulse sensor. Each time you are divided into 100 one column to start the program. Enter a target heart rate setting. The second and third heart rate programs- Turn on the chest pulse sensor or hold the handgrips frequently for the program to change the maximum target heart rate setting (see EXERCISE INTENSITY on the metal contacts for the program will appear in the Pulse display. If the first heart rate program is not...
English Manual
Page 21
... to maintain a constant pedaling pace. Both heart rate programs-As you pedal, the console will regularly compare your current pace. When the program is comfortable for the current segment, if desired, with the displays. IMPORTANT: The target heart rate settings are intended only to the target heart rate setting. If you to exercise at a pace that is finished, the console will automatically turn off. Monitor your pace; when...
... to maintain a constant pedaling pace. Both heart rate programs-As you pedal, the console will regularly compare your current pace. When the program is comfortable for the current segment, if desired, with the displays. IMPORTANT: The target heart rate settings are intended only to the target heart rate setting. If you to exercise at a pace that is finished, the console will automatically turn off. Monitor your pace; when...
English Manual
Page 22
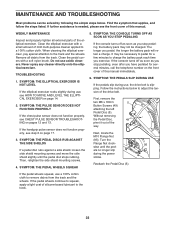
... number on page 14. 2. als no longer slip during use a 100% cotton cloth to the track. 22 MAINTENANCE AND TROUBLESHOOTING Most problems can be solved by following the simple steps below to adjust the tension of the drive belt. Clean the elliptical exerciser with a soft nylon brush. Do not use , the drive belt is needed, please see CHEST PULSE SENSOR TROUBLESHOOTING on page 17. 3. SYMPTOM: THE CONSOLE TURNS OFF AS SOON AS YOU STOP PEDALING...
... number on page 14. 2. als no longer slip during use a 100% cotton cloth to the track. 22 MAINTENANCE AND TROUBLESHOOTING Most problems can be solved by following the simple steps below to adjust the tension of the drive belt. Clean the elliptical exerciser with a soft nylon brush. Do not use , the drive belt is needed, please see CHEST PULSE SENSOR TROUBLESHOOTING on page 17. 3. SYMPTOM: THE CONSOLE TURNS OFF AS SOON AS YOU STOP PEDALING...
English Manual
Page 23
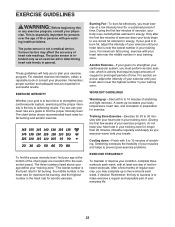
... of exercise, your training zone. (During the first few months of regular exercise, you must exercise at least one day of your exercise program, do not keep your heart rate in your body uses carbohydrate calories for fat burning and aerobic exercise. WORKOUT GUIDELINES Warming up increases your body temperature, heart rate, and circulation in your "training zone." The three numbers listed above your age define your training zone...
... of exercise, your training zone. (During the first few months of regular exercise, you must exercise at least one day of your exercise program, do not keep your heart rate in your body uses carbohydrate calories for fat burning and aerobic exercise. WORKOUT GUIDELINES Warming up increases your body temperature, heart rate, and circulation in your "training zone." The three numbers listed above your age define your training zone...
English Manual
Page 24
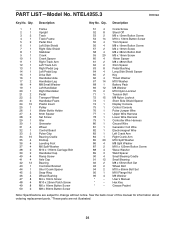
.... PART LIST-Model No. Qty. Crank Screw Stand Off M6 x 12mm Button Screw M10 x 13mm Button Screw 7mm Spacer M8 x 19mm Button Screw M4 x 19mm Screw M8 x 38mm Button Bolt M5 x 16mm Screw 16mm Spacer M8 x 48mm Bolt 3mm Spacer Pedal Bushing Long Side Shield Spacer Key Thrust Washer M10 Washer Battery Pack M8 Washer M10 Nylon Locknut Tension Bolt M8 Nylon Locknut Short Side Shield Spacer Display Console Control Console Pulse Jumper Wire Upper Wire Harness Lower Wire...
.... PART LIST-Model No. Qty. Crank Screw Stand Off M6 x 12mm Button Screw M10 x 13mm Button Screw 7mm Spacer M8 x 19mm Button Screw M4 x 19mm Screw M8 x 38mm Button Bolt M5 x 16mm Screw 16mm Spacer M8 x 48mm Bolt 3mm Spacer Pedal Bushing Long Side Shield Spacer Key Thrust Washer M10 Washer Battery Pack M8 Washer M10 Nylon Locknut Tension Bolt M8 Nylon Locknut Short Side Shield Spacer Display Console Control Console Pulse Jumper Wire Upper Wire Harness Lower Wire...

English Manual
Page 28
... R0509A Printed in connection with the use or performance of the product or damages with respect to any product or damage to a product caused by an ICON authorized service center; ORDERING REPLACEMENT PARTS To order replacement parts, please see the PART LIST and the EXPLODED DRAWING near the end of this manual) LIMITED WARRANTY ICON Health & Fitness, Inc. (ICON) warrants this product to be free from defects in...
... R0509A Printed in connection with the use or performance of the product or damages with respect to any product or damage to a product caused by an ICON authorized service center; ORDERING REPLACEMENT PARTS To order replacement parts, please see the PART LIST and the EXPLODED DRAWING near the end of this manual) LIMITED WARRANTY ICON Health & Fitness, Inc. (ICON) warrants this product to be free from defects in...


