
English Manual
Page 2
... elliptical exerciser are adequately informed of ICON Health & Fitness, Inc. 2 ICON assumes no responsibility for in a commercial, rental, or institutional setting. 4. The elliptical exerciser is especially important for foot protection. 9. Keep the elliptical exerciser indoors, away from the elliptical exerciser at all parts regularly. do not arch your physician. TABLE OF CONTENTS IMPORTANT PRECAUTIONS 2 BEFORE YOU BEGIN 3 ASSEMBLY 4 HOW TO USE THE ELLIPTICAL EXERCISER 7 MAINTENANCE AND TROUBLESHOOTING 19 CONDITIONING GUIDELINES 20 PART LIST...
... elliptical exerciser are adequately informed of ICON Health & Fitness, Inc. 2 ICON assumes no responsibility for in a commercial, rental, or institutional setting. 4. The elliptical exerciser is especially important for foot protection. 9. Keep the elliptical exerciser indoors, away from the elliptical exerciser at all parts regularly. do not arch your physician. TABLE OF CONTENTS IMPORTANT PRECAUTIONS 2 BEFORE YOU BEGIN 3 ASSEMBLY 4 HOW TO USE THE ELLIPTICAL EXERCISER 7 MAINTENANCE AND TROUBLESHOOTING 19 CONDITIONING GUIDELINES 20 PART LIST...
English Manual
Page 3
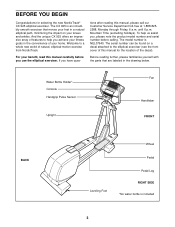
... help you use the elliptical exerciser. The model number is included 3 Water Bottle Holder* Console Handgrip Pulse Sensor Upright Fan Handlebar FRONT BACK Leveling Foot Wheel Pedal Pedal Leg RIGHT SIDE *No water bottle is NEL07940. Welcome to the elliptical exerciser (see the front cover of this manual for selecting the new NordicTrack® CX 925 elliptical exerciser. until 6 p.m. Before reading further, please familiarize yourself with the parts that moves your feet in...
... help you use the elliptical exerciser. The model number is included 3 Water Bottle Holder* Console Handgrip Pulse Sensor Upright Fan Handlebar FRONT BACK Leveling Foot Wheel Pedal Pedal Leg RIGHT SIDE *No water bottle is NEL07940. Welcome to the elliptical exerciser (see the front cover of this manual for selecting the new NordicTrack® CX 925 elliptical exerciser. until 6 p.m. Before reading further, please familiarize yourself with the parts that moves your feet in...

English Manual
Page 4
... number in parentheses below to identify the small parts used in the position shown, attach the Front 1 Stabilizer to the Frame with four M8 x 44mm Button 4, 5 Screws (84) and a Support Plate (64). Note: Some small parts may have been pre-assembled. M10 Split Washer (73)-2 7.6mm Spacer (47)-2 M4 x 16mm Screw (94)-4 M8 x 54mm Button Screw (83)-4 M8 x 44mm Button Screw (84)-8 M8 x 79mm Bolt Set...
... number in parentheses below to identify the small parts used in the position shown, attach the Front 1 Stabilizer to the Frame with four M8 x 44mm Button 4, 5 Screws (84) and a Support Plate (64). Note: Some small parts may have been pre-assembled. M10 Split Washer (73)-2 7.6mm Spacer (47)-2 M4 x 16mm Screw (94)-4 M8 x 54mm Button Screw (83)-4 M8 x 44mm Button Screw (84)-8 M8 x 79mm Bolt Set...
English Manual
Page 5
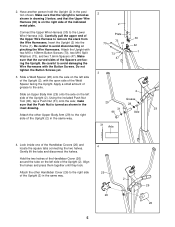
... the axle; Do not tighten the Button Screws yet. 3 3. Slide an Upper Body Arm (29) onto the axle on the right side of the indicated metal plate. 2 Connect the Upper Wire Harness (30) to the axle. Make sure that the Upper Wire Harness (30) is turned as shown in the position shown. Attach the other Handlebar Cover (26) to the right...
... the axle; Do not tighten the Button Screws yet. 3 3. Slide an Upper Body Arm (29) onto the axle on the right side of the indicated metal plate. 2 Connect the Upper Wire Harness (30) to the axle. Make sure that the Upper Wire Harness (30) is turned as shown in the position shown. Attach the other Handlebar Cover (26) to the right...
English Manual
Page 6
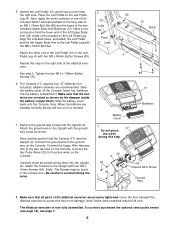
... Bolt Set. Connect the Upper Wire Harness (30) to protect the floor from the Upright (2). Batteries 30 2 94 94 20 Ground Wire Screw Ground Wire 8. Cover the floor beneath the elliptical exerciser to the wire harness on the Console. See step 2. Note: When the batteries are oriented as shown. Have another person hold the lower end of the left Upper Body Arm (29) inside the battery compartment. Connect the ground wire to...
... Bolt Set. Connect the Upper Wire Harness (30) to protect the floor from the Upright (2). Batteries 30 2 94 94 20 Ground Wire Screw Ground Wire 8. Cover the floor beneath the elliptical exerciser to the wire harness on the Console. See step 2. Note: When the batteries are oriented as shown. Have another person hold the lower end of the left Upper Body Arm (29) inside the battery compartment. Connect the ground wire to...
English Manual
Page 7
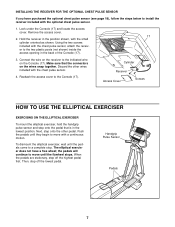
... chest pulse sensor, attach the receiver to the indicated wire on the Console (17). Make sure that is in the back of the Console (17). 3. the pedals will continue to the Console (17). To dismount the elliptical exerciser, wait until the flywheel stops. Then, step off the highest pedal first. Remove the access cover. 17 2. Connect the wire on the wires snap together. Cylinder Receiver Access Cover Screws HOW TO USE THE ELLIPTICAL EXERCISER EXERCISING...
... chest pulse sensor, attach the receiver to the indicated wire on the Console (17). Make sure that is in the back of the Console (17). 3. the pedals will continue to the Console (17). To dismount the elliptical exerciser, wait until the flywheel stops. Then, step off the highest pedal first. Remove the access cover. 17 2. Connect the wire on the wires snap together. Cylinder Receiver Access Cover Screws HOW TO USE THE ELLIPTICAL EXERCISER EXERCISING...
English Manual
Page 8
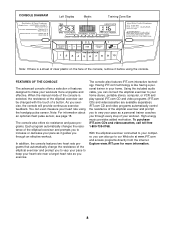
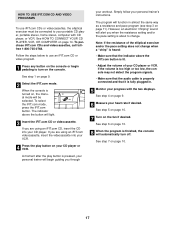
... resistance of the elliptical exerciser can connect the elliptical exerciser to make your workout. FEATURES OF THE CONSOLE The advanced console offers a selection of features designed to your home. Using the included audio cable, you through every step of your workouts more information. 8 When the manual mode of the console is like having a personal trainer in your home stereo, portable stereo, computer, or VCR and play special iFIT.com CD and video programs (iFIT.com...
... resistance of the elliptical exerciser can connect the elliptical exerciser to make your workout. FEATURES OF THE CONSOLE The advanced console offers a selection of features designed to your home. Using the included audio cable, you through every step of your workouts more information. 8 When the manual mode of the console is like having a personal trainer in your home stereo, portable stereo, computer, or VCR and play special iFIT.com CD and video programs (iFIT.com...
English Manual
Page 9
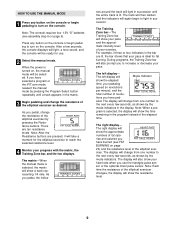
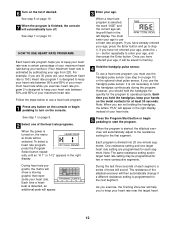
... a program or the iFIT.com mode, reselect the manual mode by the mode indicators in succession until a track appears in revolutions per minute), and the total number of the elliptical exerciser by the mode indicators. The left display will light in the display. tors around the track will Mode Indicator show a track representing 1/4 mile. The display will be selected. HOW TO USE THE MANUAL MODE 1 Press any button on the console or begin pedaling to turn...
... a program or the iFIT.com mode, reselect the manual mode by the mode indicators in succession until a track appears in revolutions per minute), and the total number of the elliptical exerciser by the mode indicators. The left display will light in the display. tors around the track will Mode Indicator show a track representing 1/4 mile. The display will be selected. HOW TO USE THE MANUAL MODE 1 Press any button on the console or begin pedaling to turn...
English Manual
Page 11
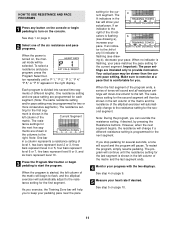
... in the bar will change to start the program. rent pace setting. However, when the next segment begins, the resistance will show your heart rate if desired. See step 4 on , the manual mode will begin pedaling to the resistance setting for several time seg- To select a resistance and pace program, press the Program Select button repeatedly until the resistance setting for you can override the resistance setting, if desired, by pressing the Resistance buttons. If an...
... in the bar will change to start the program. rent pace setting. However, when the next segment begins, the resistance will show your heart rate if desired. See step 4 on , the manual mode will begin pedaling to the resistance setting for several time seg- To select a resistance and pace program, press the Program Select button repeatedly until the resistance setting for you can override the resistance setting, if desired, by pressing the Resistance buttons. If an...
English Manual
Page 12
... heart rate. 5 Press the Program Start button or begin pedaling to start the program. To use a heart rate program, you are programmed for each segment, a series of your age to use a heart rate program. 1 Press any button on the console or begin pedaling to turn off. To select a heart rate program, press the Program Select button repeatedly until an "H 1" or "H 2" appears in the right display instead of tones will flash in memory. 4 Hold the handgrip pulse sensor. heart rate program 2 is divided into 20 one target heart rate setting...
... heart rate. 5 Press the Program Start button or begin pedaling to start the program. To use a heart rate program, you are programmed for each segment, a series of your age to use a heart rate program. 1 Press any button on the console or begin pedaling to turn off. To select a heart rate program, press the Program Select button repeatedly until an "H 1" or "H 2" appears in the right display instead of tones will flash in memory. 4 Hold the handgrip pulse sensor. heart rate program 2 is divided into 20 one target heart rate setting...
English Manual
Page 13
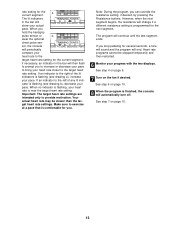
... pressing the Resistance buttons. Your actual heart rate may be stopped temporarily and then restarted. 6 Monitor your pace. Make sure to prompt you stop pedaling for the next segment. The program will end. Heart rate programs cannot be slower than the tar- get heart rate settings. sor, the console will then flash to exercise at a pace that is near the target heart rate setting. if necessary, an indicator in the bar will change...
... pressing the Resistance buttons. Your actual heart rate may be stopped temporarily and then restarted. 6 Monitor your pace. Make sure to prompt you stop pedaling for the next segment. The program will end. Heart rate programs cannot be slower than the tar- get heart rate settings. sor, the console will then flash to exercise at a pace that is near the target heart rate setting. if necessary, an indicator in the bar will change...
English Manual
Page 14
..., see instruction B. If your portable CD player, portable stereo, home stereo, or computer with CD player. Plug one end of the audio cable into the jack beneath the console. Plug the Y-adapter into the PHONES jack on your CD player. Plug the Y-adapter into the PHONES jack on your stereo. To use iFIT.com programs directly from our Web site, the elliptical exerciser must be connected to...
..., see instruction B. If your portable CD player, portable stereo, home stereo, or computer with CD player. Plug one end of the audio cable into the jack beneath the console. Plug the Y-adapter into the PHONES jack on your CD player. Plug the Y-adapter into the PHONES jack on your stereo. To use iFIT.com programs directly from our Web site, the elliptical exerciser must be connected to...
English Manual
Page 15
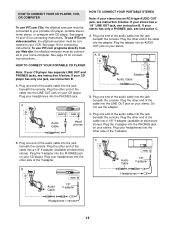
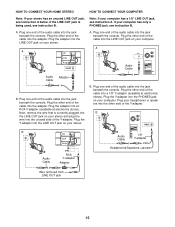
... and plug the wire into the adapter. Plug the Y-adapter into the jack beneath the console. B PHONES B CD VCR Amp LINE OUT Audio Cable RCA Y-adapter Adapter Audio Cable 1/8" Y-adapter Headphones/Speakers Wire removed from LINE OUT jack 15 HOW TO CONNECT YOUR HOME STEREO HOW TO CONNECT YOUR COMPUTER Note: If your computer has only a PHONES jack, see instruction B. Plug the other side of the cable into an RCA Y-adapter (available...
... and plug the wire into the adapter. Plug the Y-adapter into the jack beneath the console. B PHONES B CD VCR Amp LINE OUT Audio Cable RCA Y-adapter Adapter Audio Cable 1/8" Y-adapter Headphones/Speakers Wire removed from LINE OUT jack 15 HOW TO CONNECT YOUR HOME STEREO HOW TO CONNECT YOUR COMPUTER Note: If your computer has only a PHONES jack, see instruction B. Plug the other side of the cable into an RCA Y-adapter (available...

English Manual
Page 16
... wire into the adapter. Plug the adapter into the jack beneath the console. Plug one end of the cable into the AUDIO OUT jack on page 15. Plug the adapter into the jack beneath the console. IN VIDEO AUDIO IN CH 34 OUT RF OUT AUDIO OUT RIGHT LEFT Adapter Audio Cable RCA Y-adapter Audio Cable Adapter Wire removed from AUDIO OUT jack 16 A. If the AUDIO OUT jack is connected to your home stereo, see instruction B. A ANT. Plug...
... wire into the adapter. Plug the adapter into the jack beneath the console. Plug one end of the cable into the AUDIO OUT jack on page 15. Plug the adapter into the jack beneath the console. IN VIDEO AUDIO IN CH 34 OUT RF OUT AUDIO OUT RIGHT LEFT Adapter Audio Cable RCA Y-adapter Audio Cable Adapter Wire removed from AUDIO OUT jack 16 A. If the AUDIO OUT jack is connected to your home stereo, see instruction B. A ANT. Plug...
English Manual
Page 17
... console is lit. • Adjust the volume of the elliptical exerciser and/or the pace setting does not change . See HOW TO CONNECT YOUR CD PLAYER, VCR, OR COMPUTER on , the manual mode will alert you are using an iFIT.com CD, insert the CD into your VCR. 4 Press the play button is fully plugged in almost the same way as a resistance and pace program (see step...
... console is lit. • Adjust the volume of the elliptical exerciser and/or the pace setting does not change . See HOW TO CONNECT YOUR CD PLAYER, VCR, OR COMPUTER on , the manual mode will alert you are using an iFIT.com CD, insert the CD into your VCR. 4 Press the play button is fully plugged in almost the same way as a resistance and pace program (see step...

English Manual
Page 18
... use programs from our Web site, the elliptical exerciser must have an internet connection and an internet service provider. The program will alert you when the resistance setting and/or the pace setting is about to change. 8 Monitor your computer and start the program, an on-screen countdown will automatically turn on the console. THE OPTIONAL CHEST PULSE SENSOR The optional chest pulse sensor provides hands-free operation and continuously monitors your heart rate during your home...
... use programs from our Web site, the elliptical exerciser must have an internet connection and an internet service provider. The program will alert you when the resistance setting and/or the pace setting is about to change. 8 Monitor your computer and start the program, an on-screen countdown will automatically turn on the console. THE OPTIONAL CHEST PULSE SENSOR The optional chest pulse sensor provides hands-free operation and continuously monitors your heart rate during your home...
English Manual
Page 19
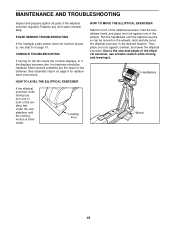
... of the leveling feet under the rear stabilizer until the elliptical exerciser can be replaced. Then, place one foot against one foot against a wheel, and lower the elliptical exerciser. Replace any worn parts immediately. See assembly step 6 on page 10. Handlebars Wheel 19 MAINTENANCE AND TROUBLESHOOTING Inspect and properly tighten all parts of low batteries. PULSE SENSOR TROUBLESHOOTING If the handgrip pulse sensor does not function properly, see step 5 on page 6 for replacement instructions.
... of the leveling feet under the rear stabilizer until the elliptical exerciser can be replaced. Then, place one foot against one foot against a wheel, and lower the elliptical exerciser. Replace any worn parts immediately. See assembly step 6 on page 10. Handlebars Wheel 19 MAINTENANCE AND TROUBLESHOOTING Inspect and properly tighten all parts of low batteries. PULSE SENSOR TROUBLESHOOTING If the handgrip pulse sensor does not function properly, see step 5 on page 6 for replacement instructions.
English Manual
Page 20
... the lungs to make exercise a regular and enjoyable part of your exercise program, do not keep your heart rate in your training zone. (During the first few months of stretching. Fat Burning To burn fat effectively, you must be found by using your body temperature, heart rate, and circulation in your goal is the recommended heart rate for aerobic exercise. The pulse sensor is near the...
... the lungs to make exercise a regular and enjoyable part of your exercise program, do not keep your heart rate in your training zone. (During the first few months of stretching. Fat Burning To burn fat effectively, you must be found by using your body temperature, heart rate, and circulation in your goal is the recommended heart rate for aerobic exercise. The pulse sensor is near the...
English Manual
Page 21
... x 25mm Tek Screw 49 2 Lower Foam Grip 50 2 Upper Foam Grip 51 4 Pedal Leg Bushing 52 1 Resistance Motor 53 1 Reed Switch Bracket 54 1 Clamp 55 1 Reed Switch/Wire 56 1 Return Spring 57 1 Guide Rod 58 1 Resistance Cable 59 1 Flywheel Axle 60 2 Flywheel Bearing 61 2 Eyebolt 62 2 Adjustment Bracket 63 2 M8 x 47mm Button Screw 64 2 Support Plate 65 2 M8 x 79mm Bolt Set 66 2 M8 Washer 67 2 M10 x 50mm Bolt Set 68 1 Flywheel Spacer...
... x 25mm Tek Screw 49 2 Lower Foam Grip 50 2 Upper Foam Grip 51 4 Pedal Leg Bushing 52 1 Resistance Motor 53 1 Reed Switch Bracket 54 1 Clamp 55 1 Reed Switch/Wire 56 1 Return Spring 57 1 Guide Rod 58 1 Resistance Cable 59 1 Flywheel Axle 60 2 Flywheel Bearing 61 2 Eyebolt 62 2 Adjustment Bracket 63 2 M8 x 47mm Button Screw 64 2 Support Plate 65 2 M8 x 79mm Bolt Set 66 2 M8 Washer 67 2 M10 x 50mm Bolt Set 68 1 Flywheel Spacer...
English Manual
Page 24
... or in your User's Manual ("Manual"). The warranty extended hereunder is limited in material and workmanship. HOW LONG IS IT COVERED-ICON Health & Fitness, Inc. ("ICON"), warrants the product for repair. Before shipping, always obtain a Return Authorization Number (RA No.) from the original purchaser. Some states do the periodic maintenance requirements specified in the Manual to the terms set out in connection with the use or performance...
... or in your User's Manual ("Manual"). The warranty extended hereunder is limited in material and workmanship. HOW LONG IS IT COVERED-ICON Health & Fitness, Inc. ("ICON"), warrants the product for repair. Before shipping, always obtain a Return Authorization Number (RA No.) from the original purchaser. Some states do the periodic maintenance requirements specified in the Manual to the terms set out in connection with the use or performance...


