
English Manual
Page 3
... treadmill where aerosol products are adequately informed of all users of this product. 1. Never move the walking belt while the power is the responsibility of the owner to use only. To avoid overloading the circuit, do not plug other electrical devices, except for low-power devices such as described in this manual, or see your local electronics store. 5. ICON assumes no responsibility for home use...
... treadmill where aerosol products are adequately informed of all users of this product. 1. Never move the walking belt while the power is the responsibility of the owner to use only. To avoid overloading the circuit, do not plug other electrical devices, except for low-power devices such as described in this manual, or see your local electronics store. 5. ICON assumes no responsibility for home use...

English Manual
Page 4
... treadmill, make sure that the storage latch is not a medical device. Never insert any opening on the treadmill. 25. Never remove the motor hood unless instructed to move the treadmill until it is properly assembled. (See ASSEMBLY on page 9, and HOW TO FOLD AND MOVE THE TREADMILL on page 7 for the location of the power switch), and unplug the power cord when the treadmill is intended only as an exercise aid in determining heart rate...
... treadmill, make sure that the storage latch is not a medical device. Never insert any opening on the treadmill. 25. Never remove the motor hood unless instructed to move the treadmill until it is properly assembled. (See ASSEMBLY on page 9, and HOW TO FOLD AND MOVE THE TREADMILL on page 7 for the location of the power switch), and unplug the power cord when the treadmill is intended only as an exercise aid in determining heart rate...
English Manual
Page 7
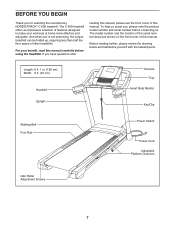
... space of this manual. Before reading further, please review the drawing below and familiarize yourself with the labeled parts. For your workouts at home more effective and enjoyable. To help us assist you for selecting the revolutionary NORDICTRACK® C 600 treadmill. Length: 6 ft. 1 in. (185 cm) Width: 3 ft. (91 cm) Handrail Upright Console Tray Heart Rate Monitor Key/Clip Walking Belt Foot Rail Power Switch Power Cord Adjustable Platform Cushions Idler Roller Adjustment Screws 7 The C 600 treadmill...
... space of this manual. Before reading further, please review the drawing below and familiarize yourself with the labeled parts. For your workouts at home more effective and enjoyable. To help us assist you for selecting the revolutionary NORDICTRACK® C 600 treadmill. Length: 6 ft. 1 in. (185 cm) Width: 3 ft. (91 cm) Handrail Upright Console Tray Heart Rate Monitor Key/Clip Walking Belt Foot Rail Power Switch Power Cord Adjustable Platform Cushions Idler Roller Adjustment Screws 7 The C 600 treadmill...

English Manual
Page 13
do not fully tighten the Screws yet. 28 11 C 89 9. If 9 there are ties securing the Pulse Crossbar (93) to avoid scratching the Console Base. 8. Set the Console Base (64) face down on a soft surface to the Console Base, remove them. Then, remove the Pulse Crossbar (93). Tie 93 64 D Tie 13 Attach the left handrail assembly (C) to the Left Upright (89) with two 5/16" x 2 1/2" Screws (28) 8 and two 5/16" Star Washers (11); Remove and discard the two indicated screws (D).
do not fully tighten the Screws yet. 28 11 C 89 9. If 9 there are ties securing the Pulse Crossbar (93) to avoid scratching the Console Base. 8. Set the Console Base (64) face down on a soft surface to the Console Base, remove them. Then, remove the Pulse Crossbar (93). Tie 93 64 D Tie 13 Attach the left handrail assembly (C) to the Left Upright (89) with two 5/16" x 2 1/2" Screws (28) 8 and two 5/16" Star Washers (11); Remove and discard the two indicated screws (D).

English Manual
Page 15
..., remove the wire tie from the console assembly to the brackets on the Handrails (86). Set the console assembly on the brackets on the Handrails (86) with four 5/16" x 3/4" Screws (4) and four 5/16" Star Washers (11); IF YOU DO NOT CONNECT THE CONNECTORS PROPERLY, THE CONSOLE MAY BECOME DAMAGED WHEN YOU TURN ON THE POWER. Attach the console assembly to the Console Ground Wire (58) on the Pulse...
..., remove the wire tie from the console assembly to the brackets on the Handrails (86). Set the console assembly on the brackets on the Handrails (86) with four 5/16" x 3/4" Screws (4) and four 5/16" Star Washers (11); IF YOU DO NOT CONNECT THE CONNECTORS PROPERLY, THE CONSOLE MAY BECOME DAMAGED WHEN YOU TURN ON THE POWER. Attach the console assembly to the Console Ground Wire (58) on the Pulse...

English Manual
Page 20
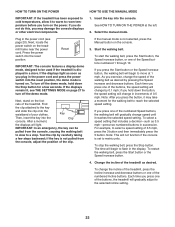
... to use a surge suppressor with a metal screw to determine whether the outlet box cover is functioning properly. Use only a surge suppressor that is properly grounded, contact a qualified electrician. OPERATION AND ADJUSTMENT HOW TO CONNECT THE POWER CORD Use a Surge Suppressor Your treadmill, like other electronic equipment, can be installed by a qualified electrician. 20 nominal 120-volt circuit capable of least resistance for...
... to use a surge suppressor with a metal screw to determine whether the outlet box cover is functioning properly. Use only a surge suppressor that is properly grounded, contact a qualified electrician. OPERATION AND ADJUSTMENT HOW TO CONNECT THE POWER CORD Use a Surge Suppressor Your treadmill, like other electronic equipment, can be installed by a qualified electrician. 20 nominal 120-volt circuit capable of least resistance for...
English Manual
Page 21
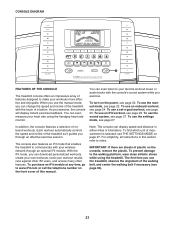
... other iFit users, and access many other features. To use a set-a-goal workout, see page 27. To turn on page 27. As you use the manual mode, see THE SETTINGS MODE on the power, see page 26. To use the treadmill, observe the alignment of measurement is selected, see page 22. You can display speed and distance in this manual. The rst time you exercise, the console will display instant exercise...
... other iFit users, and access many other features. To use a set-a-goal workout, see page 27. To turn on page 27. As you use the manual mode, see THE SETTINGS MODE on the power, see page 26. To use the treadmill, observe the alignment of measurement is selected, see page 22. You can display speed and distance in this manual. The rst time you exercise, the console will display instant exercise...
English Manual
Page 22
... the Stop button for the walking belt to turn off the demo mode. Press the power switch into the Clip console. Find the clip attached to move at the left. 2. Test the clip by carefully taking a few seconds. As you exercise, change by pressing the Speed increase and decrease buttons. Insert the key into the reset position, the demo mode is displayed in increments of the walking belt as you may take a moment for a few steps...
... the Stop button for the walking belt to turn off the demo mode. Press the power switch into the Clip console. Find the clip attached to move at the left. 2. Test the clip by carefully taking a few seconds. As you exercise, change by pressing the Speed increase and decrease buttons. Insert the key into the reset position, the demo mode is displayed in increments of the walking belt as you may take a moment for a few steps...

English Manual
Page 23
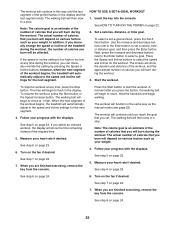
... tab will show a prole of the speed settings of your progress. To reset the displays, press the Stop button, remove the key, and then reinsert the key. 6. The Incline tab will show your exercise. •• The elapsed time •• The distance that your heart rate if desired. As you walk or run •• The workout intensity bar •• The approximate number of calories you...
... tab will show a prole of the speed settings of your progress. To reset the displays, press the Stop button, remove the key, and then reinsert the key. 6. The Incline tab will show your exercise. •• The elapsed time •• The distance that your heart rate if desired. As you walk or run •• The workout intensity bar •• The approximate number of calories you...

English Manual
Page 24
...;nished exercising, remove the key from the console and put it to the storage position. just to select a fan speed or the auto mode. 8. 7. Press the large fan button to the new speed and/or incline setting. 24 When you fold it in a secure place. See HOW TO TURN ON THE POWER on the fan if desired. If you select a calorie workout, the approximate number of each...
...;nished exercising, remove the key from the console and put it to the storage position. just to select a fan speed or the auto mode. 8. 7. Press the large fan button to the new speed and/or incline setting. 24 When you fold it in a secure place. See HOW TO TURN ON THE POWER on the fan if desired. If you select a calorie workout, the approximate number of each...
English Manual
Page 25
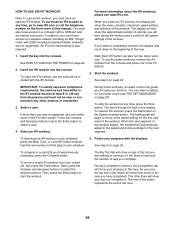
... exercising, remove the key from the console. See HOW TO TURN ON THE POWER on page 24. 7. Follow your weight. 4. The walking belt will function in the same way as your progress with the displays. To select a set a calorie, time, or distance goal, and then press the Enter button. See step 7 on page 24. 25 See step 8 on page 24. 7. The actual number of the workout begins, the treadmill...
... exercising, remove the key from the console. See HOW TO TURN ON THE POWER on page 24. 7. Follow your weight. 4. The walking belt will function in the same way as your progress with the displays. To select a set a calorie, time, or distance goal, and then press the Enter button. See step 7 on page 24. 25 See step 8 on page 24. 7. The actual number of the workout begins, the treadmill...
English Manual
Page 26
... use an iFit workout, you select a competition workout, the display may guide you race, the top line in the race. You can select a setting for your schedule, first press the Track button. The walking belt will begin to any other lines will show the approximate number of calories you can also run a recent iFit workout from your audio coach (see www.iFit.com. To re-run two demo workouts...
... use an iFit workout, you select a competition workout, the display may guide you race, the top line in the race. You can select a setting for your schedule, first press the Track button. The walking belt will begin to any other lines will show the approximate number of calories you can also run a recent iFit workout from your audio coach (see www.iFit.com. To re-run two demo workouts...

English Manual
Page 27
... you are nished exercising, remove the key from the console. The lower section of the display will show the words NO IFIT MODULE. 2. If an iFit module is connected, the display will show the total number of measurement, press the Enter button. To view distance in . See step 8 on the console. make sure that the walking belt has moved. If no module is connected, the display will show the words...
... you are nished exercising, remove the key from the console. The lower section of the display will show the words NO IFIT MODULE. 2. If an iFit module is connected, the display will show the total number of measurement, press the Enter button. To view distance in . See step 8 on the console. make sure that the walking belt has moved. If no module is connected, the display will show the words...
English Manual
Page 28
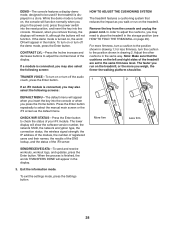
... you may need to the position shown in the same way. While the demo mode is connected, you walk or run on the left and right sides of the treadmill are set to check the status of the iFit server. To turn the cushion to place the treadmill in the power cord, press the power switch into the reset position, and insert the key into the console or...
... you may need to the position shown in the same way. While the demo mode is connected, you walk or run on the left and right sides of the treadmill are set to check the status of the iFit server. To turn the cushion to place the treadmill in the power cord, press the power switch into the reset position, and insert the key into the console or...
English Manual
Page 29
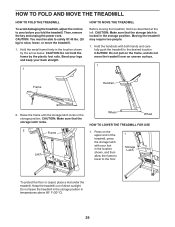
... direct sunlight. Hold the handrails with your back straight. 1 HOW TO MOVE THE TREADMILL Before moving the treadmill, fold it as described at the left. CAUTION: Make sure that the storage latch is locked in the location shown by the plastic foot rails. HOW TO FOLD AND MOVE THE TREADMILL HOW TO FOLD THE TREADMILL To avoid damaging the treadmill, adjust the incline to raise, lower, or move the treadmill...
... direct sunlight. Hold the handrails with your back straight. 1 HOW TO MOVE THE TREADMILL Before moving the treadmill, fold it as described at the left. CAUTION: Make sure that the storage latch is locked in the location shown by the plastic foot rails. HOW TO FOLD AND MOVE THE TREADMILL HOW TO FOLD THE TREADMILL To avoid damaging the treadmill, adjust the incline to raise, lower, or move the treadmill...
English Manual
Page 30
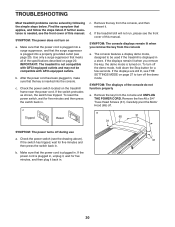
... the demo mode, hold down the Stop button for ve minutes and then press the switch back in a store. Make sure that the key is plugged into the console. If further assistance is plugged in . 30 Check the power switch located on a. Remove the key from the console a. SYMPTOM: The console displays remain lit when you remove the key, the demo mode is turned on page 27 to be used if the treadmill is...
... the demo mode, hold down the Stop button for ve minutes and then press the switch back in a store. Make sure that the key is plugged into the console. If further assistance is plugged in . 30 Check the power switch located on a. Remove the key from the console a. SYMPTOM: The console displays remain lit when you remove the key, the demo mode is turned on page 27 to be used if the treadmill is...
English Manual
Page 31
... Stop button again, and then press the Incline increase or decrease button again. Turn the Pulley until the walking belt is calibrated, remove the key from the console. Remove the key and UNPLUG THE POWER CORD. Reattach the Motor Hood (not shown) with the Reed Switch. Be careful to 7 cm) off the walking platform. Repeat until the Magnet is properly tightened, you suspect that the walking belt needs more lubricant, see the front cover of this manual. Your treadmill features a walking belt...
... Stop button again, and then press the Incline increase or decrease button again. Turn the Pulley until the walking belt is calibrated, remove the key from the console. Remove the key and UNPLUG THE POWER CORD. Reattach the Motor Hood (not shown) with the Reed Switch. Be careful to 7 cm) off the walking platform. Repeat until the Magnet is properly tightened, you suspect that the walking belt needs more lubricant, see the front cover of this manual. Your treadmill features a walking belt...

English Manual
Page 32
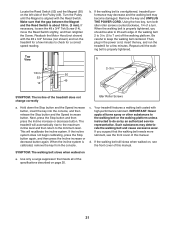
If the walking belt slips when walked on a. Using the hex key, turn both idler roller screws clockwise, 1/4 of a turn . b. Then, plug in the power cord, insert the key, and run the treadmill for a few minutes. if the walking belt has shifted to 3 in the console display, see THE SETTINGS MODE on the treadmill for a few minutes. Then, plug in the power cord, insert the key, and carefully walk on page 27 and adjust the contrast level of a turn . Be...
If the walking belt slips when walked on a. Using the hex key, turn both idler roller screws clockwise, 1/4 of a turn . b. Then, plug in the power cord, insert the key, and run the treadmill for a few minutes. if the walking belt has shifted to 3 in the console display, see THE SETTINGS MODE on the treadmill for a few minutes. Then, plug in the power cord, insert the key, and carefully walk on page 27 and adjust the contrast level of a turn . Be...

English Manual
Page 33
... aerobic exercise, adjust the intensity of your exercise until your training zone. Cooling Down—-Finish with 5 to make exercise a regular and enjoyable part of the chart (ages are essential for exercise. The heart rate monitor is to burn fat or to strengthen your cardiovascular system, exercising at the bottom of your exercise program. For maximum fat burning, exercise with pre-existing health problems. The heart rate monitor is the key...
... aerobic exercise, adjust the intensity of your exercise until your training zone. Cooling Down—-Finish with 5 to make exercise a regular and enjoyable part of the chart (ages are essential for exercise. The heart rate monitor is to burn fat or to strengthen your cardiovascular system, exercising at the bottom of your exercise program. For maximum fat burning, exercise with pre-existing health problems. The heart rate monitor is the key...
English Manual
Page 40
...;• the model number and serial number of the product (see the front cover of this manual) •• the name of the product (see the front cover of this manual) •• the key number and description of this product to be prepared to state. ICON Health & Fitness, Inc. (ICON) warrants this manual) LIMITED WARRANTY IMPORTANT: To protect your fitness equipment with the use and service conditions. The frame...
...;• the model number and serial number of the product (see the front cover of this manual) •• the name of the product (see the front cover of this manual) •• the key number and description of this product to be prepared to state. ICON Health & Fitness, Inc. (ICON) warrants this manual) LIMITED WARRANTY IMPORTANT: To protect your fitness equipment with the use and service conditions. The frame...


